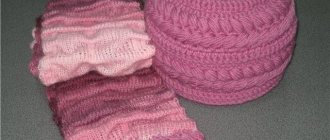
Features of crocheting a kubanka hat
The popular model consists of two main parts:
- crown, it has the shape of a rectangle;
- the bottom is in the form of a perfect circle.
The product is knitted from top to bottom without a seam, it is often decorated with piping of the same color or contrasting shades, pattern, cord and even embroidery.
Important! To achieve a sharp transition (border) between the bottom and the main part, use embossed back columns or a “crawfish step” finish.
The choice of tools and materials is of particular importance. For the winter version, thick or medium-thick blended yarn with a high content of natural wool is required (synthetic fiber should not be more than 50%). If the hat is multi-colored, this cheat sheet will help you choose a harmonious combination of colors:
According to the information on the packaging or label of the thread, a tool is selected (the recommended diameter is indicated)
When everything necessary for the creative process is prepared, you need to make measurements and calculations so that the product fits comfortably on your head. For knitting a hat, only 2 measurements play a role: head circumference (GC) and the depth of the future accessory.
To calculate the loops, you need to knit the sample with the main pattern, measure it, calculate how many of them are contained in 1 cm. Multiply the result by OG. This way you can find out the number of loops for the crown. The secrets of knitting and calculating the size of the bottom of a hat can be found in the “Tips for needlewomen” section.
Knitting pattern
Kubanka hats consist of a flat bottom and a main part, which when unfolded is a flat rectangular canvas.
They can be knitted either in the round or in reverse rows. Most often, work starts from the bottom, although you can also move from the center of the top part. The bottom does not have to be in the shape of a flat disk; you can make it somewhat convex.
As for the main part of the hat, it is knitted either in the usual way, longitudinally, or in the form of a transverse strip, which is then sewn at the back, closed into a ring, and the loops for the bottom are taken from its side edge. This variability allows you to create completely different hats using the same knitting.
For work, wool or combined yarn is used. It can be plain, melange, with a gradient, smooth, fluffy, imitating fur or creating relief. The knitting needles are selected to match the thickness of the selected threads. They will be stocking or circular - it depends on the personal preferences of the craftswoman.
Cross stitch patterns
To knit the main part of the kubanka, as a rule, patterns with all kinds of strands are used. But you can also knit using satin stitch, garter stitch or a small flat pattern. This approach is used when the yarn itself creates a relief or it is obtained through subsequent finishing, as well as when knitting the bottom of a hat.
Braids, braids, broaches and other elements of the pattern can be arranged in parallel columns. This is what happens when knitting a product from the bottom. Or they are knitted crosswise, then they go around the hat in a circle. This is achieved by side knitting, when a strip is knitted equal in length to the circumference of the head. In this case, the height of the main part of the cap is the width of the working blade.
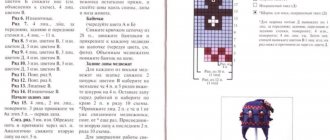
You can often find kubankas made with the “Rhombus” pattern, in which the relief is created by crossing the loops. It is knitted according to this pattern:
- 1st r. - purl 5, transfer 3 loops to a spare needle and leave them behind the work, knit 2, knit 3 loops from a spare needle, purl 5;
- 2nd row, like every odd row - according to the drawing;
- 3rd r. - 4 purl, cross stitches to the right, which is performed like this: leave 1 stitch at work, knit the next 2 stitches, knit the loop left unknitted, then knit 1 knit stitch and cross to the left (2 stitches, remove to a spare needle and leave before work, knit 1, knit 2 stitches from an additional needle), purl 4;
- 5th r. - purl 3, cross stitches to the right, knit, purl, knit, cross stitches to the left, purl 3;
- 7th r. - 2 purl, cross to the right, 1 knit, purl, 1 knit, 1 purl, 1 knit, cross to the left, 2 purl;
- 9th r. - purl, crossing to the right, 7 loops, alternating knit and purl one at a time (start and end with a knit stitch), crossing to the left, 1 purl;
- 11th r. - 1 purl, cross to the left, knit 1 purl and 1 knit three times, alternating them, then make 1 purl, cross to the right, 1 purl;
- 13th r. - 2 nights, crossing to the left, knit 1 purl twice. and knit 1, and then purl 1, crossing to the right, purl 2;
- 15th r. - purl 3, cross to the left, purl 1, knit 1, purl 1, cross to the right, purl 3;
- 17th r. - purl 4, cross stitches to the left, purl, cross right, purl 4;
- 19th r. - repeats the first one.
For the height of the kubanka, one such diamond will not be enough, so it is better to start knitting from the thirteenth or fifteenth row. Having reached the 18th, you need to knit the pattern completely from the first to the 20th rows, and then repeat from the third to the fifth or seventh row. To accurately determine repetitions, you need to knit a sample to the height of one diamond and compare it with the required height of the cap. The missing rows can be knitted with some other knitting stitch. It can only go on top or be repeated in rows before and after the diamond.
The Diagonal Stripes pattern also uses crisscrossing patterns. Each such element involves 6 loops, the first 3 of which must be removed and left before work, knitting the next 3 stitches with knit stitches, and then knitting the previously removed 3 stitches . Pattern diagram:
- 1st r. — 36 facial;
- 2nd r., like all other even ones - purl;
- 3rd r. - 6 loops with a cross, as described above, 6 knit;
- 5th r. - knit 3 at the beginning, the rest of the row is knitted, alternating a cross of 6 loops and knit 6, the last 3 stitches are knitted;
- 7th r. — 6 knits, 6 knits with crossing;
- 9th r. - 9 knits, the remaining stitches are worked out, sequentially performing 6 stitches with a cross and 6 simple knit stitches, 9 stitches are knitted at the end;
- 11th r. - repeats the third row, etc.
This motif is more suitable for side knitting of a hat. The 36 loops indicated in the diagram are not enough in height. The missing part is compensated by knitting the rim. It can be done in garter stitch or in a small pattern like rice.
Elastic band with entwined loops
The fabric can be quite textured even without crisscrossing if you use thick yarn and a pattern with entwined loops. Its basis is a simple 1 by 1 elastic band. You need to wrap the working thread around a group of 3 loops twice. The entwined elements are arranged in a checkerboard pattern.
To complete the entwining, you must first knit the loops according to the pattern and transfer the working thread to the front side of the fabric. After this, you should throw 3 knitted loops onto the left knitting needle, stretch the working thread in front of them and place it behind the work. Now the same 3 loops are again transferred to the right knitting needle, and the thread is again placed before knitting. It turned out to be one turn. In the same way, these 3 loops need to be wrapped with thread again, but left behind the work.
This knitting is very simple, you just need to master the entwining technique. The pattern is made according to this principle:
- 1st r. - 1 knit, 1 purl;
- 2nd r. and each even number - according to the drawing;
- 3rd r. - k1, purl 1, the next 3 stitches are knitted according to the pattern, then wrapped twice with thread, purl 1, the twisted element is performed again;
- 5th r. - entwined element, purl;
- 7th r. - repeats the third row.
Step-by-step instruction
A knitted hat for women with the description given below is designed for size 56. For knitting you will need 100 g of wool in two threads. Work order:
- We knit two samples - one with an elastic band, the second with a main knitting stitch. We calculate the number of loops for casting on according to the first of them. We also determine the difference in the density of the patterns.
- On circular needles No. 4 we cast on 105 stitches plus one additional stitch, which we extend into the first stitch, closing the circle.
- We knit 6 rows of simple elastic, alternating purls with knits.
- Let's move on to the main pattern. If it tightens the knitting, we select the required number of loops, focusing on the knitted sample. We knit the fabric to a height of 14 cm (including elastic).
- Now you need to make a roller that will fix the shape of the kubanka. To do this, we knit 8 rows of stitch stitches and bend this section in half lengthwise. The wrong side should be inside. Our goal is to connect the first and last rows of satin stitch. To do this, from the lowest row of the future roller, pick up a longitudinal broach, forming a purl loop, and put it on the left knitting needle. Now you need to knit this raised stitch and the first stitch from the current row together. Then we lift the next loop from the bottom and again perform knit 2 together and so on for the entire row.
- If this method of obtaining a roller turns out to be too problematic, you can knit 2 more rows with knit stitches, and hem the roller with a needle, stepping back from the open stitches 2 rows down, so that later it will be convenient to continue knitting. It is not recommended to leave this work for later to avoid tightening the fabric.
- If the roller was made with knitting needles, after it you should knit 2 rows with facial stitches. Then you can move on to forming the bottom.
- We will make cuts through the row. We divide all the loops into 7 identical parts, 15 stitches in each. At the beginning of each part we knit two knit stitches together. We knit the remaining 13 stitches in stockinette stitch. Then we perform the reduction again, etc. For 1 round, the number of loops will decrease by 7 pcs. and 98 stitches will remain in work. The new round is performed without decreases. In the next one, we again cut one loop at the beginning of each of the 7 parts. We do this until there are only 14 loops left.
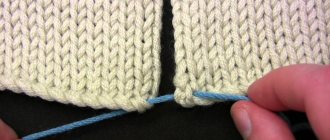
- We cut off the working thread and thread its edge into the needle. We transfer the open loops to the needle, stretch the thread, fasten it tightly and hide the tail.
Description and step-by-step diagrams of a crochet kubanka hat
The proposed descriptions are compiled for beginner needlewomen. It is enough to choose a model, carefully read the recommendations, the progress of work, and study the diagrams using symbols. After this you can start working. It is better to move from simple to complex in order to consolidate the skills of performing basic crochet elements for further crocheting more complex ones.
For those who have picked up the instrument for the first time, video lessons will be useful:
How to create an initial loop and a chain of chain loops
Knitting single crochets
Abbreviations used in descriptions:
- row - P;
- column - C;
- without crochet - sc;
- double crochet - dc;
- half column – PS;
- air loop - VP.
The following symbols will help you read the diagrams:
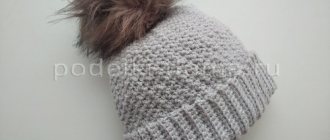
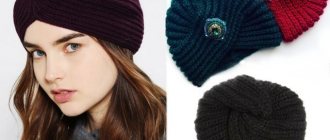
Simple crochet hat for women
The headgear model made by SSN is ideal for those who are still unsure of holding the instrument in their hands.
For a simple kubanka hat, it is better to use plain yarn
To make your first experience successful, it is better to use a detailed video tutorial on crocheting a hat for the winter from an experienced needlewoman:
Crocheted kubanka hat with decor on the crown
The secret of this headdress is in creating the decor. First, a warp typical for a Kubanka is knitted. Then the crown is decorated with knitted cord, beads - whatever the needlewoman likes. The accessory can be created in a single color or use several colors for the base and decoration. Description for exhaust gas 54 cm.
What you will need:
- 3 skeins of thick mixed yarn (100 g 100 m);
- hook number 5.
Progress:
- Cast on 3 VPs and close the chain in a circle.
- Make a round bottom with 6 wedges until it reaches a diameter of 17 cm (78P in a circle).
About the rules of knitting a flat circle in a detailed master class:
- Form a rib (the transition from the bottom to the crown) by knitting 1P with embossed purl stitches (concave), as shown in the figure:
- Proceed to performing the main fabric at 78P without decreases or increases.
- Knit RLS 13 cm.
- Decorate the edge of the product with a “crawfish step”; how to do this correctly is shown in the video tutorial
- Complete the top edge. It is tied onto the main fabric. P1: alternate connecting posts that cling to the loops of the fabric and VP.
Important! For the edging it is necessary to use loops of only one circular row, otherwise it will turn out uneven.
- R2: RLS.
- P3: like P1 (connect the connecting posts to the loops of the row located 1 below). Get a voluminous edging.
Important! It is necessary to knit P loosely, otherwise the finishing will pull the entire product together.
- Perform the lower edge in the same way, securing it immediately above the trim in a “crawfish step.”
- Fasten all ends of the threads to the wrong side and hide them in the knitted fabric.
- Start decorating. Crochet the cord, fold it in the form of the chosen pattern and carefully sew it on.
The wide caterpillar is made as shown in the figure:
Algorithm:
- Create a simple cord, assemble a chain of VP equal to the length of the cord for finishing.
- The second row is performed with sc.
- Beads can be added to the resulting cord at the request of the needlewoman.
- You can make any decorative pattern from the cord
Crochet voluminous hat
Model of a headdress made with a “bump” pattern. Relevant for cold winter. It only takes 2 evenings to make the accessory. A detailed description and diagrams will help with this.
The model, made with the “lush columns” pattern, is not only voluminous, but also very warm
Creating a cone pattern for the main fabric:
Diagram of the bottom of the headdress:
There are two ways to perform the “crawfish step” to crochet the edge of the product:
Crochet hat with pattern
Model for mature women. The use of two colors of yarn effectively highlights the “stars” connected by lush columns.
What you will need:
- 2 skeins of thick yarn (gray and white);
- tool no. 5.
First, the base is knitted, then a stripe with a pattern is sewn to the crown, so the model is not only spectacular, but also protects well from the cold
Schemes used in the work:
1 – tying the edge of the product with a “crawfish step”, 2 – bottom of the hat, 3 – “star” pattern
Progress:
- Start making the bottom of the headdress (diameter 18 cm), using the diagram proposed above. To begin, dial 3 VPs and close them in a ring. Knit all rows with sc.
- Proceed to making the crown. Without changes (increases), knit a fabric 14 cm high.
- Process the edge “crawfish step”.
Important! In order for the product to fit more tightly to the head, it is necessary to reduce 12P in the last 2 rows (6 in each).
- Form relief borders on the fabric with white yarn (4 pcs.), knitting circular rows in a “crawfish step” according to the pattern, catching the tool on the loops of the fabric.
- Make a strip of lush stars and secure it to the crown.
- Fasten the ends of the threads on the wrong side and hide.
Another version of a plain kubanka hat with a crochet pattern in the video tutorial:
Knitting pattern for this model:
Quick knitting of a headdress
Sometimes you need to quickly create a header. Then instructions for quickly knitting a hat will help. Here you will need 250 m of yarn and a hook number 4.5. It is recommended to knit with a thread that is folded in half . The quick crochet pattern is as follows:
- 10 single crochet columns are made, a lush column needs to be knitted into each one;
- Columns without a cape are knitted into an aerial plan loop;
- Columns with overlays and increases;
- Lush columnar created in the bottom row;
- The ring accommodates an air loop and is knitted without a cape;
- Next comes a combination of various combinations involving columns and braids;
- The final stage will be knitting with a lobster step.
The resulting headdress must be moistened and dried. The result is a beautiful and stylish kubanka, which will be warm even in the coldest winter. Those around you will appreciate the Kubanka you created with your own hands.
We looked at the main points related to knitting a Kubanka winter hat.
Despite the fact that initially such a headdress seems difficult to create, it can be created relatively quickly .
The most important point is the selection of yarn and tools in the form of hooks and knitting needles. If you are knitting such a hat for the first time, then it is best to follow the existing instructions. This results in a high-quality and reliable headdress that can be worn with any clothing and stored in the most convenient place without any problems. You should choose knitting courses that describe in detail and step by step the process of creating a Kubanka hat for the winter season. Working with master classes makes it possible to create your own versions of hats in the future!
Tips from needlewomen
Most often, kubanka hats are knitted from top to bottom, that is, first they create a round bottom. To ensure that it matches the size of the future housewife, it is necessary to make calculations. For this purpose, the formula for circumference is used (the product of a constant number π and diameter). Therefore, the diameter of the bottom of the cap can be calculated by dividing the circumference (CG) by 3.14. It is advisable not to round a constant number, otherwise the headdress will turn out wide.
The next task is an even circle without wrinkles. Experienced craftswomen use the rule: the number of C that must be added in all subsequent rows must correspond to the number of C of the 1st row. Increases must be made at equal intervals (in each row it will be 1 more).
In the initial ring from VP (1 row) you need to knit C:
- 6, if the bottom is performed as RLS;
- 8 for fabric with elongated sc;
- 10 for Mon;
- 12 for CH.
In the next P2, 2C are knitted from 1P, in P3, between the increments, 1C (in each + 1C).