The ability to make a blind seam on a sewing machine has helped out every good housewife more than once. Most often, this type of seam is done manually, due to the fact that not every woman knows how to use all the available capabilities of a sewing machine. But in fact, there is nothing complicated about it. This article will help you learn how to sew with a blind stitch without ruining your favorite item.
What is a blind seam?
A blind seam is a type of seam that is designed to seamlessly connect different elements of fabric to each other. The secret of a hidden seam is that it is hidden between several layers of fabric. The technology for processing material on a sewing machine in this way is quite simple, but it is still worth taking some sewing lessons. It is possible that not everyone will be able to create a perfectly straight seam the first time, so during training it is better to use unnecessary scraps of cotton fabric.
What length should the trousers be?
The length of the pants directly depends on the width of the product styles. There is a classic rule to remember: tapered pants should be shorter and flared ones should be longer.
Circumcision process
Women's trousers length
According to the laws of etiquette, women's pants should reach the heel. It looks gentle, beautiful and visually the legs become longer. This length would be considered traditional, but in recent days there are a lot of new styles appearing, so it is difficult to say about a single correct length of trousers. Such standards are no longer suitable for bell-bottom trousers.
Bottoms in denim pants
Correct trouser length for different models:
- Direct. Length reaches ½ heel. Visually, the legs look longer and slimmer. This also applies to jeans;
- Pipes. Styles with a loose fit from the hip point. Pants that are too short will visually make your hips appear fuller. With a good cut, almost the entire heel is not visible, but the toe should stick out. The correct distance from the ground is 2 cm;
- With arrows. The style is suitable for the office, straight, reaching to the middle of the heel, with smooth arrows on both sides;
- Sports. If you choose correctly, you will feel comfortable and soft when playing sports. If the trousers have an elastic band, then the ankle should not be visible.
Options for the correct length of pants
Sweatpants have their own nuances. Since the pants are knitted, it is not always possible to do this by hand. Tailors use special machines for this, but at home it can be done using a regular overlocker.
To prevent the fabric from puffing up, craftsmen suggest using needles with slightly rounded ends. To make the material stretch better, it is advisable to place a thin strip of paper. Process of working with sweatpants:
- Measure the material for bending and cut it;
- Go over the edges with an overlocker;
- Fix the bends;
- Sew from the inside.
Next, you need to make another seam at a distance of 4 mm. If the zipper is on the side, then it needs to be opened, making 5 cm on the bend.
Women's pants with stripes
Pants with stripes are hemmed in the place where the decorative seam is located. The same is permitted if the product has an elastic band.
Important! The main disadvantage of knitwear is that it quickly stretches under the influence of mechanical factors. To avoid this, it is advisable to use a special foot to carefully advance the material during work. New styles of sewing machines have an additional stitch for such fabric.
You may be interested in How to sew a beautiful hare from fabrics yourself
Men's trouser length
When buying pants, you need to try on as many models as possible. Since it is very difficult to find the right one the first time. Sometimes stores offer a service for adjusting pants on the spot. It is advisable to wear the shoes that you plan to wear with trousers.
Classic men's trousers and oxfords
Note! It doesn’t matter what kind of pants you buy, the main thing is that they fit well and match the shoes.
For formal events, it is better not to wear short styles, such as slacks, joggers, and chinos. They will be tapered to the ankle, suitable for everyday wear. For celebrations, it is better to wear classic trousers and oxfords.
Where are hidden seams used?
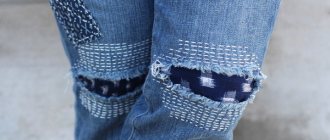
Before learning how to sew with a blind stitch, you should find out in what cases it is used. Basically, this type of seam is used to process the lower part of the product, which was sewn from thin material such as cotton, chintz, linen, etc. Very often it is also used to adjust trousers, skirts or dresses. For the housewife, this seam will be indispensable if minor repairs of the product are required on its front side.
The process of creating an automatic invisible stitch
Modern models of machines are equipped with attachments for hidden hemming seams. These feet may differ slightly from each other depending on the type of machine. Manufacturers in the instructions for the equipment describe in detail the foot and the sequence of working with it. Before starting work, read the instructions for the machine in detail.
How to sew with a blind stitch on a sewing machine? Here are some basic rules:
- We process the edge of the part using an overlocker.
- We turn the hem to the desired width, iron it and sweep it away.
- We select a program on the machine with 3-4 straight stitches and one long zigzag. If you need to set the parameters yourself, then select a length of 3-4 mm for straight stitches, and 5-6 mm for zigzag.
- We loosen the tension of the upper thread a little so that the seam does not pull the fabric.
- Install the foot for an invisible seam.
- We turn the hem over to the face so that the edge remains free at a distance further than the overcasting seam.
- We sew a seam, making sure that the zigzag puncture captures only one thread. Otherwise, oblique stitches will be visible on the outside of the product, and it will have an unpresentable appearance.
Types of sewing machines
Modern sewing machines come in three types: electromechanical, electronic and computer-controlled machines. The most affordable of them, financially, are electromechanical models, in other words manual. They are not suitable for production purposes or for working with dense materials. For example, if you need to repair a coat, then a manual sewing machine may not be able to cope with this task, because... most often they have a lightweight mechanism. The most popular models of electromechanical devices can perform about twenty types of seams, including hidden ones. A foot for a blind seam is usually included with the household appliance, otherwise it can be purchased at a specialty store.
Electronic models are controlled by an electronic microprocessor, which sets the necessary modes of the sewing machine. It also helps control the needle, which makes working with seams that are difficult to make by hand several times easier. In addition to the blind seam, electronic sewing machines are capable of performing a huge variety of decorative finishing stitches, as well as combining them with each other.
Computer controlled sewing machines are luxury household appliances. They are very expensive, but the functionality of such devices is very impressive. When working with a computerized machine, there is practically no limitation on the complexity of the seam to be performed. Such models have two modes: sewing and sewing-embroidery. At the time of purchase, dozens of embroidery samples are usually already included in the device’s computer system, but if the standard sketches do not suit the buyer, he can easily download the embroidery patterns he likes via the Internet. It is clear that for such an advanced model there is no question of how to make a hidden seam, but not every housewife can afford to acquire such a device. And, in fact, such a machine is not useful for minor repairs and one-time adjustments of things.
Blind stitch on a sewing machine: preparing the product
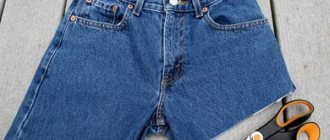
Before you begin fitting the product, you need to prepare it. Let's say you need to shorten a new skirt. How to prepare it so as not to spoil the new thing? Based on the rules that sewing lessons teach us, the preparation of the product is carried out in the following sequence:
- Open the existing hem seam. This can be done using a steamer or nail scissors. If you plan to shorten the product to a significant length, you can simply cut off its lower part.
- Determine the length of the product with a hidden seam. To do this, you just need to try on the item to be shortened, tuck it to the desired level and secure the excess fabric with pins. Making straight marks on your own is quite difficult, so get someone's help.
- Make notes. After trying on, you need to draw a straight, even line with chalk or a pencil along the entire perimeter of the product in place of the attached pins.
- Determine the width of the hidden seam and make the appropriate marks. For example, if you want the seam width to be three centimeters, then draw a straight, even line at the same distance from the edge of the product.
- Trim off excess fabric. The cutting line should be at a distance of at least two and a half centimeters from the bottom mark.
- Fold the bottom of the product and iron the bend. If you left exactly two and a half centimeters of fabric under the first marked line, then you need to wrap half of this length inside and iron it thoroughly.
- Fold the edge of the product along the middle mark so that the hidden seam will go through, and secure it with pins. The remaining lines should be at the same level, only one inside and the other outside the product.
- Unfold the hem along the line above the edge of the product and secure with pins. At this stage, the bottom line should also be visible, and below it the smoothed edge of the product.
- Iron the lapel and remove the pins. In principle, you can leave the pins; they will not interfere with the movement of the sewing machine.
How to secure the thread at the end of the seam?
You can secure the thread in two ways: with a knot or tack. To create a knot, make a small stitch on the wrong side, on top of the last stitch. Slowly tighten the thread until a small loop remains.
Pass the needle through the loop and continue tightening until a second loop appears. Pass the corner into the second loop and pull the thread tightly, forming a knot. To make the tack, simply make a few small stitches using a backstitch. These stitches are placed one on top of the other and hold the layers of fabric together well.
Now let's learn more about how to make hand stitches with your own hands.
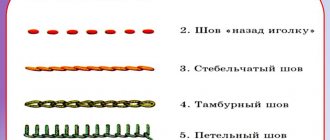
Back stitch
This stitch is one of the strongest hand stitches available. It is used for seams in hard-to-reach places and for securing stitches at the end and beginning. Bring the needle to the top side. Make a small stitch back (2-3 mm) and bring the needle up again, retreating the same 2-3 mm along the seam line.
Continue bringing the needle into the end of the last stitch and out one stitch ahead.
On the wrong side the stitches will be twice as long as on the front side.
Back stitch with skips
This option is also used to secure the transition edge of the facing and hem.
Perform a regular backstitch, but pull the needle back half the stitch length. The needle still comes out the length of a whole stitch.
Loop stitch
Used for the manufacture of hand-processed parts: hanging thread loops and holes, thread loops, hook fasteners, belt loops. Also suitable for decorating felt or fleece parts. Sew the seam from left to right, positioning the fabric so that its cut is at the bottom.
Secure the stitch to the edge of the fabric with a loop or any other method convenient for you.
For each stitch, point the needle toward you. Stick the needle into the right side of the fabric and bring it over the thread at a distance of about 5-6mm from the edge and the same distance to the right. Do not pull the thread too tight.
Seam “Goat” (“Herringbone”)
Use this stitch to join two layers of fabric with a slight degree of movement, for example to join a lining to a garment or to hem knitwear.
Sew the seam from left to right. Make a small horizontal stitch in the top layer, slightly away from the edge. Then, just beyond the edge of the top layer, sew another stitch on the bottom layer, diagonally to the right of the first stitch. Sew stitches without tightening the thread.
French setting
- Use this bartack to attach the hem of the loose lining to the hem of the garment.
- Sew 2-3 stitches, about 2.5-3cm long, between the garment and the lining.
On top of the long stitches, sew stitches in a buttonhole stitch, placing them as close to each other as possible. Completely cover the long stitches with loops.
Hemming stitch
Use this stitch for all types of hems.
Make an inconspicuous small stitch in the fabric of the project, and then bring the needle up diagonally across the edge of the hem. The distance between stitches is 5-6 mm.
Seam “over the edge” (“overlock”)
Use this stitch to prevent fabric sections from fraying.
Insert the needle perpendicular to the cut of the fabric, making diagonal stitches across the edge. Try to keep the stitches the same size and at an equal distance from each other.
- Once the stitch is finished, you can go back and stick the needle into the holes you have already made, thus creating “triangular” stitches.
Dotted seam
This version of the “back needle” seam is used to finish sewing in zippers on fabrics such as velvet, corduroy or satin, in case the machine stitching looks unsightly.
Bring the needle up through all layers of fabric. Perform a back stitch, picking up 1-2 threads of fabric. Bring the needle to the surface, retreating 5-6 mm forward.
Basting stitch
- This stitch is a basic hand stitch used for cinching fabric, tucks, darning and non-stress seams.
- Sew forward a few stitches, bringing the needle evenly in and out of the fabric before pulling the thread through.
The number of stitches depends on the thickness of the material.
The length of the stitch and the distance between them depends on the location of the seam and can range from 3 mm to 3 cm.
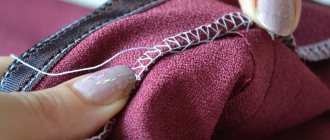
Blind seam
Used for maximum discreet finishing of hems, linings, pockets, etc.
Pass the needle through the folded edge of the top fabric. Grab one thread of the bottom fabric and reinsert the needle into the fold of the top fabric.
To sew up a hole in a machine-stitched seam, sew a blind stitch, catching an equal number of threads in the top and bottom layers. Make a few stitches and then pull the seam section together.
Hand stitches are ready!
Source: https://sewingadvisor.ru/pp/shvy/ruchnye-shvy/
Preparing the sewing machine
If you have a good sewing machine for your home, then there is no need to manually adjust things. But before you use it, you also need to prepare it. This process consists of three simple steps:
- Take out the hidden seam foot. If it was not included with the household appliance, the foot can be purchased at any specialized store.
- Attach the hidden hem foot to the sewing machine. To do this, use the operating instructions for your device.
- Set the appropriate mode. In electromechanical sewing machines, the stitch switch is usually located on the front side of the device. A blind seam is indicated by two stitches located away from the main seam.
Now the device is ready for use, you can safely make a blind seam. Using a machine, the sewing process will go much faster and with better quality than blind stitching done by hand.
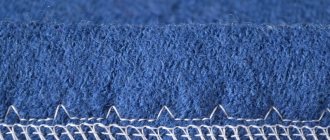
Blindstitching on a sewing machine
The needle should pass as closely as possible along the folded edge, catching only a few threads of the fabric. Otherwise, traces of this stitch will be visible on the front side.
The sewing machine makes four straight stitches and one wide zigzag, barely catching the fabric of the product with the needle on the left prick.
This photo clearly shows why a blind seam using a special foot is best done on thick and loose fabrics.
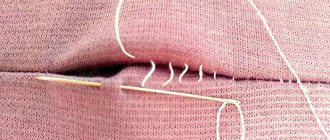
How to sew with a blind seam?
After the preparation process is completed, you can proceed directly to sewing. The product is placed under the foot with the wrong side, and the fold of the future stitch should be aligned with the guide of the machine foot. The main thing when making a blind seam on a sewing machine is not to rush. Otherwise, the seam will turn out uneven and the finished product will look untidy. The material must be held carefully so that the bend of the seam is located directly under the vertical plate. When finished, be sure to check the product for missing stitches. If there are such people, it's not scary. Just redo the places where the machine did not stitch the bottom part of the fitted item properly. When your work is done, remove the remaining pins and press the blind seam.
How to make a blind seam without a special foot?
If your sewing machine does not come with a presser foot, and the item needs to be urgently repaired, there is a way out! Even with a standard foot you can make a high-quality hidden seam. To do this you need to do the following:
- insert slats;
- place the material under the foot with the wrong side;
- make five straight stitches;
- Sew one stitch so that it catches the bend;
- Continue sewing in the same manner until the edge of the product is completely finished.