Raspberry berry knitting pattern: where to start?
Knitting any product, even the smallest one, always begins with preparing everything necessary, as well as with mandatory calculations.
The raspberry pattern, knitted with knitting needles, looks most advantageous when using plain yarn, without any inclusions such as lurex or terry threads. This is explained by the fact that the pattern itself is self-sufficient, and the abundance of details will overload the finished item.
Be sure to keep in mind that raised patterns, such as the raspberry pattern, require more yarn than flat patterns. It follows from this that it is better to purchase a little more skeins of yarn than you usually take, in reserve. This will save you from having to buy additional yarn, or even order it if suddenly the desired color is not in stock.
Before starting work, you must knit a sample. This will be needed so that you can understand how many repeats you need to place on the product, as well as correctly calculate the loops.
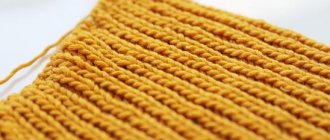
Please note that in this pattern, each first loop in the row is not knitted, but simply removed. In this case, every last loop is knitted purlwise. When working with this pattern, in some rows you need to knit five from one loop. In this case, all five loops are knitted. All yarn overs in the description of the pattern are performed only straight.
Convex patterns with knitting needles pattern of the “Malinka” pattern
Remember:
- The edge at the beginning of the row is always removed unknitted ;
- at the end of each row, the edge is knitted purlwise;
- knitting five loops from one, knit stitches only;
- Yarn overs are only straight.
Starting row:
- cast on a number of loops that are a multiple of six, add five and two more edge stitches. In total, for one repeat you should get 13 loops;
- no more auxiliary loops .
1st row:
- remove the edge; *purl two; one front; purl two; From one loop, knit five (knit, yo, knit, yo, knit), repeat from * to the end. Finish the row with two knits, one purl, two knits and an edge stitch.
2nd row:
- remove the edge; *two front ones (for symmetry of the pattern); one purl; nine knit, one purl; knit nine, repeat from * to end. Finish the row with a purl and two knit stitches (for symmetry of the pattern), edge stitch.
3, 4,5,6 rows:
- knit according to the pattern: knit purl loops, knit stitches - knit stitches.
7th row:
- remove the edge; * purl two; knit five from one loop ; purl two; knit five loops together with one loop behind the back wall; repeat from * to the end. The row ends with two purls and an edge stitch.
8th row:
- remove the edge; Knit nine stitches, purl one, repeat until end of row.
9,10,11,12 row:
- knit according to the pattern: purl - purl, knit - knit.
Row 13:
- remove the edge; * purl two; five together facial; purl two; from one loop five, repeat from * to the end. Finish the row with two purls. and edging.
Row 14:
- remove the edge; *two front ones (for symmetry of the pattern); one purl; nine facial; purl one, repeat from * to end. Finish row with purl, two knit stitches, edge row.
15,16, 17, 18:
- knit according to the pattern.
Row 19:
- repeat from the seventh row.
Raspberry pattern with knitting needles: description
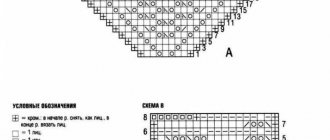
- The description of the pattern is easy, even a beginner can handle it. There are 18 rows in one repeat. And the number of loops is divided into 6 + 5 loops and + two edge loops. Row 1 – purl 2 loops, knit 1, purl 2, knit 5 from 1 loop (knit, yarn over, knit, yarn over, knit). Row 2 – knit 2,* purl 1, knit 9*, knit 2. From the 3rd to the 6th row inclusive, the loops are knitted according to the pattern. Row 7 – purl 2 loops, knit 5 from 1 loop (similar to the description in row 1), purl 2, knit 5 stitches together. Row 8 – 9 knit stitches, 1 purl stitch. From the 9th row to the 12th inclusive, the loops are knitted according to the pattern. Row 13 – purl 2 loops, knit 5 stitches together, purl 2, knit 5 from 1 loop. Row 14 – knit 2 loops, *purl 1, knit 9*, knit 2. From the 15th row to the 18th row inclusive, the loops are knitted according to the pattern. Row 19 – knitting begins from the first row.
How to knit a raspberry pattern on knitting needles
Despite the fact that the pattern looks complicated, knitting it is completely simple. Even if you are just starting to learn, feel free to pick up your knitting needles, everything will work out!
Diagram and description
Cast on a number of loops that are a multiple of 6 plus 5 loops for symmetry plus 2 edge loops (edge loops are not shown in the description).
Row 1: * Purl 2, knit 1, purl 2, knit 5 from 1 stitch (knit, yarn over, knit, yarn over, knit)* - repeat until the end of the row, purl 2, knit 1, 2 purl 2 rows: * 2 knits, 1 purl, 2 knits * - to the end of the row, 2 knits, 1 purl, 2 knits. 3, 4, 5, 6 r. - according to the drawing. 7 rows: *P2, from one stitch knit 5, P2, 5 stitches together, knit.* - finish P2, K1, P2. 8 rows: *knit 9, purl 1* - at the end of knit 9. 9, 10, 11, 12 p.m. - according to the pattern. 13 r.: *2 purl, 5 stitches together knit., 2 purl, their one stitch. make 5* - at the end: purl 2, 5 sts. knit, purl 2 Alternate from 2nd to 13th p.m.
Knitting pattern for the raspberry pattern:
Some knitters confuse the raspberry pattern with pine cones. But this is a completely different pattern and needs to be knitted differently. For those who are used to analyzing diagrams using video lessons, MK:
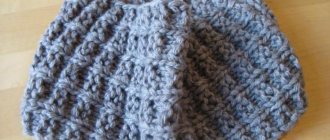
How to knit a baby hat with a raspberry pattern using knitting needles?
The pattern described above is ideal for making a hat for a little fashionista. Below we will look at how this can be done.
To work you will need knitting needles number 2.5 and a crochet hook. We will crochet green leaves, which we will sew to the top of the finished product. The knitting density should be about 20 stitches per 25 rows, and be about 10 cm by 10 cm.
First of all, we cast on 101 loops and start knitting a 1 by 1 elastic band. A larger elastic band will not look particularly appropriate on this product. We continue to knit the elastic in height until it reaches 4 cm. Next we knit 3 cm upward in garter stitch. As soon as the desired height is reached, we switch to the raspberry pattern and knit 12 cm up.
As soon as the desired height of the product has been reached, we begin to knit 1 knit loop, 2 purl loops, and then make 1 out of 5 loops, that is, we knit 5 knit loops together. Through the row we continue to knit 2 loops together. We pull the remaining loops together at the end and sew the fabric at the back.
We knit leaves from green yarn and sew them to the top of the head.
That's it, the girl's hat is ready!
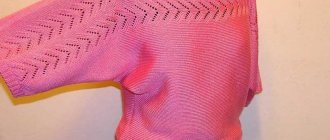
Cardigan “Malinka” knitted
- Share
The survey is not finished yet, it was held here https://www.stranamam.ru/post/11815366/ During three days of voting, 272 people took part in the survey, 98 will be knitted. I will definitely insert the final numbers later. Poll in the Country of Mothers: Cardigan “Malinka”. Online survey Shall we knit a “Malinka” cardigan?
291 users took part in the survey. So, let's begin! Description of the “Raspberry” pattern
P/6+5+2edge 1st row: 2 purl, 1 knit, 2 purl, knit 5 loops from one loop (1 knit, 1 yarn over, 1 knit, 1 yarn over, 1 knit), etc. 2nd row : 2 knit, * 1 purl, 9 knit, * 2 knit. 3rd, 4th, 5th, 6th rows: according to the drawing. 7th row: purl 2, knit 5 loops from one loop (knit 1, 1 yarn over, knit 1, 1 yarn over, knit 1), purl 2, 5 stitches together, knit, etc. Row 8: knit 9, 1 purl, etc. 9th, 10th, 11th, 12th rows: according to the drawing. 13th row: 2 purl, 5 loops together, knit, 2 purl, knit 5 loops from one loop (1 knit, 1 yarn over, 1 knit, 1 yarn over, 1 knit), etc. 14th row: 2 knit, * 1 purl, 9 knit, * 2 knit. 15th, 16th, 17th, 18th rows: according to the drawing. 19th row: repeat from the first row.
And a detailed video master class
Description of knitting this cardigan https://domosed-ka.ru/zhaket-iz-mohera/
Detailed video of MK knitting the “Malinka” cardigan on the Homebody website (in separate parts) https://www.youtube.com/watch?v=8vpHPTZYX7c
And MK knitting in one fabric
It is also knitted on aspen https://club.osinka.ru/topic-186290?start=15
Pattern from the website Homebody
I want to knit it without armholes with a dropped shoulder, approximate pattern for size 44-46
About the materials: I chose Nako Mohair Delicate yarn 500m/100g, I will knit in two threads, colors 6129 (gray) and 6138 (pink coral), knitting needles 5. After choosing the yarn, be sure to knit samples, do a WTO to find out the density you need! Here's my sample
- Share
The bottom is knitted according to the pattern, but I didn’t really like it, the raspberries are too small, so I slightly changed the pattern for myself and knitted the raspberries in length not from five, but from seven rows (pink color).
Back. I knit for size 44. My hip circumference is 94 cm + 3 cm for a loose fit = 97 cm. I plan for the cardigan length to be 75 cm. I cast on 73 stitches for the back. I started knitting in gray right from the pattern.
- Share
The width of the back was 48cm. I knit with a gradient of two colors, if anyone wants it too, here is my transition pattern: My gradient is C-gray, P-pink 1-CP 2-SS 3-SS 4-CP 5-SS 6-SS 7-CP 8- SS 9-SS 10-SR 11-SR 12-SR 13-SR 14-SR 15-SS 16-SR 17-SR 18-SR 19-SR 20-SR 21-SR 22-SR 23-RR 24-SR 25 -SR 26-RR 27-SR 28-SR 29-RR 30-RR 31-SR 32-SR 33-RR 34-RR 35-SR 36-SR 37-RR 38-RR 39-SR 40-RR The length was 80cm , width 48cm. At a height of 74cm, I closed off the middle 35 loops, then 3,2,1,1 loops on each side. It took about 250 grams, that is, 2.5 skeins. Girls, after the WTO, the back stretched by 20 cm. I opened 3 reports of raspberries on top and closed the back in a straight line! This is a photo of the first option. I didn’t have time to take a photo of the last one)
I started the left shelf. I cast on 42 loops. I knit right away with a 1 on 1 elastic band of 8 loops.
- Share
At a distance of 50cm (immediately after the gradient) I began to decrease the neckline, I decreased a total of 13 stitches almost evenly. I knitted a bar for the back collar.
After the WTO, the cardigan stretched 20 cm. I opened the top shelves and the back by 3 raspberries.
I bandaged it five times)))) I don’t have the strength anymore)))) I cast on 36 loops on the sleeve. I knitted 6 rows with 1 on 1 rib. Started the main pattern. I added 13 loops to the sleeves.
How to knit a jumper with a raspberry pattern for size 44-46?
To work, you will first need yarn. It is desirable that its composition be made from the same ratio of cotton and acrylic. If the length of the thread in a skein is 200 meters, you should take 5 skeins. In addition, you will need knitting needles number 4 and 4.5.
Knitting back
- First, you should cast on 86 loops, of which 84 are main and 2 edge.
- Using knitting needles number 4, we begin to knit an elastic band 1 by 1, knitting up about 6-7 cm.
- As soon as the desired height has been reached, we replace our knitting needles with number 4.5 and knit the main back fabric in garter stitch 49 cm upward.
- As soon as the required part is knitted, we begin to knit the right half of our product.
- From the wrong side of the fabric we knit 35 loops and turn the product.
- In the next row we knit 32 loops and turn the fabric again.
- Next, we knit 30 loops and turn the product.
- In the next rows we knit 28, 27, 26 loops, turning the fabric over each time.
- As soon as we reach the shoulder seams, bind off all the loops.
- We leave the central 34 loops uncovered for further knitting of the neck.
- The left side of the back is knitted similarly to the right side, symmetrically.
Knitting front
- The front of the future jumper is knitted similarly to the back.
- The neck should begin to be formed with a length of 46 cm in the knitted fabric, and the height of the elastic is not taken into account.
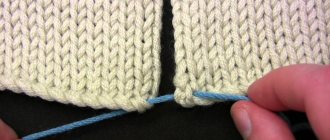
- Once the work is completed, the canvases are stitched together. Don't forget to leave 19 cm unstitched for the armhole.
- The neckline is knitted in the round with an elastic band 1 x 1. For this work, knitting needles number 4 are used.
Knitting sleeves
- For the sleeve you need to cast on 32 loops, and 1 more to close the circle.
- We knit with an elastic band 1 by 1 upwards 4 cm. For work you should use knitting needles number 4.
- Next, we switch to knitting needles number 4.5, and immediately add 15 loops.
- Further knitting should be carried out according to the above description of the raspberry pattern.
- We knit the fabric up until it reaches 51 cm, excluding the elastic, and bind off all the loops.
- The finished sleeve is sewn to the fabric that was knitted earlier.
- After completing all the above steps, you will get a wonderful jumper of size 44-46!