One of the decorations in clothes is beautiful accessories. These are various eyelets, blocks, buttons, zippers, etc. They not only visually decorate the product, but also have a functional meaning. Sometimes people encounter problems when the button has torn through the fabric and fallen out or stopped fastening. There is a question about replacing it. You can always go to a workshop or atelier, where, using special equipment, professionals will replace the broken part. It's easier, but also more expensive, and it will take some time.
If you don’t have time to run around the studio and look for a master with the necessary tools, then you can try to perform the process at home. But here, too, not everything is so simple. At home, installing buttons on clothes yourself can end in disaster, because this task requires training and skills. Strong physical effort can damage both the fabric and the fittings themselves.
In the article we will look at how to install a button on clothing, what needs to be prepared for this process, and how to perform this operation step by step. We will also give advice to novice seamstresses who want to use buttons in their work, and we will recommend equipment to make their work easier.
Types of buttons
First, let's look at what types of buttons there are. Indeed, depending on the fittings, various methods of its installation are provided.
- The O-shaped (or ring) button, as the name implies, has the shape of a ring.
- S-shaped (aka “Alpha”) are spring-type buttons. They come either sewn on or with tubes for fastening.
- Shirt. It consists not of one pin, but of several spikes. Such buttons are attached to thin fabrics or knitted and knitted items. Often used for children's things.
- Magnetic. This is a self-fastening fitting with magnetic fixation. You can often find such buttons on wallets and bags.
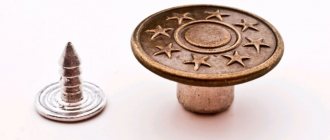
- Koburnaya. In this case, when installing the button on clothing, a screw design of two elements is used. It is screwed into leather jackets, bags, belts with a screwdriver, and is also used in a holster (hence its name).
- Klyamernaya or block. The lid has a ring fastening. If the button is fastened, you can see the second side fastener in the center.
Buttons
Sew-on snaps come in different sizes, made of metal - black and nickel-plated (silver) or plastic. On the buttoned edges of the clasp, such buttons are not visible from the outside. The fastening with buttons is also made on double-folded material reinforced with interlining. The upper part of the button (with the rod) is sewn on the wrong side of the upper edge of the fastener, the lower part of the button (with the cup) is sewn on the front side of the lower edge of the fastener.
HOW TO SEW A BUTTON
On the wrong side of the top edge of the fastener, mark where the button will be sewn. Sew the top of the button using overlock stitches. Then mark where to sew the bottom of the button. To do this, rub the rod of the upper part of the button with chalk and press it onto the lower edge of the fastener. If the chalk point on the fabric is not visible, then you should pierce the rod with a pin and insert it into the lower edge of the fastener (5). Mark the puncture point with a pin.
For those who want an eye-catching fastener but don't want to have to sew on buttonholes and buttonholes, punch-out snaps in a variety of colors and sizes, available in ready-made sets that are sold in haberdashery stores.
These buttons can be punched using a hammer (6) or even faster and easier - using special pliers (7). Exact instructions are included with each kit.
IMPORTANT: the places where the buttons are attached should be marked on both edges of the fastener. Each punched button always consists of two upper and two lower parts. When punching parts of the button, make sure that the cap of the top of the button is on the front side of the top edge of the clasp, the shank is on the back side of the top edge of the clasp, the bottom plate of the button is on the back side of the bottom edge of the clasp, and the cup is on the front side of the bottom edge of the clasp .
Why do you need a punch?
This is a necessary item when installing a button on clothing. Even if you are not a professional seamstress, but simply decided to change the button on things yourself, you still need to purchase a punch or at least find a replacement for it. It is used to make a neat hole in the fabric. If you pick at it with scissors, it will just be an uneven hole, over time it will stretch and the button will fly out. Using a punch, this can be done, firstly, quickly and accurately, and secondly, in a minimal size. The pin of the button should be pulled firmly onto the fabric.
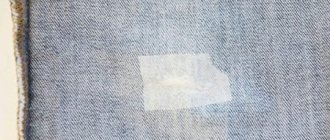
If the fabric has split edges, then the hole made by the punch must be lubricated with glue, then the edges will not crumble and the button will be firmly fixed in the hole. You can use adhesive fabric.
If you decide to take up sewing professionally, then it won’t hurt you to purchase a device for installing buttons on clothes, as in the photo above. This 11-piece set consists of a base plate and various sized punches. This purchase will significantly speed up the process of installing buttons on clothes at home. If you have a one-time installation job, then instead of a punch you can use a steel knitting needle. If the fabric is split or knitted, then the knitting needle needs to be heated over a fire.
club-snap.su
How to install a spring button (Alpha) on clothes?
How to expand a button on clothes?
There is always something to mount a button in your toolbox. For example: Phillips screwdriver, thick nail, bolts, etc.
To make a hole along the button, use a thick awl or nail. If the fabric is synthetic, you can heat an awl (nail) and make a hole. Next, we assemble the button and begin the process. The first task is to expand the cylindrical part of the button with any suitable device (cone-shaped rod).
Then, using a bolt or other cylindrical rod of suitable diameter, we finally flare the button cylinder. Ready. It is advisable to install the button on a smooth wooden surface. But try not to overdo it, otherwise the result will not please you. You can break the button so much that it simply falls apart. You need to be especially careful when working with buttons of this design. If the alignment is disturbed, they are easily destroyed. Let's move on to installing the bottom part of the button. Use a drill to make a hole in a wooden block
The diameter and depth of the recess should approximately correspond to the male part. Check. Assemble the part, place a block on top and knock with a hammer. Ready. If you need to use this device repeatedly, then it is better to use hard wood and make a recess from the end of the block. It will last longer. This operation can also be carried out using a device for installing shirt buttons. The button part is installed, but is slightly deformed. If this is not of fundamental importance, then this method can be used. The male button part is fixed by flaring the button rod. Therefore, the depth and diameter of the recess in the device should not be greater than the bottom of the button.
But if you don’t have an electric drill and other devices at hand, you will have to use some cylindrical object. For example, a socket wrench with a diameter of 6 mm.
or a nut with a diameter of 8 mm. The lower part of the button turns out to be slightly deformed, but if it is not of fundamental importance, then the result is positive. The bottom part of the button might look like this. But the operating principle remains the same. In addition, it should be taken into account that manufacturers produce different diameters of buttons, having different diameters, both external and internal.
When installing the button, be careful not to damage the spring. The diameter of the cylindrical rod for flaring the button should not be greater than the distance between the button springs.
Also, when installing buttons, it is necessary to take into account the diameter of the round rod of the front part of the button. The play between the button tube and the hole should not be more than 0.5 mm. Otherwise, you will not be able to install the button properly.
Keep in mind that high-quality fittings can only be installed in an atelier or workshop using appropriate professional equipment.
Have questions. Write, we will answer
Step-by-step instruction
After a punch has made a neat hole in the marked area, the button is threaded through. A fixation ring is placed on top. Be sure to check that it is positioned away from you along the convex edge of the button.
Then you need to place the product on a dense surface. This could be a wooden block or a rubber gasket. Do not use a metal base, as it can deform the surface of the button when struck by a punch. And this doesn’t suit us at all.
The punch is inserted into the leg of the button and, by pressing, it is divided into parts (usually four). They should lie on the fixation ring. All that remains is to press these metal petals into the fabric with a hammer. To do this, use a hammer, but be careful. There is no need for brute physical force here, as you can damage the button. A little effort will be enough.
Just in case, buy a few extra barrels, in case you won’t be able to carefully hammer in the pin petals the first time, and they will break. This kind of problem is not uncommon for beginning craftsmen.
Installing shirt buttons
This type of button is considered the simplest. Here, the main tool for installing buttons on clothes will be pliers. The installation process is similar to the previous option, only the punch needs a larger diameter.
The front parts are installed first, then the internal parts. After marking with a simple pencil, the crown of the button is pierced into the fabric. Then the product is laid on a wooden beam and the inside is hammered with little effort.
The second part of the button has an S-shaped pin. To hammer in this part, it will no longer be possible to use a wooden beam, except perhaps to drill a hole in it. Usually, when installing buttons on clothes at home, use a nut of the appropriate diameter.
Tools
Using rivets on clothes, you can significantly transform the appearance of the product. Most often, metal fittings are used on jeans, leather jackets and other items made of thick fabric. To install the blocks, you will need the following tools:
- Press for punching holes. A special device made of steel allows you to instantly punch a hole. Before making a hole, the master marks it. Then he brings the textile to a special area under the tool and presses the press. Under the weight of the press, a hole is formed - it is always smooth and small. Workshops often use a large number of attachments for different button diameters;
- Manual punch. This tool looks like an oblong cylinder of small diameter; it is also equipped with attachments. The punch helps to obtain smooth and beautiful holes;
- Hammer. Without a hammer, the punch will not work. When installing buttons on clothes, the master fixes the punch at the site where the future hole will form and hits it with a hammer several times;
- Chalk or soap. These tools are necessary for marking future holes. Usually soap and chalk are used, since the blocks are placed on jeans. If the fabric is painted in a light color, use a fabric marker.
In addition to the listed devices, you need a mini anvil where the punch will work, an awl for making holes and scissors.
Soap or chalk
Press
Manual punch
Hammer
Repairing a damaged button
If you had an incident when installing a shirt button and something went wrong, do not despair. The good thing about these buttons is that they can be removed and reused. To do this, you need to straighten the teeth of the crown and remove it freely from the fabric. You can remove the button with a flat screwdriver or knife. You can straighten the ends of the crown using pliers or small pliers.
Once the teeth are aligned, the button can be reused. This method is also applicable in cases where the button is intact, but the fabric in this place is torn. Then, after carefully removing and restoring the button, it can be installed back on the product, just in a different place.
Press for installing buttons on clothes
The best assistant when sewing clothes with buttons is a special press. It consists of an upper and lower stand and a set of screw-on attachments. A punch is screwed into the upper part of the press, and a stand for the punch is screwed into the lower part. This press is used for different fabrics, both thin and thick, even leather belts. You can purchase different attachments; they are sold separately. It is advisable to sign them immediately so as not to confuse the size. Each set is designed for a specific button size.
Using this device to install buttons on clothes is easy. Let's take a closer look at how to do this:
- We install the attachments - screw the top one in until it stops, but not too zealously, and simply insert the bottom one into the round groove of the press.
- Since there are two sets of attachments for installing Alpha buttons, they are installed alternately for one and the other pair (such buttons consist of four parts).
- Nozzles are selected according to the size of the button. Typically, the most commonly used punches are purchased - 2, 4 and 6 mm.
- It is important to correctly mark all the holes and punch them in advance with a punch; it is recommended to do this with a piece of reinforcing fabric.
- When all the holes are punched, the nozzles are replaced, and then work continues with the fittings. Advice: it is better to punch holes of a smaller diameter. The button pin must be pulled firmly through it, otherwise the button will subsequently fall out.
My experience of installing accessories on clothes
I LEAVE THE POST AS ADDITIONAL INFORMATION FOR BEGINNERS! Currently, I install all metal fittings on professional equipment. If you have not purchased one yet, then you can use the tools I write about below as an alternative.
Girls, due to the increasing number of questions I receive about “how I install buttons on clothes,” I will write a separate post about installing accessories on clothes.
Of course, the best thing is to have in your arsenal good pliers for punching holes, pliers for installing eyelets, pliers for installing buttons of various configurations... and even better, have a press with various attachments... BUT!!!! It’s not all that bad if you don’t have all of the above, due to the lack of these gadgets in stores, lack of money for all this, or lack of storage space. I purchased several tools that allow me to install the fittings quite professionally. All of them, as well as the eyelet buttons themselves, fit perfectly in a tin tea jar:
What is important to know when selecting tools:
-TYPE OF ACCESSORIES
- SIZE OF ACCESSORIES
So, the most universal ones I have:
1. To install simple buttons, I bought this set, the price is 280 rubles.
I specifically showed these buttons on my ladybug so that the bottom and top of the button could be seen. The set includes 5 items: a hole punch (I also use it to install grommets and eyelets) on the left, two backings for button caps (for the top cap it is convex, for the bottom it is flat - it is important to remember that the buttons are installed and do not wrinkle ), 2 different “stumps”, as the sellers call them, but from the position of a design engineer I call them flaring machines, due to the name of this operation)))))))): this is what they look like:
Attention! Tools for specific button sizes!!!! These are for the most popular 12-14mm. It would also be nice for 15-17mm, but it’s not on sale yet (These sizes are the most suitable, they can be used for both outerwear and underwear. It’s also important to remember how to correctly install the flaring tool for the top button: with the grooves between the button antennae, otherwise you’ll crush it these mustaches, and the button will not fasten.
Installation with these tools is simple, a light blow with a hammer, even a child can do it.
2. Shirt buttons (blouse buttons). Oh these are my favorites! I love it very much!!!! the cheapest and easiest to install and operate!
There is only one tool - a “stump” for 40 rubles))) Universal for a wide range of sizes. The shirt buttons themselves consist of 4 parts:
2 interchangeable rings with spikes (I specifically showed the top and bottom) and two tuck pieces.
Such buttons can be installed simply with pliers, however, I don’t like this method: you can bend the button and it will not function; it is inconvenient to install far from the edge. But as a method it has the right to life)
3. Eyelets.
For small eyelets, I have this “stump” flaring tool. Installs eyelets from different manufacturers:
4. Rivets/holniten
I install directly with a hammer without any tools. The only thing is that for the backing, so as not to flatten the top, I use the convex backing from set No. 1
When installing any accessories by hand using these tools, the main thing is not to overdo it with the force of the impact with milk))) the impact should be medium, on a hard surface (I always install it on the floor, and at the same time I put a cutting board 20mm thick).
That's all the tricks))) My entire arsenal costs 320 rubles)
It’s very interesting how you install the fittings without tongs and presses. Add comments with recommendations and photos!
Procedure
Here's what you need to do:
- First, a hole is punched in both the fabric and the pad (if there is one).
- We replace the punch with an attachment for the eyelets.
- A part of the button is placed on the lower part of the press with the pin facing up. We place the fabric on top with the wrong side up, aligning the hole with the pin. If necessary, either a piece of fabric or a reinforcing plastic ring is added.
- A counter washer is placed on top. Its concave side should point down.
- We press gently and smoothly on the handle of the press. In this case, the pin is flared. The button is firmly installed on the fabric.
General principle
Buttons are a useful invention. They were first used in France in 1885 for leather goods: shoes, gloves, bags. Today, buttons are inserted into jackets, overalls, children's bodysuits, pockets and even underwear. They securely hold the edges of the fabric and at the same time can be completely invisible.
What you need to know about the buttons:
- "Mom and Dad". This is what people call the upper and lower parts of the button (which can also consist of several parts). The “male” has a protruding pin that fits into the “male” - a metal part with a recess and a beautiful “face”. They are located on opposite sides of the fabric. The “mother” is always installed on the upper part of the product, and the “father” is placed on the bottom. As planned, the pin should fit in and out of the recess.
- If the rivets are not sewn, they consist of several parts. Usually “mother” and “father” have 2 parts each. They are collected during the installation process. There is no need to do this in advance.
- Insert non-sew buttons into the holes. They should be narrow and the fabric should be dense. If there are already holes, but they are torn or frayed, they are strengthened with silicone glue, non-woven fabric or sewn with thread. If there are no holes, use a special punch or awl. As a last resort, you can punch a hole with a thin nail. You can’t cut it with scissors: sooner or later the fabric will come apart and the button will start to fall out.
- The button is assembled after installation on the fabric. The metal parts are inserted into the hole, checking for the correct location, and then pressed tightly against each other. Ideally, a press and special attachments are used to connect parts, which allow you to flare (flatten) the required parts of the button. After flattening, one piece fits tightly onto the other.
We recommend: How to properly fold a jacket in a suitcase?
Forceps
If you want to purchase a machine for installing buttons on clothes, it is best to use tongs. This is a very useful tool that will greatly facilitate the work of a seamstress. As professionals advise, there is no need to save on such a product. Cheap tongs often have handles that break. Typically, attachments for various buttons are sold in the kit for this tool.
The appearance of the tongs differs greatly from different manufacturers, but the method of use is similar.
The handles of the tongs have a lock. When starting to work with such a tool, you need to squeeze the handles and remove the lock. Places for buttons are marked in the fabric and holes are made with a punch. Then the button is inserted into it with the head facing up and the tongs are compressed. You need to press smoothly, but all the way.
Helpful information
In order to ensure that the back and front parts of the button match exactly and wrinkles do not form on the clothing, you need to accurately mark the installation locations of the individual elements. Some people use the following method: install the lower parts first, and lubricate the pin with chalk. By aligning the edges of the clothing, the chalk leaves a mark in the right place. After this, it is easy to find the desired point for the upper parts.
Some people don't like this technique. They use a different way of marking. Craftsmen measure the distance with a pencil or use a self-disappearing marker. In this option, the upper front elements are installed first, and only then the lower ones.
In the article, we looked in detail at different ways to install buttons at home. We hope that the tips will help you complete this type of work quickly and efficiently.
Installing buttons and rivets without a press
If you are smart, you can do without a press and special tools. To install the button, you will need a hammer, a bat (bolt) or even a simple needle and thread. It all depends on the type of fittings.
Sew on buttons
Does not require the use of special tools. The easiest way to attach sew-on snaps to clothing is. All you need is a sewing needle, thread to match the fabric and the buttons themselves. The more holes they have, the better.
Instructions:
- Place the metal piece with the bolt on the smooth side against the face of the bottom of the product. Sew on.
- Place the metal part with the recess on the wrong side of the top of the product. Use a needle and thread.
Make sure that the 2 parts of the button are located opposite each other, and the fabric does not form wrinkles. If in doubt, install the bottom part with the bolt first, coat the protruding part with chalk and stamp on the opposite side.
Ring
Perhaps the most common type of button. They are used in tailoring clothes, including jackets, as well as in the manufacture of wallets and bags. They come in different sizes and colors and are mostly made of metal.
The ring button consists of 4 parts and looks like this:
It is connected by inserting a small ring into a large one. Hence the name.
How to install a ring button without a press?
- From the inside of the bottom of the fabric, insert a metal piece with a leg (more inconspicuous in appearance).
- Place a wooden block or something hard under it.
- Cover with a piece with a narrow ring.
- Armed with a bat and hammer, carefully flatten the protruding leg. You can use a suitable size bolt.
- Take the remaining part with the leg (it is usually prettier and better built) and insert it from the front side of the top of the product.
- From the wrong side, place the part with the ring on the leg. Place it on the beam and flare it again. Ready!
In a similar way, you can install plastic ring buttons without special pliers. Only instead of flattening the legs, they should be melted. At home, a soldering iron or a hot nail is used for this.
Alpha buttons
No less popular buttons. They have a spring mechanism and a convex pin. You can see the difference between the ring (2) and “alpha” buttons (1) in the photo:
Inserting them into a jacket or other product with your own hands is more difficult. The reason for this is the pin, which can become wrinkled when flared. To prevent this from happening, you should drill a recess in a wooden block for the convex part of the button.
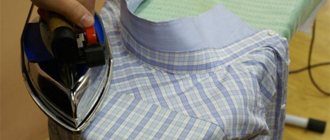
We recommend: How to fold a shirt correctly after ironing or carefully place the product in a suitcase?
What to do next:
- Install the part onto the bottom of the product. To do this, take a simple rivet with a leg and thread it from the inside out. Attach the part with the bolt on the front side. Turn it over and place the convex side into the hole drilled in the block. Tap lightly with a hammer on the top (from the inside).
- Next you need to assemble the front part of the button. Insert the rivet with the leg into the hole. Install the part with the recess from the inside out. Armed with a bat (bolt, blunt nail), flatten the leg from the wrong side.
If you often have to install rivets and buttons, then it is worth purchasing at least a minimum of tools: a washer, a standard size bit and one with a recess for the button bolt. The buttons are placed on the washer with the front side so that they do not wrinkle, and with a special bat you can rivet the product in literally 1 minute.
Rivets
Along with functional buttons, decorative rivets are often used in clothes: figured, with pebbles, spikes. They usually have sharp protrusions on the reverse side.
Inserting them is as easy as shelling pears:
- Pierce the fabric with the teeth.
- Press something hard against the rivet. The fabric should be taut and the rivet should fit snugly against it.
- Fold the teeth from the inside out. The easiest way to do this is with a flat screwdriver.
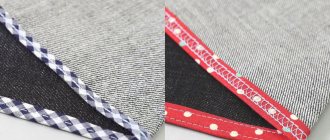
There are also rivets used to secure fabric stitching. Holnitens are often used in products made from denim and leather. This is what they look like:
Installation of this type of rivets is quite simple. The main thing is that the length of the leg matches the thickness of the fabric.
- Insert the part with the leg into the hole from the wrong side.
- Cover with a cap and place face down on a wooden surface.
- Lightly tap the rivet from the inside out with a hammer.
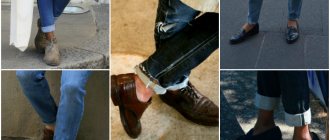
The buttons are inserted into jeans in the same way. The only difficulty is preserving the front part. To prevent it from being wrinkled or scratched, the rivet is hammered in from the inside out, and a rubber or leather gasket is placed under the front side.
Now you know how to install buttons yourself. Home renovations will save you time and money. If you doubt your abilities, try practicing on an unnecessary piece of fabric. You will succeed!