Fleece hat pattern
When sewing various models, a basic fleece hat pattern is used. It is adjusted based on your own measurements.
To determine your size, you need to take two measurements: the first is the circumference of the head, the second is the depth of the hat. How to correctly take head measurements is shown in the photo below.
The main part is one-piece, or is divided into an upper part - the crown and a lower part, which covers the ears.
By the way, there are models with elongated “ears” that turn into ties, and there are others without them at all. In this case, this part of the pattern is simply removed.
This is interesting: Pattern Children's hat with ears (weight 48-50)
Rectangle fabric beanie
Now that you know how to take measurements and make a pattern, we’ll get to the point: the tailoring itself.
- Take a piece of fabric 55 cm high and OG wide (head circumference).
- Fold the front side inward. Matching the edges.
- We fasten with needles. Leave a small hole unattached (mark the boundaries with a pencil).
- We put a line where we connected with pins.
- The result is a pipe (conditionally).
- Combine one upper corner with the opposite one. The second one is exactly the same. There were 4 layers in total.
- We remove the second and third layers inside the structure. Connect the bottom layer with the top one. We pin it with pins.
- We lay a line along this place. But start stitching about 3 fingers away from the edge.
- But we don’t complete the stitching, but straighten the second and third layers and align the edges. We flash them the same way.
- We finish the line where we started.
- We look for a hole and turn the structure inside out. We straighten the cap.
- All that remains is to sew up this hole. We straighten the cap.
The Beanie hat is ready, wear it with pleasure. This model is quite simple, easy to sew.
Required materials and tools
The main thing in sewing a children's hat is the choice of high-quality material with spectacular colors.
For one headdress you will need only 25 cm of knitwear and the following accessories:
- sewing threads matching the color;
- tailor's needles with a round eye;
- chalk or pencil for cutting;
- scissors;
- needle;
- sewing machine.
When choosing knitwear, you can pay attention to the following recommendations:
- If you use a simple sewing machine, you should choose denser fabrics. For example, fleece, ribana, footer with lycra or fleece.
- For sewing on a cover machine, you can use thin fabrics (kulirka or interlock).
- For the manufacture of children's products, fabric from unnecessary knitted T-shirts and jumpers is suitable;
Rules for taking measurements
A knitted hat for a child is sewn according to 2 main measurements. This is the circumference of the head and the depth (or height) of the product. For a hat with ties that covers the ears, you also need to know the measurements for the side depth of the hat.
The main measurements and measurement technology are given in the following table:
| Measurement name | How to measure |
| Head volume | Place the measuring tape above the ears at the level of the eyebrows, at the back - along the most convex part of the back of the head. |
| Cap depth | Measure the distance up to the forehead from the crown to the point between the eyebrows, back to the base of the skull and along the sides to the edge of the earlobe. |
| Rear Width | Measure the distance from your earlobe to the posterior center line at the base of the skull. |
To create a hat pattern, take any pattern from a sewing magazine as a basis or print out a ready-made pattern. You can also trace the outline of another baby hat and add seam allowances.
Children's hat-stocking
A children's stocking cap is sewn on a machine in the same way as an adult's. Only the pattern will be the same, but one size smaller. You yourself must measure the volume of the child’s head and the height of the hat with a centimeter, and make changes to the pattern.
The video shows how to sew a hat and snood from knitwear:
Hat and snood.
We make calculations for the wedge
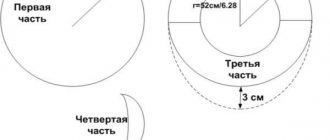
The main part of the hat is the bowler, it consists of 6 wedges. To correctly calculate the base of the wedge, you need to take into account how thick the insulation of the cap will be. If the insulation is thick, you should add 6 cm to the circumference of the head, that is, you get OG = 48 + 6 = 54 cm. Now you can find the width of the wedge 54: 6 = 9 cm. The height of the wedge is found by dividing the distance from the eyebrows to the back of the head in half, that is 34: 2 = 17 cm. Now you can make the first part for the pattern of a children's hat with earflaps - a wedge pattern (1 part in the photo). We get a rectangle whose sides are 9 and 17 centimeters. Mark the center on the top side (9: 2 = 4.5) and build an isosceles triangle. From the middles of the sides of the triangle, we put 1 cm perpendicular to the side, then we connect the top of the triangle and the points of its base with a smooth line.
Tools and materials Time: hours • Difficulty: 6/10
- fleece (or any soft fabric) in white and pink;
- pattern;
- matching sewing threads;
- scissors;
- sewing machine.
To sew such a hat, you can use any warm fabric, for example, polartek or fleece, or combine them.
First of all, we make a pattern, and for this we take three measurements:
- face circumference;
- head circumference,
- distance from the eyebrow line to the base of the skull.
Then we draw a drawing grid - a rectangle, the width of which is equal to the half-circumference of the head + 2 cm, the height is equal to the half-circumference of the face + 2 cm. If your hat is not warm, then you don’t need to add allowances.
We denote the key points of the drawing with the letters A, B, C, D. From point A we set aside 6-9 cm (depending on the size of the cap) and draw a horizontal line.
Then from point C we set aside a distance that is equal to half the distance from the eyebrows to the base of the skull.
Draw another horizontal line.
Next, divide the rectangle in half vertically. The result is points A1, B1, C1, D1.
Then we divide segment AA1 in half and draw vertical lines. We do the same with the adjacent segment.
Let's draw a layout of our hat. In order for it to lie roundly on the baby’s head, we make several darts.
We lower the back of the head by 2 cm and draw out the pattern with smooth lines, not forgetting about the ears.
To do this, take a piece of fabric and fold it in half. We apply the pattern with the front part to the fold, transfer it to the material and cut it out, making an allowance of 0.7 cm.
We cut the lining and insulation elements in the same way, but 1.5-2 mm less than the top.
We cut out the shape and length of the ears at our discretion.
This is interesting: Pattern for children's beanie hat and snood (size 48-54cm)
Simple version of the product
It is recommended to iron the fabric before cutting. If the knitwear has a pattern, it is necessary to position the pattern so that the objects are placed centrally or symmetrically around the center line.
A knitted hat for a child, the pattern of which can be created in just 10 minutes, can be single-layered or with a lining.
First you need to decide on the size of the hat: measure the volume of your head and choose the desired height of the product.
Next, to create a pattern you need:
- Divide the head circumference measurement by 4 and make a deduction for the stretch of the product (for dense fabrics, subtract 0.5 cm, for thinner and more elastic ones - 1 cm).
- On a sheet of paper, construct a rectangle with the following parameters: the width is equal to a quarter of the circumference of the head, taking into account the necessary deductions, the length is the height of the hat with an increase of 5 cm for the lapel (optional).
- On the left side, move 2.5 cm from the corner to the left, and down ¼ of the height of the cap. Connect the dots to get a dart.
- Round the upper left corner of the rectangle.
- The resulting part is ¼ of the cap.
- To create half of the hat pattern, attach the resulting piece to a sheet of folded paper so that the side line with the dart coincides with the fold line, trace the template and cut it out.
Preparing fabric for cutting
The length of the fabric cut for the hat depends on how it will be cut:
- If the product is single-layer, then a fabric size equal to 1 cap length plus an increase for the lapel will be sufficient.
- For a two-layer model without a seam on the bottom fold, you will need double the length of fabric.
- If the hat is double-sided, made of knitwear of different colors, you need to take 2 pieces of fabric, equal in length to one size of the length of the hat.
Sequencing
The main characteristic of knitted fabric is its elasticity. It can stretch in one direction or in two. When cutting products, you should pay attention to the main direction of stretching and place the pattern strictly perpendicular to the direction of the stretching line.
For correct cutting you need:
- Fold the piece of fabric across the stretch line with the right side facing inward.
- Attach the hat pattern, trace it with chalk or pencil and cut out the resulting parts, leaving a 1 cm seam allowance.
- When cutting out two-layer products, the fabric needs to be folded across and separately cut out 2 parts with a fold at the bottom.
- To sew a hat with a lining, cut out 4 identical parts or 2 parts with a side fold.
Beret details and their pattern
This pattern is suitable even for beginners; its advantage is that the finished product is easy to sew and will hold its shape perfectly. To do this, you need to take measurements, and then start sewing the product.
The main thing that needs to be done before cutting the fabric is to take the measurements correctly , otherwise the headdress will have to be constantly adjusted when walking or it will put pressure on the head. To do this, you need to take a measuring tape and measure your head at the widest part.
IMPORTANT ! Do not tighten the tape too much or, conversely, loosen it.
When sewing, we will work with three parts of the future product: the bottom, the sides and the cachepin (ring).
Use a round base with a diameter of 30 cm, and in the center build a circle according to the size of your head.
To calculate the radius of a small circle, you need to use the following formula: r = head circumference / 2, where = 3.14. Next you need to cut out the cache-pin. This is a strip about 6 cm wide and length around the circumference of the head. It will need to be folded in half and sewn to the rest of the parts.
IMPORTANT! Don't forget about small seam allowances.
Sewing
A knitted hat for a child has a simple pattern that even an inexperienced craftswoman can handle. Sewing a hat takes no more than 30 minutes.
To complete the work you need:
- Place the cut pieces right sides facing each other and pin the edges together with sewing pins.
- Sew the edges on a machine and overcast them with an overlocker or a special machine stitch.
- To ensure even seams, iron the product with an iron.
- Sew the darts in one line. Carefully align the previously stitched seams to create a beautiful intersection of lines on the front side.
- Finish the edges of the dart with an overlocker.
- Sew the bottom of the hat with an overlock stitch and fold it inward by 2-2.5 cm. Pin the hem and sew the edge on a machine, departing 1.5 cm from the fold.
Choosing a model and fabric
Hats with ears are suitable for girls, as well as teenagers and children of both sexes.
Wide models are suitable if you have a round or oval face . Widely spaced ears will look harmonious on those with a narrow face.
For comfortable use of the product, we need to choose a fabric that has good stretch:
- Knitwear, elastic in one or two directions.
- Stretch denim.
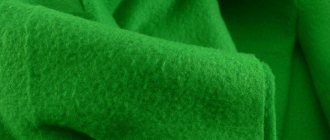
- Various types of fleece.
- Natural fur.
- Faux fur on a knitted base.
- Used knitwear.
Advice! If you decide to use a sweater or T-shirt on a hat, then the material must first be prepared. Wash it with a detergent suitable for the fabric. If it is natural wool, then a good hair shampoo will do just fine. Expand the product. Iron through a damp iron. You can start cutting.
Beanie
To make a hat with a flip at the top of the head, you only need to sew 3 seams. Job completion time: 10 minutes. To cut a hat, you need to place the fabric in front of you and set aside along the stretch line a size equal to the circumference of your head and subtract 4 cm for tension. Measure 55 cm in height and cut out the part.
The nuances of making a beanie hat:
- First you need to fold the rectangle in half, perpendicular to the stretch line, align the side cuts and pin them together with pins.
- Next, lay a straight machine stitch along the edge, leaving a hole (5 cm long) in the seam for subsequent turning of the product.
- The next step allows you to create a curl at the top of the head. To do this, you need to place the stitched part in front of you vertically, take the upper right corner and align it with the lower left corner of the rectangle. Then take the top left corner and align it with the bottom right corner.
- The bottom cut produces 4 layers of fabric. The middle 2 layers need to be moved slightly inward and the 2 outer layers need to be pinned together.
- Next you need to start sewing the chipped sections together using a machine. Having reached the opposite edge, you need to do the following: gradually begin to straighten the folded edges and continue sewing in a circle. As a result, the machine stitch will be laid along the entire lower circumference.
- After stitching, the product must be turned inside out. The hole must be sewn up on the front side with a hidden seam or machine stitched.
Stocking hat
Another hat, simple to make, but no less popular, is the stocking cap made of knitwear. Sewn with your own hands from purchased fabric or a cut thick T-shirt, it is indispensable in early autumn and spring. These hats are lightweight and take up little space in your bag or backpack. We will sew a hat from double knitwear.
To work you will need:
- A piece of knitwear.
- Scissors.
- Tailor's pins.
- Sewing machine.
Knitwear consumption for a double stocking cap for sizes 52-56 - 60/50 centimeters. The knitwear must be folded so that the wrong side is on the outside and the front side is on the inside.
Next, fold the fabric from left to right. On the right is the back seam of the stocking cap.
We adjust the pattern to your sizes. You should have 4 of these paper pieces. In this work, the stocking cap is 28 cm by 45-46 cm wide. Making a pattern: place the paper pattern on the fabric and secure with pins. We outline with chalk, add 1 cm to the seam allowance, and cut out.
This is what we should get:
We remove the pattern, this is what we see:
We unfold the knitwear to its full width. Fold the fabric so that the front side is on the inside and the back side is on the outside.
We process the back seam using a machine or overlocker.
We move to the top part and sew the top of the hat.
Turn the work right side out.
We fold the hat in 2 layers, make sure that all the seams match, and pin it together. Machine sew the top seam. In this case, the back seam will be completely closed. All that remains is to turn out the stocking cap.
So the hat is sewn.
Lined
A lined hat is made from a knitted outer material and lining fabric. If you plan to wear a hat with a lapel, then the color of the lining should be chosen so that it is in harmony with the main color of the hat. To sew, you need to create a pattern or use a ready-made printed pattern. A lined hat can have a classic cut, a beanie shape, or a model with triangular ears.
To sew a hat with a lining, you need to do the following:
- Cut out 2 pieces from the main and lining fabric.
- Turn the hat base blank inside out and sew the back seam and darts.
- On the lining piece, sew a back seam and a front dart. Leave the middle undercuts unsewn.
- Place the lining piece into the base blank. The front sides of both parts should be facing each other.
- Sew the bottom edges with an overlock stitch.
- Turn the hat right side out through the hole in the lining. Sew the hole closed with a blind stitch.
How to sew a hat for women from drape: pattern, sewing instructions.
Cap – Eugenia Kim, RUB 11,075/$245
Cap - OVS, 319 RUR/$10
Fedora hat – Janessa Leone, RUB 8,690/$215
Fedora hat – Rag&Bone, RUB 7,885/$195
HEADWEAR
VELVET BERET (SIZE 58-60)
You will need:
1. Bottom - 1 piece;
2. Crown - 2 parts;
3. Band - 1 piece.
Job:
First, sew the sides of the wall parts together using a 0.7 cm seam. Press the seams. After this, stitch the walls to the bottom. Iron the seam towards the walls, stitch to the edge or press it. Treat the lining in the same way. Fold the parts from the main and lining fabrics with the wrong sides inward, aligning the lower sections. Sew the narrow sides of the band (it will take the shape of a ring), and press the seam. Sew the band to the bottom edge of the beret, folding it right side together with the lining. Turn the band onto the front side of the beret and stitch it onto the wall, covering the stitching seam. If the band is made of leather, make its inner side from the main fabric (cut the part according to the shape of the leather band and stitch it to it along the longitudinal side, folding the right sides inward). Steam the beret carefully and attach the finishing parts.
Black velvet beret with a bow, secured with a brooch. It is recommended to sew such a beret from soft pile fabrics that drape well - velvet, loose drape. The bow is made of grosgrain ribbon in a contrasting color. The leather band also serves as a decorative function. The lining is best made from a thin lining or voile-type fabric.
BERET FROM CLOTH (SIZE 56-58)
You will need:
1. Bottom - 1 piece;
2. Crown - 2 parts;
3. Band - 2 parts;
4. Bow - 1 piece.
Job:
First, sew the sides of the wall parts together using a 0.7 cm seam. Press the seams. After this, stitch the walls to the bottom. Press the seam towards the walls, stitch to the edge or press it. Treat the lining in the same way. Fold the parts from the main and lining fabrics with the wrong sides inward, aligning the lower sections. Sew the narrow sides of the band (it will take the shape of a ring), and press the seam. Sew the band to the bottom edge of the beret, folding it right side together with the lining. Turn the band onto the front side of the beret and stitch it onto the wall, covering the stitching seam. If the band is made of leather, make its inner side from the main fabric (cut the part according to the shape of the leather band and stitch it to it along the longitudinal side, folding the right sides inward). Steam the beret carefully and attach the finishing parts. An unusual decoration is a large decorative bow, which can be made from bright drape or velor. Along the middle line marked on the pattern, pull the bow detail with a thread or fold it with several soft folds and attach it to the beret with a brooch. Since it is recommended to make the bow from non-fraying fabrics, there is no need to process the edge. The band is made of artificial leather.
BERET FROM DRAPE
You will need:
1. Bottom - 1 piece;
2. Crown - 2 parts;
3. Band - 1 piece.
Job:
First, sew the sides of the wall parts together using a 0.7 cm seam. Press the seams. After this, stitch the walls to the bottom. Press the seam towards the walls, stitch to the edge or press it. Treat the lining in the same way. Fold the parts from the main and lining fabrics with the wrong sides inward, aligning the lower sections. Sew the narrow sides of the band (it will take the shape of a ring), and press the seam. Sew the band to the bottom edge of the beret, folding it right side together with the lining. Turn the band onto the front side of the beret and stitch it onto the wall, covering the stitching seam. If the band is made of leather, make its inner side from the main fabric (cut the part according to the shape of the leather band and stitch it to it along the longitudinal side, folding the right sides inward). Steam the beret carefully and attach the finishing parts. The rigid beret is made of drape, backed with two layers of adhesive padding. The gasket is necessary in order to clearly fix the cone-shaped shape of the beret. The adhesive pad can be replaced with a regular linen border, but in this case the fabric parts must be carefully quilted with the border using oblique stitches in a circle so that the stitches are not visible from the front side. When stitching, do not tighten the thread too much. The seam on the bottom of the beret should be covered with a decorative piece made of drape or leather. The band is made from the main fabric. The lining is normal.
WOMEN'S Earflaps (SIZE 57)
1. Wedge made of top material – 6 parts;
2. Visor – 2 parts;
3. Back plate and earpiece – 2 parts;
4. Lining wedge with insulation – 6 parts. at the seams.
Models of hats for men, women, children
Nowadays, hats made from this material are in fashion - on the street, in magazines there are countless options. Looking at them, you will notice that men, women and children have different fleece hats.
- The stronger half of humanity prefers to wear simple, tight-fitting models without unnecessary decoration with a lapel or its imitation . At the same time, men usually try to stick to a restrained color scheme, giving preference to black, gray, dark blue, and beige.
- Women and girls feel more free to choose colors and styles. Bright berets, turbans, hats with pom-poms, tight-fitting headdresses with colored appliqué are all acceptable. Although more discreet options are invariably in demand.
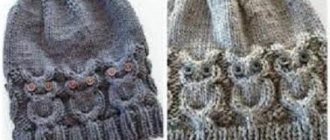
- Children love colorful things, and are happy to wear green, blue, light blue, yellow, and red hats. Models with ears , like those of a cat, a fox or a bear, are very popular now
Important! There are universal styles that suit everyone, regardless of gender and age.
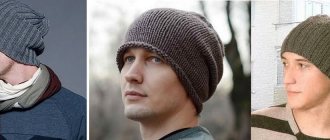
These are, for example, sports models that fit tightly to the head; beanie hats. They are quite neutral and easier to combine with other wardrobe items.
We sew a fur hat with earflaps: material for the hat
In order to sew a fur hat with earflaps, you will need not only fur, but also other materials:
- Fur. The most beautiful and luxurious part will go on the visor;
- Material for crown: leather, suede, raincoat fabric, knitwear, etc. For the most daring, you can make the crown from the same fur as the visor with ears;
- Insulation: synthetic winterizer, batting, etc.;
- Lining fabric (choose high-quality fabric, ideally silk);
- If the “ears” have pom-poms, use a cord for them;
- If you want the “ears” to be fixed on the back of the head, use buttons or buttons;
- Optional accessories for the visor.
Winter fleece hat
In order to get a particularly warm headdress, a layer of insulation is inserted between the outer and inner layers.
Attention: when using insulation, the parts increase additionally on all sides by 1 - 1.5 cm. Otherwise, the hat will turn out to be small.
The ear areas are reinforced with a piece of jacket fabric, this will prevent blowing.
This manipulation is carried out as follows:
- Cut two circles from a piece of raincoat fabric, about 7 cm in diameter.
- Place the circle to the ear area between the layers of the cap and secure them with running stitches.
- Sew in circles.
An interesting video will show you how to sew a men's hat with your own hands.
We design a variety of berets with our own hands
Choosing fabric. To make your own beret warm enough for the off-season, it is better to choose thick woolen fabric, for example, loden or drape. A light and practical beret will be made from fleece; you can also use knitted fabric or cut up a boring sweater. Don't limit your imagination. With a stylish beret, we're all a little French!
Building a pattern
In order to sew a beret with your own hands, you will need to create a simple pattern. Let's take a circle with a diameter of 30 cm as a basis - this is the standard size of a beret. In the center of the circle you need to build a circle equal to the circumference of your head. To make the beret asymmetrical, the circle can be cut out by moving it to the edge.
How to sew a beret with your own hands - instructions and pattern
Let's calculate the radius using the formula familiar to everyone from school: R = head circumference / 2π. Let's say head circumference = 57 cm. Then R = 57 / (2×3.14) = 9 cm.
If the fabric chosen is elastic, then it is better to subtract 1-2 cm from the circumference of the head so that the beret fits well.
In total you will need to cut 3 parts:
round bottom of the beret (circle with a radius of 30 cm);
part with a hole for the head (ring from our pattern);
cashpen, simply a band.
We have already created patterns for the first 2 parts. As a cache-pin, you need to cut a strip with a length equal to the circumference of your head, and a width of your choice. To get a 3 cm high pot, the width of the part must be 6 cm. Don't forget to add seam allowances.
We sew with our own hands
Just 3 stitches! Sew 2 beret pieces in a circle using one. Second, connect the cache-pin into a ring. Using the third seam, sew a folded cache-pin with a hole for the head. Iron the seams thoroughly and, one might say, the beret is ready!
How to sew a beret with your own hands
If the fabric of the beret does not fray, then it can be worn in this form. And if it frays badly enough, then in order to prevent threads from remaining in the hair, you will have to sew a lining for the beret. You will need a piece of lining fabric or knitwear if you want to make the beret a little warmer.
From the fabric you need to cut 2 round parts the same as for the beret. Having folded the right sides, you need to sew them around the circumference, but not completely. Leave about 7cm unsewn. To sew a beret with a lining, turn it inside out. Place the lining into the beret with the right side facing inward. Align the pot and lining around the circumference of the head and stitch in a circle. Through the hole left, turn the entire structure inside out and sew up the beret. Now it's definitely ready!
The colors of the band and the top of the beret may vary.
Boutonnieres will help diversify your beret
And this is what an asymmetrical beret with an offset center looks like
Flirty bows are another decoration option for a beret
How to sew a beret with your own hands and not decorate it with a luxurious flower? The trend is large baroque brooches with sparkling crystals and vintage cameos in light lace. Choose what is right for you and welcome spring in a new beret!
Pattern starts with paper
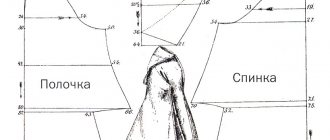
You will need: fur (faux or natural) or water-repellent raincoat fabric, lining fabric (thinsulate or fleece), interlining and all the necessary accessories for sewing. Of course, it’s better to experiment on something small, even if you have sewing skills. You can safely take on sewing a hat for a child if you get ready for work and make patterns on paper, focusing on recommendations and calculations.
So, we begin work with a pattern for a children's hat with earflaps, for which we take the necessary measurements with a centimeter tape: the circumference of the head, face and the length of the arc from the line of the eyebrows to the back of the head. For a two-year-old child, these measurements will be as follows: head circumference = 48, face circumference = 52, arc length = 34 cm.
How to sew a sock hat from knitwear
To sew a headdress you need to prepare:
- Meter tape;
- Chalk;
- Scissors;
- Threads.
First of all, you need to make a pattern on paper. If you do not have a sewing machine, a product made from such fabric can be sewn by hand. The seam will not be noticeable because the fabric is fluffy. It will be more convenient to sew if you first pin together the parts.
After the materials are prepared, you need to measure the circumference of your head. Divide the resulting value by four - this will be the width of one wedge. Next, you need to determine the depth of the cap. To do this, using a meter tape, you need to measure the distance from the forehead to the back of the head through the top of the head.
Cutting out the headdress
Divide the result by two. The result is one wedge, there should be four in total. To build a wedge, you need to draw a triangle, the base of which will form the lower part of the wedge. Then, give a rounded shape to the segments that go from the base to the top.
Since the material does not fray, internal seams do not need to be processed. But if the headdress is unlined, you should use an overlocker.
Then you need to attach the pattern to the fabric, cut out four parts and sew them together. It is important not to confuse the front side of the canvas with the back, otherwise you will have to redo everything again. The parts can be sewn together one by one.
Boy's hat with ties
You can first sew two wedges each, you get two halves of the product. Then combine them. There are quite a lot of fleece hat patterns. In this case, the hat will have the side turned up. It can also be used as an option with the bottom seam turned up.
Double sided
A knitted hat for a child (the pattern and cutting diagram are presented later in the article) can be sewn from one piece of material and look exactly the same inside and out. Before sewing, you need to create a pattern.
To do this you need:
- Take a sheet folded in half and set aside from the fold an amount equal to ¼ of the length of the head circumference, and at the top measure the length of the cap and build a rectangle from the resulting points.
- From the top, retreat 2.5 cm from the fold line, and down a distance equal to ¼ of the length of the cap. Connect the resulting points and cut the corner along the line.
- On the other side, smoothly round the corner of the rectangle.
The resulting part is a pattern for half of the hat. When cut from the bottom and left, it will have folds.
To cut and sew a hat, you need to do the following:
- Fold the fabric so that the fold lines on the fabric coincide with the fold lines on the pattern, and cut out 1 solid piece of the hat with undercuts and seam allowances.
- Sew the middle undercuts using a machine.
- Fold the piece in half with the right side inward and sew with a continuous stitch in a circle. For turning inside out, leave an unstitched space of 4-5 cm long.
- Turn the hat inside out through the hole left and sew it with a hidden seam.
In addition, you can sew a simple scarf from the same fabric with a button closure. To do this, sew a rectangle of the desired length (so that it fits freely around the neck) from the inside out around the perimeter using an overlocker. Sew a fabric loop on one narrow side. Next, turn the product inside out through the hole left and sew on a button.
Headdress for the Snowman
Not a single New Year's event takes place without Santa Claus and his assistants. On the eve of the New Year's carnival, together with your children, make a Snowman hat in the form of a bucket with your own hands.
To do this you will need polyvinyl acetate glue, thick cardboard, watercolor paints and a small piece of jute rope.
Using a rope, measure the circumference of your head. Draw a trapezoid on a sheet of thick cardboard. The length of the lower belt should correspond to the circumference of the head. Do not forget that you should add a couple of centimeters to the seam.
The upper belt should be made in the form of teeth. The teeth are bent inside the truncated cone and the bottom is secured using polyvinyl acetate glue.
Now the Snowman's headdress should be painted black. Use a rope to secure the bucket to the child's head.
Useful tips for sewing fleece hats
- To create a truly comfortable and beautiful thing, you must always carefully think through the sewing process before starting work.
- Select materials and threads to match the color, think over the style, and carefully draw out the pattern. And then you are doomed to success.
- Fleece is relatively easy to work with. It is easy to cut, does not crumble, does not require special threads or complex sewing machine settings. A regular seam with a stitch length of 3-3.5 mm will work fine.
- Since this type of fabric has good elasticity, the edges must be pinned together before sewing them on a machine.
- Experienced craftswomen sometimes advise finishing all the seams with an overlocker. Then they will turn out more accurate.
A smart fleece hat will come in handy in any wardrobe.
Mink hats 2021: fashion trends
Short fur coat - what is it (photo)
With ears
Making a model for a baby with ears does not have significant differences in sewing technology. The difference is that the pattern is not rounded, but has corners at the top in the form of ears.
The pattern of 1 half of the hat is a rectangle, the width of which is equal to the half-circumference of the head minus 1.5-2 cm for the tightness of the fit. The length of the rectangle is determined by the height of the header. To do this, you need to measure the distance from the line between the eyebrows to the back of the head and make an increase for the ears and lapel.
To sew a hat you need:
- From a vertical strip of fabric, cut out 1 whole piece of the hat with a fold.
- Cut the workpiece, leaving seam allowances (1 cm).
- Machine sew the side seams and turn the hat right side out.
- Place the hat in front of you, mark a central point on the top edge with chalk and set aside equal pieces of 3-4 cm in length on both sides.
- In the marked places, lay folds 1.5 cm deep, the folds of which should be directed towards the center line.
- Pin the folds with pins and place 2 securing stitches along the top edge in place of the folds.
- Finish the bottom of the product with an overlocker, fold it inward and machine stitch it in a circle at a distance of 1.5-2 cm from the bottom fold.
Another option for obtaining triangular ears is to lay 2 symmetrically located darts in the upper part of the cap.
Video
- The author of the video tells how to sew a cute baby hat for a newborn baby. Soft fabric and the absence of machine seams will definitely please your baby and mother. And when the hat is ready, find out how to sew bumpers into a crib.
- Instructions for beginners with explanations on how to sew a hat from a scarf with your own hands. Pavloposad shawls are chic in themselves, and a small, neat hat will come in very handy and will go with any outfit.
- If the old collar has no longer made you happy, there is only one thing left to do - sew a fur hat with your own hands. A knitted base and little tricks will help you create a fashionable element of your look.
- A fashionable youth beanie hat can be worn even by those who are just thinking about how to learn to sew. The simple pattern and practical advice from the author of the video are clear and accessible.
You may have already created your own hats. How did you like this creative process? Write about your achievements, we will be grateful to you.
We sew a female model of a fleece hat in a step-by-step master class
The women's hat in this tutorial is inspired by the fall season. Because it is decorated with improvised felt maple leaves. If desired, the decor can be replaced with any other one, be it flowers or snowflakes. The flight of your imagination is limited only by the tools at hand. It’s easy to sew such a hat; all you need is desire and careful shaping of the pattern.
To sew this original headdress, open our master class and follow the instructions step by step:
- We measure the size of the head of the person for whom the future fleece hat is intended. Average head circumference of an adult? 55-60 cm. Next, you need to measure the distance from the center of the forehead to the hollow at the beginning of the neck, this will be approximately 40 cm.
- We cut fleece fabric approximately 60x30 in size, depending on your measurements. This piece should be enough.
- We make an express pattern. For this you will need an A4 sheet. We divide the circumference of the head in half (for example, your head size is 56 cm, then 56:2 = 28 cm). This distance must be measured and drawn on paper, and the excess must be cut off. Fold the pattern in half, and then in half again. Then we level the sheet and mark the fold lines. We retreat 8 cm from above and draw a horizontal line. We round off the edges for the grooves first with a pencil, then cut out the excess. The pattern is pinned with safety pins to a piece of fleece folded in half. We determine the height of the hat by dividing the distance from the forehead to the neck by 2. Be sure to leave an allowance of 2-3 cm at the bottom and 1 cm on the sides.
- Let's start stitching the product. Sew the back seam first. Next, we fold the undercuts and stitch them too. Lastly, we bend the bottom of the hat a couple of centimeters and make a seam.
- We decorate the finished headdress. Do I offer you an autumn decor option? felt maple leaves. You can have any other option you like.
Fleece hat for a boy.
Which hat do boys prefer? Of course, soft, warm and comfortable so that it does not slip over your eyes. With all the variety of products presented in the store, it is difficult to choose a headdress that is suitable for the child, then skillful hands come to the rescue. It’s easy to make a fleece hat for a boy with your own hands, if you have 15 minutes of time and a good mood.
Let's consider the simplest options that will be a universal solution for a headdress, and even novice needlewomen can handle such patterns. Let's start sewing, there will be two pattern options, you will see them in the photo below:
- Take a piece of fleece with a width that will correspond to the measurements of the child's head. In the first version? On sheet A4 we mark the depth of the hat, the width of the lapel and leave an allowance of a couple of centimeters. In the second option? On the pattern we mark the depth of the hat, the width of the lapel, the width of the decorative bud and about a couple of centimeters for the allowance.
- Sew a simple version of the hat. We apply the pattern to the fabric, cut it, and then sew the side seam on the sewing machine. We turn 5-7 cm inside out and stitch the edge of the product again. We assemble the top of the hat and sew it by hand.
- Sew a hat with a bubo. We repeat the steps described for sewing a simple hat. And then we collect the fleece and tie it with a ribbon, as if we were making a ponytail. We cut this tail with sharp scissors into 1.5 cm strips. You should get a real bubo.
Such a hat can be decorated with iron-on stickers with the boy’s favorite characters, or with hand embroidery with threads of a suitable color. Fleece hat for girls.
A hand-sewn pussy hat is perfect for a girl. The pattern here is more complex, so you need to be able to build them correctly so that the product fits. So, let's move on to the master class:
- First, let's draw a pattern. You will need three measurements: head circumference, face circumference, and the distance from the eyebrow line, across the top of the head to the base of the skull.
- When the pattern is ready, apply a piece of fleece folded in half and trim off the excess. We will have a hat with ears. We cut out the “ears” in the size and shape that seems most suitable to you.
- We begin to sew the product, starting from the front. Each seam must be ironed so that the finished hat does not bulge.
- We mark the place where the antennae will be and sew them on a sewing machine.
- Our hat will have an elastic band, so we pin it at a distance of 2-3 cm from the back seam and sew it on with a three-foot zigzag.
- We pin the insulation and also carefully sew it on.
Our master class is over, and you can implement ideas for additional decoration yourself.
Sewing a knitted hat for a child
First, you need to understand the principle of making a basic hat pattern from thin knitwear with your own hands. A structure is built that can later be redesigned to suit your design and needs.
Knitted hat pattern for children's model
The basis of the pattern is the width of the product, equal to the head circumference halved. The figure may be slightly less or slightly more than the head circumference and depends on the elasticity of the selected material.
Note! If you already have knitwear, wrap the fabric around your head in a circle to determine the degree of its stretch. This measurement is used to adjust the width of the pattern.
The length of a fashionable hat is approximately 47 cm, but this measurement can be easily modified depending on the design.
The upper edge is formed by a smooth rounded line.
Fur trim
Place darts along the upper contour with a solution of 2-3 cm.
For a lining made of another material, reduce the contour by 0.5-1 cm. This is necessary, since the inner layer adjacent to the head has a smaller contour and volume.
You may want to lengthen the base for gathering or creating a lapel. You can add a warm lining for protection from the wind.