In such a skirt with buttons with a slight touch of vintage, you will definitely not go unnoticed. Another big plus of this model is that it can be combined with almost all things; it is a basic item that must be in your summer wardrobe. Today I will show you how to sew such a skirt with buttons in the front, and the highlight of the master class will be the luxury processing of seams, which is used in couture clothes. There will also be no visible stitches in my skirt, which will add even more neatness to it.
What I needed to make a button front skirt:
- shirt fabric (or for shirts) striped - 60 cm.
- chintz fabric - 30 cm.
- cotton bias tape in a check - 4 m.
- buttons Ø 1.3 cm - 8 pcs.
- threads in color
- adhesive fabric - 30 cm.
- glue web - 2 m.
- tailor's tools - pins, scissors, measuring tape
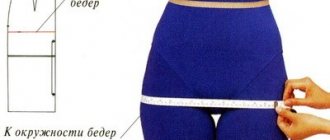
How to make a pattern for a button front skirt
The pattern looks like in the picture, however, you can cut it directly from the fabric. Especially if the design assumes a loose fit, then all the undercuts will go into the gathers or tucks. The main feature of the cut that distinguishes this model from a classic skirt is the slit along the entire height in the front and the presence of wide strips for sewing on buttons.
Wide planks are needed in order to ensure a wide overlap on each other without the formation of any gaps. Careful attention must be paid to this feature when calculating fabric and cutting.
And so, in terms of design features, the product is a trapezoidal panel, with gathering at the waist level. To cut the skirt, you need to fold the fabric in half and with the right side inward, draw a line along the entire width, retreating 4-5 cm from the bottom to the hem.
We put the required height of the product up. Now you can draw a second line parallel to the first one. It is very easy to create a trapezoid shape. On the top line, starting from the edge of the fabric, you need to retreat 6-7 cm. Draw a connecting line down from the resulting point, now the drawing on the fabric resembles a trapezoid. Cut the front part into two parts along the center line. It remains to cut out 2 strips and a belt.
Skirt pattern with buttons on the front
Before cutting, I iron the fabric with an iron and steam, and let the fabric dry for 30 minutes. This must be done to prevent the fabric from shrinking after washing.
I'm making a pattern for a skirt with buttons in the front right on the fabric. On a piece of fabric 60 cm long, I cut a strip of 8 cm across the entire width on top, it will go on the belt.
The rest of the fabric is the panels of the skirt. To make a trapezoidal or bell-shaped skirt, I measure 6 cm from the waist line and cut off the wedges along the side sections, as in the photo.
I cut the front panel of the skirt in the middle to the bottom - this is a button closure.
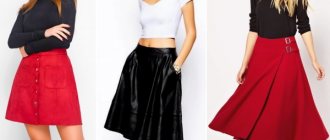
Variety of styles and models
A skirt with buttons is a detail of a woman’s suit that can be used in everyday life, when creating a romantic look, on vacation, at work and while studying. Where exactly it will look just right depends on the length and degree of expansion of the finished product downwards.
Among the most popular styles that remain forever fashionable and modern are:
- Pencil.
- Straight.
- Tapered (tulip).
- 6 or 4 blades.
The main difference between the models is the length of the skirt, but some styles are supplemented with patch or other pockets. Sometimes this is a truly functional detail, but sometimes they simply play the role of a decorative element.
The pencil skirt style is widespread. This model is combined with a sports sweater and a delicate silk blouse, a checkered shirt and a chiffon blouse. The silhouette of the skirt emphasizes the slim figure of the owner of such a fashionable wardrobe item. If short pencil skirts can more often be seen on high school girls and students who are not required to comply with a certain dress code, then a skirt with buttons located in the front length to the middle of the knee or covering 1/3 of the shin emphasizes the advantages of the figure of the fair sex working in office of a large company.
This model allows its owner to move easily and freely, retains its original shape for a long period of time and does not lose its attractiveness. A denim pencil skirt with buttons down the front is the perfect complement to a formal suit. Fashion connoisseurs call denim pencil skirts demi-season. This is a classic that never loses its relevance.
A flared denim skirt with buttons sewn on the front is the most popular model, which does not lose its attractiveness and popularity among young people. Schoolgirls and students feel easy and free in this outfit. A slight extension of the long skirt downwards will make the created image more weightless and less significant. This is a model that not only allows you to move freely, it allows the body to breathe and the owner of the item to feel relaxed in any situation.
A mini skirt with a slightly high waist and buttons located in the front is one of the most popular models in the hot season.
It is with this wardrobe detail that they look great:
- tops;
- chiffon blouses;
- calico and cotton shirts;
- sports jerseys (T-shirts).
Summer clothes should not be uncomfortable or hot, but most importantly, all things collected in the wardrobe and prepared for the summer season a few months before it begins must fully comply with fashion requirements. As for the flared short denim skirt with buttons on the front, this model will be considered a brand for many years to come.
Skirt patterns
Patterning a denim skirt is useless for the vast majority of experienced and beginner amateurs.
That's right, until we remember that we can use this pattern to sew not only from jeans. A mini skirt of almost the same look can be made from old jeans. To do this, you need to open the crotch seams and undercut the middle seams. Moreover, the finishing contrasting threads must be preserved and not cut. But maybe we’ll look at this technique later, but for now here’s the real pattern. So, here is a denim skirt pattern. There are a lot of great thick and soft cotton fabrics that you can use to replace denim. Or buy already boiled jeans. There are many options, you can even use gabardine.
Sewing process
The strip area must be duplicated so that the fabric does not lose its shape. Fold the duplicated strip in half lengthwise, right side out, and iron the edges.
Place the back half right side up. Place the front half wrong side up. Align the side cuts and stitch. Finish all edges using an overlocker; you can replace it with a hand-stitched buttonhole stitch or a zigzag stitch.
We have prepared for you a detailed video course “Sewing Basics”
Get it now for free!
get a course
It is also better to duplicate the belt so that it keeps its shape. Fold inside out and iron. Next, fold the placket along the ironed fold and stitch it.
Fasten the belt where the top of the bar is located, so that its edge protrudes beyond it by 1 cm.
Distribute it over the entire waist section, secure with pins and sew.
The seam should be on the wrong side. Fold the waistband lengthwise with right sides facing in and sew the edges together.
Turn it inside out so the seam is on the inside. Sew the loose edge of the belt on the wrong side.
All that remains is to make loops for the buttons and sew on the buttons themselves.
It is easier to do this using a machine, but manual formation and processing of loops is allowed.
Skirt with buttons: MK video
Pencil skirt with front slit and vertical flounce
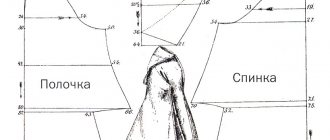
For such a model, you first need to create the basic pattern of a pencil skirt with your own hands or download it on the Internet for your size. For example, on Anastasia Korfiati’s website you can download a skirt pattern for your size.
Next, let's look at modeling this pencil skirt model for beginners.
We copy onto tracing paper the front of the skirt in a full spread - see drawing.
For a pencil skirt with a slit, draw a vertical line and cut the pattern.
The back part for the skirt of this model does not change; we cut it out of 2 parts according to the basic drawing.
To the narrower part of the front we add an allowance for the vent. Its width is 8 cm, length is 14 cm.
On the larger part of the front we draw a shuttlecock.
We transfer all the elements of the shuttlecock onto tracing paper and glue them into a common part along the long sides.
Using a smooth rounding you need to create a beautiful outer side of the shuttlecock. How to do this correctly is marked in the drawing with a blue line.
Uncover
Main fabric:
- front part – 1 pc.;
- front side part – 1 pc.;
- back part – 2 pcs.
Black cotton fabric:
- part for processing the shuttlecock – 1 pc. (in blue in the drawing);
- belt – 1 pc. (length is FROM + 4 cm for the clasp, width – 7 cm).
Don’t forget to take into account seam allowances of 1.5 cm and hem allowances of 4 cm. We reinforce the waistband with thermal fabric, cut without allowances.
How is this model sewn?
We fold the large front piece and the piece of black fabric for finishing the flounce with the right sides inward.
We baste their outer edge and the outer edge of the slot. We sew together the details, cut off the allowances, and turn out the flounce. We sweep the flounce along the edge and iron it.
We process the side of the front part with an overlocker, tuck an allowance of 4 cm onto the vent, and baste it.
Place the central part of the skirt on the side, aligning along the line and basting.
We adjust along the alignment line to the slot.
Sew a zipper into the back seam. Baste and sew the side seams.
We turn the seam allowance at the bottom to the wrong side and sew it by hand with a blind seam.
We lay the slot and sew it with a hidden seam.
We sew the lower part of the flounce along the longitudinal side to the skirt with a hidden seam.
We sew in the belt and sew on the hook for the fastener.