Creating a basic dress pattern with sleeves is the main stage in design. But also the most difficult, especially for a beginner. Today I will show you step by step how I build a pattern, and, as always, I will try to make it clear and visual. I wish you that by the end of this master class, each of you will have your own basic pattern for a dress with a sleeve!
If you don’t yet know how many advantages and opportunities such a pattern opens up for a tailor, I’ll tell you now.
An individual pattern improves the quality of the product’s fit, reduces or completely eliminates the number of changes made during fitting, and also minimizes the number of fittings to one. At first, my clients were surprised that I invited them to try on only once, since they were used to running to the studio three or four times, but my method is about quick and simple. I am a lazy person by nature, and if I can simplify or automate something, I will definitely do it.
Why do you need a basic pattern?
- Ready-made patterns are made to fit a standard figure. Do you have a standard size figure? If not, create the patterns yourself. You will be able to take into account all the features of your figure - breast size, posture, hips, bulge of the abdomen.
- All patterns for different product models are obtained by modeling the base pattern. That is, having built the base once, you will then be able to sew more than a hundred clothing models using it!
- Sometimes creating something new is easier than redoing it. Correcting and adjusting a finished pattern will take no less time than making a new pattern.
- It happens that you want to sew something for which there is no pattern. For example, you saw her in a store, in a photo or to an unfamiliar girl.
- Even if you use ready-made patterns from magazines, you can adjust the product if you only know the principles of design, that is, you know what to adjust and how to do it. And in the basic pattern, changes after fitting are minimal and even a beginner in sewing can cope with them, or are completely reduced to zero.
Well, do you also want to make your sewing easier? Then let's learn how to build a pattern ourselves.
What is a pencil dress?
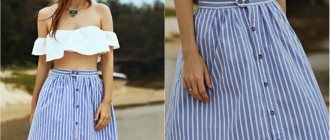
The classic pencil dress is a narrow, straight dress without a collar and with a rounded neckline at the chest. It perfectly emphasizes all the advantages of the figure and looks appropriate in almost any situation.
Many women spend long hours in shopping malls trying to find a unique dress that fits their body perfectly. The cut of such a product is quite simple, so it is not difficult to sew it yourself, with accuracy and patience. As a result, you will receive a unique outfit that only you will have and will become an indispensable attribute of everyday life.
The pencil wedding dress has become widespread. This elegant style looks appropriate at a celebration, emphasizes the figure favorably and does not distract attention from the bride. If you want to sew a pencil dress for a wedding, you can use the classic pattern below as a basis.
What design methodology will I use?
In design I use the EMKO method. It stands for the Unified Method of Clothes Design, it was invented back in the Soviet era, it is time-tested and is still successfully used in their work by leading ateliers and fashion houses.
In fact, there are many technologies in design - this is the English system, Muller and Son, TsOTSHL and others. And in the end, when building according to one of them, a pattern is obtained for the model that is planned. But from the height of my many years of experience, I can say that the best technique is experience! Only by trying and experimenting, constantly working and learning new things can you find the very system for creating ideal patterns.
The design method is a tool in the hands of the tailor. Therefore, you can not stop at one system, take for yourself the best from each and draw on something new.
Therefore, I advise you not to sin on the methodology; if your product does not fit your figure perfectly, analyze your work, perhaps you made mistakes in the calculations.
Features of choice
First of all, flounces should look harmonious with the overall image. Too much frills will create a shapeless look, devoid of taste.
Let's consider the main types of models:
- a sheath dress is a stylish and effective option, quite appropriate even for a business meeting;
- a long evening dress is a solution that emphasizes sexuality and romanticism. This could be a dress in the style of a fish, with frills not only along the sleeves, but also with a flounce at the bottom of the dress.
- a dress with one long sleeve and a two-layer flounce looks original;
- loose-fitting beach dress with flounces - asymmetrical finishing of leisure clothing allows you to diversify styles and add elements of mischief.
To sew a dress with a flounce on the shoulders, we will need to learn how to model a pattern. It's not as difficult as it might seem at first. Shall we begin?
Increases in looseness of fit for the basic dress pattern
Before you start building the base, you need to know that the measurements in the pattern are not laid out “clean”, but with increases. What are these meanings? The increase is a value that determines the freedom of fit of the product. Here we will take increases designed for maximum fit, that is, for a dress.
Increases in calculations are indicated with the prefix - P. In my construction, the following types of increases will appear:
- PG - increase in chest - 3 cm.
- Fri - increase in waist - 1 cm.
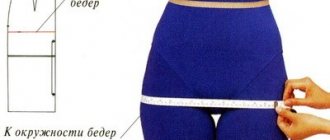
- Pb - increase in hip circumference - 0 cm.
- Pspr - increase in armhole freedom - 2.5 cm.
- Pore - increase in sleeve girth - 4 cm.
- Pshs - increase in back width - 1 cm.
- Pshg - increase in neck width - 1 cm.
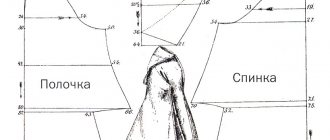
In the figure you can clearly see how the increase in Pspr determines the level of fit of the sleeve along the armhole. Depending on the value of the increase that you choose when constructing, it will depend on which sleeve you get in the finished product.
Sheath dress pattern
It is very easy to make a pattern with your own hands . First you need to find the right tools:
Graph paper.- Ruler.
- Roulette (centimeter ruler).
- Pencil.
- Eraser.
- Scissors.
- Calculator.
- Tailor's pattern.
Now you will need measurements for construction.
Here you see some explanations . They mean half-girths:
- Sat - hips.
- Ssh - neck.
- St - waist.
- Сг1 - the first half-circumference of the chest.
- Сr2 - second half chest circumference.
- Cg3 - third half chest circumference.
Now we measure the length:
There are also length notations here:
- DTP - the length of the shelf to the waist.
- Dts - back to waist.
- Di - products.
- DP - shoulder.
Next we measure the width:
Width designations:
- Shs - backs.
- Shg - breasts.
- Shp - shoulder.
Then we measure the heights:
Height designations:
- Vpkg - shoulder height oblique chest.
- Vpks - shoulder height oblique back.
- Vg - chest height.
Shelf calculation
10. T3 A3 - traffic accident measure up.
I draw a horizontal line through point A3:
Neck width = A0 A2 (from the back drawing) – 0.5 cm.
A3 A5 - Neck depth = A3 A4 + 1 cm. I build a rectangle and use a pattern to create a round neck.
11. G3 G6 - measure Tsg, through point G6 I draw a vertical line to the waist line, at the intersection of the lines I get point T6.
12. From point A4, using a measuring stick Bg, I make a notch with an arc on the line G6 T6. I get point G7 - the center of the chest. It can turn out either above or below the chest line, or it can intersect with it, it depends on the type of figure.
13. Bust dart opening (point A9):
A4 A9 = 2 (Shg2 – Shg1) +2
At the intersection of these two dimensions: the segment (A4 A9) and the segment (G7 A4) - I get point A9.
14. Shoulder cut (A9 P5):
I get point P5 by crossing the Vppk measure from point G7 at the intersection of the Shp measure from point A9.
I connect point P5 with point A9 and get a shoulder section of the shelf.
15. Armhole shelf
G4 P4 = G4 P5 along an arc from point G4
Shelf control point (P6)
G4 P6 = G4 P4 / 3
Bisector (G4 2) = Bisector from the drawing of the back (G1 1) – 0.5 cm.
P6 P5 I connect a straight line and divide the resulting segment by 2 - I get point 3. From point 3 I put up a perpendicular of 0.5 - 1 cm. I connect points P5, P6, 2, G2 with a smooth curve - I draw the armhole of the shelf. I remember that the angle at point P5 is 90
Darts
Calculation of darts = (segment T T3 – (St + Pt))/ 4.
I distribute the resulting difference between the back and front details in the waist and side darts.
The center of the waist dart on the back runs in the middle of the segment G G2, the descent from the chest line G G3 is 4 cm down, the descent from the waist line T T1 is 10 cm down
The center of the dart along the front runs along the center of the chest G6 T6, the descent from the chest line G G3 is 4 cm down, the descent from the waist line T T1 is 12 cm down.
In order to construct side darts along the hip line, you need to calculate the difference using the formula: segment BB3 - (Sb + Pb). We divide the resulting value (it can be either positive or negative, it depends on the type of figure) in half.
And with a positive value we retreat along the line of the hips of the back to the right, and along the shelf to the left. For a negative value it's the opposite. In the figure below, the side slices intersect, which means I got a positive difference.
If the value is zero, the side darts meet at one point.
With a negative value, the side darts are located further away from each other.
One shoulder dress without pattern
One shoulder dress without pattern
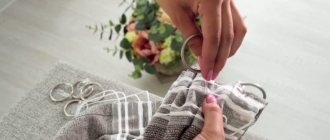
It doesn’t take much effort to sew a hoodie dress like this. The principle of operation is shown schematically on paper below.
On a rectangular piece of fabric folded in half, round off the ends
Cut the neck
Make a side seam with a hole for the belt
Round the edges and hem the bottom
Make a side seam with a hole for the belt
Sew a strap onto an open shoulder
The dress is ready!
Construction of a drawing of a straight set-in sleeve
The construction of the sleeve also begins with drawing the mesh.
01. Sleeve hem (O1 O2):
In the drawing of the shelf and back, I connect the end shoulder points P1 and P5, divide the resulting segment in half, lower the perpendicular down to the chest line G G3. I measure the length of the resulting segment - a perpendicular.
The height of the sleeve cap (O1 O2) = the resulting segment minus Pspr (increase in armhole freedom) minus “Value for the development of the deltoid muscle of the arm”:
- for sizes 44 - 46: 2.5 cm.
- for sizes 48 - 52: 2 cm.
- for sizes 54 - 56: 1.5 cm.
02. Sleeve width (O1 P1) = O1 P2 = Measurement Or + Pore (increase for sleeve girth)/2
O1 Рп = segment O1 Р1 /2
O1 Рл = segment O1 Р2 /2
03. Sleeve length (O2 M1) = Measurement Dr. I draw horizontal lines left and right and get points M2 and M3.
03. Rp 1 = G4 P6 (control point from the shelf drawing). From point 1 I move 0.5 cm to the right and place point 1'
04. RL P3 = G1 P3 (control point from the back drawing). From point P3 I move 0.5 cm to the left and place point P3'
05. I connect P3' and P2 with a straight line and divide them in half. I get point 4. From point 4 there is a perpendicular (1-2 cm)
06. O2 O6 = O2 O4 / 2
O6 and O3 are connected by a straight line, O6 (3) is the bisector of the angle P3' O6 O2 = 1 – 2 cm.
07. O2 O5 = O2 O3 / 2 + 2 cm, set aside the resulting value from O2 to O5.
I connect O5 and 1' with a straight line, O5 (2) - the bisector of the angle O2 O5 1' = 1.5 - 2.5 cm.
08. Рп 8' = bisector from the drawing of the shelf armhole (G4 2) + 1 cm.
09. I draw the okat line by smoothly connecting the points: P2, P3', 3, O2, 2, 1', 8', P1.
The drawing located to the left of point O2 is the back of the sleeve, to the right is its shelf. The control point, the center of the O2 sleeve, is transferred 1 cm to the shelf.
After constructing the sleeve, it is necessary to check the length of the collar. It should correspond to the length of the armhole from the base drawing + (1 - 1.5 cm) for fitting.
This completes the basic pattern of a dress with a sleeve, step by step instructions. I hope you were able to figure out all the calculations, and you got your own pattern, which you can now use to sew more than a hundred models of things, and they will fit your figure flawlessly!
First fitting
Before fitting, pins are pinned where they are needed. Points oriented vertically point downwards, horizontally - to the left. The place of the fastener is chipped off, then the outfit is straightened. Measure the lines of the bust, waist and hips, check all seams. Make sure that the neckline is smooth and has sufficient depth. The darts are also checked.
Particular attention is paid to the armhole and sleeve cap, since most often these are the places that turn out to be skewed. If there are any shortcomings, corrective lines are applied for new seams. They check whether the sleeves and the entire outfit are long enough. During the first fitting, the collar is attached, if provided in this model. When the dress is put on, mark the places where the pockets will be located. After all checks, the dress is removed and the seams are sewn.
My online cutting and sewing courses for beginners
My core principles are honesty, openness and caring for my students. I am 100% confident in the quality of my product. Today in my sewing school “Beloshveika_school” there are three directions of teaching cutting and sewing for beginners in online format:
1) Design - this course is suitable for those who want to learn how to create patterns and take measurements of a figure. To successfully pass here you do not need to be an ace in drawing or have any special skills, the information is presented easily and simply
2) A basic course in cutting and sewing is the basics. I suggest taking it to all beginners who are in search of sewing knowledge and don’t know where to start. This course was pieced together from my offline (live) sewing courses, which I have been teaching in the city of Ufa since 2014. I know at what stage students may have difficulties, so I can help you
3) Course on sewing pajamas and underwear This course was born in the process of working on master classes on home clothes, when I saw that my interest in it deserves separate training. In this course we sew using ready-made patterns, so it is perfect for complete beginners who are still afraid to delve into the processes of constructing patterns. Honestly, you can even take this course with your children, because it is interesting, and you can get results very quickly!
Step-by-step sewing instructions
Before sewing a dress, you need to choose the right material. It is recommended to give preference to linen, knitted, cotton and suiting fabrics. These options are distinguished by their density, which will allow the product to maintain its shape. Warmer materials: drape, boucle and knitwear, and the thinnest materials suitable for the warm season are chiffon, silk, linen and cotton.
Sheath dress made of natural fabric
When the pattern of the product is ready, you can start sewing the product. To work you will need to take:
- main fabric 2×1.5 m;
- lining fabric 1.5×1.5 m;
- hidden zipper;
- a sewing machine with a special foot;
- threads;
- scissors;
- pins;
- chalk or bar of soap.
It is best to take extra fabric, as a small part of it will be used for allowances.
Progress:
- Sew lining material to the main fabric.
- Place the top and bottom parts right sides together and connect the darts, tucking the fabric inside.
- After this, you need to sew the parts of the bodice and skirt together.
- Sew the zipper fastener.
- Finish the neckline and armholes. To do this, you need to apply a facing to the front side, then align all the cuts, first baste, and then stitch.
- Iron the product.
You might be interested in this: The procedure for sewing up the volume of bras and swimsuits
Attention! It is not recommended for beginners to attempt to cut out and sew more complex versions of the product. It is best to go to a salon and entrust the work to skillful, experienced hands.