The ability to work with complex and simple fabrics reveals the skill of a seamstress. One of these materials is guipure. However, the myth of his capriciousness is exaggerated. It is possible to cope with it. It is enough to know some secrets.
Unlike silk or satin, it does not crawl under your hands, and is not as thick as wool or denim. Here lace flowers, leaves, patterns seem to be woven into a mesh. And this mesh should look neat when sewing both outside and inside. Let's learn how to work with this fabric.
How to process guipure?
On almost all fabrics, seam allowances are processed using an overlocker. And those who have not yet purchased this technique process the cuts with a zigzag. Some materials are sewn with a backstitch, in which the edges are not visible at all.
Simply wrapping the allowances of guipure will not work due to the nature of the material. You can do it differently.
- Double or closed seam. In this case, the allowances will not be noticeable. From the inside out, the product looks neat. But with such tight seams, a dress or blouse can seem rough.
- Using color-matched bias tape or ribbon. The sections are wrapped with ribbon or bias tape in the color of the material and stitched. The fabric does not fray and looks neat. Bias trim made of chiffon or organza will be almost hidden from the front side.
- Zigzag or overlock can sometimes also be used to process seam allowances. This is true if the lace elements are located on a high-density mesh. After the final fitting, reduce the allowances by 3-5 mm relative to the seams and process them.
Sometimes you can sew two parts by overlapping each other. Guipure is cut out in scallops along the lace fragments and also stitched along them in a zigzag pattern. To prevent the fabric from stretching, you can put thin paper (tracing paper, tissue paper) on the inside, and remove it when finished.
Elegant dress with a fluffy tulle skirt and a cutout on the back
Children's fluffy tulle marshmallow dresses are the best option for any holiday! Sewing a dress based on our lesson will not be difficult - you just need to have basic sewing skills, as well as download and print a life-size top pattern. If you want to make things even easier for yourself, trace your daughter’s neatly laid out blouse on paper. On the back piece, draw and cut out a heart by hand. That's all, the baby dress pattern is ready. All that remains is to transfer the paper pattern onto the fabric, add seam allowances and cut out;)
For work we will need the following tools and materials:
- 50 cm satin;
- 50 cm cotton fabric for lining;
- 1 m of tulle to match the fabric for the skirt;
- lace for top;
- hidden zipper;
- threads;
- pins;
- sharpened scissors;
- pencil or chalk;
- beads and seed beads for decorating the finished product.
Sewing elegant dresses: master class
Stage one
Since we already have the pattern for a fluffy dress for a girl, let’s proceed to cutting out the parts of the base and lining. This can be done individually or in a “sandwich” by putting all the layers together, pinning them with pins and cutting them out at once (in this case, the scissors must be really sharp, as the satin and lace can fray).
The bodice detail in our dress consists of a base, lining, lace and four layers of tulle. In our case, such a number of layers of tulle is due to the desire to add brightness to the dress and match the color of the top with the color of the bottom. On the skirt we will also use four layers of fine mesh.
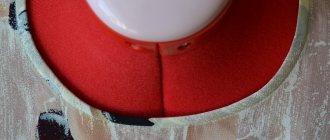
Having cut out all the layers, remove the cotton lining layer. On the base fabric (satin) on the front side we apply four layers of tulle and lace, fasten them with pins and go through the seam allowance with a machine stitch. This is what it should look like:
Stage two
Next we'll do the lining.
While the blanks for the top are not sewn along the side and shoulder sections, fold the back piece in half and cut out a heart. Don't forget to leave room for seam allowances at the top and bottom, and also remember the space from the skirt and neckline! Then we sew the shoulder and side seams and connect the top and skirt lining. At this stage, be sure to try on the blank!
The left side seam was left unstitched - here we will later place a hidden zipper.
During the fitting process, we carefully examine the fit of the product! In our case, the armhole was enlarged and the neckline was trimmed.
Next, we connect the lining to the front part of the bodice along the neckline. Turn it inside out and stitch along the lining by 1-2 mm.
This is what our dress looks like at this stage:
Stage three
It's time for the armhole.
If you plan to add any additional decor (wings, sleeves, ribbons), this should be done now. Sew them to the front side of the bodice and only then proceed to join the face and lining fabric.
Below we offer two options on how to do this.
Option one: we turn the front part and the lining inside by the width of the allowance. Then we connect the pieces along the armhole either manually with a blind seam or using a sewing machine. This method is simple and fast enough, suitable for beginner craftswomen.
Option two: shown below in the photo.
So, first we fold the face with the face along the shoulders and armhole.
Then we sew a machine stitch, as far as the sewing machine will allow you to do it (about half of the armhole).
We fasten, take out the workpiece and again pin the area that was not sewn on the machine.
Now the most difficult thing is to connect the rest as carefully as possible, making sure that the machine does not jam the layers (to do this, hold them and pull them slightly).
Stage four
At this stage, what remains is essentially processing and assembly: we go over all the raw cuts on the skirt along the lining and on the front side using an overlocker, and also begin to assemble the front skirt from tulle.
Let's assemble the tulle layers each separately to get the fullest possible skirt right from the waistline.
This is what we get in the end. Lightly tighten the thread, gathering the skirt until its top is equal to the bottom of the bodice (the stitching line of the skirt with the top).
All four layers:
Using an additional stitch, we first connect all the gathered layers of tulle together, and then we connect the finished tulle skirt with a satin base.
We sew the front top and tulle skirt, folding them with the right sides inward. We sew in the zipper along the side cut.
Stage five
Now let's work on the heart on the back part. We connect the front fabric with the lining along the neckline in the same way as the armholes. We stitch with a connecting seam, put notches and stitch along the lining.
Sew on the bow and button.
We decorate the shoulders with wings. To do this, we need to fold the tulle into several layers and cut out circles from it, fold them in half and in half again, sew two such parts on each side.
We decorate the middle of the wings with beads and beads. This way we also additionally fix the twists and close the stitches with which they were sewn.
Next, fold the bottom of the skirt and stitch it.
Fluffy dresses for girls can also be decorated along the front by adding, for example, a removable collar or belt.
That's it, the dress is ready!
How to glue guipure?
Guipure, like any other textile material, can be glued. It all depends on whether you need to do it for a while or so that it lasts for a long time.
- For temporary gluing, you can use weak-hold glue, a regular glue stick, or water-soluble interlining.
- For a longer time, use cobwebs and textile glue. However, it should be noted that these methods are only suitable for guipure, which does not stretch. Stretch guipure, firstly, will lose its elasticity, and secondly, it may tear at the place of gluing.
How to sew guipure with a covering?
Most guipure products are sewn on a lining or cover.
Tip: choose a model with a minimum of seams, and move the darts to an inconspicuous place. If the cut is not complex, the same parts are cut from the lining fabric as from the main one. A dress sewn, for example, is folded right side to the wrong side of a lining cover, sewn along the neckline and the bottom of the sleeves. Next, it is turned inside out and, if necessary, sewn to the edge. If the cut is complex, then patterns made from lining fabric are simpler than those made from guipure. There is another, more labor-intensive way.
- Connect the guipure and lining parts.
- Sew the product.
- Finish the neckline: with a facing, bias binding made of satin, lace or organza, or fold and stitch.
- Process the bottom of the sleeves and hem.
Fluffy dress for a 1 year old girl
For work we will need the following tools and materials:
- cotton fabric – 70 centimeters;
- satin fabric - 20 centimeters;
- lace – 20 centimeters;
- tulle that holds its shape well to match the fabric - 2 meters;
- soft tulle – 2 meters;
- satin cord – 20 centimeters;
- satin ribbon for bow – 1 meter;
- paper for patterns;
- pencil;
- sharpened scissors;
- pins;
- needle;
- sewing machine;
- threads to match the fabric.
DIY children's dress: master class
Stage one
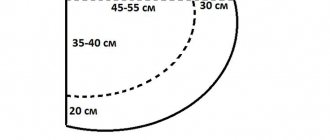
Let's start with the cut. For a one-year-old girl, we recommend finishing the top of the dress not at the waistline, but a little higher. Taking into account the seam allowances, we create a length of 18 centimeters, a front and back width of 27 centimeters each, and a shoulder width of 6 centimeters. We suggest finishing the armhole at half the height (9 centimeters).
Next, cut the piece of tulle into strips of 50 centimeters.
For the lining of the skirt, we cut it 12 centimeters wider than the front and back, since we will add folds - 6 centimeters each.
On the back parts, along the bottom of the blanks and in the center, we put two loops on each side - this will be lacing. With it you can adjust the fit of the dress at the waist.
Then we sew the back blanks from satin and cotton fabric along the central seam, folding the blanks with the right sides inward. Turn it inside out. We place a lace blank on the front side of the satin blank and stitch along the edge.
We connect separately the shoulder and side seams on cotton fabric, shoulder and side seams on satin + lace details. Iron the seams.
Stage two
We turn the top of the future dress inside out so that the front side of the lace and cotton fabric is inside. We use a sewing machine to sew all three layers along the front neckline. We already connected the back a little earlier. We grind along the armhole in the same way.
If you have just recently started sewing clothes and are afraid of getting lost in the layers, choose a simpler option: edge all the layers together with bias tape.
We will sew a petticoat from two pieces. We connect them on the sides using an overlocker and sew a straight line. We fold the bottom edge, iron it, fold it again and sew a straight line.
We sew two pieces of tulle together. As a result, we will get two circles from tulle that holds its shape well and two more from soft ones. We sew a line along the top with the longest stitches possible, then tighten the thread, adjusting the bottom to the top.
To hide all the seams, we sew the tulle face-to-face up in lace and satin, and the cotton petticoat face-up in cotton. This is what we get:
Having sewn all the layers, we cut out a droplet on the skirt in the center back. We turn the skirt inside out so that the front side of the tulle and cotton fabric is inside, and connect them along the edge. Pull in the lacing and the tulle dress for the girl is ready!
How to sew guipure on a machine?
You can sew parts together in different ways.
- Straight stitch, selecting the optimal stitch length and presser foot pressure.
- Zigzag - especially stretch fabrics.
- The method of superimposing one element on another.
- Double seam with closed cut.
For sewing non-stretch fabric, needles No. 75-95 are suitable, depending on the density of the material. And stretch guipure should be sewn with special needles for stretch or superstretch No. 70-80. Guipure is a delicate fabric. However, it is quite possible to master the intricacies of working with it.