Everyone can become Santa Claus. Bring gifts, listen to poetry, sing together about the Christmas tree. How to make a holiday unforgettable? Dress up like a real Santa Claus! You can sew the costume yourself.
This article is intended for persons over 18 years of age
Have you already turned 18?
What's New Year without Santa Claus? That's right, none. He always comes to the holiday - handsome, cheerful, with gifts. We remember his outfit from childhood. And how it will be in the children’s memory depends on you.
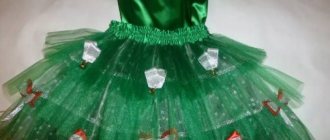
Is it possible to sew an outfit with your own hands? Certainly! You need fabric, a sewing machine, a little patience and imagination. You can choose a traditional style - a red and white long fur coat, mittens, a staff, a hat, but you can change the traditions. If you connect individual parts, you will get a creative Santa Claus that will be loved by adults and children. Watch a master class on how to decorate the clothes of Santa Claus, and children will definitely remember this guest!
If you are not a seamstress, you will need more time to prepare and work. Don’t be afraid of this - any work is rewarded, and the joy in the eyes of the kids will definitely justify the time spent.
Don’t forget to try on and make adjustments at every stage - correcting a finished suit is much more troublesome.
What's the best way to proceed? Make a step-by-step plan:
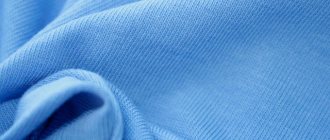
- Decide what material to sew from. Traditionally it is a soft, velvety red, blue or light blue fabric. Satin, corduroy, satin or velvet will do the best job of disguising a relative as a Grandfather. Don't forget about the fur trim.
- When you choose what fabric to make your outfit from, determine the measurements. Take measurements of the person you are sewing for.
- Draw a sketch and make patterns based on it. Don’t skip this stage, even if you’ve been sewing suits all your life—for a costume to be successful, you need to work out all the details exactly.
- Make a pattern. Cut the fabric and baste all the parts by hand.
- Try on the suit - only after that sew the seams with a machine.
- Let your imagination run wild and decorate your fur coat. It’s better to do this yourself to add individuality to the finished image.
- To prevent your clothes from falling open at the most inopportune moment, take care of the fasteners in advance - sew on invisible internal buttons or make a traditional wide belt.
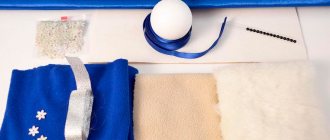
What can be used to decorate a Santa Claus costume:
- white faux fur;
- shiny braid, lace;
- rain, tinsel;
- ready-made snowflakes;
- beads, sequins.
You can attach this with threads or hot glue. A flickering grandfather will look unusual - a battery-powered garland will come in handy. It can be wrapped around a staff or along the hem and collar.
The staff and bag give the main fabulousness to the image, carrying the New Year's mood. The easiest way to act as a staff is to use a stick, for example, from a broken mop. Just a few steps and it turns into a magic staff.
- The real staff is white. Therefore, the stick needs to be painted or covered with white paper. You can use a roll of window covering paper for these purposes.
- Place a star or light on the top of the staff. This can be a ready-made luminous element (for example, a children's wand) or a star (snowflake) made independently from foam, plastic or paper. Rhinestones, stones or a light bulb can serve as decoration.
- To top it off, the almost finished staff is decorated with snowflakes, tinsel, patterns or stones. You can come up with a design yourself or choose from ready-made solutions.
The holiday will not begin until Grandfather has a bag of gifts hanging on his shoulder. It's not difficult to sew. Use the fabric from which you sew a fur coat or buy red satin separately. A beautiful lace, sparkles, snowflakes, any tinsel - and a bag of gifts shines better than any gift!
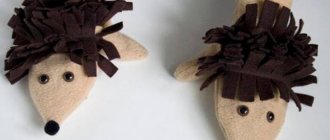
Don't forget to sew a hat and mittens! Decorate them with patterns in the style of the fur coat. And of course, a New Year's look wouldn't be complete without a beard.
A beard can be made from different materials:
- from cotton wool. There are two ways: roll the balls, then glue them onto a paper base, or carefully disassemble the cotton wool into fibers and stitch it to the fabric base - the beard will look like a real one;
- from paper. It's simple: cut out a semicircle, trim the edges to the size of the face of the person who will put on the beard. Make vertical cuts on the workpiece and twist the ends with scissors;
- made of wool. Blanks made of wool for felting are sewn onto the fabric base. It is easy to comb, and if necessary, it can be trimmed, so that the beard will look beautiful and resemble a real one.
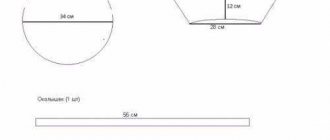
Pattern for an adult Santa Claus costume
It’s clear how to sew the details of the outfit. But how to make a pattern? This is an important part of the whole work; how the New Year’s costume will look when finished depends on its success. For the pattern you need patterns. They are made from paper based on measurements.
What parameters are needed:
- arm length and shoulder size for sleeves;
- chest volume and total length;
- waist circumference;
- distance from waist to heels;
- head circumference for a hat;
- for the mittens you can simply outline the hand.
When the measurements are received, prepare patterns from paper, attach to the fabric, cut out the parts.
You can simplify this procedure: for the pattern you will need a T-shirt or shirt, hat and mittens of the person for whom the costume is being prepared.
Trace the outline of a shirt folded in half. Widen and lengthen the sleeve in the picture. If you outline an item with short sleeves, complete the drawing taking into account the length of your arm. Next, show resourcefulness and finish drawing the hem, expanding it towards the bottom. Here, take into account the person’s height.
Draw the collar area of the wraparound fur coat. This way you will have half of the clothes ready on paper. Then everything follows the same pattern - transfer it to the fabric, then cut it out. You will receive a hat and mittens using the same principle.
How to sew a Santa Claus costume - coat
For such a robe you will need to prepare:
- Red or blue fabric, threads.
- Fabric in white color or with a golden, silvery sheen for finishing.
- Faux fur for covering the product.
Instructions for sewing a coat:
- Start with a pattern. For this outfit, you will use a regular dressing gown pattern. By the way, if you have one, then you won’t have to sew anything; it will be enough to decorate it with various patterns or snowflakes made of fabric or other materials, for example, foil.
- After constructing the robe pattern, transfer it to the fabric, and do not forget to leave 1-2 cm for seam allowances.
- Cut out the details of the robe. Sew the front parts of the product and the back.
- Then sew on the sleeves.
- Finish the seams with a zigzag stitch on your sewing machine.
- Next, sew the belt. And trim the edges of the coat with faux fur. Form a collar from the same fur.
- In the end, all that remains is to show your imagination and decorate Santa Claus's coat with intricate patterns.
How to sew a hat and make a beard for a Santa Claus costume?
Even a novice needlewoman can make a hat; this headdress does not require a complex pattern. Draw a tall isosceles triangle the size of the head. Cut two of these triangles from fabric and sew along the sides. Sew the seams with a zigzag, and trim the bottom of the hat, again, with faux fur trim. Sew a bubo to the top corner of the hat.
A beard can be made using different methods and materials. Let's stick to the simplest things.
- Cut out a picture of a beard and mustache from thick fabric.
- Sew an elastic band to this material on the sides according to the volume of your head.
- Using PVA glue, glue identical pieces of cotton wool to the fabric over the entire surface.
- Wait for the product to dry, then you can put it on
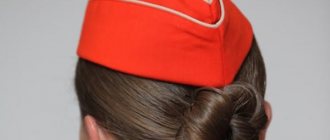
How to sew a men's Boyarka hat?
Are you looking for how to sew a Boyarka hat for a man? The process of creating a pattern, cutting and assembling a men's Boyarka hat is similar to a women's one, with one nuance.
Men's hat Boyarka
When creating a pattern for a female model, 1 cm is added to the height of the crown to add volume. The male model fits tightly on the head and this additive is not required.
DIY gift bag and mittens
It is desirable that Santa Claus's bag, fur coat and mittens be made of the same fabric or at least the same color. Sewing a bag is very simple. Fold the fabric in half, draw a large rectangle on the material, and cut it out. Sew the bag using a sewing machine. Finish the edges so they don’t fray, fold the top edge in half and sew with a regular seam. The bag is ready.
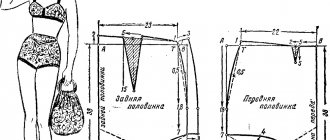
We sew the mittens according to the pattern, as in the photo below.
- Draw the pattern details on paper, then transfer them to the fabric. Moreover, make two pieces of such parts at once (for two mittens).
- Sew cut pieces C and B as shown in the picture.
- Next, sew the thumb of the mitten.
- Then sew the front and back parts of the mitten.
- All that remains is to turn the mitten right side out and trim it with beautiful patterns and make a fur edge.
After reading the article, you can create a beautiful Santa Claus costume for the New Year yourself. Or maybe you can show your imagination and make your outfit different from others.
There are holidays on which even adults feel a little like children, expecting a miracle and wanting magic. This is especially true for winter holidays - New Year and Christmas. And the main character there, of course, will be Grandfather Frost himself - a favorite of children and a long-awaited guest at every New Year's tree.
In order to thoroughly prepare for the holiday, you need not only to think through the menu or buy gifts, but also to make a Santa Claus costume with your own hands, especially since it is not so difficult.
How to sew a Boyarka hat: reviews
How to sew a Boyarka hat - reviews:
Irina : I got a chic fox collar, but I have nothing to wear it with. I decided to sew a Boyarka hat. The pattern is simple, and it took a little over two hours to sew. I didn’t build the pattern from scratch - I enlarged the pattern in the browser to the desired size and transferred it to a piece of paper. Fits perfectly!
Oksana : prepared a luxurious gift for her father-in-law - she sewed a Boyarka hat to go with his sheepskin coat with her own hands. I used suede for the crown and raccoon fur for the trim. It turned out great, my husband can’t wait to give the gift to his father for the holiday.
What does Grandfather's New Year's outfit consist of?
Santa Claus costumes can be very different, depending on the traditions of not only a particular country, but also different localities, regions and even cities. If you look at St. Nicholas, who was our forerunner of Father Frost, his outfit combines bright blue or soft blue and white colors; Santa Claus, an overseas relative, has a red suit consisting of trousers, a shirt, a vest, and a short robe or even a jacket. Also, unlike our Frost, he does not have a traditional staff.
Domestic Santa Claus dresses in rich red clothes:
- a good-quality fur coat (robe) to the floor;
- a belt or sash to tie it up;
- hat;
- boots or felt boots;
- mittens.
His suit can be of all shades of red - from bright scarlet to dark burgundy. Grandpa also sports a full white beard/mustache and long hair. Walks with a bag (with gifts) and a staff.
Before you make a Santa Claus costume, decide on the color, style and appearance of the future outfit. Next, think about what you will sew from. You can choose brocade, velvet, jacquard, satin, velor, drape, etc. Will you take long or short fur, will you make insulation for the suit (grandfather is going to perform outdoors or indoors, wear a suit on a naked body or on some clothes) - you need to answer all these questions in advance in order to understand how and what to work with.
Also prepare a lot of different decorations for the outfit: plastic snowflakes, tinsel, sparkles, sequins, beads, etc.
Pattern for a women's Boyarka hat: photo with description
Interested in the question of how to sew a Boyarka hat? First, you need to measure your head to find out the size of the future hat, and then you can proceed to the pattern of the crown and fur trim.
The Boyarka hat should be 1-1.5 cm larger than the volume of the head so that it does not put pressure, but fits well. This is important so that subsequently you don’t get a headache when wearing it, and there are no red stripes left on your forehead after wearing the headdress. So, we measure the head circumference and record the data.
For example, the volume of the head is 56 cm. Now we check the depth of the hat with your measurements in the table below. Does everything match? Let's move on to the pattern.
Table of correspondence between the volume and depth of the cap
56 cm head volume, add 1.5 cm, total - 57.5 cm. Divide this amount into 6 (6 parts) and we get the width of one part equal to 9.58 cm.
The height (depth) of the cap is 17.8 (according to the table). Since we need the hat to be slightly convex, we add 1 cm. The total height of the pattern is 18.8 cm.
Boyarka hat pattern
The height of the pattern is divided into two parts, the lower rectangle, and the upper - oblique smooth lines connecting at the top. The lower part is 8 cm (the width of the fur edge). It can be increased or decreased depending on the width of the fur, but not more than 1-1.5 cm.
The height of the upper part (conical) is calculated as follows: 18.8-8 = 10.8 cm. And one more detail - fur trim. In our case, we build a rectangle: the height (width) of which is 8 cm, the length is 57.5 cm. And we move on to choosing the material.
Ideas for creating an image
If you are wondering how to make a Santa Claus costume, but have never made a carnival costume before, you may need patterns (just put in child or adult sizes). They will need to be transferred to the fabric, carefully cut and sew all the parts together. Typically a fur coat consists of five parts:
- back;
- two front shelves (right and left);
- belt;
- collar.
First, sew the two front strips and the back along the shoulder seams. Then sew side seams on the wrong side. Also sew the sleeves separately, and only then sew them into the armholes of the fur coat (make sure that the sleeve fits well, do regular fittings). Lastly, sew on the collar and create the belt.
The most primitive option would be to simply process and design an ordinary velvet robe (blue or red).
Most likely, it will need to be shortened a little, the sleeves decorated with fur, the collar and hem trimmed, and a belt with white tassels added. You can also embroider the top of the robe with snowflakes, stars or other patterns, and decorate it with sparkles and tinsel.
Baby Wearing Santa Claus Costume — Image by © Bernd Vogel/Corbis
A DIY Santa Claus costume can be more solid and presentable. If you don’t want to bother with real patterns, try using the same robe or coat as a pattern for making an outfit.
If you are sewing a children's costume, do not make it bulky, reaching to the floor, because it will be very uncomfortable for the child to sit and play in it. Sew some buttons, Velcro or snaps to the edges of the floors so that they do not swing open when walking and the baby does not get confused in them. For very young children, it is better to make an image more similar to Santa Claus - with pants and a jacket, since it may be difficult for them in a long fur coat or robe.
How to cut and sew a Boyarka hat?
How to cut and sew a Boyarka hat?
Of course, when wondering how to sew a Boyarka hat, it is important to understand how to cut and assemble the product.
- So, we recommend starting with fur. To ensure that the fur does not subsequently become deformed, and that the cut is even and without defects, the fur must be prepared. Place the fur, pulp side up, on a flat wooden surface (or any other surface so that you can secure the fur on it with needles or tacks).
- Moisten the fur with water so that the pulp becomes moist and elastic . Stretch it slightly (a sharp movement can tear the pulp, work carefully) and secure along the edges with buttons or needles. Let dry for at least 12 hours.
- In the meantime, you can cut and assemble the crown . Pay attention to the density (thickness) of the insulation. It should be no thicker than 0.7-1 cm. Otherwise, the hat will be hot and look worse.
- So, we cut out 6 parts each from the lining, insulation and top material. Be sure to add a 1 cm edge around the perimeter.
- We sew all the shares together, steam them with an iron and steam (preferably on a blank, if not, a three-liter jar covered with a towel or blanket, depending on the size required).
- At the top we make a securing stitch that will connect the lining, insulation and outer material. Try to make the stitch as hidden as possible and bring the rest of the thread to the seal to disguise the seam as much as possible.
- We bend the edge of the base of all the parts so that they look inward. In this case, bend the insulation to one side of your choice, it does not matter.
- Let's return to fur. It is already dry and when the buttons are removed it remains in the same position without shrinking. Place the pattern on the pulp and trace it with a gap of 0.5 cm.
- We remove 0.5 cm of fur around the perimeter, without touching other places, so that bald spots do not form. It is convenient to work with a blade or hair clipper. Take your time when working with expensive material.
- On the crown we measure the height of the upper edge of the trim and make a schematic outline. We sew the fur around the perimeter so that the trimmed edge of 0.5 cm is hidden inside. When sewing, we take fur, the material of the top of the crown and insulation. We make sure that there is no great tension or, on the contrary, “bubbling”. We sew the ends of the fur.
Boyarka hat with fur crown and three-tail decor
- If the fur is thin, you can resort to tricks. Insert a sealant made of batting or padding polyester between the crown and the fur, thereby giving the fur edge volume.
- We sew the lower edge of the crown material to the fur, fold the edge and sew it with insulation and lining. This way, all the edges on the hat will be hidden, and the product looks perfect.
- We put the hat on the blank again and, if necessary, go through it with a stream of steam (carefully so as not to deform the fur). The Boyarka hat is ready!
Let's get down to details
After sewing the main component of the image - a luxurious fur coat, you can move on to other details, without which Santa Claus will be completely unreal.
For shoes, you can choose ordinary black boots, shoes or felt boots and decorate them with tinsel or fur. If you are preparing a slightly shorter fur coat, look for white shoes (they will also need to be decorated). You can use the most ordinary mittens or gloves (according to the color of the suit - red, white, blue).
Grandfather’s hat also varies. As a rule, it consists of several parts:
- top part;
- bottom;
- band.
The band is made of thick paper or highly starched cotton fabric. It will need to be sewn to the hat so that it holds its shape better.
You can also make a hat in the form of a cap with a pompom at the end (cut an isosceles triangle from the fabric and sew it, insert a lining made of thin synthetic padding).
The bag can be made from a simple pillowcase (although it must be the right color). It is easy to cut it in the form of a regular rectangle, you just need to make a drawstring for the ties at the neck. Be sure to decorate the bag in the same style as you did the Santa Claus costume.
A magic staff can be made from a mop, a wooden handle, or a long plastic stick. It will need to be painted with silver or gold paint (aerosol spray), wrapped in foil or satin ribbons, and supplemented with tinsel, sparkles, silver braid and rhinestones. You can attach a star to the top (cut it out of thick packaging cardboard and paint or decorate it in the same way). To create a miracle for children, wrap a garland of light bulbs around the staff and hide a box of batteries or a remote control in your pocket.
All that remains is to make a magnificent beard and mustache for my grandfather.
In a similar way, you can make a beard from felt, padding polyester and paper. Particularly experienced grandfathers apply complex makeup and use real false parts. If you wish, you can also paint on your cheeks and nose, and draw in your eyebrows. Of course, the child most likely does not need this. You can complement the look (in the Western style) with glasses, a smoking pipe and other small accessories.
As a rule, Santa Claus is portrayed by a father or another adult relative, a man. This is not difficult, but the problem with the costume is that you need to get it somewhere, there is no point in buying it - the holiday is once a year, and at the box office all the costumes are booked a couple of months in advance. What remains? That's right - sew a Santa Claus costume yourself! And believe me, it's not that difficult. The main thing is to approach the matter soberly and without unnecessary fear.
DIY Santa Claus costume: exploring options.
Buy a Santa Claus costume in the online store My-Karnaval.ru
Sew a Santa Claus costume with your own hands
First, let's decide on the components of the costume. The most important thing, of course, is the fur coat. Yes, a fur coat - long, red or blue, with white fur, maybe with silver patterns. And definitely - with a sash. You also need a hat, made of the same material as the fur coat. Also - a bag with gifts, a staff, mittens and felt boots. And a beard.
There are usually no problems with felt boots, a staff and a beard - you can buy felt boots and fit a long pole under the staff, wrapping it in shiny paper. You can buy a beard ready-made, fortunately, there are a lot of carnival beards before the New Year.
For a full-fledged Santa Claus costume, all that remains is a fur coat and a hat. And it will have to be sewn.
To sew a Santa Claus costume you will need:
Pattern. You don’t need to immediately think that patterns are difficult, imagining incomprehensible patterns in magazines like “Burda”. There is nothing complicated, at least in Santa Claus' fur coat. Because a men's bathrobe is perfect for the pattern. Well, why not a fur coat? And for the hat and mittens, by the way, the pattern is very simple, even a child can handle it.
Material. Yes, a fur coat needs to be made from something. We buy fabrics - you can use velvet or velor, or you can use brocade or satin. And definitely - faux fur with medium-length pile, for the hem and collar. Plus different finishing materials, if you suddenly want to make your fur coat absolutely chic. Plus - lining fabric for fur coats.
Sewing accessories, in particular a sewing machine. There’s no way without her. And yes, a little time and diligence.
DIY Santa Claus costume pattern
So, the pattern. As mentioned above, the best option is to take an old men's bathrobe and use it as a pattern. So you don’t need to fuss with the cut, and you don’t need to guess with the sizes either - Santa Claus’s fur coat will fit just perfectly.
What do we do with the robe? In general, it is better to carefully tear it apart into separate parts. This way you will get a full-fledged pattern, which, by the way, will come in handy in the future (suddenly you want to sew a bathrobe for your husband).
You can not rip the robe, but carefully fold it along the seams and transfer the contours of the details onto the fabric. It's up to you to decide.
Now we lay out the purchased fabric and carefully lay out our parts on it, facing the wrong side. We trace the outline with chalk and then cut it out.
Then we transfer the pattern onto the lining fabric, but in a “mirror” fashion, that is, inside out to inside out (because the lining has seams inward, not outward).
So we have two sets of parts. Each set is sewn together in the same way as it was sewn in the “original”. We try it on, if everything was done correctly, no adjustments are required. You can scribble.
After the fur coat itself is sewn, we move on to finishing. Fur should be used to trim the hem and collar of the fur coat. To do this, we cut out a strip of faux fur, about 30 cm wide. We cut out several of these years, because we need to trim the collar, hem and one hem of the fur coat with fur. The fur can be sewn on by hand or by machine - whatever is more convenient for you. Although, thanks to the pile, the hand stitch will be almost invisible, which means everything will look neater.
Sew Santa Claus' sash
Its width should be about 25 cm, and the length should be such that the sash is wrapped twice around the waist and its ends hang down at least to the middle of the fur coat. You can make the sash single-layer (that is, in essence it will be a wide ribbon), or cut the ribbon 2 times the width of the sash, fold it in half and sew it, and then turn the seam inside out.
We sew a Santa Claus hat
To make its pattern, you need the head circumference of the future Santa Claus and the height of the head (the distance from the top of the head to the earlobe). The pattern is made simply: a strip is cut out of fabric (head circumference + 1 cm, width 10-15 centimeters) and stitched down - this is the band of the hat. Next, cut out a semicircle. The width of the semicircle is equal to half the circumference of the head + 1 cm, and the height is the height of the head, plus 1-2 cm. This is one half of the hat, now you cut out the second half in the same way. We grind both parts and sew them to the band. Now all that remains is to trim the band with faux fur, and the hat is ready.
Sew Santa Claus gloves
To sew mittens without a long search for a pattern, take an ordinary kitchen oven mitt in the form of a mitten - it will become an excellent template for our mittens. Trace the pot mitt - here is one half of the mitten. We do the same for the second one. And in the same way we make two halves of the second mitten. Now we cut out the inside of the mittens - preferably from a quilted lining (such as on autumn or winter jackets). Without the inside, Santa Claus's mittens will look more like bags, and we don't want that. Well, that's it, now you can stitch.
The Santa Claus costume is ready. If you wish, you can additionally trim the suit with sequins, glass beads, and appliqués, but if you are sewing a suit for the first time, this will be enough for you.
Press release prepared by My-Karnaval.ru website