Preparation
Taking measurements on your own is quite difficult, so ask someone to help you.
To take measurements you will need:
- mirror;
- tape measure;
- clothesline or long cord;
- pen;
- paper;
- assistant
Stand up straight. Wear the underwear that you will wear under your new dress or uniform. If you are wearing anything other than underwear, the measurements will be inaccurate and the dress will be too loose.
Tie an elastic band around your waist and adjust its position while looking in the mirror. To avoid mistakes, imagine that there is a skirt going down from the elastic band. Is the waist in place? Let's continue!
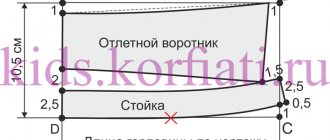
Why do you need your own pattern?
Correctly taken measurements are important to us not in themselves, but as a mathematical “given” for a reference individual pattern.
When the popular Burda magazine appeared in our country, many became hooked on these patterns. But, it must be said that things sewn using them look “clumsy”, and the styles are monotonous.
Each pattern has to be adapted to suit you not only according to individual sizes, but also to remove something from the style and add something, taking into account the characteristics of your figure or fabric.
And, most importantly, in advance how it will fit .
It is clear that the light did not fall like a wedge on Burda! But with all the delights of magazine patterns, you need a standard of your own personal base pattern , the fit of which will be impeccable.
Using your pattern, you can always compare the magazine one even before transferring it to paper.
You will soon see that it is much easier to become a little more skilled in modeling and make any patterns yourself on your own individual basis.
And in magazines and the Internet you can only look at styles and interesting cut details. Gradually, a valuable collection of what you love will accumulate around your foundation.
Using one single pattern you can sew your entire basic wardrobe!
You can see the features of my pattern making system separately HERE.
In the meantime, I’ll introduce you to a very convenient format for creating and storing patterns. I get asked about this very often.
How to take measurements for a dress?
On a piece of paper, write down in a column the designations of all the parameters listed below. Leave enough space for notes.
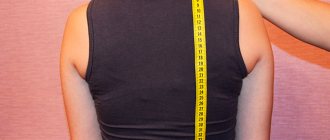
Ask your assistant to measure the volumes in the places indicated in the picture and write down his readings in your column. When you finish measuring, you can double-check to be sure.
Ask a Question
Let's start with the chest:
Og – chest circumference. We encircle the chest with a centimeter: from the back along the edge of the shoulder blades, in other words, along the line of the bra fasteners; in front - along the protruding points of the chest.
Osh – neck circumference. We measure the base of the neck. We grab it with a centimeter: from the back at the level of the seventh vertebra, from the front above the jugular fossa.
From – waist circumference. Measured at the level of the elastic band.
About – hip circumference. We grasp the thigh with a centimeter at the level of the protruding points of the buttocks.
Dpt - the length of the front (front) to the waist. Measure the distance from the waist line to the base of the neck.
Vg - chest height. We measure the distance from the base of the neck to the middle of the chest.
Ds - length of the back to the waist line. Find out the distance from the base of the neck to the waist line.
Shs - back width. We measure the distance from one armpit to the other.
DP - shoulder length. We measure from the base of the neck to the junction of the shoulder and arm.
Or - arm circumference. We place a centimeter at armpit level around the arm and measure its circumference.
Dr - sleeve length. We measure the distance from the shoulder to the expected edge of the sleeve.
Basics of taking measurements before sewing
Before you begin cutting the material and sewing the product, it is necessary to accurately measure the body circumferences required to complete this work.
By the way, taking measurements for a product is a very important process. After all, everyone knows that if mistakes are made at this stage, the product will be sewn to inaccurate measurements. And therefore, it will never fit well on the figure.
When taking measurements, it is very important to pay attention to the body structure of the person for whom the product will be sewn, since various deviations from the accepted norm are possible. Therefore, for figures with deviations from the generally accepted norm, more measurements are taken than for a typical figure. It is necessary to take into account the characteristics of the body when choosing the future style of the product, as well as its optimal shape.
The quality of the final result directly depends on the more accurate the measurements you take...
So, all measurements of a person’s figure can be divided into four groups by default:
- girths (neck, shoulder, wrist, chest, waist, hips);
- length (to the waist, arms);
- width (back, chest, shoulder);
- projection measurements (body position, shoulder height).
The first three groups are measured with a measuring tape, the fourth group is measured using a system of rulers.
The figure is measured using underwear or a light dress without large layers of fabric. Be sure to ensure that when taking measurements the person stands without tension, without changing his posture.
To correctly take measurements, as well as other related measurements, it is necessary to determine the horizontal - the reference line. It is recommended to place it at the waist line, as it is easily fixed on the figure and connected to any point on it.
To do this, tie an elastic band at the waist so that it is positioned strictly horizontally. The correct location of the elastic is checked by measuring the distance from its upper edge to the floor (from the back and front).
When designing a dress for a specific figure, the position of the tops of the front and back neckline is determined by measuring without calculating calculation formulas. In this case, the middle of the shoulder is taken as the starting line. All measurements are made with a tight fit of the measuring tape without taking into account allowances, because they will be provided for when creating a drawing of the future design in direct dependence on the fabric, silhouette, size and purpose of the product.
The number of basic measurements recommended by this method gives the necessary idea for cutting and sewing about a figure that does not have any special deviations from the standard one, both in general and in individual areas of the body.
The measurements taken are written in the following capital letters:
- O - girth,
- C - half-circumference,
- B - height,
- D - length,
- W - width,
- C - centers or protruding points,
- P - position of a point or line,
- P - height (length).
Indices, that is, small letters with capital letters, indicate measurement areas. The values of girths, lengths, heights and widths of the shoulder are recorded in full, and half girths and widths - half of this value...
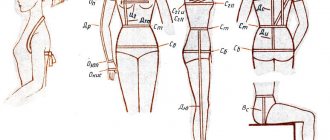
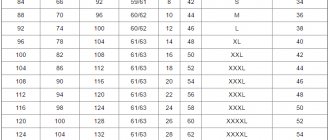
So, the size number corresponds to the measurement number on the figure.
1) Half neck circumference (POsh)
A centimeter tape is applied above the seventh cervical vertebra, from the side and in front it passes along the base of the neck and closes in front above the jugular cavity.
2) Half chest circumference first (POg1)
The tape is applied horizontally to the shoulder blades, it touches the upper edge of the posterior corners of the armpits, runs along the armpits, passes above the mammary glands in front and closes on the right side of the chest.
3) Half chest circumference second (POg2)
This measurement determines the size of the product when constructing the drawing. After the previous measurement, the tape on the back is not moved, in front it passes through the protruding points of the mammary glands and closes on the right side of the chest.
3a) Half chest girth third (POg3)
In the retail chain, this measure determines the size of the product. The tape is applied horizontally around the body through the protruding points of the mammary glands and closes on the right side of the chest.
4) Half waist circumference (W)
The tape is applied horizontally around the body along the waist line. When sewing some products, you may need to measure the full waist circumference (from).
5) Half hip circumference (HH)
The tape is applied to the buttock points, it runs horizontally around the torso, in front along the protrusion of the abdomen and closes on the right side of the torso. Sometimes you also need to measure the full circumference of your hips (Ob).
6) Shoulder length (Dpl)
Measured along the middle of the shoulder slope from the base of the neck to the shoulder point.
7) Sleeve length (Dr)
The tape is applied from the end of the shoulder seam through the protruding point of the elbow in the direction of the little finger to the hand. The arm is slightly bent at the elbow. At the same time, record (record) the length of the sleeve to the elbow.
 Arm circumference (Op)
Measured with the arm freely lowered. The tape is applied strictly horizontally. Its upper edge touches the posterior corner of the armpit, the tape closes on the outer surface of the arm. For a narrow sleeve, additionally remove the girth of the arm at the level of the elbow and at the level of the wrist, or the girth of the hand (OK).
9) Half back width (PShs)
The tape is applied horizontally over the convexities of the shoulder blades to the posterior corners of the armpits.
10) Half shoulder width (HW)
Measured between the shoulder points on the back side. The ribbon goes through the sprout. This measure is a control measure.
11) Back length to waist (Lst)
The tape is applied from the back from the waist line to the base of the neck at the shoulder; it runs parallel to the spine through the convexity of the shoulder blades.
12) Armhole depth (Gpr)
Measure from the base of the neck at the shoulder seam to the top edge of a strip of thick paper placed under the armpit. The tape runs parallel to the spine along the convexity of the shoulder blades. The end of the paper strip is taken to the shoulder blades, positioning it strictly horizontally.
13) Side length (db)
Measured on the back from the top edge of the paper strip to the waist line vertically.
14) Back shoulder height (Vps)
Determine the position of the shoulder point in relation to the waist line. Measurements are taken in two directions: along the shortest distance from the intersection of the waist line with the spine through the shoulder blade to the shoulder point (oblique shoulder height) and from the waist line to the shoulder point parallel to the spine (straight shoulder height). The measurement is written as a fraction: the numerator is the value of the oblique measurement, and the denominator is the direct measurement.
15) Half of the chest width first (ПШг1)
The tape is applied above the base of the mammary glands between the verticals, mentally drawn from the anterior corners of the armpits upward. This measure is a control measure.
16) Half the width of the chest second (SHPg2)
The tape goes along the protruding points of the bust to the verticals, mentally drawn from the front corners of the armpits down.
16a) Half the bust width (ПШб)
The tape is applied between the front corners of the armpits through the protruding points of the bust. The last two measurements are recorded together: the first number is PShg2, the second is PShb.
17) Bust Center (CB)
Measured between the centers of the mammary glands.
18) Chest height (Вг)
The tape is applied from the base of the neck at the shoulder to the protruding point of the mammary gland.
19) Front length to waist (Dpt)
This measurement is taken directly after the Bg measurement. The tape, applied to the base of the neck at the shoulder, passes through the protruding point of the chest gland parallel to the middle of the front to the tape at the waist line.
20) Length of the middle front (chipboard)
Measured from the jugular cavity to the band at the waist line. With a large bust, a thin ruler is applied to its protruding points - the tape passes through it. To control, measure the depth of the neck from the base of the neck at the shoulder to the upper edge of a ruler placed horizontally at the jugular cavity.
This measurement, added to the depth of the neck, should make up the length of the front to the waist, and it is written down in two numbers: the first is the depth of the neck, the second is the chipboard itself.
21) Front shoulder height (VPP)
Measurements are taken in two positions: from the shoulder point to the center of the bust and from the same point (the tape is not moved from it after the first measurement) parallel to the middle of the front to the braid at the waist line. Record both values.
22) Product length (Di)
The tape is applied from the 7th cervical vertebra, it goes down through the waist line to the desired point.
23) Skirt length (Du)
Measured from the waistline to the side.
24) Length in the middle of the front from the waist to the floor (Dpp)
25) Side length from waist to floor (Dbp)
26) Length from waist to floor at back (chipboard)
Measured along a line that continues the line of the spine.
Length of the skirt in the middle of the front (L). Its value is the difference between the DPP measurement and the length from the bottom of the skirt to the floor.
Back skirt length (Ds). The difference between the chipboard measurement and the length from the bottom of the skirt to the floor.
27) Length of trousers, length of trousers to the knee (Dbr, Dbrk)
Measured from the waist line along the side to the desired point.
28) Thigh circumference (About)
The tape wraps strictly horizontally around the thigh, touching the upper edge of the subgluteal fold, and closes on its outer side.
29) Seat height (Sun)
The person whose figure is being measured must sit on a chair with a flat, hard seat. Measure along the side from the waist line to the seat of the chair.
30) Seat length (Ds)
The tape runs from the front waistline through the groin to the back waistline.
31) Step length (Lw)
Measured along the inner surface of the thigh from the groin to the floor with the legs slightly apart.
32) Knee circumference (Approx)
Measured with the leg bent at an angle of 90° at the level of the knee point.
33) Height of the subgluteal fold (Vpya)
Measured from the middle of the subgluteal fold to the floor vertically.
ATTENTION!!!
- Before making a pattern drawing, you need to check whether the measurements were taken correctly.
- The half-circumference of the chest should be equal to the sum of the measurements of half the width of the back, the width of the armhole and half the width of the front (POg2 = PShs + + Shpr + PShn)
- Half the width of the back is taken according to the measurements taken; the width of the armhole is calculated by measuring the circumference of the arm (Shpr = = Or: 3 + 0.5 cm);
- Half the width of the front is equal to half the width of the second chest (ПШп = ПШг2) or half the width of the bust minus approximately 2 cm (ПШп = = ПШб-2 cm);
- If there is an inaccuracy of more than 1 cm, the measurements must be checked again;
- The length of the back to the waist should be equal to the sum of the armhole depth and side length measurements (Dst = Gpr + Db);
- When sewing hats, you need a measurement of head circumference (Og).
How to take measurements for trousers?
Do not forget that measurements are not equal to the dimensions of the product parts. When creating a pattern, you need to make an allowance for freedom of fit. This value depends on the parameters of the figure and the properties of the fabric.
Ask a Question
Unlike the 11 parameters that we measured to create a dress pattern, for a trouser pattern you will need only 3 main and 3 additional ones. We also prepare a list in a column with a brief description of the parameters, take measurements and record the data.
Main settings
St – half waist circumference. We take a centimeter around the waist and record the measurement in half size.
Sb – semi-hip circumference. We grab the hips: from behind along the protruding points of the buttocks, from the front along the stomach. Divide the girth in half.
DB – trouser length. We take measurements along the leg: from the waist line to the estimated bottom of the trouser leg.
Extra options
Dtk – length from waist to knee. Measure the distance from the center of the kneecap to the waist line.
Lsh - step length. We measure the length of the crotch seam along the inside of the leg from the groin to the bottom edge of the product.
Sun - seat height. Sit with your back straight and ask an assistant to measure the distance from the bottom edge of the elastic band at your waist to your tailbone.