Initial stage: taking measurements
To model a straight skirt pattern, the first step is to take measurements. Without obtaining the necessary parameters, designing will simply not be possible. In total, you need to know several values:
- waist circumference This parameter is divided by 2;
- hip volume. Measured at the most convex points and also divided in half;
- seat height. This is the distance from the waist to the hips;
- back length to waist line;
- total length of the finished product.
It is extremely important that all measurements are made strictly according to the rules. Otherwise, the result may not be accurate.
Waist
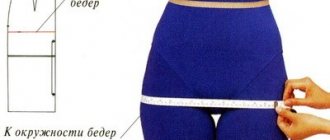
This measure is considered one of the most important. If you take the measurements incorrectly, a straight skirt will most likely simply not fit. The centimeter should be carried out strictly along the narrowest zone. It should be applied tightly to the body, but not pulled.
It is also worth considering that when taking measurements, the girl must take off her tights. This is due to the fact that they have a tightening effect and the result will seem several centimeters smaller than in reality.
Hip volume
In this case, the measuring tape is laid along the most prominent points. If a girl experiences the so-called “breeches effect,” measurements should also be taken. In this case, the centimeter is laid along the most protruding areas. If the difference between the resulting options is significant, the larger value should be taken into account.
Side cuts. Skirt base.
If you are going to sew a completely straight skirt , the width of the back panel along your hemline should be equal to the width along your hips.
4:329
You can also make the skirt a little wider. In this case, the width of the back panel of the skirt along the hem line should be 2–6 centimeters greater than the width along the hip line.
4:637 4:647
Guided by this rule, place point H3 at a distance of 2–6 centimes. to the right of point H2 and connect it to point B2 using a ruler (in the case of a straight skirt, connect point B2 to point H2).
4:1003
The width of our front panel along the bottom line of our straight skirt should also be equal to the width along the hip line, if slightly wider, 3-4 centimeters more. To the left of point H2 along the bottom line, set aside 3-4 cm, place point H4 and use a ruler to connect it to point B2.
4:1522
Calculation of matter
It is not only the construction of the straight skirt pattern that deserves attention, but also the calculation of the fabric. If you approach it responsibly, you will be able to significantly save material and avoid unnecessary expenses.
The main parameter that is taken into account when performing such manipulations is the width of the product. Accordingly, the circumference of the hips is taken into account. If this parameter is at least ten centimeters less than the width of the canvas, the consumption is one length with an increase of about twenty centimeters. Half of this allowance will be used to hem the hem, and the other half is needed for the waistband.
For a classic skirt with pleats, the calculation is made taking into account their number. If the model implies the presence of a circular fold, three lengths are taken. A small allowance is also added for hemming.
Construction of a straight classic skirt pattern
First, place a point T on top of the vertical line dividing the skirt into two parts. Divide the resulting segments from the point (T) in half and place marks. In the drawing, I specifically did not mark them with letters, so as not to clutter the pattern. But if you wish, you can mark them with any letters, for example B1 and B2.
From these points, draw vertical dart lines down. For the back half of the skirt - 15 cm and for the front - approximately 10-12 cm. Now we need to build a beveled waist line for both halves of the skirt. To do this, set aside 1 cm from the top line along the left edge (the back of the skirt) and 1.5 cm along the right edge (the front of the skirt). Connect these points to point (T).
In the drawing, these lines turned out to be straight, but you need to make them slightly “convex” in relation to the top of the pattern (the belt stitching line). Now you can build a drawing of the dart. The tuck depth of the back half is 3 cm, the front half of the skirt is 2 cm. This is not difficult to do and is easy to understand using this diagram. Just note that you need to cut the upper part of the dart at an angle, so don’t forget to mark these lines too.
All that remains is to calculate the position of points T1 and T2 and the pattern will be ready. First, you need to calculate the sum of all solutions using the following formula: (Sb + Pb) - (St + Pt), where Pt and Pb are an increase of 1 cm at the waist and hips. Subtract 5 cm from the result obtained (the sum of the back and front darts). Divide the remainder in half and set this value aside from the side seam line and place points T1 and T2.
Now the straight skirt pattern is completely completed. All that remains is to use a special pattern to smoothly draw lines down from points T1 and T2. Usually this line is constructed using calculations, but this is not necessary. As a last resort, if you have little experience, make an allowance of 2 cm in this place, and clarify this line during the fitting.
Self-drawing technology
A straight skirt pattern will allow you to create a truly unique item that will fit perfectly on your figure. After all, when sewing products that are sold in stores, a standard pattern is used. It is not possible to take into account the individual characteristics of a woman’s silhouette. If you figure out how to make a skirt pattern, the outfit will fit perfectly.
To perform such manipulations you will need:
- graph paper;
- eraser;
- well sharpened pencil;
- calculator for making calculations;
- ruler.
Once everything you need is at hand, you can begin building the skirt, and then sew according to the received drawing.
Meshing Rules
The basis of the pattern is created by initially constructing a grid consisting of three horizontal and five vertical lines. With their help, the dimensions of the main parts of the structure are determined. In fact, this is the space with which a number of manipulations will need to be carried out in the future.
The width of the mesh is the volume of the hips with an allowance to ensure a loose fit. It is only a couple of centimeters. The length corresponds to the length of the future product with an increase for tucking and decorating the belt.
Once the main indicators have been determined, design can begin. This process is carried out in several stages:
- Initially, the waist line is indicated by drawing a horizontal line. Its width corresponds to the width of the grid itself.
- After this, a vertical straight line is drawn downwards from the left point of the drawn line. This way the center of the back half is determined, equal to the length of the drawn mesh.
- Now you can start building the front. It is also equal to the length of the mesh. To perform these steps, draw a vertical line down from the right edge of the waistline.
- At the next stage, a horizontal straight line is made, indicating the bottom of the product. This line connects the points of previously drawn vertical lines.
- After this, you should draw a straight line for the hips. It is placed from the waist at a distance equal to the length of the back.
All that remains is to divide the hip line in half by placing a dot in the center and drawing an auxiliary line in the area of the side cut. It should be vertical and perfectly straight.
At this stage, the pattern base is already ready. You can now start marking the darts. This process is also not difficult if you strictly follow the instructions. In fact, a skirt without darts can also be created. True, in such a situation it is unlikely to be possible to ensure a perfect fit.
Darts
It is extremely important to correctly mark the darts on the skirt. Even minor errors will lead to the fact that the sewn clothes will not fit as tightly as required by the cutting rules. Therefore, the calculation process in this case should be carried out with special care.
When creating a model with two darts at the back, you need to follow the following instructions:
- The first step is to determine the total solution of these elements. To determine it, subtract the waist circumference from the mesh width.
- At the next stage, the dart parameter along the side line is determined. It is equal to half of the resulting total solution.
- Now you need to find out the solution for the future dart on the back of the product. To obtain it, you need to divide the total solution by four and add one centimeter to this value.
- The front dart opening is determined using the same scheme, but in this case a centimeter is not added, but subtracted.
It must be taken into account that the construction of the skirt pattern and the designation of darts are carried out without taking into account the allowances that are necessary to ensure a loose fit along the waist line. Otherwise, the product in the waist area will not fit tightly enough. Accordingly, the clothes will be visually large. It is possible that this will create the impression that the cutting was done incorrectly.
Back half
The pattern for the base of the skirt involves marking the darts in the back. For this purpose, a distance corresponding to the waist circumference divided by 4 is measured from the center of the hip line. The middle line of the dart is drawn from the marked point. It is indicated by a dotted line. From this strip it is necessary to mark half of the solution in both directions. The centers of this dart should be located exactly three centimeters above the contour of the reed. From the designated points, inclined lines are drawn.
Now you need to deal with the side cuts. To designate them, half of the solution should be set aside along the waist from the auxiliary straight line. A convex curve is drawn from the marked point to the center of the hips.
Half of the defined extension should also be set aside from the side line along the bottom. A straight line is drawn from this point to the center of the thigh.
The side cut should extend one centimeter beyond the waist. At this point on the pattern, a mark is made, which, by making a concave curve, is connected to the upper right point of the dart.
After performing such manipulations, the bottom is drawn. For this purpose, the side cut is shortened by literally five millimeters and a convex curve is made to the bottom of the center of the rear half of the product.
Front half
Separately, it’s worth figuring out how to build a front pattern. Initially, a notch should be drawn on it. For this purpose, a distance is measured from the center along the hips, which is equal to a quarter of the waist circumference. From this point the middle line of the notch is made. Just like in the case of the pattern for the back half, it is made dotted and led strictly upward vertically.
From the marked dotted line along the waist, segments are drawn that correspond to half the solution. The center of the dart is located three centimeters higher than the hips.
Now you need to mark the outline of the side cut on the pattern. For this purpose, half of the solution is deposited from the auxiliary straight line to the right along the waist. A point is placed at this place, which is connected to the center of the hips by making a convex curve.
To the left of the auxiliary line, half of the defined extension should be measured, and the resulting point should then be connected to the center of the straight line on the hips. The cut is made exactly one centimeter longer than the mesh. This point is combined with the upper left point of the dart strictly along the waist line. For this purpose, it is also necessary to draw a concave curve on the pattern.
To make the skirt pattern complete, all that remains is to draw the bottom. To do this, the side cut is equalized in length with the back part. The center line of the front part is extended by only a centimeter. In this case, the point is aligned with the alignment point of the side seam by making a convex curve.
Belt
The design of a straight skirt often implies the presence of a belt. There are also models where this detail is not provided. If a belt is needed, this part must be cut out. It can be with or without overlap.
The option without overlap implies the presence of short transverse sides that come close to each other, but without overlapping one another. This type of belt is used if clothes will be fastened with a zipper or hooks. The zipper can be placed on the back, side or front.
When choosing a hook-and-eye fastener, the belt is a long rectangular element folded in half lengthwise. The width of this part in this case is chosen based on personal preferences and varies, as a rule, within 2 - 5 centimeters. The length of the belt should be equal to the top of the base. To this value it is necessary to additionally add allowances equal to one and a half centimeters.
If you select a part with an overlap, one of its edges will overlap the second. The allowance for decorating the fastener is 3 cm. The shape of the edge may be different. For example, with corners, rounded or rectangular.
Instead of a belt, you can use an elastic band. In this case, no fittings are required at all. The model does not imply the presence of zippers, hooks and buttons.
Cutting details
To sew a product, several parts are cut out. You will need one front element that bends in the center. A couple of parts for the rear are also being made. Additionally, a belt can be cut. Often the presence of a lining is also implied. To create it, a special lining material is used.
This creates the base of the skirt. If desired, it can be modified somewhat. For example, correct the lower part. In this way, a model expanded to the bottom will be obtained. If you remove the darts at the front, you get a skirt with two notches located only at the back. In both the first and second cases, the outfit will change significantly and look completely different.
Straight skirt pattern. Step-by-step instruction.
Hi all!
It is clear why the method of constructing a skirt drawing using the method of two German subjects - father and son - has aroused such great interest in the world of sewing. Simple, affordable, fast. Fast results with a minimum of measurements.
However, not all sewing lovers like such simplicity. Many people prefer something more substantial and... domestic.
Straight skirt pattern size 50.
To construct a drawing of a straight skirt, let’s take the dimensional characteristics of size 50 (height 164 cm, full group 1, chest volume - 100 cm, waist volume - 78.2 cm, hip volume - 104 cm (including the protrusion of the abdomen)).
Note. For a proportional, typical figure, it will be sufficient to draw a straight skirt drawing for half the figure. Therefore, all volume measurements are “used in this matter” at half size. In different sources there are different designations for “halves” of volumes: Pot - half waist circumference, Pob - half hip circumference. And St is also half waist circumference, and Sb is half hip circumference. Both abbreviations are correct.
(There will be a separate article on how to correctly take measurements of a figure).
One more thing. For a loose fit of the finished skirt to the figure, ease of movement, for heat exchange and breathing of the body, when drawing a skirt, you need to take into account the allowance for freedom of fit.
Depending on the desired tightness of the fit for a straight skirt, increases are made along the waist and hips.
Note. The first number in each column is for skirts made from thin fabrics, the second for thick ones.
To start building the pattern, we need to make one more “calculation”. Mathematically, you need to “find” the distance from the waist to the knee. We know the height of the waist line - 103.2 cm. The height of the knee point is also 45.4 cm. 103.2 - 45.4 = 57.8 cm.
So, the distance from the waist line to the knee is 57.8 cm. But in the pattern, this is the distance from the waist line to the hem line. But in fact, this is the length of the skirt. Up to the knee!
Why is the skirt pattern first built up to the knee line?
The fact is that only this length of the skirt pattern (from the waist line to the knee line) allows later, after the project is completed, to use the finished skirt without making any preliminary changes to its pattern. Such a skirt can even not be equipped with a vent (slit). Its absence will not become an obstacle to freedom of movement.
If you want to make the skirt shorter or longer, you can’t do without making changes to the side line. Changes in the lateral lines occur both on the back part and on the front part, symmetrically.
Short skirts should be tapered at the bottom to a width of 0.5 - 2 cm, depending on the length. You need to start tapering at a distance of 8-10 cm from the hip line.
When lengthening the skirt, changes to the side line can begin just above the hip line. And at the bottom the skirt widens by 2-3 cm, depending on the length.
And shortening - narrowing the skirt, and lengthening - widening, and here and there, for freedom of movement, either a cut or a slot will be necessary (according to the model, at will).
(The skirt can be shortened by -25 cm and extended by +45 cm).
Constructing a straight skirt pattern.
Base grid.
The construction of a straight skirt pattern begins with the construction of a base mesh. The basic grid is a set of auxiliary vertical and horizontal lines that determine the overall dimensions of the main parts of the product.
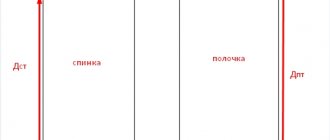
The basic grid consists of three horizontal and five vertical lines. Horizontal lines are the lines of the waist, hips and bottom. The vertical lines are the lines of the middle of the front and back panels, the side line, the lines of the back and front darts.
- waistline;
- bottom line;
- line of the middle of the rear panel;
- lateral line;
- line of the middle of the front panel;
- hip line;
- back dart line;
- front dart line.
How is the base mesh constructed? Distances, lines, segments, points, etc.
Construction of the base grid.
Below is an example of calculation for constructing a straight skirt (height 164, size 50, fullness 1).
Base grid points.
In local areas of the base grid (waist line, hip line, bottom line), the intersection points of lines and the ends of segments are designated for convenience by the letters T (waist), B (hips), H (bottom).
Lines, segments.
- The construction of the mesh begins with the construction of a right angle with the vertex at point T.
- The segment TB (see Table 3) down vertically determines the position of the hip line.
- TN segment (see Table 3) bottom line.
- Horizontal lines are drawn through points B and H. The lengths of the segments TT1, BB1 and NN1 are the same. And segment BB1 is the width of the skirt along the hips plus the increase in freedom of fit (see Table 3).
- The segment BB2 determines the position of the side line: BB2 = 0.5 x BB1 - 1 (see table 3).
- The position of the back dart is determined by segment BB3. It is deposited from point B to the right horizontally and is equal to 0.4 x BB2 (see Table 3).
- The position of the front dart is determined by the segment B1B4. It is deposited from point B1 to the left horizontally and is equal to 0.4 x B1B2 (see Table 3).
Waistline.
The true waistline of a skirt is not a straight line. The real waistline still needs to be built. And to do this, it is necessary to determine the magnitude of the rise of the waist line along the side line and the line of the middle of the front panel.
Raising the waistline along the lateral line. The segment T2T20 (see Table 4) is laid vertically up from point T2.
Rise along the mid-front line. The segment T1T10 (see Table 4) is laid vertically up from point T1.
We connect the points with segments: T, T20, T11.
We extend the lines of the back and front darts until they intersect with the specified waist line. We denote the resulting points as T30 (rear panel) and T40 (front panel of the skirt).
Darts.
The difference between the volumes of the hips and waist, along with allowances for a loose fit, is removed in darts.
Total darts ∑B=(Sb+Pb) – (St+Pt)= 54 – 40.1 (see table 5).
The side dart removes 50% of the entire difference between the hip and waist volumes. In the back 35%, in the front 15% (see table 5).
When constructing a drawing of a skirt, the solution for each of the three darts must be divided by 2. In the case of a figure of size 50, 1 fullness - the following numbers are obtained:
side dart 0.5 x ∑B = 6.95 cm (½ solution - 3.48 cm);
back dart 0.35 x ∑B = 4.865 cm (½ opening - 2.4 cm);
front dart 0.15 x ∑B = 2.085 cm (½ solution - 1.04 cm); cm.
Side dart.
The depth of the side dart does not reach the hip line 2 cm.
From point T20 to the sides, straight from the top along the segments (refined waist line), we lay aside half of the side dart solution.
Even with the naked eye it is clear that the segment, the one laid to the right and located on the side of the front panel of the skirt, has a smaller deviation from the imaginary horizontal line (from point T20) than the other, laid to the left and located on the side of the rear panel. This means that this side of the dart will be higher than the other.
The rule is half the tuck solution.
The sides of the darts are aligned along the larger side.
Therefore, first we build the right side of the side dart. We connect the end of the segment set aside from point T20 (to the right! down) with an auxiliary point on the side line.
The side of the side dart should be decorated with a smooth line. To do this, divide the set aside segment in half.
And we build a perpendicular to the point marked on the line. Depending on the shape of the hips (steep, flat, normal), the segment can be from 0.1 cm to 1.2 cm. (Here 8 mm).
We connect three points with an arc.
The sides of the side dart or both parts (according to the model) will be connected by a seam, so the bend of the side line of the back panel above the hip line should be exactly the same as on the front panel. To do this, you should build a mirror copy of the drawn arc.
From the point (end of the segment (1/2 of the side dart opening, set aside from point T20 to the right)) we build a perpendicular to the side line.
And then we put exactly the same segment on the other side of the side line.
In the picture below you can see how the locations of the points differ: 1st - the end of the segment of ½ side dart solution, laid from point T20 to the left and 2nd - the point at the end of the newly constructed segment (a copy of the right side).
This is fine. I would even say it's correct. That's how it should be. (see “Half Dart Rule” above).
From the resulting point, using the same principle as on the side of the front panel, we build the second side of the side dart.
Back dart.
From point T30 down vertically we set off the length of the back dart. The length of the back dart can be from 13 to 17 cm. Here (16 cm).
The end of the segment is marked with a line mark.
From point T30 to the side, up the segment, towards point T20, set aside ½ of the back dart solution (see table 5).
We connect the resulting point with an auxiliary point on the line of the back dart.
We follow the rule of half the tuck solution! (see above in the article).
We build the second side of the back dart exactly the same as the first, with a length and angle of deviation from the vertical line. To do this, from point T30 up horizontally a little, 1-2 centimeters, we will continue the line of the back dart.
And from the point (the right end of the ½ back dart segment) to the extended line we will construct a perpendicular.
We are building exactly the same one on the opposite side.
We connect the left end of the resulting segment with an auxiliary point on the line of the back dart.
Front dart.
From point T40 down vertically we lay off the length of the front dart. It can be from 10 to 12 cm. (Here 11 cm).
The end of the segment is marked with a line mark.
Following the rule of “half the dart solution”, see above in the article, we put it to the left and slightly up along the line of ½ the front dart solution (see table 5).
We connect the left end of the set aside segment with an auxiliary point on the line of the front dart.
The right side of the front dart is built according to the same rules as the left side of the back dart (see above in the article).
From the base of the right side of the back dart and the left side of the front dart, as well as from point T10, towards the side line, you need to make auxiliary horizontal lines that cannot be climbed behind when drawing arcs (waist line).
And now we “draw” the arcs.
We connect with arcs:
dot T with a dot on the left side of the back dart.
A dot on the right side of the back dart with a dot on the left side of the side dart.
Dot on the right side of the side dart with a dot on the left side of the front dart.
Dot on the right side of the front dart with T10 dot.
The drawing of the straight skirt is ready.
If the drawing is cleared of all auxiliary lines, it will look like this.
Straight skirt belt pattern.
The back and front panels of the skirt are cut. The pattern itself is cut out along the contour and that’s it, you can start making the skirt.
If you plan to further model the skirt, some auxiliary lines can be left.
Straight skirt pattern for plus size people.
Many sewing enthusiasts are interested in information on how to create a straight skirt pattern for a full female figure. Nothing , I repeat once again, nothing , the construction of a straight skirt pattern for a full figure is no different from the construction of a pattern for an incomplete figure, if the difference between the half-volumes (Sb-St) of the hips and waist of this figure does not exceed 14.5 cm. Once again, nothing !
Many overweight women have a perfectly proportional figure, with fat deposits evenly distributed throughout the body.
And at the same time, other “skinny women” have a figure with a difference in half-volumes of 16 - 19 centimeters or more.
If the sum of the dart openings exceeds 14.5 cm, then to better fit the skirt on the figure, 2 rear darts should be built.
To construct a drawing of a straight skirt with two darts at the back, let’s take the dimensional characteristics of size 50 (height 164 cm, but size 3).
St - 41.1 cm
Sat - 56 cm.
Increase in waist + 1cm; hips +2 cm.
The difference between the volumes is 15.9 cm.
How is the difference in volume distributed between darts in this case?
Lateral 0.4 x ∑B = 6.36 cm (½ solution = 3.18 cm)
Front 0.15 x ∑H = 2.4 cm (½ opening = 1.2 cm)
Rear 0.45 x ∑V. The standard opening width of 4 cm (½ opening = 2.0 cm) will be used for the main tuck, and for the additional remainder 0.45 x ∑B - 4 = 7.2 cm - 4 cm = 3.2 cm (½ opening = 1.6 cm).
According to all the rules (see above in the article), the most common drawing of a straight skirt is constructed. The solutions for the side, back and front darts are made according to the calculations laid out above in the article.
Then: 1) the area between the right side of the back dart and the left side of the side dart is divided in half and the most common dart is built (see above in the article): 2) an auxiliary dart solution is laid from the point on the line upward to the right, 3) the right side of the dart is built, 4) and then the left one.
When sewing a skirt cut using a pattern with two back darts, the side seam allowance should be made at least 2 cm wide, since adjustments to the side seam line may be necessary.
The pattern for a skirt with two back darts looks like this.
If the difference in the half-volumes of the hips and waist is more than 17.5 cm, it is necessary to construct another dart. This time also from the front.
To construct a drawing of a straight skirt with four darts, let’s take the dimensional characteristics of the same size 50 (height 164 cm, but size 5).
St - 43.1 cm
Sat - 60 cm.
Increase in waist + 1cm; hips +2 cm.
The difference between the volumes is 17.9 cm.
How is the difference in volume distributed between darts in this case?
Lateral 0.4 x ∑B = 7.16 cm (½ solution = 3.58 cm)
Two back darts 0.4 x ∑H = 7.16 cm, opening of one dart 3.58 cm (½ opening = 1.79 cm).
Two front darts 0.2 x ∑H = 3.58 cm, opening of one dart 1.79 cm (½ opening = 0.9 cm).
The drawing of a straight skirt with four darts is constructed in exactly the same way as the drawing of a straight skirt with two back and front darts described above in the article. Then additional darts are built between the main and side cuts.
Additional darts can be the same length and width of the solution as the main ones. Or they can be smaller (according to the model, according to the figure, at will). The main darts can be shifted closer to the lines of the middle front and back (according to the model, according to the figure, if desired).
Straight skirt with vent pattern.
Patterning a straight skirt with a vent begins with constructing a straight skirt pattern. For information on how to build one, see the article above. The slot is “attached” to the skirt as the last of all its parts. You can read everything about the slot in the article “Processing the slot on the skirt.”
All! Good luck to all! Sincerely, Milla Sidelnikova!
Cutting technology
After constructing a drawing of the future product, it is extremely important to make the cutting correctly. For this purpose, it is necessary to familiarize yourself with all the intricacies of transferring the diagram onto the canvas. Initially, you need to determine the back and front sides of the material. All marks are made on the wrong side. The fabric is laid out taking into account the direction of the grain fibers and the features of the print.
It is recommended to iron the material before transferring the drawing. Thanks to this, all manipulations will be much easier.
It is best to work with materials that do not crumble. For example, novice craftswomen can use chintz. To cut a straight skirt, you must follow these instructions:
- The matter along the lobar fibers is folded in half.
- Pre-cut paper parts are laid out on it. They are fixed to the canvas with pins.
- Initially, the details of the future product are outlined strictly along the contour with soap or small pieces.
- Then they are outlined with seam allowances equal to 1 - 2 centimeters.
- The matter is cut along the second of these contours.
- Pins and paper parts are removed from the canvas.
If the fabric has stripes, geometric patterns or some other prints, it is necessary to place the drawing on the fabric so that the lower sections are directed in one direction. It is extremely important that the pattern on the seams matches perfectly. If it is excessively large, it is recommended to place it in the most visible area. Beginner needlewomen, however, are better off using plain fabric. In this case, the risk of making a mistake is reduced to a minimum. Printed products should be chosen after you have gained experience.
Skirt patterns
It is with the straight skirt pattern that many begin to get acquainted with the world of sewing.
Sewing clothes, not aprons or handbags. A straight skirt is the basis of a woman's wardrobe, a must-have, even for those who prefer to wear jeans. True, I started right away with trousers, and got acquainted with straight skirts later, when... however, it doesn’t matter when I got acquainted, otherwise I’ll remember something else.
So, straight skirt. Creating a straight skirt pattern is quite simple; anyone can figure it out, although at first you can get lost in all the increases, lines, and segments. There are also very simple methods that are used in the studio, we will not touch them, they have their own technological nuances.
Creating a pattern yourself ultimately gives a more accurate result that fully matches your figure. However, the finished pattern can be precisely “fitted” to all the lines of the figure. Decide for yourself, but it seems to me that using a ready-made straight skirt pattern is more correct, especially for beginners. The result will appear faster.
In this article you can download three skirt patterns at once. Two of them actually differ only in darts, the third is a straight skirt widened towards the bottom. Comparing all three, you will see that you can change the skirt pattern yourself. Everything is very clear.
But let's get back to the patterns.
Stitching parts
Before stitching the main structural elements, it is necessary to process all edges. It is most convenient to use an overlocker for this purpose. It is also possible to use a machine zigzag stitch. Even if the fabric is not prone to fraying, it is not recommended to sew it immediately.
Before joining the parts on a sewing machine, they must be stitched together by making a basting seam. For this purpose, the blanks are folded with their front sides facing each other, aligning the edges as accurately as possible. After this, they begin to sew them together by hand. The sequence of actions in this case will be as follows:
- The undercuts are sewn first. The stitches are made from the narrow end upward.
- Then folds, cuts and other elements are outlined.
- The side seams are basted. It is extremely important that all lines are aligned. The stitching goes from the front side from top to bottom.
- The bottom and top edges are folded and also basted.
When making a basting seam, it is recommended to make stitches no more than five millimeters. Otherwise, they will diverge when trying on. Naturally, it will be quite difficult to make a full correction and eliminate shortcomings in such a situation.
Product fit
Before sewing all the parts together with machine stitching, you need to try on the assembled product. This way it can be perfectly tailored to your silhouette. Many beginning needlewomen consider this stage unimportant and therefore neglect it. In fact, this step is of particular importance and should not be skipped.
The adjustment is carried out according to the following scheme:
- The skirt does not turn inside out and is put on. In this case, the fastener breaks off.
- The side seams are in the correct position.
- If the width is excessively large, the excess is immediately removed.
- If there is insufficient volume, the seam is ripped out and swept away again, taking into account the necessary adjustments.
- The size and location of the recesses are viewed. If mistakes were made during their creation, they must be ripped apart and re-laid.
All changes are initially made on the right side of the garment, and after that they are transferred to the left. If the correction was significant, the fitting must be done again.
Final assembly
Having corrected all the shortcomings, you can safely begin machine stitching. In this case, it is extremely important to select threads of a suitable shade and set the optimal stitch length on the sewing machine. When stitching, it is recommended to position the front piece over the back half.
The product is assembled according to the following scheme:
- The machine stitch is laid a millimeter from the basting and moves closer to the cut.
- The first step is to sew the central seam along the back of the product, if provided. At the same stage, if necessary, a cut is formed and a zipper is sewn in.
- After this, all the darts are sewn in.
- When the notches are formed, you can join the side seams. They are stitched, as with basting, from top to bottom.
- A belt is sewn to the base. If it is not provided, the edge is processed for subsequent stretching of the elastic.
- After this, the bottom of the skirt is hemmed.
Experienced needlewomen recommend ironing each stitched seam immediately. Due to this, further work is significantly simplified.
Even a novice needlewoman can independently create a drawing and sew a straight-cut skirt. To do this, just study the described instructions and strictly adhere to them. Thanks to this, you will be able to achieve excellent results and please yourself with an incredibly beautiful new thing.
Small tips
After the straight skirt pattern is drawn on paper, you need to make patterns for additional parts of the skirt and belt. Be sure to make patterns for these parts; they will help you accurately calculate the fabric consumption and lay out the fabric.
Please note that the front half is cut out completely (without a connecting seam). Therefore, before cutting the fabric, fold it in half along the longitudinal line and attach half of the pattern for the front of the skirt exactly along the fold. The back part is cut out of two parts, since a straight skirt is usually made with a vent and a hidden zipper is installed in the same seam. See also How to Sew an Invisible Zipper.
When laying out the pattern pieces on the fabric, do not forget to add allowances for the middle seam and top cut - 1.5 cm, for the side seams - 2-2.5 cm, and add at least 3 - 4 cm for the hem of the bottom of the skirt.
To check the accuracy of constructing a straight skirt pattern, you can first sew a “test” sample from inexpensive fabric. To check, it will be enough to connect the side seams and sew up the darts or folds.
Don’t forget that any ready-made skirt pattern from a magazine or online resource cannot take into account the individual characteristics of your figure. To more accurately fit the skirt to your figure, it is necessary to try on the sour cream details. And only after repeated “rework” can you make an almost ideal skirt pattern for your figure.
If you managed to achieve this, then transfer this pattern to thick paper (cardboard) or film (oilcloth) and use it as a basis for cutting other styles and models of skirts.