Home Home and cottage Hobbies and entertainment
Every parent knows for sure that their child deserves the best. And if this best thing can be done with your own hands, then hardly anyone can resist this opportunity. This article will talk about bedding for a crib and how to sew it at home.
At a very early age, sound and healthy sleep in a comfortable environment is especially important for a baby, which means that equipping his place to sleep with a good crib and soft, pleasant bedding is almost the first necessity.
Today, stores for children present a huge assortment of all kinds of bedding for a crib, surprising with color options and modifications, as well as prices. Sometimes the whole problem lies in the price: you don’t want to pay a fortune for a set of children’s underwear, but giving your baby the best is certainly the main task. In addition, you often pay for the brand name, but the quality remains approximately the same. And it’s no secret that children are one way or another a large expense item, one of which is unlikely to include expensive baby linen for the crib.
Therefore, if you want to save money and at the same time make your child a beautiful set of bed linen to your taste with your own hands, have at least a basic understanding of a needle and thread and are full of enthusiasm - this article is for you.
Preparation
If saving is one of your criteria, you should forget about it when choosing fabric for your baby’s bedding. There are a number of points that you should pay special attention to when choosing a material:
- Avoid artificial materials. The ideal solution would be to purchase material made from 100% cotton. This will ensure convenience, hypoallergenicity, practical use and healthy sleep for the baby, and therefore your peace of mind. Satin, calico, flock are suitable. Despite its delicate and soft texture, it is not recommended to use chintz: such bedding will quickly wear out and lose its appearance.
- Pay attention to the pattern (if there is one on the fabric). Check whether the paint will cause allergic reactions and whether it releases substances harmful to the child if used frequently.
- Carefully study the label that any roll of fabric should have. We are interested in thread quality and density. It would seem that these are not primary issues, but if our task is durable and comfortable bed linen, then the quality of the threads should be high, the threads themselves should be dense, but not thick, and the density of the fabric should be higher than 128 g. per meter All this data must be indicated on the fabric.
- Please note if the fabric requires gentle washing or special cleaning conditions or recommendations. Still, this is a set of children's bedding, not a fur coat. Our task is to sew not only beautiful underwear that is pleasant to the eye and touch, but also practical, which in an unexpected event (and the baby will provide many of these) can be easily and quickly washed and returned to service.
Check in advance whether the fabric will shrink during washing. This determines how your set will turn out and what size fabric you will need when purchasing.
LiveInternetLiveInternet
How to sew this zipper so that everything is smooth and beautiful?!
Rule #1:
Sew the zipper into the open edges of the seam until all sides of the duvet cover are sewn together!
We lay out the parts of our duvet cover facing each other on a flat surface (I do this on the floor).
The side to which the zipper will be sewn can be pinned together so that the fabric does not move.
I prefer to make a hole with a zipper at the bottom of the duvet cover.
Let's take lightning...
For bed linen, I prefer to buy hidden zippers with a cotton-based braid 60 cm long, although 50 is quite enough for a hole.
Well, if not with cotton braid, then synthetic tape will do. Nowadays, anyway, few people boil their laundry and wash it mostly at a temperature of 40-50 degrees, since most of it is colored...
Rule No. 2: Be sure to iron the zipper itself.
This is important, because later after sewing, during ironing, it can shrink and wrinkle the fabric.
Iron the zipper with cotton braid using steam or a spray gun!
Rule No. 3: We make the so-called markings on the zipper!
I draw serif lines at the end, beginning, and middle of the zipper with a washable marker. You can do this with a pencil, the main thing is that they do not wash off during the process, but wash off afterwards.
At the same time, at the end I retreat approx. 3.0-3.5 cm from the end of the spiral itself:
and at first – 1 cm from the edge of the braid:
I mark the middle relative to these marks, and not to the braid itself!!!
For a zipper length of 60 cm, these marks are not enough, so I also divide each part in half. You can put more tags, they won’t hurt.
Rule #4:
We transfer the marks to the parts! As, in principle, can already be seen in the photographs, we apply the zipper to the sections of the duvet cover so that the middle of the zipper and the middle of the underside coincide, and we make notches on the fabric itself, corresponding to the marks on the zipper.
! And don’t forget to somehow mark on the fabric the side where you will have the upper end of the zipper, so that later all your marks will clearly align if suddenly the marked parts turn out to be unequal. I wrote directly on the fabric with a marker (photo above).
Important: We cut two layers of fabric at once!
We make small cuts, but not too small, approx. 0.5 cm.
Afterwards we sew the notched sections on the two parts of the duvet cover.
If we do this on an overlocker, we try not to cut them off!
Important: After sewing, be sure to iron the edges, as they may pull a little!
Rule #5:
We combine the marks with the notches!
We pin the zipper to the overcast edges, placing it face to face with the duvet cover parts: first to one side, and then to the other. At the same time, we combine the notches on the fabric with the marks on the zipper!
Important: Unzip the zipper and baste each side of it to the fabric.
Don’t be too lazy to do this: 5-10 minutes of work, and the result speaks for itself!
Rule #6:
Fastening the zipper! After basting, I machine stitch along the zipper tape 0.2-0.3 cm from the edge, thus sewing it to the seam allowances.
This provides additional fastening of the zipper and prevents, during further use of the laundry, from breaking the lines passing directly next to the spiral links themselves. I do this using a regular machine foot, moving the needle a little to the left:
At the same time, it is important to finish the line on our mark at the lower end of the zipper!
The top edge of the zipper can be sewn from the beginning, i.e. above the intended line.
Rule #7:
The zipper is secured, now you need to stitch it.
To do this, change the foot to a foot for sewing hidden zippers. Mine looks like this:
These feet may have a different shape, but they have the same principle: they have two longitudinal grooves on the sole, and when sewing, the foot bends the zipper spiral, helping to sew it evenly and close to the spiral itself (arrow in the photo):
We place the zipper under the foot so that the spiral is in the recess of the foot to the left of the needle and stitch it. I stitch one side of the zipper from top to bottom and the other from bottom to top. With the zipper basted, nothing moves.
If you sew both sides from top to bottom, then when sewing the other side, place the zipper under the foot so that the spiral is in the recess of the foot to the right of the needle, for this there are two notches in it, not one.
It is important here, as in the case of fastening the zipper, to finish the line at the lower end of the zipper strictly at the level of the mark!
The zipper is sewn in!
You can remove the basting threads, fasten the zipper and admire the fact that all the edges are in place and do not go beyond each other.
A difference of 0.5 cm is acceptable, although this usually does not happen if you follow the above instructions.
Rule #8:
Now our task is to sew the seam itself.
To do this, we chop off our open sections with pins.
Moreover, at the end and at the beginning of the seams for attaching the zipper, we try to combine these seams and pin them together with a pin at the same level.
To soothe your soul, you can sweep away the cuts, but I usually don't do that. The main thing is to remove the pins in time when sewing so that the machine needle does not accidentally bump into them and break.
Rule #9:
Now I'm changing the foot to a foot for sewing in a regular zipper.
By the way, it can also be used for sewing in a secret one if you don’t have that special one. Only in this case will you need to carefully bend the spiral with your fingers so that it does not fall under the needle. This is not as convenient as using a special foot, but it is quite possible - tested!
Important! I start stitching the edges from the edge to the zipper.
Seam width approx. 1.0-1.2 cm. It is equal to the width of the seam for attaching the zipper (the seam near the spiral) plus 2 mm (0.2 cm).
Here, when sewing, you need to rely either on your eye, or follow the guide lines on the needle plate, if any.
Or you can use a magnetic guide like mine. A very convenient thing if your machine has a good metal plate.
We set the needle to the extreme right position so that, when approaching the zipper, the line runs as close as possible to the seam line for attaching the zipper, and at the same time the zipper itself does not interfere with the foot.
Usually everything works out without any obstacles, since for this we, in fact, left the free end of the zipper (ours are 3-3.5 cm)
I usually have a line that lies 0.1-0.2 cm from the line of the zipper stitching seam, but if you get this distance a little more, it’s not so important!
The main thing is that the line itself goes 0.5-0.7 cm (max 1.0 cm), below our mark where we ended the previous line. Well, and of course, don’t forget to put bartacks at the beginning and end of all our lines!
We grind the cut from the top of the zipper in the same way:
If suddenly you don’t have a zipper foot or the needle in the machine doesn’t move left and right, and you can’t get as close to the right place as you would like, don’t worry! You can finish the line a little earlier, and then hem the whole thing by hand.
Rule No. 10: After sewing, we first iron the seams from the inside, and then iron them from the front side, while simultaneously smoothing the stitching seams of our zipper, carefully straightening the fabric with our free hand.
It should turn out like this...
At the beginning of the lightning:
At the end of the lightning:
If desired, you can add fastenings using a zig-zag stitch, but usually even without them, everything holds quite tightly and lasts a long time.
The most important thing is behind us! There’s just a little bit left to do – stitch the remaining three sides of the duvet cover: the sides and the top.
This is where the rules end and the little secrets begin! Although it’s not a fact that you don’t know them!..
First, we chop off all our sides with pins. I do this again on the floor, since this is the only place where I can properly straighten out parts of this scale.
Important: Don’t forget to unzip the zipper a little, otherwise it will be more difficult to do later, and the opening for turning inside out will be so necessary!
After this, we begin to sew our sides together with a seam 1.2-1.5 cm wide from the edge in one pass of the machine, while turning our duvet cover at the corners.
Secret one:
I start and finish my line in this way: I lay out the allowances of the ironed seam on the bottom side (in which we already have a zipper sewn in), bending them onto the main parts of the duvet cover, each on its own side - like this:
This method is very helpful when turning the duvet cover inside out to create a beautiful and even corner.
After we have stitched all the sides of our product, they need to be overcast, after which we need to do another small manipulation with the upper corners.
Secret two: Fold the seam allowance on the top side of the duvet cover along the line of stitching the seam onto the duvet cover itself. Important: the main thing is that the entire allowance is laid on one side and does not twist. After which we stitch, or rather secure it using the machine's reverse gear, exactly into the seam of the side seam.
Secret three:
When turning the duvet cover inside out, fold the corner, bending it along the seam line for attaching the side seam in this way and, holding it, turn it inside out, as if squeezing it out with your thumb.
If you can’t hold it, pin it with a pin, only then don’t forget to pull it out.
Then we finally straighten our corner with a peg, the sawn-off tip of an awl, a knitting needle or anything else that you have available for this task, after which we admire the result...
We straighten all the remaining corners in the same way. After which all that remains is to iron all the seams and EVERYTHING!
Our duvet cover is ready!
Source: artyushenko.blogspot.com
ALL IN OUR HANDS !!!
Your LYUBASHA BODIA
How much fabric do you need for a set?
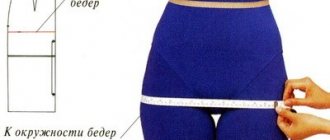
Now that everything has become clearer with the fabric, we need to start taking measurements. In order not to make a mistake, you will have to arm yourself with a measuring tape and carefully measure each element for the crib: blanket, pillow, mattress so that the duvet cover, pillowcase and sheet fit in size and sewing bed linen for a child becomes a pleasant task and not a difficult ordeal with constant alterations and damaged materials.
For your convenience, below are the standard sizes of bedding sets.
Standard bedding sizes for newborns
- Pillowcase 40 x 60 cm
- Bed sheet 110 x 140 cm
- Duvet cover 100 x 140 cm
For a child after one year
- Pillowcase 50 x 70 cm or 70 x 70 cm
- Bed sheet 150 x 210 cm or 180 x 260 cm
- Duvet cover 143 x 215 cm, 150 x 210 cm or 160 x 220 cm
Before buying fabric, it is advisable to measure the crib, pillow, mattress and blanket again - sometimes the sizes may differ. As a rule, on average, only 4 meters of fabric are needed for a set, but do not forget to take into account the shrinkage of the material after washing, so add at least 10 or more centimeters on each side to your measurements.
Don't forget to take into account that you need to add about 1 cm per seam to the edge of each element.
How to sew a duvet cover - step-by-step algorithm
In its standard form, a duvet cover consists of two pieces of fabric sewn together. Although it is possible to cut a duvet cover from a single (one) piece of fabric.
It would seem that what could be difficult about sewing it? But there is nothing complicated. You just need to cut the fabric and when sewing the duvet cover, provide a window for the blanket to enter into it.
To determine the size of the canvas and how to cut it to fit your duvet cover, you can use our cutting calculator.
Let's look at a step-by-step algorithm for sewing a regular duvet cover from two pieces of fabric of the appropriate sizes. We will sew with a regular linen stitch using a regular sewing machine.
So, we have a blanket 200 cm wide and 200 cm long.
We will make our duvet cover for it with a description of the step-by-step algorithm.
Step 1 – determine the required size of the duvet cover to match the size of our blanket.
Taking into account the fact that cotton fabric is subject to some shrinkage after washing, it is necessary to provide a certain margin in the size of the duvet cover relative to the size of the blanket itself. You can choose the optimal size for your duvet cover through our online service.
Since we plan to sew from satin, 100% cotton, taking into account the manufacturer’s regulated standards for the shrinkage of fabric of this type, for a blanket size of 200×200 cm, a duvet cover with a width of 204 cm and a length of 211 cm is required. That is, the duvet cover itself must be sewn from two fabrics these sizes.
Step 2 – determine the cutting size taking into account the fabric seam allowances.
Each piece of fabric from which we will sew a duvet cover must also have seam allowances. For seams we take 2 cm from each edge. As a result, we need to cut 2 canvases 208 cm wide and 215 cm long.
Step 3 – processing the upper side of the sheets, where we will make an entrance for the duvet cover.
We bend the edge of the fabric in two folds (towards the wrong side) (within 2 cm) and make a seam on a sewing machine.
As a result, we have two blanks with a processed top edge.
Measure seven times, cut once
Now that we have the material, it would seem that we can start cutting and sewing, but first of all the fabric needs to be “decorated”. To put it simply, the material should be washed, allowed to dry and be sure to be ironed with a hot iron so that it shrinks before starting, and does not treacherously turn the entire sewn set into a small misunderstanding after the work has been done. When all this is done, you can start cutting.
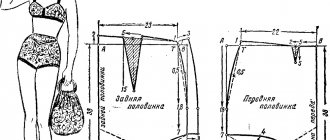
Even if there is enough fabric, it would be more correct to place the bedding elements so that half of the material does not later go into the trash as scraps and awkward pieces. Therefore, the diagram below shows how convenient it is to cut out all the elements of bed linen on your material at once.
We draw the contours on the material with chalk, carefully measure everything with a ruler and cut it with scissors.
Let's start sewing. Sheet
After all the blanks for the future bedding set for the baby have been carefully cut off and are waiting in the wings, we determine a convenient work procedure for ourselves and begin sewing.
Start sewing from the sheet. This is the simplest element of the kit, on which you can train your hand and, at the same time, think about what it will be like - simple, or with an elastic band.
Indeed, the sheet is a rather insidious element of the sleeping set. On the one hand, you can sew it in the most ordinary and easiest way - simply hemming the edges. To do this, we sew them with an overlocker or bend the edges by 0.5 cm and repeat this simple operation again. Thus, we get a double fold of the edge, which we pin with pins or apply a basting with brightly colored threads so that it is clearly visible when working on a typewriter and is easier to remove afterwards. Sew the edge using a sewing machine as shown in the picture.
If you made the pattern correctly, then most likely two of the four edges of your sheet already have a factory edge and do not need to be stitched. However, if there is none or it is very hard, work on these edges as well.
Returning to the question of the sheet, you can, of course, make it with an elastic band. However, immediately keep in mind that this is a more labor-intensive process with calculations and additional patterns. But the baby’s active movements will not knock down the sheet, as is usually the case, which means that it will have to be rearranged or adjusted less often.
We will use standard techniques for its manufacture.
On average, such a sheet will require more fabric than usual. It is necessary to take into account the fit of the mattress (about 10 cm), seam allowances (about 2 cm for each) and the drawstring through which, in fact, we will stretch the elastic.
In total, the total fabric consumption will be approximately 150 or 160 cm by 110 cm.
- It is necessary to sew the fabric at the corners and stitch it so that it turns out nothing more than a mattress cover.
- Then fold the sheet, stitch it and leave four holes with the expectation that the elastic should fit inside freely.
- Distribute the elastic around the perimeter of the sheet and stitch the edges
For those who still don’t dare to bother with an elastic band, there is an optimal solution that is convenient in practice and easy to implement - a sheet with clasps, elastic bands or elastic bands at the corners of the duvet cover.
How to properly sew a sheet with an elastic band?
A sheet with an elastic band is convenient because it never moves or wrinkles, but it is a little more difficult to sew. The pattern will be something like this:
Fitted sheet pattern
Another difficulty is that fabric 2.2 meters wide is only enough for a one-and-a-half bed with a width of no more than 1.5 meters. If the bed is wider, then you need to look for a wider fabric. And the technology for sewing a sheet with an elastic band is as follows:
- We cut the fabric as in the diagram. Don't forget to leave 1 cm seam allowances (they are marked in green)
- Sew the corners of the sheet with a bed stitch
- We process the edge of the sheet: we make a wide seam in the hem (about 1.5 cm wide).
- We insert the elastic into the seam that has formed along the edge of the sheet. The elastic band is suitable for regular underwear, 0.7 cm thick. The length of the elastic band for the sheet is taken one meter less than the perimeter of the mattress
VIDEO: How to sew a baby sheet with an elastic band?
Sew a duvet cover
With a duvet cover everything is quite simple and easy. We will need that part of the material that you cut out to fit the baby blanket. However, if the patterns given above did not help, then the easiest option to correctly measure the size of the fabric for a duvet cover is to fold it in half and in this form cut off a piece of material the size of a blanket.
Don't forget about the seam margins and leave about 2 cm on each free edge.
When the duvet cover fabric is ready to use, already folded in half, it should be stitched along all the free edges. For strength and reliability, it is recommended to use overlock or zag-zag seams.
Important! On the side that is comfortable for you, do not forget to leave a hole into which you will insert the blanket into the duvet cover.
The hole for threading the blanket is usually made about 30-40 cm and its edges are carefully stitched inward, to the wrong side.
The duvet cover is ready. All that remains is to turn it right side out, straighten it and straighten it well, especially in the corners.
How to sew a duvet cover:
To correctly determine the required duvet cover dimensions, measure the duvet and add 2-3 cm to each side so that the duvet fits freely.
- The duvet cover can be sewn from one sheet, folded crosswise properly, or from two parts - top and bottom. Let's consider the option of sewing from two parts as more complex.
- For a duvet cover with a zipper or ties for the bottom and top, cut out identical pieces whose width is the width of the finished duvet cover plus 4 cm for allowances, and the length is the length of the finished duvet cover plus 3 centimes for allowances and sewing in a zipper or ties.
- For a duvet cover with buttons, parts of different sizes are cut out. The width of both parts will be the same, it is equal to the width of the finished duvet cover plus 4 centimes for allowances. The length of the top part is equal to the length of the finished duvet cover minus 18 cm and plus 3 cm for allowances. To calculate the length of the lower part, you need to add 3 cm to the length of the finished duvet cover for allowances and another 20 centimes to form the slot flap.
How to sew a duvet cover with ribbon ties
1. Cut the decorative tape into 24 equal lengths. Lay the top piece of the duvet cover face up and on one of the short sides place 12 ribbons at equal distances from each other so that the treated ends of the ribbons are directed to the other short side of the panel, and the untreated ends are aligned with the cut of the fabric; Pin each ribbon. Place a strip of sheet fabric 4 centimeters wide on the ribbons, face down, and baste it to the duvet cover piece, at the same time: basting the ribbons and removing pins from the fabric as you work. Sew the parts together, 1 cm apart from the edges.
2. Fold the strip of fabric onto the wrong side of the duvet cover piece so that the fold line coincides with the stitched seam, and iron. Fold the raw edge of the strip to the wrong side by 1 centimetre, baste, and stitch.
3. Similarly, prepare the lower part of the duvet cover for further work, then sew 2 parts with a French seam along the three raw sides. Turn the duvet cover right side out, pushing the corners with scissors, and iron.
How to sew a duvet cover with a zipper
1. Fold the top and bottom parts of the duvet cover together and baste. Sew a French seam around the perimeter, leaving a slot on one of the short sides, the length of which is 2 centimeters less than the length of the zipper.
2. Turn the duvet cover right side out, pushing the corners through. Iron.
3. Sew a “zipper” into the slit, attaching each of its halves to the duvet cover parts with a double stitch so that the raw edge of the slit is closed, and the fastener itself is invisible from the front.
How to sew a duvet cover whose opening is fastened with buttons
1. To one of the short sides of the top part of the duvet cover, baste a strip of sheet fabric wide. 4 centimes, folding the parts right sides inward and aligning the cuts. Sew the strip, 1 centimeter from the edge. Fold it onto the wrong side of the duvet cover piece so that the fold line runs along the stitched seam. Press the seam. Place a non-woven strip under the wrapped strip, fold the raw edge of the strip to the wrong side by 1 centime, iron, and stitch.
2. Process one of the short sides of the bottom piece of the duvet cover in the same way.
3. Place the top and bottom pieces right sides together, lining up the raw edges. The top piece should be 38 cm shorter than the bottom piece. Fold the bottom piece over the top piece, forming a flap. The overlap of the valve on the upper part should be 2 cm.
4. Sew the duvet cover pieces along the raw sides using a French seam. Turn the product right side out, pushing through the corners with scissors, and iron it.
5. Along the overlapped edge of the flap, at an equal distance from each other, mark the places for the slotted loops of the fastener. Process the loops and cut them. Along the edge of the top piece opposite the loops, mark the places for sewing on the buttons and sew the buttons on by hand. The same applies to pillowcases. Easy stitches and good luck!
Let's start with the pillowcase
It won’t be too difficult to deal with a pillowcase. Make sure once again that its dimensions match the baby pillow and start sewing.
To do this, we need, by analogy with a duvet cover, to fold the fabric in half, mark the size of the pillow on the folded area, but there is no need to rush to cut anything yet. On the side of one free edge we need to leave a fabric about 20-30 cm long. In the future, this will be the valve of our pillow so that it does not fall out of the pillowcase and looks aesthetically pleasing.
We fold the cut material with the front side inward and the backside, respectively, outward, and leave our valve on the outside. We sew the edges of the future pillowcase and sew the edges of the flap separately, having previously folded them. Turn the pillowcase right side out, turn the valve the other way around, and tuck it in. Voila: the pillowcase is ready.
Make your own bumpers for a baby crib
The bumpers are not only an integral part of the decor of a crib - they protect the baby from unwanted impacts on the backs or bars of the crib, drafts or wind, and direct sunlight. Although, you must admit, the sides also create a feeling of comfort and warmth.
You will be surprised, but it is also possible to make bumpers with your own hands. For this we need not only fabric, but also filler (sintepon or foam rubber)
Make sure the filler is of high quality. Cheap, bad filler can cause allergies in your baby.
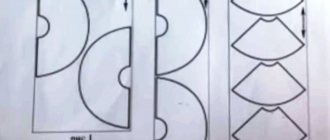
As mentioned above, before cutting, do not forget to wash, dry and iron the fabric. To make the side, we need a piece of fabric measuring 110 by 550 cm. Although the size of the crib may not be standard, so if you wish, you can measure the dimensions of your crib yourself and mark them on the fabric, not forgetting about the seam margins.
Otherwise, we cut out the material in accordance with the markings:
We cut out the elements and sew them together, not forgetting to leave one edge unsewn in order to fill the side with filler. Ruffles are sewn in parallel to how each element is sewn, but this is not at all necessary and depends on your desire (we will talk about decorating children's bedding in the next chapter).
Next, cut out the filler. Its dimensions should be slightly smaller than the element into which you plan to insert it (at least 0.5 cm). We put the cut out filler into the side, carefully making sure that the filler fits evenly and in size. Then we sew the open seam and, for greater convenience and practicality, we make a through seam in the center of the side, sewing the fabric and the filling together. This way he won't "walk" inside.
After the border is stuffed, you can sew a hidden zipper into the unstitched edge so that you can wash the filling and the border cover separately. In this case, you should not sew the filling and fabric together.
How to sew a duvet cover with a hole in the side
The simplest and, I would say, democratic option: sew a duvet cover with a hole in the side. There are many advantages here: both sides of the duvet cover are used, there is no need to spend money on a zipper, technological processing is simplified, and a special foot is not needed.
Usually a duvet cover is sewn from a whole cloth, and if excess fabric is cut off, it is only on one side. It is better to make a cut in the duvet cover from the edge side, which will simplify the processing technology, otherwise you will have to sew a hem seam with a closed cut.
So, connect the two canvases with the first line from the side of the cut. Sew with fastenings on both sides of the cut to the marking with a stitched seam along the edge of the edge: seam width 1.0 -1.5 cm. Lay the fabrics face down and stitch the frame along the seam allowances 0.1-0.2 cm from the inner edge, placing pintucks on the stitching seams to secure the seam (watch video). At the end of the line, make a bartack.
After processing the cut, sew the second longitudinal section with a double seam or backstitch. Finish sewing the duvet cover by finishing the end sections with a double seam.
How to decorate a baby bedding set
Of course, making a set of bedding for a baby with your own hands is already a great achievement, but often parents want to somehow especially decorate their child’s bedding, making it even more interesting and soft.
In this matter, your imagination will play into your hands, but it should be limited. Don’t forget who this bedding set is being made for. Sometimes even manufacturers take precautions by decorating baby underwear sets with buttons or sewing zippers into them. Therefore, when choosing this or that decorative element, keep in mind that there is a child in the crib, and one way or another it is almost impossible to keep track of whether a dangerous piece of bedding ends up in his mouth. Therefore, it is recommended to abandon the zipper in the duvet cover, and it is better to put the buttons that can be used to fasten the pillowcase pocket aside and leave everything as is.
To decorate children's bedding you can use:
- Ruffles
- Lace
- Frill
- Wide ribbons
And you should absolutely refrain from:
- Buttons
- Lightning
- Bus
- Rhinestone, etc.
Helpful tips for completing your work
The crib set is almost ready. However, after the work has been done, it is recommended to wash all its elements again, dry them thoroughly and iron them with a hot iron, so that you can confidently and without fear put your baby into a bed made with your own hands. Well, after that you can safely tuck the pillow and blanket into our bedding set and put on the sheet.
Before you start using the bedding for its intended purpose, carefully check to see if there are any needles or pins left somewhere.
As practice shows, this happens, which means sooner or later the baby can get hurt. If you are worried that you may not be able to find the needles or pins used in the cutting process, make bastings with simple stitches using brightly colored threads so that you can easily find them and remove them from the finished product. This process is a little more labor-intensive, but completely safe for the baby.
Another piece of advice: if you liked the process, and more was done than wasted your nerves, then you can sew several similar sets and select fabrics so that the elements of the baby’s bedding are interchangeable. For example, some elements can be monochromatic and combined in color. Then you can always, if necessary, replace, for example, one sheet with another and at the same time maintain the pleasant appearance of the baby’s crib. When choosing special or bright patterns on the material, keep in mind that such a set cannot be “broken” without harm to the appearance, and during the washing process the material risks losing colors and looking stale and old. Therefore, traditionally, fabrics in bedding colors are chosen as materials for children's bedding, with patterns that are not bright and do not irritate the eyes, in order to create the most calm and comfortable atmosphere for the baby's precious sleep.
How to mend bed linen with your own hands?
There is another way to mend bed linen with your own hands, this is a patch. Any accessory from the set may lose its appearance due to the appearance of a hole, but everything can be changed if you know how to dry bed linen correctly and handle it with care. You can take a similar material or a picture and sew it on the place where the hole appeared.
But in order for the hole to become invisible and take on a fresh look, you need to know a few rules:
- We process the edges of the hole - you need to trim off the excess fibers that stick out and slightly increase the gap; this is done so that the seam is not visible;
- We sew the edges of the hole with the same color scheme of thread, but this must be done inconspicuously and efficiently; we baste oblong ties, which we will see only on the wrong side;
- We bend the fabric so that the darned edges are connected, then we baste them to each other;
- We iron or steam the outer side of the fabric well, and the seam should become invisible.