The famous fashion designer Christian Dior always argued that Any figure can be made attractive with the right skirt style. If a fashion boutique does not live up to expectations, then you should try to sew the product yourself.
A universal option is a tight-fitting and tapered pencil skirt. The pattern for beginners is so simple that even a girl who does not have a special sewing education can handle sewing.
How to choose the right fabric
It's no secret that a pencil skirt suits both slender and plump girls. When choosing fabric, it is necessary to take into account not only the shape of the figure, but also the season in which the item will be worn and its purpose.
Basic Rules:
- You should not buy bulk materials (for example, chiffon, georgette). They do not hold their shape well and require the use of lining fabric.
- For sewing summer and spring outfits, it is better to use knitwear, viscose, linen, and cotton. For winter - gabardine, velvet, tweed, wool.
- Hard fabrics look better on slender hips, and soft textures on full hips.
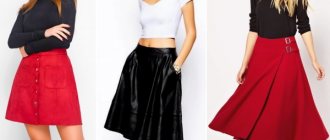
A pencil skirt is considered an office option, so it is recommended to choose either plain options or a strict checkered one.
The versatile black and white color can be combined with any top.
However, if the product is sewn from bright fabric, complemented, for example, with an asymmetrical frill, then it can look great in a festive look .
On a note ! In summer weekend outfits, it is better to exclude monotony and give preference to interesting colors. For the winter, you can sew a stylish leather skirt, complementing it with a fur vest.
How to sew a pencil skirt?
Sew the darts and iron them to the center of the panels.
Sew the middle seam on the back panel and finish the vent.
Sew side seams and press. If you don't have a serger, zigzag the edges to protect the fabric from fraying is quite acceptable.
Finish the zipper, sew the belt, sweep out the loop, sew on the button. When attaching the waistband, don’t forget to add ribbon loops so that the skirt can be hung on coat hangers.
Hem the bottom. The bottom of the skirt, hand-hemmed with hidden stitches, looks neat.
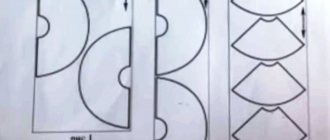
Step-by-step instructions for making a pencil skirt pattern for beginners
First of all, you need to really assess your figure and decide on the size: measure the circumference of the waist (WT) and hips (H), the length from the waist to the widest point of the hips (D1), the length of the entire model (D2).
To pattern a pencil skirt, novice seamstresses need to measure the waist, hips and length of the future product.
To get the correct pencil skirt, the pattern for beginners is made on ¼ of the model.
Step by step it will look like this:
- A rectangle with a width of ¼ OB + 4 cm and a length of D2 + 21 cm is constructed on a sheet of Whatman paper.
- The length D1 is laid down from the top point of the rectangle.
- To determine the waist line, you need to divide the OT data by 4 and add 3 cm to the result. The final value is set aside from the upper right corner along the line and put a point T, which is connected on the pattern with a smooth line to D1.
- On the lower part, retreat 6 cm from the corner and place a point H, which is smoothly connected to D1.
The pattern is ready. All that remains is to cut it out and apply it to the fabric.
How to make a pattern
A basic step-by-step pattern for a pencil skirt for beginners involves taking into account all measurements and fabric features. Two rectangles are drawn on paper - the front and back of the product. To the desired length of the product, add 12 cm for the waistband at the top and the hem at the bottom. To the width - 2 cm at the seams. Excess paper is cut off.
The next stage is pattern modeling. It involves applying a narrowing zone of the product. To do this, mark the center on the bottom line. Next, step back 1-2 cm in both directions and apply marks that need to be connected to the central point of the hip line.
The finished template is applied to the fabric and outlined with chalk or a piece of soap. This model is the basic option. There are seams only on the sides, where, if necessary, a zipper is sewn in later.
If you plan to have a vent, then you should modify the existing pencil skirt pattern. For this purpose, the location of the cut in the form of a triangle is indicated on the template of the back of the product. Its standard dimensions are 4-5 cm at the base, 16-20 cm in height.
Step-by-step instructions for sewing a skirt
Using the pattern, sewing a pencil skirt will be a simple and quick process even for a novice seamstress. First, you should decide on the size of the material: the width should be equal to half the volume of the hips, taking into account seam allowances, and the length of the cut should be two lengths of the skirt with a small margin for hems.
Then you can do the following:
- Fold the fabric in half (right sides facing each other) along its entire length.
- Place the pattern from one edge of the cut so that the fold of the fabric coincides with the inside of the pattern. Circle it with chalk. Repeat the same on the second edge of the cut.
- Cut out both pieces using tailor's scissors.
- Place the two halves of the blanks right sides together, overcast the seams, and then stitch them on a sewing machine.
- To decorate the belt, the upper part of the skirt should be folded twice 3 cm inwards and stitched with a zigzag stitch. Do the same steps with the lower part of the skirt, only bend it 2 cm.
This tailoring option is suitable for a simple skirt made of elastic fabric for a slender figure.
When choosing a thicker fabric, it is recommended to sew a zipper into the side seam.
High waist pencil skirt
In order for a woman with full hips to be able to afford such a style, she should sew a product with a high waist.
To do this, you will have to make some changes to the instructions described above:
- The upper horizontal line of the waist should be raised by 5-7 cm and point T2 should be placed there.
- Point T must be shifted to the left by 0.5 cm.
- Connect points T2, T and D1 with a rounded line.
Attention for beginners! When cutting fabric for a pencil skirt, it is important to deviate 1.5 cm from the pattern for allowances.
Before you finally sew the skirt, you should do a preliminary fitting and adjust the model to your figure . If necessary, you can sew a wide elastic band into the belt or make a zipper on the side. This will allow the skirt to fit better and highlight even fuller hips.
Skirt with one seam
To diversify your wardrobe, you don't have to buy a lot of different styles of clothes. This can be done using pencil skirts alone, sewn according to the same pattern for beginners, but in different ways.
A one-seam product is the simplest option.
So, by correctly laying out the pattern on the fabric, you can make sewing your skirt easier by making it with one seam. To do this, you need to select a cut that is equal in width to the length of the skirt (taking into account the hems at the waist and hem), and the pattern itself should be made not into ¼ of the model, but into half of the model.
In this case, the fabric does not have to be folded in half. Simply lay it out on the table in one layer, face down. Apply it twice along the inside of the fabric and trace the pattern with chalk, while one side line should be common.
All that remains is to cut out the workpiece and the recess formed at the junction of the patterns, indicated by the line T-D1 (or T2-T-D1). This will be the side dart. When sewing the connecting seam, you should sew a zipper into it .
This style has its own variations: you can move the seam from the side back, and so that the dart does not end up in the front center, it can be distributed on both sides, reducing the depth of each dart by half.
Yoke skirt
The product with a yoke looks elegant. It is not so difficult to complete: a simple pencil skirt is taken as a basis (pattern for beginners, described above).
If the element is planned on the front part of the model, then the pattern should be duplicated again on paper, and the required option should be drawn on this copy. Only after this can the material be cut into the required parts.
The yoke can be different in configuration (simple or curly) and in size, but darts (at least partially) will definitely fall into its area . After cutting the pattern, the dart openings are closed on the yoke.
If part of the dart remains on the main fabric, then there is no need to remove it.
A model with a yoke will look great in a high-waisted version. However, in this case, you should not turn up the waist; it is recommended to use non-woven fabric on the inside.
The yoke can also be supplemented with loops that securely secure the belt to the belt. Their length should be equal to the width of the belt + 2 cm for seams.
If you make a model with a frill (flounce), then the junction of the yoke with the main fabric of the skirt is perfect for inserting such an addition. This will help give the product a special charm and hide such figure flaws as the same width of the hips and waist.
Also, with the help of a frill, you can lengthen the product even from thick winter fabric, thereby protecting your knees from the cold.
How to tailor a belt
Step-by-step process for making a belt for a skirt:
- To begin, assemble both parts of the belt separately, grinding the central parts with the sides and laces;
- On one side of the central part you need to leave an unstitched corner 2 cm wide for the lace;
- Iron the seams of each part of the belt;
- Next, the elements of the upper and lower sides of the belt need to be fixed along the entire length. It is important that the holes match;
- Baste the fastened elements around the perimeter, making an open section 6 cm long in the lower part;
- Then the belt must be turned outward, straightened and ironed well;
- Sew the open area with an invisible seam. Then sweep the edges along the entire perimeter;
- The last operation will be to make a finishing seam at a distance of 1 cm.
You may be interested in this Rating of the best sewing machines for home use
Such a belt can visually make your waist thinner and slimmer. But it is not recommended to use it if the stomach is very visible, as it will make it appear even larger and rounder.
Asymmetrical model for slender legs
How to sew a skirt without a pattern
Not only real craftsmen can sew an outfit “by eye”, that is, without using patterns or patterns. A pencil skirt is an option when even a novice seamstress can easily cope with the task .
The simplest algorithm of actions is as follows:
- First you need to measure the circumference of your hips and decide on the length of the model. The standard length is knee-length or just below the knee.
- Having laid out the fabric in one layer on the table, cut out 2 rectangles, where the base should be equal to half the volume of the hips + 2 cm, and the height should be equal to the length of the skirt + 3 cm.
- Baste both fabrics and put them on for test fitting.
- To determine the curve line from the waist to the hip, it is better to use pins. They usually pin up excess tissue.
- After removing the workpiece, use a chalk to mark a line (along the pins) and then cut off the excess, leaving 1.5 cm for the seams.
- Now you can stitch together the fabrics and sew in a zipper on the side.
- A rectangle is cut out of fabric with a length equal to the circumference of the waist and a width of 4 cm. It should be sewn along the upper part on the inside of the skirt - in this way a belt will be designated.
- The lower part of the skirt just needs to be slightly tucked and stitched.
The entire procedure will take no more than 2 hours, taking into account the lack of skills of a novice seamstress.
A professional, of course, will do it faster.
How to take measurements correctly
If a person does not have an assistant, then it is better to take measurements in front of a large mirror.
Tie a thread around your waist, but do not pull it too tightly, it should be pleasant to the body. Next, you need to stand sideways in front of the mirror and use a centimeter to take measurements from your hips. You need to pay attention to the fact that the centimeter passes through the convex points of the buttocks.
Note! If the stomach is convex and not flat, then when measuring the hips you need to make allowances taking into account the tummy. If you forget about this rule, you may not fit into the finished product.
You might be interested in: Patterning and sewing car seat covers with your own hands
The waist should be measured using a thread, and the length using a centimeter in front of a mirror. Do not bend, otherwise the product will turn out short. To make work easier, you can simply take measurements from an old skirt if it fits.
It is advisable to add 3 cm to the finished length measurement. For this style of skirt it is very difficult to choose the length the first time, since everyone has different buttocks, hips and legs. The length is determined after a test fitting. It is better to write down the measurements on paper: hip volume, waist circumference, length.
And yet, most tailors recommend using an assistant when taking measurements. Since it is much easier for a third party to take measurements, plus he can look and photograph the skirt during the fitting process to understand what modifications are needed.
Model options for full figures
Wrap pencil skirt
Without a pattern, you can make another interesting version of a pencil skirt - a wrap model.
To do this, you need to take a piece of fabric with a length equal to 1.5 times the waist circumference and a width along the length of the future skirt.
Next, perform the following steps:
- Hem the bottom and sides of the fabric rectangle.
- Wrap yourself with a piece of material so that one upper corner of the rectangle falls on the right side of the waist, and the second corner lies on the left side. This way we get the desired shape of the skirt. You can use pins to secure the edges of the canvas.
- Having determined the middle of the back of the skirt, make a cut to the length of the zipper, which you then sew in.
- Separately, cut a rectangle from the fabric (on the bias) with a length around the waist and a width of 3 cm. It must be basted to the skirt (from zipper to zipper), folding the parts with the right side inward.
- Fold the second edge of the belt and stitch it, and turn the belt itself over to the inside of the skirt and secure it there.
Any of the styles described above will be an excellent addition to a woman’s wardrobe. You can combine a pencil skirt with various blouses (both tight and slouchy options), elegant or business jackets and vests.
The product can also be supplemented with patch or sewn pockets, and trimmed with decorative buttons. The main thing is that even the simplest model can make a woman elegant.
What do you need to cut and sew a skirt?
Prepare a cloth, a piece of dry soap or chalk, and a large plastic pattern for cutting. Don't have a pattern? A longer ruler will do. You will also need sharp scissors, thread, sewing needles with a limiter at the end, and a measuring tape.
If you have no cutting skills at all or the chosen skirt model is complex, it is better to first make a pattern on paper and then transfer it to fabric. An old newspaper and a bright felt-tip pen are quite suitable for this. Don't be afraid, everything will work out for you!