What you need for work
Dressing your family in shorts before going on vacation doesn't require a frantic shopping spree. Just a desire is enough. To create this part of the wardrobe you do not need any special skills or abilities, there is no need for any devices such as awls, hooks, clips, etc.
Sewing tools
It’s worth going to the list of what you need for sewing. Men's shorts, pattern:
Important! The amount of fabric we need depends on the width of the rolls in which it is sold.
For children's shorts, if the width is 90 centimeters. Then you need a meter, if the width is 140 centimeters, then half a meter is enough. For men's shorts with a width of 90 centimeters, about two meters will be required, with a width of 140 centimeters, one and a half meters is enough. Now the size of the elastic band is 1 centimeter wide. For a child 20 centimeters, for an adult 40 centimeters. Well, you will need a cord to tighten the elastic. For a child, six centimeters is enough, for a man - ten centimeters.
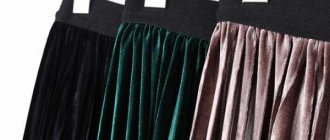
Bright colors
This is interesting: Pattern for women's shorts (size 36-44 euros)
Shorts fabric
This type of short leg clothing is often used for sports activities or beach holidays.
One common material for shorts is twill. Such dense material is often used for weaving bags because it is durable and wear-resistant. The denim material also looks very flattering. It's stylish and fashionable. These shorts allow you to go for a walk without looking too beachy.
Twill option
Checked shirting material is more often used for shorts, which are very pleasant to the touch. They are cozy and homely. This cotton material is used very often in sewing. A huge palette of colors allows you to create different images.
Comfortable indoor shorts
How to take measurements
Taking measurements is a fairly easy process. Which does not require special skills and abilities and does not take much time.
Note! When taking measurements, the person for whom the shorts are sewn must stand straight, without straining, and also maintain good posture.
You might be interested in this: The procedure for sewing chevrons onto uniform sleeves
Also, the person being measured should not be wearing any bulky clothing that would allow the measurements to be taken incorrectly. It is better if he is as naked as possible or in thin, tight clothes.
Taking measurements
When taking measurements, you do not need to pull the tape too much. The waist is measured by placing a measuring tape horizontally on the floor, strictly at the waist. Hip circumference is also required. This is the widest part that covers the buttocks. Also shoot horizontally on the floor. Now you need to measure the circumference of one hip. To do this, it is worth grasping the thigh in its very upper part, also horizontally to the floor. The knee should be measured in a bent position at the level of the knee point. The angle should be 90 degrees. More seat height will be required. It is necessary to sit the person down and measure the height from the waist to the place where he sits.
You also need the length of the product. It is measured from the waist to the length you need: above the knee, knee-length, below the knee.
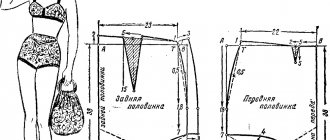
How to make a pattern for men's shorts with elastic
Light summer shorts with elastic are most often sewn according to the pattern of men's “family” briefs. This model is perfect for sports and beach holidays. The appearance of the finished product depends on the quality of the fabric and color scheme. By combining pieces of fabric of different textures and colors, it is possible to create very non-trivial shorts.
Constructing a pattern for the front half
- Construct a right angle with a vertex at T.
- Place a measure equal to DI down vertically, put t.H and draw a horizontal bottom line through it
- To the right, along the bottom and waist lines, set aside the distance POB/2 + 4, place t. H1 and t. T1, respectively
- From t T down, lay down POB/2 + 4, put t. W and draw a horizontal step line. At the intersection of t Ш1.
- From point Ш1 to the right they put aside POB/10, point Ш2.
- From point Ш1 upwards they lay down POB/10, point Ш3
- A bisector 2.5 cm long is drawn from the corner.
- Connect Ш3 and Ш4 with a concave line.
- From T1 down 1.5 cm we get T2.
- From t. H upward 2 cm, t. H2 is obtained.
- Connect all the dots.
Constructing a pattern for the back half
- Construct a right angle with a vertex at T.
- Place a measure equal to DI down vertically, put t.H and draw a horizontal bottom line through it
- To the right, along the bottom and waist lines, set aside the distance POB/2 + 4, place t. H1 and t. T1, respectively
- From t T down, lay down POB/2 + 4, put t. W and draw a horizontal step line. At the intersection of t Ш1.
- From point Ш1 they lay down POB/5 + 2 cm and down 4 cm it turns out to be point Ш2.
- From point Sh1 they put POB/10 up and get point SH3.
- A bisector 3.5 cm long is drawn from the corner.
- Connect points Ш3 and points Ш4 with a concave line.
- From t. H1 to the right POB/10 + 2 cm and down 4 cm get H2
- From t. H up 2 cm we get t. H3
- From t. L1 to the left 3 cm, get t. L2 and connect it with a straight line to t. Ш4.
- Extend straight line Sh4L2 to distance POB/10
- Connect all the dots.
Depending on the wishes of the customer, the waist line is lowered down.
This is interesting: Pattern Shorts with elastic drawstring and top (size 36-44 euros)
We sew men's shorts
Source
And even if you have already bought shorts for leisure, sew another one using our pattern - firstly, men's shorts sewn to individual measurements are a real exclusive, and secondly, such shorts will fit perfectly!
Pattern for men's shorts. Click to enlarge
Before you start creating a pattern for men's shorts, you need to take the following measurements:
Half waist circumference – 44cm
Semi-hip circumference (buttocks) – 50cm
Shorts length – 56cm
Constructing a pattern for the front half of men's shorts
From point A to the right and down, draw horizontal and vertical lines.
Length of men's shorts. From point A, set down the length of men's shorts according to measurement - point H: AN = 58cm - length of shorts according to measurement + 2cm.
Step line of men's shorts. From point A, vertically downwards, set aside 1/2 of the hip circumference according to the measurement plus 3 cm - point B:
AB=50/2+3 =28cm.
From point B, draw a horizontal line BG1 - the step line of men's shorts.
НН1 = 2cm
From point H1 draw a line parallel to line AT.
Waist width of the front half of men's shorts. From point A along the line to the right, set aside ½ the circumference of the hips according to the measurement plus 3 cm - point T: AT = 50/2 + 3 = 28 cm.
From point T, draw a perpendicular down; At the intersection with the step line we place point B1, and at the intersection with the length line - point H4. H4H2 is equal to 1cm.
We connect points H and H2 with a slightly concave line.
The width of the bottom of the front half of men's shorts. H2H3 is equal to 5cm.
TT1=1cm
Connect points A and T1 with a straight line.
Step width of the front half of men's shorts. From point B1 along the step line we set aside 1/10 of the girth of the buttocks to the right according to the measurement plus 0.5 cm and set point D: B1G = 50/10 + 0.5 = 5.5 cm.
B1B2=9cm.
Connect points B2 and G with a concave line, points G and H3 - connect with a concave line.
Additionally, build a one-piece zipper valance 4 cm wide and about 20 cm long along the length of the zipper.
The pattern for the front half of men's shorts is a green outline.
Construction of the back half of men's shorts.
Back seam of men's shorts. T1T2=2.5 cm.
Connect points G, T2 with a straight line and continue upward from point T2.
From point T2 upward we set aside 4cm and place point A1: T2A1=4cm.
Connect points A, A1 with a straight line.
Step width of the back half of men's shorts: GG1=4cm.
The width of the bottom of the back half of men's shorts: H2H3=3cm.
We connect points G1 and 2 with a curved line. G1G2=1cm.
Connect points H and 2 with a slightly concave line. Connect points A1 and G2 with a slightly convex line, as shown in the pattern of men's underpants (red line).
The pattern for the front half of men's shorts is a red outline.
Men's shorts are cut according to a pattern on fabric with a seam on the side. You can cut the shorts unfolded without a side seam, if the width of the fabric allows.
When cutting shorts on fabric, allow 3 cm for the hem of the shorts, 4 cm for the gathering along the top, and 1 cm for all other seams. An elastic band 3 cm wide is measured around the waist with a slight stretch.
Source: https://dushka-li.ru/post224356620/
Men's Bermuda shorts: pattern
These shorts have their own characteristics. For example, their waist is lower, so you should lower 40 millimeters down from the waist line and draw a new line, which will be the waist. Cut off the rest. Now you need to add 30 millimeters to insert a zipper in the center of the trousers.
Next, draw pockets on the front half.
What do Bermudas look like?
Now, from the main material, you need to cut out the front halves of Bermuda shorts with a valance - two pieces. No barrel needed. Next, the front side with pocket burlap is also two pieces. Two back halves. Two parts of the back half belt.
From the lining, make two burlap pockets of Bermuda shorts.
Important! All elements of the belt should be reinforced with adhesive material.
Now sew by analogy. Make a pocket at the front with a trimmed side. Baste and sew darts at the back. Next, you need to iron everything to the middle seam at the back. Now baste and stitch the middle seam to the bermuda valance. Now it's time to deal with the lightning. Sew it in with a valance.
Bermuda shorts pattern
External parts should be reinforced with thermal fabric on the belt. Sew on a belt for Bermuda shorts.
Now tuck and baste the bottom. To do this, you should use a hidden seam. It has to be done manually.
It remains to baste the belt loops according to the markings made earlier.
That's basically it. It's ready. It's not quite as easy as sewing regular shorts. But everything is also in your hands. Such a beautiful piece of wardrobe will delight any man. And the fact that it was made by the hands of a beloved woman gives it special value.
Pattern for men's shorts
Sewing things with your own hands is very cool, because manual labor is always valuable. And your loved ones will be pleased to receive such a wonderful gift. Today we will teach you how to sew men's shorts with your own hands.
To make good men's shorts, you will need fabric, matching thread, a zipper and buttons. The fabric can be cotton, linen or denim.
It is necessary to take the following measurements: waist circumference, hip circumference, product length (measured from the waist to the desired length). In addition, you need to leave a small allowance (from 2 to 8 cm) so that the shorts are not butted. It’s better to sew it in a little later than to cut a very narrow thing that will be uncomfortable to walk in.
Draw a pattern on special paper, you can print ready-made patterns from the Internet, or use old shorts. If you chose the latter option, then fold the shorts in half, lay them on the fabric and trace them. The pattern is ready!
If you like precision in everything, you can use our pattern for men's shorts:
How to sew men's shorts with your own hands
So, to sew men's shorts with your own hands, you need to cut out two front and two back halves of the product. Remember to leave some space for seams. Cut out all the pieces and start sewing them together.
First of all, let's deal with the pockets. Sew the corner to the lining, finish the seam and machine stitch it. Then sew the pocket lining to the front of the leg, turn the material inside out, sew a hem and two finishing stitches.
Important
Next, attach and pin all the blanks, sew the pocket and finish the seams. Using a separating stitch, we sew the edge of the pocket lining and the front half of the shorts. Sew the front halves together, while stepping back half a centimeter from the seam line.
We make a shelf (codpiece) that will cover the zipper. Its parts will be: one - double, the second - single. To sew a zipper to the product, you need to attach it to the right half of the shorts, cover it with a double piece of the codpiece and sew along the edge. After this, you need to go through a securing seam.
Now you can work on the single piece of the codpiece. Sew it right side to the left leg, turn it inside out, make a hem and secure the seam. Next, sew the zipper to the single piece. Once the snake is sewn on, turn the piece over and mark the seam line for the fly. Make two parallel lines along it.
Sew on the back pockets. First, sew the darts, then turn the fabric over and sew two strips to it, securing them with pins for security. Make a cut between the slats, turn the fabric inside out and sew the edges. Sew the first piece of fabric for the pocket, then the second and connect everything to the main fabric.
Next, sew the pocket and finish the seams. Sew on the button and your pocket is ready. Now you need to sew the side and crotch seams. Turn the trouser legs inside out, sew them and machine them. Don't forget to fold them in and finish them underneath. Your pants are ready!
Men's denim shorts
Old and unwanted jeans can be turned into great shorts. Fold the jeans in half, making sure the side seams are parallel to each other. Mark the length you need with chalk, then cut the legs along this line. If you hem the edges, leave an extra couple of centimeters for the seam allowance.
If desired, denim shorts can be decorated. To do this you will need a small grater and a utility knife. Using a grater, you can age individual areas of the fabric. Use a utility knife to make holes and pull out the threads along their edges. This is how you can sew original men’s shorts with your own hands without any special financial and physical costs.
Source: https://OtvetKak.ru/hands/vykrojka-dlya-muzhskix-short.html
Nuances and features
There are several options for creating a pattern with your own hands. One of the simplest is to rip open some old and unnecessary, but well-fitting pants or shorts, iron them and draw them on paper. Such details can serve as patterns. Another option is to download your favorite base from the Internet. And modify it accordingly, according to the features of your structure. Now there are a huge number of sites that can help you with this. Well, what is described above, take measurements yourself.
Large sizes have their own subtleties. After all, the structure of the figure is distinguished by the presence of a belly or voluminous buttocks. This should be taken into account when modeling. Before making a pattern, you should ask how a man prefers to wear shorts, because they often drop the waistband below the stomach. It happens that men like to pull their shorts higher. Here, too, adjustments need to be made.
To create a loose-fitting pattern, take a maximum of 50-60 millimeters. If there is a belly, appropriate changes are made. This helps not to restrict movement when walking.
You might be interested in this Instructions for sewing files, sheets and folders with thread yourself
Sports shorts with an elastic band are perfect for practicing skills for a novice seamstress.
Athletic shorts
Decating is also an important part and is of great importance. Unfortunately, many materials shrink significantly after the first wash. For example, shorts can shrink by 7 centimeters. And it turns out that all the work done was in vain. To avoid this, decatification was invented. Experienced craftswomen do this before sewing. One of the easiest ways: soak the material in hot water. There is no need to add any products, then dry, smooth and start cutting.
Don't forget about seam allowances. This is an important point that can affect the result. Before sewing on a sewing machine, do not be lazy to sweep everything by hand. This may not seem necessary, but it plays an important role in the final result.
Technique for sewing men's shorts with pockets
Pockets with cutting side
Pockets can be made using classic technology with burlap lining and valances.
Place the burlap pockets right sides together with the front halves of men's shorts and sew them on the top parts using a sewing machine. Press and press the seams. Sweep pocket entrances into splits or with piping. Place finishing stitches along the entrances of pockets 0.1-0.7 cm wide or double. Iron.
Manually connect the valance to the burlap of the shorts pocket, aligning the entrance to the pocket with the marks on the valance. The valance pattern is downloaded with the specified marks. From the top cut at the entrance to the pocket, we lay a stitch 0.1 cm from the edge, ending it 3 cm below the parts alignment mark. At the entrance to the pocket we set aside 18 cm. From the bottom mark to the bottom of the entrance to the pocket we lay a second line. At the entrance to the pocket we put zigzag fasteners.
We sew the burlap and the valance with a double stitch, and sew the seam with an overlock or zigzag. Along the side and top edges of men's shorts, we sew burlap to the main parts.
Iron the finished pockets using an ironing iron.
Back patch pockets
We iron the upper edges of the pockets twice, 1 cm to the wrong side, and secure them with a single or double finishing stitch. Iron it.
We iron the remaining sections to the inside of the pocket by 1 cm. To outline the lines of the finished pocket, use the pocket pattern.
From the pattern of men's shorts, we transfer the lines for the location of the pockets to the back halves, pin the patch pockets and sew them with finishing stitches. Iron it.
Seams
Stitch and overcast the side seams. We iron the allowances onto the back halves, and add finishing stitches along the seams.
Stitch and overcast the middle seams. Iron it as shown in the photo of the model, and add finishing stitches.
We sew and overcast the crotch seams. Iron the allowances back.
Rubber
We iron the top section of men's shorts 1 cm on the wrong side, then another 4 cm. We hand-baste the ironed section to the shorts and secure it with a finishing stitch, leaving room for threading the elastic. Temporary lines are removed.
We insert an elastic band 3.5 cm wide into the belt, specify the length, sew the ends together, and sew up the hole for the elastic.
Men's shorts: pattern
Let's look at sewing and patterning knitted shorts with elastic. You won't believe it, but it's very simple. Even a beginner will be able to cope with the task. These shorts, which have side pockets, are very comfortable to wear. First you need to build a pattern on paper and then cut it out. Some can do it directly on fabric so as not to waste their time.
Pattern 1
This pattern is suitable not only for men's shorts, but also for shorts for teenagers, as well as for sewing family pants.
How to take measurements is already known. Therefore, they already exist: the length of future shorts, seat height, waist and hips.
Now you should prepare everything you need: fabric, paper, pencil, elastic band, scissors, sewing machine with sewing accessories, elastic band 250 millimeters wide, and interlining for pockets. There is no need for stationery if everything is done right away on the fabric.
- You should start by building the front halves. From the waist line, lower the seat height. Now count 40 millimeters to the left. Make a smooth line creating the middle of the front.
- Next, mark the hip circumference from the drawn seat line. From the drawn waist line, count the waist circumference to the left. Now set aside a couple of centimeters along the bottom line to narrow it. Connect the dots you got. Extend these points to the very bottom to create the sides.
- Divide the seat line into two. These will be ironings. Next you need to draw the pockets. From the seat line, count 40 millimeters upward. Set aside 60 millimeters from the waist. Connect the dots. I'm done with this pattern.
- Now construction of the rear halves. Attach the front halves, step back 80 millimeters from the sides, and transfer all the lines. Set aside 80 millimeters along the waist. Set aside 50 millimeters from the sides along the seat and 20 millimeters along the bottom. Connect everything.
- Raise 30 millimeters along the central seam. Connect this at the waist. Decorate the middle of the back half. Next draw a pocket.
- Cut out 2 pocket pieces. Lay out the parts on the material, circle, leaving allowances.
You might be interested in this: The procedure for sewing backpacks from old jeans on your own
Note! If the fabric is elastic, then this will work, but if not, then it is better to leave more room for allowances.
- Put 40 millimeters down on the hem. Widen the sides by 20 millimeters. Cut out all the details. Multiply the width of the elastic by two. It’s also worth adding the seam allowance, that is, another centimeter and a half. To calculate the belt, add 120 millimeters to the waist. And don't forget the seam allowance.
Pattern No. 2
Additional Information! For sewing, it is better to use a zigzag stitch. This will stretch the fabric so that the seam does not tear.
Now sew all the details and the knitted shorts with elastic are ready!
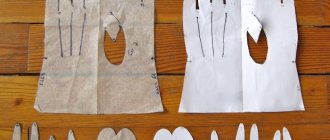
How to make a pattern for men's shorts
I previously drew the pattern for the shorts in a notebook (very convenient, by the way! - it’s faster and easier to cut out the details later):
Let's start building the front halves of the shorts. From the top of the product, i.e. the waist line (LT in the drawing), set the seat height down - 21.5 cm, draw a horizontal line - the seat line (LS). We set aside 4 cm along this line to the left and draw a smooth line in the middle of the front.
Along the seat line to the left (from point 4) we set aside Pob /2 + 4 cm: 43/2+4=25.5 cm.
Along the waist line we put ½ Pot + 3 cm = 18 cm from the beginning of the codpiece to the left.
To narrow along the bottom line, set aside 2-3 cm. We connect the resulting points, extend the line to the bottom - we get a side line.
We divide the front seat line (25.5/2 = 12.3 cm) in half - we get the ironing line, the middle of the front halves.
Draw a line for the entrance to the pocket. To do this, you need to set aside 4 cm from the seat line. Set aside 6 cm from the waist line. All that remains is to connect the dots. The pattern for the front halves of the shorts is ready.
Let's move on to building the back halves of the shorts. To do this, we place the part of the front half on the paper, retreating from the edge of the paper on the sides by about 8-10 cm. We transfer all the lines: waist, seat, bottom.
From the side point along the waist line we set aside 8 cm, from the side point along the seat line - 5 cm, along the bottom line - 2 cm. Connect the points with lines.
From the center point along the waist line (where the middle seam will be) we put 3 cm up.
We connect the resulting point with the side point on the waist, and along this line we put aside the measurement POT / 2 + 3 cm = 30/2 + 3 = 18 cm.
From the side point along the hip line we set aside (POB/2) x 1.5 = 32.25 cm.
Set aside 2 cm along the bottom line. Connect the resulting points. We make a slight deflection along the step line.
We design the middle of the back half (in the drawing - an elephant). The back half is ready.
Please note that if you do not have enough fabric in width, you can make a gusset on the back halves.
Draw a pocket as in the diagram (set about 15 cm down from the seat line, depending on the depth of the pocket).
We cut out 2 pocket parts from paper: one with a hem, the second without.
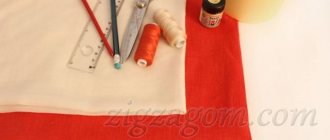
Lay out the pattern pieces on the fabric; on the sides, waist and seat line we make seam allowances of 1 cm (please note that our fabric is knitted, if the fabric is not elastic or low-elastic, it is better to increase the allowances to 2-2.5 cm, and correct them during the fitting).
Down from the bottom line we set aside 4 cm for the hem, draw a line parallel to the bottom, with a 2 cm extension on the sides.
We cut out the details. We will also need a belt piece. We cut without creating a pattern on paper. The width of the elastic is 2.5 cm, which means we multiply the measurement by 2, we get 5 cm plus seam allowances on both sides of 1.5 cm, resulting in the width of the belt for cutting - 8 cm. To calculate the length of the belt, add 12 cm to the waist circumference plus seam allowances.
Check the quantity of parts:
- front halves of shorts – 2 pieces;
- back halves of shorts – 2 pieces;
- barrel with burlap pocket – 2 pieces;
- pocket burlap – 2 pieces;
- belt – 1 child.