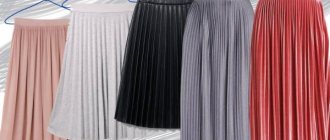
Features of a pleated skirt
A distinctive feature of a pleated skirt is its conservatism and monotony. It is believed that the folds themselves are already an interesting decorative element. However, lately, interesting options have been appearing with checkered, polka dot, floral and other patterns. Black is rightfully considered a universal color. In this shade, the product, depending on a well-chosen top and shoes, can be worn for almost any occasion. So, with the help of a regular black pleated skirt and a bright, eye-catching blouse, you can create a memorable evening look.
What colors are suitable for such a skirt?
Popular colors are also powdery, gray and milky shades. Blue and mint colors will look good with a black badge. Blue and silver colors can be combined with denim shirts and tops.
REFERENCE! Separately, we should highlight the leather pleated skirt in various colors. It is a win-win option and harmonizes with any clothing style.
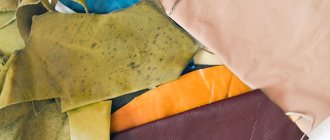
Choice of fabric and color
The main thing is to initially choose the right textile option. The selection is determined by several factors:
- Depending on what season the item will be made for. If it's summer, then corrugated chiffon would be an ideal option.
- Wherever you want to wear it. If the wardrobe item will be used for going out, then it is better to choose a more aristocratic fabric - velvet.
- Personal preferences. If translucent material is not acceptable, then it is better to choose dense textiles, for example, woven.
Specialized stores have a wide range of materials for sewing such a wardrobe item. You don't have to buy standard products. Eco leather is very popular.
Example of pleated velvet
Note ! To choose the right textile color, you should pay attention to the fashion trends of the season.
The color scheme does not have to be monochromatic. You can use printed fabrics.
Making a pattern for a pleated skirt
It is possible to purchase ready-made pleating in fabric stores. If you take a purchased pleated fabric, you will need a standard piece of fabric 150 cm wide and a length equal to the length of the skirt plus a couple of centimeters for processing the top and bottom.
It’s better to make it pleated with your own hands. The material will keep its shape well. First you need to decide on the fullness of the skirt and the width of the folds. The folds can be wide or small. Next you need to calculate the size of the fabric. To do this, you need to increase your hip circumference three times. For example, if the girth is 85 cm, then the width will be 2.6 m. With a regular fabric width of 1.5 m, you need to buy a cut that should be two lengths of the skirt plus about 15 cm for processing seams and cutting out the belt.
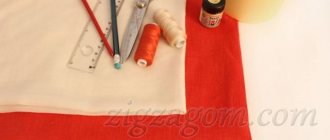
To make pleats and sew the product, you need to prepare the following materials and equipment:
- several sheets of thick paper;
- elastic band for lining the belt;
- thread and needle;
- scissors;
- piece of chalk;
- pins for chopping;
- iron;
- rulers and pencils;
- gauze;
- soap, water and vinegar.
How to sew a long pleated skirt
All size information is given below separated by a dash or *. If only one number is provided, it applies to all sizes offered.
For work we will need the following tools and materials:
- chiffon with a pattern 2 m x 1.45 m for any size;
- single-color crepe-satin 2.2 m x 1.4 m;
- interlining G 785;
- one button;
- two small buttons.
According to this description, we will sew a skirt in the following sizes: 34, 36, 38, 40, 42, 44
The length of the product is 102 cm.
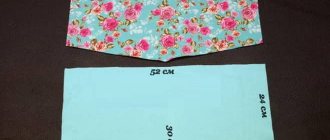
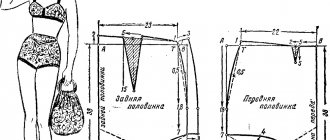
Patterns: how to cut a pleated skirt
Pattern of the front panel of the skirt. All values are in centimeters.
Layout plan. Patterned chiffon, width – 145 cm.
Lay the fabric out in one layer, face up. We cut out the blanks for the front and back of the pleated skirt symmetrically!
Single-color crepe-satin, width – 140 cm.
We make a paper pattern according to the life-size drawing of the front panel of the skirt. To do this, draw a rectangle along the given length and width, mark the middle, from which we draw the seam lines with dotted auxiliary lines using the given dimensions. We cut the paper blank along the seam lines and get the right side blank of the front fabric of the product a, the middle blank of the front fabric of the skirt b, the left side blank of the front fabric of the skirt c. We designate the workpieces with the indicated letters, and we also designate the upper cuts.
DIY pleated floor-length skirt
Stage one
We leave allowances for seams, for cuts and for hemming the bottom - 1.5 cm. Let's start cutting.
Important! We cut out the details of the back fabric symmetrically to the parts of the front fabric of the skirt.
Chiffon with pattern:
- right side part of the front/back skirt x 2;
- left side part of the front/back panel of the skirt x 2.
From single-color crepe satin:
- middle piece of front/back skirt fabric x 2;
- belt 68*72*76*80*84*88 cm long (3 cm of which is allowance for fastening) and 6 cm wide, finished - 3 cm.
Lining: see details on the layout plan (highlighted in grey).
Preparatory work has been completed. Next, we will learn how to sew a pleated skirt with your own hands!
Pleated: we sew the right and left sides of the fabrics of the product, respectively, to the middle parts of the skirt fabrics, while notching the allowances in the corners. We cut the allowances of each seam to a width of approximately 7 mm, sew them together and iron them to the center front/back line. We process the lower sections of the skirt fabrics with dense zigzag stitches.
We hand over the skirt fabrics for pleating or do it yourself: triple pleating, pleat width - 1.5 cm.
Stage two
Next we are waiting for the actual tailoring of the product.
To sew a skirt with your own hands, we sew down the right side sections (two types of fabric) on pleated fabrics, placing a stitch in the inner fold of the fold.
From the left side cut of the front fabric we count 59*61*64*67*69*72 folds and make a left side seam, placing a stitch in the inner fold of the fold, while leaving an 18 cm long cut open at the top.
From the upper end of the left side seam, iron the allowance along the edge of the cut of the back fabric inside out, at the upper end of the seam - diagonally. Below the cut, we cut the left side seam allowance to a width of 7 mm and stitch it together. Along the upper edge of the pleats we place one on top of the other to a width of 4 mm. The length of the top cut of the finished skirt (with a closed slit) is 65*69*73*77*81*85 cm.
Fold the belt in half lengthwise with the wrong side inward and iron it. We lay out the belt again. We sew it to the upper edge of the skirt, while we sew the allowance for the belt fastener to the depth of the fold of the rear edge of the cut, then we leave the allowance for the belt fastener protruding. We iron the seam allowances for attaching the waistband and the allowance along the other longitudinal section of the waistband onto the waistband. Fold the belt in half lengthwise, facing inward. We sew short sections at the ends of the belt. Turn out the belt. Next, we sew the inner edge by hand! Sew the bottom edges of the clasp allowance. At the front end of the belt we sew a loop. We close the incision with buttons.
The long pleated skirt is ready!
DIY pleated fabric
Having understood the theory, we suggest moving on to practice. Pleated fabric, as a rule, is sold in only two or three colors: black, white, red, brown... But what to do if you want to sew a unique product from pleated fabric? Today's master class will come to your aid!
For work we will need the following tools and materials:
- drawing paper (several larger sheets);
- thin fabric (we will use chiffon, but silk, satin, cotton will also work);
- iron building meter;
- large paper clips;
- super glue “Moment Crystal”;
- needle;
- knife;
- pencil;
- sharpened scissors;
- a piece of cotton or linen for ironing;
- iron (preferably with a steam generator);
- matching sewing threads;
- sewing machine and overlocker;
- weight for the press (books or the same sewing machine).
A little about the tools for work
To avoid confusion, let’s clarify what tools we need for the job.
- Whatman paper - we use sheets of any format: A1, A0 or Whatman paper in a roll of 1.2 x 10 m. We advise you to choose the latter option, since with the help of rolled Whatman paper you can make almost any convenient length and width of the canvas.
- We will need a metal meter to measure the folds. Rulers made of wood or plastic are not suitable for these purposes.
- Super glue is needed to glue sheets of paper together.
- We select a dull knife or use its unsharpened side.
- A steam generator is not a necessary device to use, but with its help we will steam pleated fabrics much faster than ironing them with a regular iron, since the steam is supplied under high pressure. If you use a regular household iron, try to weigh it down with something or put more pressure on it.
- We recommend using fabric with a mixture of synthetics (at least 50%) so that it can be washed without the risk of losing its shape. If we choose natural fabric, it cannot be washed (dry cleaning only!). For this master class, you can use chiffon, tulle, silk (synthetic), stretch satin, thin knitwear, any thin costume fabric that drapes well, gabardine or eco-leather.
In this manufacturing method, we will not use impregnation to preserve the shape of the folds.
How to make pleats for a pleated skirt: step-by-step master class with photos
Stage one
First, we cut out whatman paper. For the form, we will need two sheets of the same size, their short side is the length of the future skirt + 3 cm of margin (when working with loose fabrics, you can increase the margin), the long side of whatman paper is the width of the skirt (equal to the circumference of the hips + 5 cm) x 3 for skirts , for finishing – cut length (for example, yoke line) x 3.
On one of the Whatman paper we draw lines along the two longer sides, retreating 1.5 cm from the edges.
We mark the places of future folds, mark from the edge with dots on the drawn line from the edge of 1 and 2 cm, then make notches every 2 cm, as shown in the photo. We make the markings with a sharp pencil with maximum accuracy.
Having combined two Whatman paper, we press them down with a weight to avoid displacement. We punch all the points on both sides with a needle.
Using a blunt knife, carefully press all the fold lines along the punched points.
Now we need to bend the drawn shape along the pressed lines and glue the sheets together. The seam of the top and bottom of the form must match completely.
Place the top of the mold into the bottom, making sure that all the folds fit perfectly. Like this:
Stage two
Then we need to steam the mold with the folds already in place - this is done in order to make it more elastic and avoid deformation and tearing during operation. We steam it using a steam generator; if you don’t have one, moisten the cotton pad with water, wring it out, apply it to the mold in 3-4 layers and set the folds with an iron at maximum temperature without using steaming.
Place the finished form on or near the radiator to dry quickly. Next, we iron all the folds with an iron or steam generator, leveling them out.
Stage three
Now we need to prepare the fabric. If the fabric contains viscose, cotton, wool or silk, you need to rinse it in advance and let it dry to avoid shrinkage later. We iron the fabric and cut out the panels of the required size: total width of the panel = (OB + 5 cm) x 3, length = L of the skirt + hem + 1 cm for the seam.
For a skirt with elastic for a hip volume of 94 cm and a length of 65 cm with a fabric width of 1.4-1.5 m, we will need 1.5 m.
We cut off the edges of the fabric, cut the chiffon along the pulled thread to avoid distortions.
Stage four
Next we need to hem the bottom of the skirt. For chiffon, we recommend doing this on an overlocker with a rolled seam; if another fabric is used, you can overcast it by hand or on a sewing machine. As an option, use the “Moscow seam”.
After this, we put the chiffon in the prepared form: spread it on the bottom, cover it with the top and then start making folds, constantly monitoring the location of the fabric to avoid distortion.
Important!
First, we lay out six strips and secure the template with paper clips along with the fabric on both sides, as shown in the photo below. We put a weighting agent (books, iron) so that the folds do not move, steam them thoroughly (if we use an iron, then iron the folds through 3-4 layers of dampened cotton or linen fabric at maximum power, thoroughly stagnating the folds), immediately place a weight on them (for example , a long board, and place books or a sewing machine on it) for 10-15 minutes until the fabric has cooled. Next, we add a larger number of folds in the same way (you can try 12 at a time) and continue steaming/ironing the fabric until the cut is finished.
Then we again go through the already assembled form without using steam and place it under the load. Leave to dry for about 8 hours if you use an iron and 4-5 hours if you used a steam generator. After this time, remove the weight and forms, the pleated fabric is ready!
We recommend washing this fabric by hand at a temperature no higher than +30°, do not wring it out and dry it strictly in a vertical position. Iron both chiffon and knitted pleated skirts very carefully, without using steam.