The neckline and armhole of the dress can be processed in different ways, for example, by sewing facings from the same fabric as the dress. But, more often than not, you have to edge it with factory-made trim or made with your own hands from cut strips of fabric. Bias trim cut from the same fabric as the dress always looks elegant and stylish. Using factory bias tape to finish the neckline or armhole of a dress is not advisable. Finished bias tape is most often sewn along the cut edge of curtains, tulle, etc. In this article I will show you how to make bias tape yourself and the technology for processing curved lines of the neckline, armhole of a dress, blouse without using a special foot.
How to cut strips of bias tape from fabric
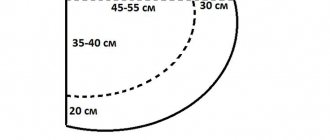
Processing curves and rounded cutout lines differs from straight sections. Smooth laying out of the trim strips is possible only if they were cut along an oblique line in relation to the grain thread, at an angle of 45 degrees. By the way, please note that for this master class I used the most complex type of fabric - chiffon. If you have never worked on the neckline or armhole of a dress made from thin fabrics such as chiffon, practice on other, thicker types of fabric.
Before cutting the bias tape, calculate the width of the fabric strip. According to my calculations, to process the neckline of a chiffon dress, I needed to cut a strip 5.5 cm wide.
The easiest way to mark stripes on fabric is to use a washable fabric pencil.
For this master class on processing the neckline of a dress, I used a small piece of fabric to imitate the neckline. Therefore, one length of strip, cut along an oblique line, was enough for me. To process the neck of a dress, you most often have to join two or three strips together. For information on how to properly cut the edges of strips of bias tape and sew them together, see another article on the site: Processing the neckline with bias tape.
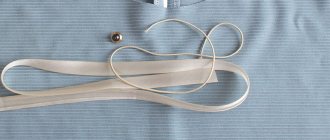
Now the cut and sewn strips of bias tape need to be folded with the wrong sides together and ironed.
The bias tape is now ready for stitching. But before you start sewing, set up your sewing machine for sewing thin fabrics. Adjust the pressure of the presser foot on the fabric, the tension of the upper thread, etc.
Place the bias tape along the neckline and check that it is long enough for the edging.
Bias tape as a facing
The secret of high-quality processing of a neckline without a collar, armholes without sleeves with bias tape lies in its very uncomplicated, simple preparation (processing) before stitching.
Every time you think about how best to process sections, you need to take into account the properties and appearance of the fabric.
When should you use bias tape instead of facing?
1. Intercutting of the main fabric is not enough to cut out the facing.
2. Fabric with glitter, “scratching” fabric, unpleasant and traumatic to your delicate skin.
3. Transparent fabric (chiffon, organza and others).
4. Extremely flexible fabric (chiffon, silk, crepe georgette and others).
5.Easily stretchable fabric.
6. Voluminous, loose fabric.
7. Oval neck shape.
This time I have voluminous, loose, easily stretchable fabric. The photo shows that this is a 2-layer knitwear with a very complex weave of the finest threads, and it is translucent.
I don’t have interpattern lunges that are suitable in size for cutting out facings.
Of the seven points, all the reasons for using bias tape apply in my case, excluding the second point.
To achieve a clean, flat and thin neck line, I decided to use ready-made bias tape.
The secret of bias tape, which allows you to avoid any deformation, distortion of the shape of the neckline, armholes when processing it with bias tape, is to give it the desired shape BEFORE stitching .
Of course, simple and easy-to-work fabrics do not require such additional processing of the bias tape before stitching, and often even basting. You can immediately adjust the binding.
If the fabric is very mobile (chiffon) and easily stretchable, more careful and thorough processing will be required.
Procedure:
1. Along the neck line of the dress or blouse, we will place a machine marking stitch, which will make the cut of the fabric more stable and will also serve as a reliable guide for alignment with the bias tape.
2. Draw on a sheet of thin cardboard, applying the pattern, the line of the front and back neck (or armhole).
3. Now, having placed the finished bias tape on cardboard with a drawn neck line, we begin to form the tape without violence, voluntarily and forcibly, precisely laying one edge along the neck line and fix it, steaming, with an iron.
Important! The trim needs to be laid so that it easily and naturally, without changing its width, lies along the neckline and looks like a narrow and graceful facing.
4. Having steamed the binding, fix its position on the cardboard with needles and leave it for a while so that it cools and is finally fixed in its new shape.
5. Apply the cooled binding with the marked alignment points made with a water-soluble marker to the neck of the dress, baste,
bending the fold of the binding and making stitches exactly into this fold.
6. Sew the bias tape,
laying a line close to the basting line, to the right, in the direction of the neckline.
7. Remove the basting.
8. If the fabric requires it, the seam allowances for the neckline should be notched, not reaching 2-3 mm from the machine stitching.
Bend down the bias tape
on the wrong side of the product, sweep it to form a transition edge and iron it.
9. We secure the inner fold of the binding manually, using a hidden seam.
Or we adjust the inner edge of the bias tape, close to the very fold, using a machine finishing stitch.
When processing chiffon, organza, transparent fabrics or when finishing the neckline with trim of a different color, the bias tape is stitched on the wrong side, folded over and adjusted to the front.
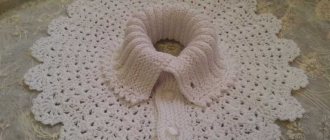
This method allows you to achieve ideal, even, high-quality processing of the neckline and armholes, without spending much more time on it than usual.
The photo was taken before the tags were removed, of course!
But the result will definitely please you!
In offering you this processing method, I was guided by the fact that I had not seen it anywhere. Perhaps because, always counting on the plasticity, mobility of the bias binding and the small width of the binding that contributes to it, as well as having sewing speed as a priority, the binding is not shaped, as I did, before stitching.
I wish you success in sewing, beautiful and impeccable quality products!
With love and respect, Lyubov Komissarova.
Technology for processing the neck of a chiffon dress
Place the folded strip of fabric to the edge of the neckline along the right side of the dress and begin sewing. If you don't have enough experience, you can pin or even sweep.
Please note that the seam divides the strip into three parts, two of which will be used for hems.
Now you need to iron the sewn bias tape, as shown in this photo.
Now you are ready to perform the most difficult operation of processing the neckline of a dress.
How to sew bias tape along the neckline or armhole
The width of the strip for bias tape is usually 2.5 -3 cm, no more. The narrower the edging, the better it will fit on the curves of the neckline, especially on the shoulder seams. However, for thin fabrics you can cut out a strip up to 5 cm; when folded and ironed it will be 2.5 cm. One edge of such bias tape is nailed to the edge of the product using a sewing machine, and the other is manually folded and swept away. The finishing stitch is given on the front side. This is a very painstaking job, so it is advisable to use a special foot for sewing on the binding. Ironing the binding in half, and then ironing each side, folding its edges towards the center, is necessary not only for “homemade” binding. If you bought ready-made trim in the store, you also need to prepare it before sewing it on. Check your sewing machine, it should work flawlessly. The thread tension on the sewing machine should be uniform, the foot should not “collect” the fabric, the thickness of the needle should correspond to the number of threads and fabric. Set the stitch length to the middle position. Do not sew the bias tape with a very fine stitch; frequent needle punctures can damage the fabric.
1. To sew bias tape with a hem on both sides, first use a cold iron to unroll one edge of the hem and stitch it to the cutout on the front side of the product, along the line left by the iron. This line is a great guide, but still, if you are not experienced enough, baste this seam. 2. Closing the binding along the neckline or armhole is best done in the most inconspicuous place. And this seam must also be sewn at an angle of 45 degrees. 3. It is difficult to guess in advance the exact location of the connection, especially since the seam will be at an angle. In addition, the neckline can stretch during sewing, and the binding itself has to be slightly stretched, especially in places of strong bending, shoulder seams. Therefore, it is more convenient to sew almost the entire binding, leaving “tails” of 5-7 cm, and then precisely adjust the connecting seam. In any case, you need to sweep and check everything more than once before sewing the bias tape “white”. 4. After you sew the trim onto the front side of the neckline, there will be very little left to do the finishing stitch. Since your binding is already completely ironed, it will easily find its place on its own and all you have to do is baste or pin along the wrong side. 5. Make sure that the edge of the binding on the wrong side of the dress is slightly lower than the edge of the hem of the binding on the front side. This is necessary so that the needle, when making the finishing stitch, does not “pass” past the edge. You will be sewing the binding along the front side and will not see whether the needle grabs the edge of the hem or passes by. Try to sew the finishing stitch evenly and as close to the edge of the hem as possible (0.2), constantly checking the wrong side.
In this video you will see how simply and at the same time beautifully you can process the neck of a dress. The so-called French method of processing the armhole or neckline with double bias tape.
The finishing stitch should run along the bias tape seam.
First, you will have to fold the tape sewn to the neckline, as shown in the photo, and be sure to baste with contrasting threads. No need to iron.
To ensure that nothing interferes with folding the edging in half, be sure to cut off any excess sections of fabric.
During basting, the needle and thread should pass along the connecting seam along the front side of the neckline.
And with a slight overlap on the wrong side.
This is what the bias tape edging will look like from the wrong side.
On the front side, the basting thread is almost invisible, so you need to use a contrasting thread color.
The last securing and finishing stitch should be laid along the front side of the neckline so that the needle runs along the connecting seam, as shown in this photo.
Method 1. How to sew finished bias tape to the neckline step by step
In this sewing method, I will use ready-made bias tape purchased to match the color of the blouse fabric and show how to sew bias tape to the neckline. You can use the trim in contrast, this will emphasize the neckline.
This is what my blouse looks like with a raw neckline. Small folds in the sleeves add complexity, but for me this is not a problem.
1. I start sewing by smoothing one edge of the bias tape. I set the iron to a low temperature. I iron without steam.
2. I take one end of the binding and pin it with a tailor’s pin as shown in the photo to the neckline on the wrong side of the product.
3. Next, I connect the bias tape in this way using pins along the entire circumference of the neckline. When both ends meet, you need to overlap them by 0.5-1 cm.
4. Next, I sew using a sewing machine along the pins, stepping back from the edge by 0.5 cm. You can first baste the binding with hand stitches, then sew it on the machine.
5. Then I take the free edge (which has a hem) of the bias tape and, as if wrapping the cut of the neckline, I bend it to the front side. On the front side I baste the edge of the bias tape with hand stitches as shown in the photo.
6. I edged the neckline, now all that remains is to machine stitch it. To process the neckline carefully, you need to use a machine to stitch the bias tape on the front side, not reaching the edge by 1 mm. The stitching should be even and the stitch length should be the same throughout the entire area. If you are new to sewing, try repeating this jewelry operation first on a piece of fabric.
The neck cut has been processed. As you can see, the method is neat, fast and easy to implement. In the same way, you can process cuts at the armhole, bottom, or edge the edges of pockets.