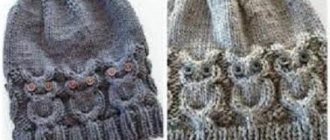
Women's scarves and collars were brought into fashion in the last century by Christian Dior. And since then they have been in great demand. Such scarves do not unravel, do not slip, and evenly warm the neck. By the way, for the same reasons, such models will be very useful for a child. There are many options for a collar scarf: thick and openwork, with or without a hood, square and round, with or without buttons. There is even a hooded scarf with a collar. A knitted scarf collar described in this article is presented for the cold season. The yarn of choice for such models is wool or mixed thread.
Scarf collar with braids
We will need:
- yarn, alpaca (50g per 167m) – 150g;
- circular sp. No4 with line length 40cm;
- circular sp. No5 with line length 60cm;
- marker (M).
Patterns:
- shawl pattern: all sts in all r. – facial;
- persons satin stitch: alternate rows of knit stitches/purl stitches;
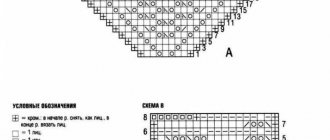
- patterns according to diagrams.
Density: face. Satin stitch using knitting needles No. 5 with double thread 17p. for 22r. correspond to 10cm by 10cm.
Description
We cast on with knitting needles No. 4.5 with yarn in two folds of 47 sts. (of which 2 cr.). and do 2p. shawl pattern. Let's go to sp. No5 and knit 2p. persons satin stitch Don't forget - the outermost stitches in the row are edge stitches! In persons row we add 6 stitches at equal intervals. In total we have 53p. We continue knitting: next. R. (front): 1 cr., 18 p. – diagram C.2, last loop cx. S.1, 14p. – diagram C.1, 18p. – diagram C.3, 1cr.
We continue with the description. We set M at 25cm in height. We knit a scarf collar up to 85cm. The vertical repeat of the pattern must be completely knitted. Then we do 2p. persons satin stitch In persons row we decrease at equal intervals 6p. 47p left. Closed loops.
Assembly
Stitch the closed edge between the marker and 2 r. scarf rice.
Collar collar with knitting needles: diagrams and description
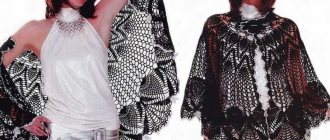
The ideal complement to a warm, voluminous sweater will be a collar, which is popularly called a collar. Some knit it with canvas, connecting it with a knitted seam. But most craftswomen like knitting a seamless collar.
Advice! If you knit a cardigan or jacket, then you definitely need to master knitting a shawl collar. Shawl collars look like turn-down collars; they can consist of several pointed or rounded tiers.
Necessary materials:
- white yarn;
- knitting needles on fishing line.
Step-by-step description of the process:
- You can knit an original collar with cords not only as a finishing touch to a sweater, but also as an independent wardrobe item.
- Scarves are often called scarves, so it can also be removable.
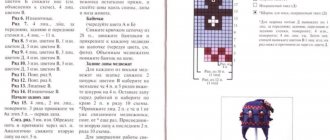
- We will knit the collar according to this pattern.
- To decipher the diagram, let's look at the symbols.
- We start, as usual, by casting on the required number of loops. We will talk about knitting a removable collar in the form of a collar, so we first determine the knitting density.
- We cast on 10 loops and knit 10 rows in height. Using a measuring tape, we determine how many loops there are in one centimeter.
- Now you can easily determine the required number of loops for the collar in accordance with your pattern.
- In this master class we cast on 59 stitches on knitting needles using the classic method.
- The first edge can be knitted with a knit stitch, and the last one with a purl stitch.
- We start knitting the first row with 3 edge loops. Next we knit according to the following pattern: three knit stitches and three purl stitches, one knit stitch and three purl stitches. We repeat this step four times.
- Next we knit three more knit stitches and three edge stitches.
- Now let's start knitting according to the pattern. It is better to do the first row purlwise.
- We also knit three edge loops. We knit the next twenty loops according to the pattern. We repeat the pattern twice.
- We also knit the last thirteen loops according to the pattern. The last three loops will be edge stitches.
- Next, we knit according to the pattern and repeat the repeat of the pattern in height, starting from the third to the fourteenth row.
- We will knit the last row like the first row of our collar.
- Now all you have to do is close all the loops in a way convenient for you. The most common is knitting two stitches at the same time. Do not forget to return the knitted loop to the left knitting needle.
- Before sewing the edges of the collar with a knitted seam, the collar must be thoroughly steamed or moistened.
- After drying, sew the edges of the clamp.
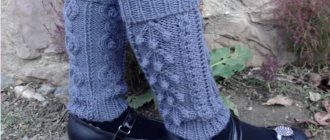
Scarf collar with arans
Collar width is about 17cm.
We will need:
- yarn h/w (50g per 50m) – 150g;
- knitting needles No. 8;
- add. Arana needle;
- marker (M).
Patterns:
- shawl pattern: all stitches in all rows. facial;
- arans - see diagram.
How to perform short rows on both sides of the collar:
- 1st row (face stitch): 6p. handkerchief rice, turn the canvas;
- 2p. (purl stitch): tighten the thread and knit 6p. plat. pattern;
- 3p: knit all stitches;
- 4p.: knit the initial 6p. shawl knot, turn;
- 5p.: tighten the thread and knit 6p. handkerchief knot;
- 6p.: knit all stitches.
Description
We cast on with knitting needles No. 8 24p.
Track. R. (front side): 6p. – board drawing, 12p. according to the scheme, 6p. – board risk. We continue to knit the pattern, while simultaneously performing shortened rows every 6cm, as described above. Set M at the beginning of the trail. R. on the front side – the height of the part is 22 cm. We used a marker to mark the seam of the collar.
Continue to a height of 76cm (measure in the center). We finish with the last p. Arana schemes. Closed p. We join the closed edge and the side of the collar, guided by M - see as in the photo above. We make a seam.
Knitting lessons-3 Collars on knitted items.
I am sharing a selection of Knitting a collar on men's garments. But the principle of knitting is the same and applies everywhere.
POLO COLLAR The name of this type of collar is borrowed from the sports game of polo, whose players wore sports shirts with similar collars. A distinctive feature of this collar is that the neckline turns into a small placket with buttons. To decorate the collar, a bosom is knitted on the front half of the sweater. At a distance of about 12 cm from the middle of the front neckline in the center of the front of the sweater, close several loops (about 2-3 cm). Next, knit each side of the front separately from the beginning of the bosom to the neck line. Knit the neckline and shoulder bevels according to the pattern.
Take knitting needles one size smaller than the main ones. It is more convenient to lift the loops with a crochet hook and then transfer them to the knitting needle. We knit a placket with buttons.
Along the left shelf, pick up and knit with a 1×1 elastic band a number of rows equal to the number of closed loops. For men's products, knit a placket on the right shelf. Close the loops by knitting them with an elastic band. We knit a placket with buttonholes. From the front side, pick up the loops and knit half the width of the placket with a 1×1 elastic band. On the next row for three (or more) buttonholes, bind off the stitches just below the neckline. The number of closed loops depends on the size of the button. Then, evenly across the entire bar, close the loops in two more (or more) places at the same distance from each other. To create button holes on the next row, cast on the appropriate number of new stitches above the cast-on stitches. Then knit the second half of the width of the placket with an elastic band. Close the loops by knitting them with an elastic band. We connect the planks with the shelf. Lay the sweater right side up and connect the bottom edge of the buttonhole placket to the closed loops of the chest base. On the wrong side behind the buttonhole placket, sew the bottom edge of the button placket.
Collar Finish the shoulder seams. Place the sweater right side up. At the neckline, pick up an odd number of stitches, starting from the right side and passing the loops of the straps. Next, starting from the wrong side, knit with a 1×1 rib. Purl 1 at the beginning and end of each row.
Having knitted the required collar height, close the loops by knitting with an elastic band.
Note: Knit the last 2 rows of elastic with knitting needles one size larger than the main ones, and use them to close all the loops so that the knitted turn-down collar does not puff up.
Double stand collar.
Read more.
This collar is used on polo jackets and pullovers. The double stand-up collar holds its shape well and, when unbuttoned, looks neatly finished on the inside, since the folded edge of the collar is hidden under the stand-up collar.
1. Start casting on circular knitting needles from the outside of the product from the middle of the right fastener bar. In the areas where the edge of the neck is rounded on the right and left, the number of stitches cast on should be the same, and the total number of loops should be sufficient so that the neck does not tighten. The total number of stitches cast on for this model is a multiple of 4 plus 2 more loops. Work 1 purl row with purl loops, 1 knit row with knit stitches and 1 purl row with purl loops, then leave the loops temporarily and cut the working thread. After every 10th stitch, use a contrasting thread to make a mark.
2. On the second circular knitting needles, from the inside of the product along the edge of the neck, cast on the same number of loops: from each transverse thread of the 1st cast-on row of the outer part of the stand, knit a loop (= 10 loops between marks), Knit 3 rows of knit on all loops satin stitch as described above.
3. In the next front row, connect the loops of the inner and outer parts of the stand: knit the 1st loop of the front knitting needle and the 1st loop of the back knitting needle together, while first inserting the knitting needle into the loop on the front knitting needle. Knit the next pair of stitches on the front and back needles together in the same way. Purl the next 2 stitches of the front and back needles together, and first transfer the loop from the back needle to the front one. Also purl the next pair of stitches together. Next, knit as described, alternately knitting 2 loops together with the front one and 2 loops together with the back one, until the end of the row. Then resp. knit a collar in a pattern, using knitting needles full size thicker. Having knitted the collar, loosely close the loops according to the pattern.
Collar without stand
For jackets and pullovers with a polo fastener, it is important that the stacked edge of the collar looks equally good on both the outside and the inside of the garment, and so that it can be worn unbuttoned.
1 Crochet the fastener strips on the short sides and the edge of the neck with 1 row of single crochets. Here, for greater clarity, the binding is made with a thread of a contrasting color. At the beginning and at the end of the binding in the areas where the neck is rounded, the number of columns should be the same.
2 A set of loops for the collar is made on circular knitting needles from the middle of the right fastener bar. To do this, from each single crochet, grab the front thread with a knitting needle, knit 1 knit stitch, and after every 3rd or 4th loop on the knitting needle, additionally double crochet, so that in the end a sufficient number of loops are cast on for the elastic pattern. In the following in a row, knit alternately 1 knit and 1 purl, while knitting each yarn over according to the pattern - knit crossed or purl crossed. In subsequent rows, knit loops according to the pattern. Having knitted the collar, close the loops.
3 Another version of the collar, made in the manner described above. Tie the fastener strips on the short sides and the edge of the neck in the same way. Start the set of loops for the collar from the right placket and end in front of the left placket. Then knit with an elastic band as described above. In the 3rd row, after the 3rd loop and before the last 3rd loop, add 1 knit stitch. In the 7th row in the same places, add 1 purl crossed loop. Repeat these increases in every next 4th row. Having knitted the collar, close the loops.
Peculiarities
A polo is a rounded neckline with a cutout for a placket, which can be wide if trimmed with a placket and collar, and narrow if trimmed with only a placket.
Proportions Back: The neckline is straight (A) if the model does not include a collar, and slightly rounded if a collar is sewn on.
Front: rounded neckline (B) with a cutout for the placket (C), which begins to knit simultaneously with the armholes.
Shoulders: Slightly sloping (B) on both back and front; Only shoulders with straight armholes are knitted straight.
Completing of the work
1. Calculate the number of loops required to finish the neckline, and subtract the number of loops that make up the width of the base of the cutout for the strap, dividing the remaining loops in half. 2. To mark the base of the cutout for the plank, you need to close or leave open the loops that make up the width of the base. In the first case, the line for sewing the finishing strip will be indicated, in the second, these loops will be cast on during the work. 3. After this, knit each side of the placket opening separately to the neckline, then the neckline and bind off the loops. 4. Finish the cutout for the plank with two planks placed one on top of the other.
Plank with closed loops of the base of the cutout
Cast off the loops at the base of the cutout, pick up stitches along the edges of the cut and knit separately 2 strips with a height equal to the width of the base of the cutout. At the end of the work, sew the strips to the base, placing one on top of the other.
A placket with a set of loops at the base of the cutout.
Before knitting the placket, place the open loops of the base of the placket cutout onto a long pin. Leave the stitches of the base of the cutout for the placket open, knit the top placket, pick up the stitches along the cutout from the neckline (B) to the line (C) (left side) and vice versa for the other side. Knit the placket on the left side of the neckline and at the end of each row on the face of the work, knit together the last stitch on the needle with the first open stitch of the base; continue until all open stitches at the base of the neckline (C) have been worked. Knit the second strip and sew it to the base.
Alternative.
The finishing strip at the neckline of a polo collar can be knitted at the same time as the front. At the base point of the cutout for the bar, divide the loops in half and continue knitting one bar. For the other half, cast on loops for knitting the finishing strip and make buttonholes on it. At the end of the work, sew the base of the outer strip with a hidden seam.
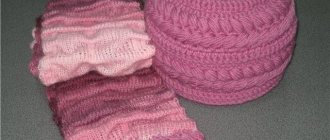
Knitted scarf collar for beginners
The length of the fabric before the seam is made is 90cm. When sewn, the length is 21cm.
We will need:
- h/w yarn (50g per 75m) – 150g;
- sock knitting needles No.5;
- marker (M).
Patterns:
- shawl pattern: all stitches in all rows. facial;
- pattern - see diagram.
Density: face. satin stitch 17p. for 22r. will be 10cm by 10cm.
Description
We dial 35p. and do 2p. handkerchief rice.
Further in persons. r.: 2cr. – shawl knot, 1 p., 30 p. = 3 p. x 10 repeats – pattern C.1, 2 cr. – board knot We continue using this algorithm until the height is 21cm. Install M (useful during assembly). After 89cm we switch to a scarf. pattern. Need to knit with 2p needles. and close p.
Assembly
Along the long side of the scarf, carefully sew the short edge, guided by M.
Knitted scarf - collar with buttons
Size: 34cm by 60cm.
We need:
- yarn h/w (50g per 75m) – 250g;
- knitting needles No; and No5;
- markers (M);
- buttons – 4 pcs.
Patterns:
- shawl pattern: all stitches in all rows. facial;
- pattern - see diagram.
Density: 17p. for 22r. will be 10cm by 10cm.
Description
Using knitting needles No. 4, cast on 62 stitches. and do 1p. knit stitches. This row will be purl. Next (personal row): 6p. – shawl knot., 2l., *2i., 2l.* – from * to * repeat up to 60 p., 6p. - handkerchief knot. Having knitted 4cm, we switch to sp. No5. Distribution p.: 6p. shawl knot, 50p. – сх. S.1, 6p. handkerchief knot Having received 20cm of scarf height, close. 6p on both sides. Cut the thread and set aside knitting. We knit the second part of the scarf in the same way.
Assembly
We cast on 6 stitches with knitting needles No. 5, transfer stitches from the first part of the scarf set aside to the knitting needle, transfer the loops of the second postponed part here, and cast on another 6 stitches. There are only 112p in work. We work with them like this: 6p. handkerchief rice-k, 100p. – сх. S.1, 6p. - handkerchief risk. Having completed it to a total height of 34 cm, we move on to sp. No4. Add evenly to the trail. R. 2p. and knit: 6p. - handkerchief rice. 2l., *2i., 2l.* – from * to * repeat until 6th last. loop. We knit them with a handkerchief. drawing. There are only 114p in work. Continue 4cm in height with an elastic band. Closed p. Sew the fastener, sewing buttons through two layers of fabric.
Knitted scarf hood with collar
A very original solution to combine a scarf, snood and collar in one model allows you to knit an irreplaceable item for cool weather.
The diagrams assume that the hooded scarf with a collar is knitted by machine.
But, for a knitter with even minimal experience, it is quite possible to knit such a model by hand with knitting needles. We use the same patterns for the model as for machine knitting. For the collar we choose an elastic pattern, the main part is knitted with a “rice” or “honeycomb” pattern. The main thing is that the yarn should be very thin, otherwise the knitted scarf-hood will be bulky. And it is very important to make the seams carefully.
Wide braid collar
Dimensions: approximately 23cm by 73cm.
We need:
- h/w yarn (96m per 100g) - 200g;
- knitting needles No. 7;
- marker (M).
Patterns:
- shawl pattern: all stitches in all rows. facial;
- patterns - see diagrams.
Density: face. Satin stitch with knitting needles No. 6 13p. on 17r., knitting needles No. 7 12p. for 16r. will be 10cm by 10cm.
Description
Using knitting needles No. 7, cast on 33 sts. and knit: 10p. – diagram C.1, the rest of the items – shawl pattern. Having knitted 24cm (we measure along the edge of the scarf), we put M at the end of the p. (front side facing us). We continue knitting up to 75cm and closed. P.
Assembly
We sew the closed edge to the left long side (the front side is facing us) between the starting row and M.
Children's bib
With the arrival of cold weather, every mother tries to warm her child. Hats, scarves, mittens. All these are necessary wardrobe elements, without which no mother would let her child go outside. But as practice shows, after running for a few minutes on the street, the child gradually begins to lose one thing or another. And here a bib collar for children comes to the rescue. It completely covers the child's throat and shoulders and does not slip during outdoor games. But, unfortunately, not all children like to wear them, citing the fact that they are not comfortable and make their necks itchy.
To minimize the inconvenience of this accessory for a child, it is necessary to knit a shirtfront from a thread that will not prick. Also, knitting can be done in such a way as to interest the baby. And most importantly, it is better to knit from brightly colored yarn.
In our case, we will consider the simplest knitting pattern using children's acrylic, which will not irritate the baby's skin.
We knit a shirtfront for a child from two to three years old with two knitting needles. For such a product we will need only 150 g of yarn.
Scarf collar with elementary patterns
The model is designed in three sizes:
- circle along the upper edge – 55; 59; 64cm;
- front height – 30; 32; 34cm.
We need:
- h/w yarn (50g per 100m) – 100g for any size;
- knitting needles on a fishing line 40 cm long, No. 4 and No. 4.5;
- marker (M).
Patterns:
- persons Ch.: when knitting in the round, all stitches in all rows. facial;
- pearl pattern: 1p.: *1l., 1i.* – from * to * repeat on all sts; 2p.: above the faces. We knit purl stitches, over purl stitches. We knit knit stitches. Repeat both rows to the desired height.
Description
Knitting is done from top to bottom in circular rows, the front flap is straight/reverse knitting.
We dial sp. No4 109; 117; 127p. and switch to circular knitting. Having completed 1 rub. with knit stitches, proceed to the pearl pattern. Having knitted 2cm, we change the knitting needles to thicker ones, and the pattern to knitting. smooth surface Having reached 20; 21; 22 cm in height, again we return to knitting needles No. 4. We knit a 2cm pearl pattern with them in the round.
Next, the algorithm for distributing the loops is as follows: first 55; 59; 63p. – pearl rice, the rest 54; 58; 63p. – persons smooth surface
Track. r.: 55; 59; 63p. pearl rice, the rest 54; 58; 63p. closing. We continue knitting at 55; 59; 63p. pearl rice straight/reverse knitting. At the beginning of each r. close 2p. Last 11p. on the knitting needle we close in the last row.
Preparing for work
Before you start knitting an accessory, you need to select its style and pattern. Then choose a yarn whose color and composition matches the selected parameters of the finished product. At the same time, do not forget what the finished accessory will be combined with.
Yarn
For a warm product that is used mostly in cold weather, we recommend yarn containing at least 50% wool. Threads containing 35% wool/65 acrylic are intended for products with a softer structure. If you add cashmere thread, the shirtfront will be warm, soft and pleasant to the touch.
Spokes
The working tool is selected according to the number of yarn that corresponds to it. Then the product will be smooth and will keep its original shape. Usually the recommended number of knitting needles is written on the factory packaging.
If you take knitting needles larger than recommended, the product will turn out loose and will not retain its shape well, but it will knit quickly enough. With a smaller knitting needle size, the item may end up being pulled and twisted, which can be very disappointing during use.
It is better to start working on double needles (5 pieces). This is done so that there is no seam at the top of the accessory. Then switch to circular knitting needles to knit the lower (widened) part of the scarf.
Sample
In order not to make a mistake with the finished size of the product, you must not be lazy and knit a 10x10 cm sample, from which the number of loops in a horizontal row is calculated. And for openwork products and the number of rows in height to obtain a full-fledged pattern.
Then, based on the sample, the initial set of loops is calculated. This is done like this: attach a ruler to the square and count how many loops fit into 1 cm. In our case, 1 cm = 3 loops. The neck circumference is 30 cm. 30x3 = 90 loops plus 2 cm, that is, 6 loops for a loose fit. Let's sum up the final figure: 90+6 = 96 loops. We will need exactly this number of loops to cast on the first row.
Patterns used
The product is knitted from the top of the neck to the desired size. In our master class for beginner needlewomen, we offer simple knitting techniques with a description of the patterns used.
Elastic band 2x2
Since the product is knitted in the round, the pattern is obtained by alternating purl and knit stitches. All subsequent rows are knitted over knit stitches and purl stitches over purl stitches.
Pattern "facial surface"
Knitted in the round with knit stitches only.
Let's start making the shirt front.
We start knitting from the neck in stocking stitch. This pattern allows the product not to stretch and at the same time fit snugly to the body. The height should be calculated at your own discretion. The gate can be either with or without a lapel. During the work process, it is advisable to make several fittings to determine the optimal height and width of the finished product.
1 step
On the prepared working tool, cast on the required number of loops (96 pcs). knit in a circle with an elastic band 18-20 cm in height.
Step 2
The neckline needs to be divided into front and back sides for knitting raglan (side parts of the product). To do this, you need to divide the total number of loops (96) into 6 equal parts. Having previously set aside 4 loops for knitting a yoke. It turns out: (96-4):6=92. Now we put 15 loops on the side parts, mark with a marker all the counted parts, and on the front and back two parts together (31 each). You will get this layout:
Step 3
Please note that where the markers are located, the product will expand. This means that before and after the mark we need to add one loop each. In total there will be 8 added loops around the circle. Add loops every other row. The best option is to add loops using a yarn over.
Step 4
We change the knitting needles, switch to circular ones and continue knitting the shirtfront using stockinette stitch. We continue to knit the product until you think it is ready. To complete the work, close the loops using any proven method.
You can stop here, because by and large, the shirtfront is ready. But, if you have crocheting skills, you can beautifully finish knitting with an openwork pattern. To do this, crochet one row with single crochets.
Then knit just one row according to the pattern:
The result will be a very beautiful, openwork finish.
This is what a shirtfront looks like, crocheted with an openwork pattern.
Our MK provides the basis for beginning needlewomen. For experienced knitters, it is not difficult to add braids or other fancy patterns to give the item a completely different look.