Children's fur vest for girls
Not a single girl will refuse fashionable, beautiful fur clothes. White, pink, gray, bright, neutral, with or without lining - this is a versatile and stylish item in the wardrobe of a growing fashionista.
The modern market offers a wide range of fur vests for girls. They differ in various characteristics:
- style;
- length;
- manufacturing materials;
- colors;
- cost and other parameters.
Among the large range of products, it is easy to find an option that best suits your wishes and budget. Since we are talking about a vest, this item of clothing comes without sleeves.
Which fur to choose from for a children's vest?
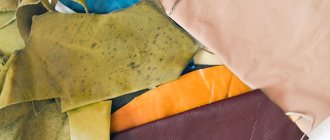
Manufacturers offer vests from various materials. It is worth distinguishing between artificial and natural fur . Before you buy something for a child, you should make sure that the girl is not allergic to natural fur with long fibers. Most often, this problem occurs in young children.
If you have allergies, you should opt for faux fur products. Such models have their advantages:
- Easier care. Faux fur items can be easily washed in an automatic washing machine, while natural models require dry cleaning.
- Affordable price . The cost of vests made of artificial materials is much lower.
A vest made of natural fur will warm you more than something made of artificial material. A sheepskin vest provides very good warmth.
Natural models are made from various furs. Rabbit vests are perfect for very young princesses. These are soft, pleasant to the touch products with short fur.
A fashionable vest for girls aged 10-12 can be made from arctic fox or chinchilla. After all, at this age, girls want to look like adults.
It is very important to choose the right size. Visually, such things may seem large, but you should only rely on measurements taken from the inside of the product.
Review of faux fur models
The modern market offers a wide selection of styles of eco-fur vests for girls:
- Short models. An excellent solution for autumn and spring. There are short models, like bolero, and up to the waist. In this case, the model may have short sleeves.
- Long vests. Such models warm well even in strong winds. They may have a belt or drawstring that prevents the wind from blowing in.
- Long models. Fashionable and stylish solution. The length of the product can be up to the knees or even lower. Models made of voluminous fur look very impressive.
It is very important to correctly determine the size of your fur vest. It is worth taking into account all the nuances - width, length, waist size. Not everyone can sew and alter such products - to do this you need to know the intricacies of working with fur. To make the right choice, you need to measure the girl’s parameters and compare them with the sizes provided. This way you will definitely choose the right size.
The appearance of the product largely depends on the fur used. It can be a whole cloth or sewn from pieces, as well as fluffy, smoothed, faux or natural fur.
This is interesting: Pattern Jumpsuit, shirt, vest, jacket
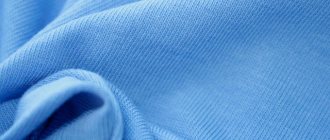
Children's vest: choosing fabric
Match the threads and buttons to the fabric you have already purchased. You can also sew a completely reversible vest - buy twice as many buttons (with holes, not on the leg!) and sew them in pairs from the front and back at the same time.
We used a T-shirt for the sample, but it can also be a shirt, as long as the item is the right size.
So, let's sew a children's vest!
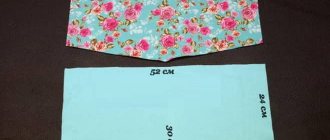
Constructing a pattern
Lay out a sheet of paper on a flat surface. Place a T-shirt folded in half on it.
Trace the line of the armhole and neckline with a pencil, and also mark the vertical lines of the middle of the part and the side seam.
Take off your T-shirt. Measure the desired depth of the cutout and move the mark to the line of the middle of the part and connect it to the left extreme point of the shoulder. Draw the desired silhouette of the bottom of the vest at the required distance from the shoulder. Cut out the pattern, notching it so that it is convenient to mark the fabric for cutting out both the front and back.
The sewing technology used in this master class requires a seam in the middle of the back in the lining fabric. A seam along the back on the front is optional, and you can cut out the back in one solid piece.
From the main fabric (for the front side):
- 2 back pieces; to cut out the second pattern, turn it over and mirror it.
- 2 front pieces (vest panels), to cut out the second pattern, turn it over and mirror it.
From lining fabric:
- 2 back pieces; to cut out the second pattern, turn it over and mirror it.
- 2 front pieces (vest panels), to cut out the second pattern, turn it over and mirror it.
Progress
- vest details
- buttons
- thread, pins and scissors
Sew the back pieces from the main fabric in the center. Sew the back pieces from the lining fabric - leave part of the seam open in the middle, about 10cm. Press seam allowances to the sides.
Fold the parts of the back and shelves from the main and lining fabric in pairs with the right side inward. Pin and stitch around the perimeter, leaving the side and shoulder seams open.
Cut the allowances at the armholes with scissors, 2-3mm short of the seam, cut the allowances at the corners at an angle.
Turn out the sides of the vest and iron them.
Insert the fronts into the open side seams of the back and match the shoulder and side seams.
Pin all layers together and sew shoulder and side seams.
Turn the vest inside out through the open area in the center seam of the back lining.
Iron the vest well.
Mark the location for the loops and sew them by hand or by machine. Sew buttons.
Taking measurements for a vest
Measurements for a vest are taken in the classic way - standing upright, a ribbon is tied around the waist. Basic measurements:
- chest girth;
- waist;
- hips;
- as well as the length of the product (from the shoulder to the required length);
- neck girth.
To simplify the task, select a ready-made pattern and transfer your measurements
Advice! This model has a fitted silhouette. In order to make a straight cut, you need to draw the side line straight, without bending 3 cm.
How to take measurements of men correctly
Not every man would risk wearing a fur vest, because this element of a man’s wardrobe is considered shocking and attracts the attention of others. A classic option for the stronger half of humanity is considered to be vests made of tanned leather or short-pile fur.
To create a pattern for a male figure, similar measurements are taken. It is necessary to take into account the features of the figure - narrower hips and broad shoulders. The length of the vest is set based on preference. Most often, a men's vest has a straight silhouette.
Advice! A men's vest can be decorated with a stand-up collar, patch pockets or a small hood.
How to take women's measurements correctly
When taking measurements, the main thing is to adhere to the basic rules:
- Wear the clothes that you plan to wear under the future product. Although the vest is outerwear, you should not take measurements in underwear. Because warm sweaters and layers of clothing can play a cruel joke, and as a result, the new thing will be small.
- Take a natural pose. This is important, because if you slouch or stand tall, you can get incorrect measurements and get the wrong size!
- After receiving the data, you need to compare it with standard indicators. This will help to identify such features of your figure as wide/narrow shoulders, large/small breasts, etc. This knowledge will help in correcting the pattern.
How to sew a children's vest with your own hands: Master class
A fur vest, sewn by the caring hands of a mother or grandmother, is a thing from the realm of “you can’t buy anywhere.” To sew a vest for your princess, you don’t need to be a sewing master. This is a simple procedure that does not take much time. Well, if you doubt your abilities or, moreover, do not know how to hold a needle in your hands, take courses at a cutting and sewing school, which include practice in making vests and other clothes. During the courses you will be taught how to work with patterns from a fashion magazine of any complexity.
Materials
You will need a piece of fur, fabric for the lining, and elements for the fastener. To connect the sides of the product, you can use pieces of leatherette, and for fastening - a cord and metal rings.
For the lining, it is better to take a beautiful chintz, viscose fabric, or a cozy flannel. To maintain the elasticity and lightness of the product, the lining should not be too thick and warm.
You can sew a vest from any fur. You can use pieces of fur from an old fur coat, or you can buy a new piece in a specialized store. Today, fur of bright colors is available for sale. It is light, practical, washes and wears well. To calculate the required amount of fur, you need to add 5 cm to the desired length of the product.
There are several ways to sew a fur vest for a girl. You can come up with your own vest model or choose from existing ones. In any case, you will get a warm thing, even if it is made of faux fur or altered from an old fur coat.
How to work with fur correctly
When sewing a product, you should adhere to the following rules:
- To avoid damaging the pile, do not use scissors - replace them with a stationery knife. When working with a knife, make smooth movements, as if pushing apart the fur parts.
- Fur parts should be sewn manually or using a special machine. When using the machine, it is recommended to place paper under the lining.
- The lining with fur is sewn inside with fibers.
Pattern for a vest
You can cut the product using a ready-made pattern. A children's fur vest consists of a back and two shelves. You can also use a children's vest or jacket as a template. The loose fit allows you to sew a garment to grow - simple, practical and profitable. To make a pattern yourself, you need to take careful measurements. If you plan to wear the vest over bulky items, it is recommended to take measurements in these clothes.
The shelves can be sewn with or without overlap. In the latter case, use special hooks and loops, sew on a zipper, or use a belt. To make a button closure, add a 1.5 cm allowance to the buttons on both sides.
You should definitely measure the volume of your chest, hips, and waist in order to estimate the required width and length of the item. You also need to measure the width of your shoulders and the desired length. Once we have the measurements, we begin marking the fur. In this case, the back can be made of one or two halves.
To make a pattern, find a suitable item in your wardrobe, turn it inside out, attach it to paper (fur) and cut it out. First make the back, then the shelves. Be sure to add seam allowances.
Vest elements:
- Fur parts with a seam allowance of 1.2 cm: back – 1 piece, 2 shelves.
- Lining details with 0.7 cm seam allowance.
Work begins with taking measurements. Then they begin cutting out the fur. They make a cutout for the neck, determine the line of the shoulders and waist and cut it out. Two shelves are positioned so that the fur lies symmetrically towards the center.
Connect the lining to the fur, starting from the shoulder line. If leatherette is used for the sides, it is inserted between the lining and the fur, with the front side facing the fur.
When sewing parts of products, you should first fold them with their right sides facing each other, taking into account the direction of the pile. The machine uses a medium zigzag stitch. The long pile perfectly masks the seam.
The clasp and rings are sewn onto the vest at waist level.
A fur vest for a girl is a stylish wardrobe item. Please your young fashionista with a comfortable, eye-catching item, and your child will be guaranteed admiring glances.
Do I need to decorate a fur vest?
A fur vest, especially made from long-haired fur, is a completely independent wardrobe item that does not need additional accents.
The finished suit can be complemented with long gloves or a scarf - a turban. Don't overload your Look so as not to look ridiculous. A few more options for decorating a vest made of short-haired fur:
- Wide belt with a massive buckle in matching or contrasting fur tone.
- Large brooch.
- Embroidery. Suitable for models with fabric inserts. Bright flowers look great on plain fabric.
- Beads on a long chain in several rows. Pairs well with a plain turtleneck and skinny trousers.
In general, when decorating the finished product, remember to use a sense of proportion and keep in mind that the vest itself is a rather bright and accent item.
Where is the best place to place the clasp on a fur vest?
The location of the holes is horizontal: top – 7mm, bottom – 5mm. The distance between them is 12mm. Insert the hook fastening mechanisms into the holes from the flesh side, and sew the hook. Reinforce the starboard side with non-woven fabric. Apply the reinforcing strip to the half-skid line.
Do the same with the left side. Reinforce the shoulder sections, neckline, and side sections with fabric strips or 1cm wide braid, this will help the seams not to deform during further processing. Sew the strips so that they are flush with the cuts and fall into the seam.
Tips from an experienced seamstress on how to sew a fur vest
Working with fur is quite difficult, so take the following tips into account.
- Never cut the fur with scissors! They cut the hairs, as a result of which the fur falls off greatly and the appearance of the product deteriorates.
- If you use used fur, then you need to quilt it on the side, thanks to this the fur will not tear under load.
- The shoulder seams should be sewn with a strong tape that does not stretch. The main load will be on this part of the product.
- When assembling parts, pay special attention to the seams and the direction of laying the fur; if the seams are visible, the appearance will look unpresentable.
Now you can make your own pattern for a fur vest and sew a product using it. You can also easily turn an old fur coat into a fashionable vest.
What are bluetooth socks
What to wear with gray ankle boots
How to sew a fur vest
First, you need to decide what kind of fur your new item will be made of - natural or artificial.
Choosing good fur for a vest
If you are not sure that you can handle real fur, try sewing a vest from faux fur. Its base is softer than animal skin, and it will be easier to sew with a zigzag stitch on a regular machine. But the pile also crumbles a lot if not processed correctly, this will give you an idea of the difficulty of working with natural fur.
Advice! Do not try to grind down the parts of the skins on a machine! This treatment is not suitable for natural fur; the base becomes loose and quickly breaks. It is recommended that before assembling the parts, grind small pieces of fur and try to stretch them. If they pass this test, feel free to sew the main parts together. And if not, the product will turn out fragile and is unlikely to last long.
To evaluate your strength, you should try altering an old fur coat. If you think that to do this you need to rip off the sleeves and cut off the bottom, then you are very mistaken. When re-cutting the product, absolutely all old seams are removed, the pattern pieces are laid out on the most preserved and strongest parts of the fur. In order to save money, even the back is divided into two parts in order to choose the most successful ones from the entire fur coat.
When choosing dressed skins, pay attention to the length, color and thickness of the pile. All these indicators should be as similar as possible. After all, sometimes visually identical fur can turn out to be radically different to the touch.