An old stole begins a new life
Many women love and enjoy using a large elegant cape - a stole, they know how to effectively throw it over their shoulders, and wear it beautifully on their heads.
Stoles are often matched to certain things. Therefore, fashionistas often have not one such item, but several: lightweight and more durable, plain and multi-colored, with prints and patterns.
But not everyone knows what to do with a stole that has been out of use for a long time.
The cape is pushed further into the closet, and in vain!
A little imagination, patience and diligence - and the old stole will begin a new life : it will delight its owner, turning into a nice and necessary thing.
Let's give you some ideas on what could be made from old palatnite for a creative repurpose.
Stole clothing: attractive and comfortable
An old stole can still be part of a woman's wardrobe. After all, you can make a variety of clothing items .
Sew a poncho
Warm and cozy stoles make a beautiful poncho that will save you from the cold wind.
The work can be done in different ways:
- Buttoned center front;
- Without fasteners : the cape is folded in half, a neckline is cut in the middle of the fold. And the thing is put on after alteration over the head.
TIP: You can use buttons or knit trim to decorate your new item.
And if you find two stoles , you can make a new thing with a hood and pockets.
Comfortable vest
It’s easy to sew an original vest from any large scarf . Depending on the material, it will be warmer, for cold weather, or lightweight, which will be useful on summer evenings.
But in any case, it will become a decoration and an additional highlight of a woman’s image.
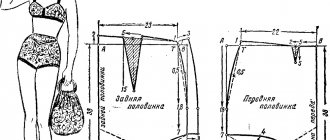
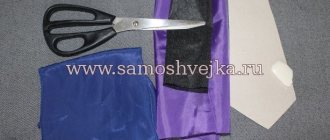
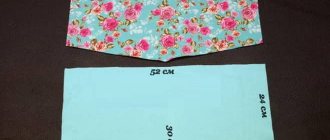
Skirt for the beach
Even novice craftswomen will not have problems turning a light silk or cotton into a skirt. It will be indispensable for going to the beach.
With gathers at the waist
All you need for the alteration is a wide elastic band for the waistband.
With smell
But if you don’t have it on hand, you can still make a skirt, just in a different model – with a wrap.
Summer dress
Another beach outfit may appear in your wardrobe: a light dress .
Depending on personal preferences, you can choose one of the models.
Open top
A large bright silk scarf does not require complex work , special skills or an intricate pattern. But there are a few stitches to be made. One of them is at the top of the dress. The fabric is wrapped around the body, joining above the chest. Then the fabric is folded inward and secured with a seam, and an elastic band is inserted into the resulting fold, which should fit tightly to the body.
A couple more seams will be needed at the waistline. There will be another elastic band or belt. But you can leave the silhouette free.
TIP: you don't need a side seam on the dress: this model has a wrap that will provide freedom of movement and make you feel comfortable on the beach.
Tunic dress
To make a tunic dress from a stole, you will have to work a little more. But you can build a tunic with different necklines : round, V-shaped, rectangular. You will also need to make side seams, having previously outlined the required distance for the armhole.
Wedding bag made of satin, beads and flowers
Whatever shape of handbag the bride prefers, delicate decorative elements are its mandatory details. For a wedding, girls choose accessories decorated with beads, artificial stones, and flowers. Satin is a traditional and widely used fabric for wedding dresses. In order for everything to be harmonious in the image, it is recommended to make a handbag for such a dress from satin, and then decorate the product with details that suit the style.
Wedding handbags from 990 rub.
Necessary materials
- Four pieces of satin fabric, 25 cm wide and 15 cm high.
- A piece of thick fabric to strengthen the product from the inside.
- Decorative elements: artificial flowers, beads, silver or gold cord.
- Thread.
- Needle.
- Sewing machine.
- Pins.
Stages of creation
Draw the shape of the future bag on a piece of paper. Make it square, oval, rectangular or heart-shaped if you wish.
We outline the pattern on the fabric. We make 4 blanks from satin material (2 parts will be used for the front side of the product, two for the lining). On thick fabric we cut out two more pieces of the same size, which will strengthen the finished product and give it shape.
We sew 2 blanks for the lining together, first folding them right sides inward. We connect the remaining two satin patterns with the front side to the parts made of thick fabric and lay them on top of each side. We sew using a machine.
Having turned the blank of the future bride's handbag inside out, we put a lining into it, which we do not turn inside out.
We connect the edges of the product, gradually bending them inward. We process it on a sewing machine, not forgetting to secure the fastener (button loop) and handle in the right places. As the latter, use a ready-made chain, lace or tape made from inlay.
We decorate the product according to our own wishes: we sew on flowers, embroider with beads, beads, bows, rhinestones, sequins.
Leisure accessories
You can use unnecessary stoles not only for sewing clothes. It will make things that will certainly come in handy on vacation.
Bag
A simple way - a bag-bag
You can turn a stole into a capacious string bag in a few minutes . And in this case you won’t have to sew anything. If you find that you don’t have anything suitable for walking on hand, but you have an old stole, you can easily solve the problem.
To do this, you just need to tie the edges of the fabric. Due to the length of the canvas, the resulting bag can be worn on the shoulder.
TIP: It is better to tie the ends of the scarf located diagonally. This way you can make the bag roomy and comfortable.
Another option is a tote bag
You can make an original and fashionable shopping bag from a thick and durable scarf.
Such things have the shape of a rectangle, so first of all you will need to make a pattern for the base and long handles. The necessary parts are cut out of the canvas, sewn together, and the seams are processed.
Such a bag can be a pleasant gift for a friend who will appreciate hand made work.
Tablecloth
Another use that does not require sewing or cutting the material is to use the stole as a picnic tablecloth . Products made from natural linen, cotton fabrics or fine wool are better suited for this .
For a cozy home
Women know that textiles can diversify or modify the interior of a room. To do this, it is not necessary to radically change the entire situation; one new thing is enough, which you can make yourself from an unnecessary stole.
Pillowcases
Familiar thought pillows will become a bright detail and a real decoration of the room if you sew a beautiful new pillowcase for them from a silk or satin scarf. And for winter, covers made of warm woolen stoles .
TIP: scraps left over from stoles during other alterations are also suitable for pillowcases. They can be combined and then sewn together to create a pillowcase using fashionable patchwork technology.
Plaid
It’s quite easy to create a blanket that will warm your country house on autumn evenings. One large scarf can make a blanket for a child .
And if you find 2 or 3 large scarves , then you will get a cape for adults .
Interior decoration
An unnecessary scarf will become an unusual decorative element if you cut it into pieces and then insert them into frames. Such a textile “picture” can become a bright or contrasting spot on the wall. Several fabric paintings placed in different parts of the apartment will give the apartment a stylish and finished look .
DIY wedding topiary made from coffee beans
For wedding topiaries, not only classic materials are used, such as ribbons, beads, stickers and various fabrics. Often the heroes of the occasion want something more original, and sometimes the unusual style of topiary is dictated by the theme of the wedding. Cotton pads, paper, money, candies, pasta, and artificial vegetables can be used as decoration for a wedding tree. Coffee topiary has become very popular. Its design looks original; this decorative element emits a wonderful smell of unground grains.
Necessary materials
- Coffee beans – preferably well roasted (250-300 g).
- Styrofoam ball.
- A small flowerpot.
- Wooden stick or plastic tube for the trunk.
- Glue.
- Double sided tape.
- Plaster or alabaster.
- Thin satin ribbon.
- Wide tulle ribbon.
Stages of creation
- Start covering the ball with grains - you need to do this in two layers to avoid gaps. When gluing the first layer, the coffee should be placed on top with the semicircular side, and the second - on the contrary. The place where the barrel will be attached must be left empty.
- Wrap the base for the barrel with double-sided tape so that the entire mounting surface is completely covered with it. Then attach the tape diagonally to the stick or plastic pipe - make sure that the tape is not visible underneath it. Glue the resulting trunk to the crown of the wedding tree.
- Pour a small amount of water into the pot and dissolve alabaster or plaster in it. The solution should be thick. While the mixture has not hardened, fix the trunk with the topiary in the pot, it should be located in the middle.
- If the alabaster has not had time to harden, start placing coffee beans on the surface of the mixture - first with the smooth side, as in the case of decorating the crown, then vice versa.
- When the solution becomes completely solid, decorate your topiary as you like. In this case, a laconic decor was chosen - a wide fantine ribbon tied in a bow on the front side. The finished topiary looks elegant and interesting.
To the children's room
Small mattress or play mat
Instead of storing the stole in the closet, it is better to actively use it. In a children's room, where the baby often plays on the floor, you cannot do without a small mattress or rug . Sitting on it, the child will not catch a cold even if he plays on the floor for a long time in cool weather. A stole is quite suitable for such a product. It will make a cover , which will only need to be filled with any filler - synthetic padding, batting, etc.
Textile toys
Craftswomen will appreciate the fabric of unnecessary scarves, which will make an excellent basis for homemade soft toys . They will become especially dear to children if their mother or grandmother creates the toy together with them.
While sorting out the shelves of a dresser or closet, did you find a stole that you haven’t worn for a long time? And decided to postpone it again until better times?
Should not be doing that! Imagine how many pleasant moments you will experience yourself and bring to your loved ones by turning a stole into beautiful and necessary things with your own hands!
We decorate wedding glasses
If you are a creative person and want to take a direct part in creating the decor of your wedding, or you are a novice master who is trying his hand at wedding decor, then the following master class, each stage of which is accompanied by a step-by-step photo, is for you.
To decorate wedding glasses in the “Bride and Groom” style you will need:
- Two glass glasses;
- Super glue;
- Satin cord;
- Ready-made flower made of fabric;
- Pearl hemispheres;
- Scissors;
- White braid without lace.
Before you start decorating your glasses, you need to decide on the colors of the materials that you will use in your work.
Let's start decorating the glasses.
Glass "Bride"
Step one. We prepare the workplace and collect together all the materials necessary for the work.
Step two. We disassemble the finished textile flower into parts. To make this easier, cut off the plastic stem with scissors and leave large parts of the base.
Step three. Cut the resulting parts of the flower into petals.
Step four. Using super glue, carefully glue the flower petals to the base of the glass; it’s okay if the petals overlap each other a little. When the first tier of petals is glued, we make the second tier using the same technology.
Step five. For this step, take our satin cord and wrap it around the stem of the glass, starting from the base of the stem and up to the flower, periodically securing the cord to the stem of the glass with super glue.
Step six. When the stem of the glass is ready and the glue has dried well, glue pearl hemispheres of different sizes on the top of the glass in a chaotic manner the way you like.
The “Bride” glass is ready.
Festive "Groom"
Step seven. We take the second glass and wrap the remaining satin cord around it, starting from the base of the stem and reaching approximately 1/3 of the bowl of the glass. Secure with super glue.
Step eight. We take our white braid and measure the required length along the part of the glass where our satin cord wrap ends. Glue it around the entire circumference of the glass.
Step nine. We make a small bow from the same braid and fasten it in the middle of the braid already glued to the glass.
Step ten. Decorate the center of the glass with pearl hemispheres, as shown in the photo below.
The second glass is also ready. Now you can admire the finished result. These glasses will be a wonderful decoration for your wedding.