Model selection
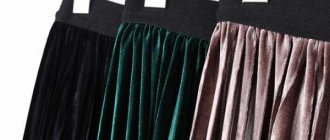
Sewing a beret begins with choosing a style. The difference between such hats lies in the materials used, the knitting method, the cut, and the decor. The classic women's beret is made of felt, wool, and cotton. For evening walks and going out, models made of velvet and suede, decorated with beads and sequins, are suitable. Accessories embroidered with lace look interesting. Yarn is used to create winter, spring, and autumn patterns. Threads can be thin or voluminous. The pattern is selected individually.
The men's beret is a popular headdress. The product is often sewn from felt, wool or genuine leather. Decor is rarely used. The military beret falls into a separate category, indicating membership in a specific type of military. Accessories for children are made using the same pattern as berets for adults. Their main difference is specific decorations and size.
Military
Children's
Classic women's
Male
Assembly and processing
In order for a neat product to come out, the beret should be properly processed. The pattern is only half the battle. Of course, ideally, it is best to process all seams with an overlocker, but if such a unit does not exist, then a sewing machine with a zigzag stitch will do just fine. You can also decorate the seams with bias tape, covering all the cuts in it. Winter hats made of fur can be lined. It is also cut out according to the basic patterns and the same allowances are made. When sewing the lining fabric, the seam for attaching the elastic strap is hidden inside, leaving a small area of the unclosed seam, after which the product is turned inside out and the slit is closed manually.
One has only to try to work on this piece of clothing, and it will immediately become clear that it is not at all difficult to sew berets with your own hands. The patterns described above are very simple to make. Even the most inexperienced seamstress can cope with this task. A little diligence, and a fashionable new thing will be ready.
Materials and tools
You need to choose a fabric for a beret taking into account exactly when the product will be worn. Summer and spring models are best cut from thin, breathable fabrics such as linen, cotton, cambric. Such fabrics will not interfere with ventilation and at the same time protect your head from the sun. For late autumn, you will need denser materials that will protect from the wind. The best option is angora, velor, thick knitwear. Winter models are often made from drape. Berets made of artificial and natural fur and woolen fabric with a small pile look interesting. To sew a women's beret, you can take polar or fleece; these fabrics are optimal for daily use.
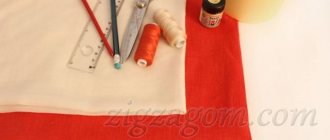
As a basis for creating a paratrooper beret with your own hands, it is recommended to use thick knitwear, thick fleece or coat fabric. Sewing a border beret can be made from any dense green fabric. In addition to the material, you will need the following tools for the job:
- tape measure;
- threads with needles;
- bias tape for finishing seams.
If desired, you can sew a lining inside, thanks to which the product will better hold its shape. The most important step in sewing a product is the correct pattern. It must be printed in its original size.
Beautiful patterns of women's fabric berets
For several centuries now, berets have not lost their popularity. They can be combined with dresses, coats or overalls. These hats are worn by everyone from children to men. This article talks about how to make a fabric beret with your own hands and what materials are needed for this.
What are berets good for?
Hats can be worn in any season; they perfectly emphasize the shape of the face. Quite easy to sew and decorate, it will become an indispensable part of your wardrobe. They can be worn with coats, jackets or suits. A hand-made knitted beret will highlight the individuality of your look.
Beret, fabric pattern
For example, in France, women have hats for different occasions. Both for holidays and for everyday outings. They can complement business suits or evening dresses. And children generally cannot do without this clothing. It perfectly protects from the sun or light rain, and does not allow drafts to pass through.
Choosing fabric
The products are made from rigid fabrics that hold their shape well and are easy to care for. A fabric beret pattern can be found on the Internet or in tailoring magazines.
Such products can be sewn for dolls so that girls can play fashionistas. It is advisable to take high-quality fabric, so it will have a high price.
Cheap materials can quickly deteriorate, crumble, or form a lot of pellets.
Measurements and pattern
Before sewing a beret, you need to decide on the dimensions. Only 2 parameters are needed:
- head circumference (to find out, you need to draw a measuring tape around your head along the line of the eyebrows and the back of the head);
- the distance from the top of the head to the edge of the headdress (usually a centimeter is swallowed to the middle of the forehead).
Now you need to adapt the beret pattern to your parameters. All that is required is to increase or decrease the parts proposed in the diagram by a few centimeters so that they coincide with the obtained values. Since simple children's and adult berets are cut from 2-5 parts, redrawing them will not cause difficulties even if you have no experience.
When taking measurements, do not pull the tape, otherwise the product will turn out small and will press.
Building a pattern
In order to sew a beret with your own hands, you will need to create a simple pattern. Let's take a circle with a diameter of 30 cm as a basis - this is the standard size of a beret. In the center of the circle you need to build a circle equal to the circumference of your head. To make the beret asymmetrical, the circle can be cut out by moving it to the edge.
Let's calculate the radius using the formula familiar to everyone from school: R = head circumference / 2π. Let's say head circumference = 57 cm. Then R = 57 / (2 x 3.14) = 9 cm.
If the fabric chosen is elastic, then it is better to subtract 1-2 cm from the circumference of the head so that the beret fits well.
Sewing stages taking into account the model
A detailed master class on making a fabric headdress will make the task as easy as possible. If you follow all the rules and follow the algorithm of actions, even a beginner can handle the job. If you have no experience, it is better to start sewing simple models.
Female
This beret can be sewn from knitwear. Since the material tends to stretch and does not hold its shape well, it is necessary to make a lining. It is made in the same way as the base. In order for the accessory to turn out beautiful and fit well, you need to adhere to the algorithm, and also smooth the product after each seam, checking whether everything corresponds to the measurements.
Main stages:
- The first step is to connect the parts of the board so that it is solid.
- Next, iron the seam.
- The bottom is fixed to the board and the base is formed.
- The seams are smoothed out again.
- Now you need to sew a pre-made lining to the base.
- Finally, the band is sewn on, controlling its fit on the head.
It is recommended to steam the cap, after which the product is ready for use. To make the accessory more unusual, it is recommended to decorate it. It is better to use beads or small beads as decoration. Massive elements are not suitable as they can pull out the knitwear.
Male
The beret pattern for men consists of the same patterns as the women's models. The only difference is in the materials. It is recommended to use drape or thick felt of a dark color as the main fabric; the band is sewn from leather. You can choose cotton for the lining.
Algorithm of actions:
- First you need to sew the bottom and sides from the main fabric. Perform similar steps with the lining.
- After this, press the seams on the base and sew decorative stitches on both sides at a distance of 3 mm.
- Now glue the band with non-woven material, which will prevent subsequent deformation. It needs to be folded in half and the short sides stitched to form a circle.
- Next, the band is sewn to the finished base of the accessory, placing the front side to the back of the top. The band must be turned to the front side and stitched so that it covers the seam formed.
All that remains is to insert the lining inside out into the beret, baste and hem along the inner edge of the band. This accessory looks stylish and fashionable and will appeal to any man. It will look especially impressive if the band is made of genuine leather.
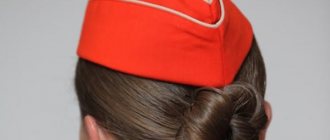
Military
This pattern of a military beret, like that of the Airborne Forces, involves making an accessory from thick felt or wool. The headdress is sewn from only 3 parts, so its production will take a couple of hours.
The army beret is made according to the following algorithm:
- First you need to connect the side part with the facing. Then turn the facing inside out and stitch along the edge.
- The bottom and the side part are connected in a circle on both sides (the edges must already be processed).
- Now you need to sew the edge of the beret. The sheathing can be done by hand, but it is better to use a zigzag stitch on an overlocker. This will make the seam look neater.
- Finally, the product must be turned out and ironed.
All that remains is to decorate the accessory using stars. You can make them yourself from plastic and fabric, or use ready-made stars (the second option looks more impressive). A beret made according to this pattern is considered universal and practical. It is suitable for adults and children.
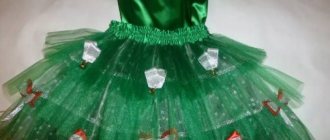
Children's
For a girl or boy, you can sew a simple classic beret. But a headdress made of wedges will look much more interesting. To sew it, it is recommended to use thick knitwear or felt. To make the accessory look unusual, it can be stitched with contrasting threads. To work, you will need to cut out 8 wedges and immediately overcast them, which will prevent subsequent crumbling of the fabric. You also need to cut out the rim.
Algorithm of actions:
- the wedges need to be sewn in pairs, then fix the 4 resulting parts and iron them;
- then sew the rim along the narrow edges to form a circle, smooth out the seam;
- the rim needs to be folded in half, swept, ironed;
- Now attach the finished part to the beret, lowering it by about 1.5 cm;
- All elements are stitched manually or by machine.
Finally, the lining should be hemmed. A children's beret made according to this pattern will turn out to be voluminous and unusual. To make the accessory more non-standard, it can be cut from wedges of different colors.
We design a variety of berets with our own hands
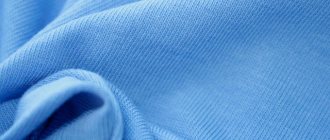
Choosing fabric. To make your own beret warm enough for the off-season, it is better to choose thick woolen fabric, for example, loden or drape. A light and practical beret will be made from fleece; you can also use knitted fabric or cut up a boring sweater. Don't limit your imagination. With a stylish beret, we're all a little French!
Building a pattern
In order to sew a beret with your own hands, you will need to create a simple pattern. Let's take a circle with a diameter of 30 cm as a basis - this is the standard size of a beret. In the center of the circle you need to build a circle equal to the circumference of your head. To make the beret asymmetrical, the circle can be cut out by moving it to the edge.
How to sew a beret with your own hands - instructions and pattern
Let's calculate the radius using the formula familiar to everyone from school: R = head circumference / 2π. Let's say head circumference = 57 cm. Then R = 57 / (2 × 3.14) = 9 cm.
If the fabric chosen is elastic, then it is better to subtract 1-2 cm from the circumference of the head so that the beret fits well.
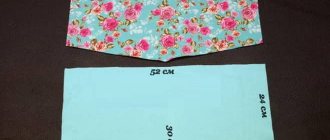
Cutting out the details
In total you will need to cut 3 parts:
round bottom of the beret (circle with a radius of 30 cm);
a piece with a hole for the head (ring from our pattern);
a cache-pin, simply a band.
We have already created patterns for the first 2 parts. As a cache-pin, you need to cut a strip with a length equal to the circumference of your head, and a width of your choice. To get a 3 cm high pot, the width of the piece should be 6 cm. Don't forget to add seam allowances.
We sew with our own hands
Just 3 stitches! Sew 2 beret pieces in a circle using one. Second, connect the cache-pin into a ring. Using the third seam, sew a folded cache-pin with a hole for the head. Iron the seams thoroughly and, one might say, the beret is ready!
How to sew a beret with your own hands
Lining
If the fabric of the beret does not fray, then it can be worn in this form. And if it frays badly enough, then in order to prevent threads from remaining in the hair, you will have to sew a lining for the beret. You will need a piece of lining fabric or knitwear if you want to make the beret a little warmer.
From the fabric you need to cut 2 round parts the same as for the beret. Having folded the right sides, you need to sew them around the circumference, but not completely. Leave about 7cm unsewn. To sew a beret with a lining, turn it inside out. Place the lining into the beret with the right side facing inward. Align the pot and lining around the circumference of the head and stitch in a circle. Through the hole left, turn the entire structure inside out and sew up the beret. Now it's definitely ready!
The colors of the band and the top of the beret may vary.
Boutonnieres will help diversify your beret
And this is what an asymmetrical beret with an offset center looks like
Flirty bows are another decoration option for a beret
Ideas
How to sew a beret with your own hands and not decorate it with a luxurious flower? The trend is large baroque brooches with sparkling crystals and vintage cameos in light lace. Choose what suits you and welcome spring in a new beret!
Save so you don't lose
Source
How to decorate
How to decorate a beret depends on its style, as well as on the color it is made of. Classic autumn and winter headdresses can be decorated with rhinestones, beads, and sequins. You can complement the front part of the product with an applique made of natural fur. You can sew it on in pieces or make small pompoms.
It is recommended to decorate summer and spring knitted models with voluminous figures made of yarn. These can be butterflies, flowers, stars. You can sew beads of a similar color along their edge. The Scottish beret is decorated with a small faux fur pompom located in the center.
It is better to decorate children's hats with embroidery or appliqués. You can make them yourself or purchase ready-made options. Stripes that are fixed with glue also look stylish and modern. With this mounting option, it is recommended to give preference to small decorative elements.
Fashionable styles
When choosing a factory product, you need not only to follow fashion, but also to know which variety suits a certain type of face. Any round hat visually lengthens the look. Therefore, it is not recommended to be worn by girls with an oval face type.
With visor
Despite the fact that the visor characterizes a cap or cap, it can also be present on berets. The barely noticeable length adorns the face and does not cover it at the same time.
Beret hat with visor
Round
The most common model that can be found in stores. It is easy to sew, which is why it is so popular among other products. Women's berets made of mink, arctic fox, and sable look ideal with leather outerwear, down jackets and winter jackets. With a mink coat, it must be selected carefully. It should be a tone darker or lighter than the outerwear.
Mink fur beret
Volume
Women's fur berets themselves provide additional volume to the head due to the pile. The longer it is, the more impressive the headdress looks. When purchasing such an accessory, you do not need to decorate it with various decorations. They will only spoil the image and impression of the sophistication of the texture of the material.
With elastic band
This type of model fits perfectly on the head and does not fall off when wind or movement occurs. Typically, a wide elastic band is used along the edge of the factory product.
With decor
Various decorations are added to the look if the headdress has thin and not long pile. Various brooches, flowers, pendants are placed on the side.
Fur beret with decor
Good to know! Manufacturers cannot do without blanks. This item follows the shape of the head and is designed for sewing hats.