array(3) { [0]=> array(50) { [0]=> string(113) «
" [1]=> string(113) "
" [2]=> string(113) "
" [3]=> string(113) "
" [4]=> string(113) "
" [5]=> string(113) "
" [6]=> string(113) "
" [7]=> string(113) "
" [8]=> string(113) "
" [9]=> string(113) "
" [10]=> string(113) "
" [11]=> string(113) "
" [12]=> string(113) "
" [13]=> string(113) "
" [14]=> string(113) "
" [15]=> string(113) "
" [16]=> string(115) "
" [17]=> string(113) "
" [18]=> string(113) "
" [19]=> string(113) "
" [20]=> string(115) "
" [21]=> string(115) "
" [22]=> string(115) "
" [23]=> string(115) "
" [24]=> string(115) "
" [25]=> string(115) "
" [26]=> string(115) "
" [27]=> string(115) "
" [28]=> string(113) "
" [29]=> string(115) "
" [30]=> string(115) "
" [31]=> string(113) "
" [32]=> string(115) "
" [33]=> string(115) "
" [34]=> string(115) "
" [35]=> string(115) "
" [36]=> string(115) "
" [37]=> string(115) "
" [38]=> string(115) "
" [39]=> string(115) "
" [40]=> string(115) "
" [41]=> string(115) "
" [42]=> string(115) "
" [43]=> string(115) "
" [44]=> string(115) "
" [45]=> string(115) "
" [46]=> string(115) "
" [47]=> string(115) "
" [48]=> string(115) "
" [49]=> string(115) "
" } [1]=> array(50) { [0]=> string(62) "/wp-content/uploads/d/b/0/db056bfdccbe4d0b71422f9c631e0f20.jpg" [1]=> string(62) "/ wp-content/uploads/2/b/8/2b8fb45266f750dbb3ed3d8ea5f3c211.jpg" [2]=> string(62) "/wp-content/uploads/9/4/4/9445838640ad52c4792655e4f67c67ee.jpg" [3]=> string( 62) “/wp-content/uploads/a/f/e/afe3f40c565f8439704259afa8970a2f.jpg” [4]=> string(62) “/wp-content/uploads/e/e/b/eeb982f19d9403368c37b68955e94d27.jpg” [5] => string(62) "/wp-content/uploads/8/6/6/866b1fc044db1e591ba8244da669bcd7.jpg" [6]=> string(62) "/wp-content/uploads/b/f/7/bf7f50f5c9d390e12248ec03e0c3cb23.jpg " [7]=> string(62) "/wp-content/uploads/6/2/9/629b054d88649407015d2650c0781de6.jpg" [8]=> string(62) "/wp-content/uploads/b/f/e /bfe62c37b83f638037b6cf4eaacc79f0.jpg" [9]=> string(62) "/wp-content/uploads/8/2/7/827d09cd9e9f62a9f1e1f83227935ebe.jpg" [10]=> string(62) "/wp-content/uploads/b /c/7/bc71cac81ff2133af777cdebe4a7e1a7.jpg" [11]=> string(62) "/wp-content/uploads/c/f/d/cfd5d6771a72e9e784741883e793c226.jpg" [12]=> string(62) "/wp-content /uploads/c/c/3/cc3fcebad08ebae379de32f69ed48b98.jpg" [13]=> string(62) "/wp-content/uploads/2/5/d/25d9a6795db2f5b3096cfbc892fd4579.jpg" [14]=> string(62) " /wp-content/uploads/a/4/b/a4b7ce0c85eebe10b338197469da85a2.jpg" [15]=> string(62) "/wp-content/uploads/7/2/0/7201f8463a6195f5d830a522b96d84f0.jpg" [16]=> string (63) “/wp-content/uploads/3/8/4/384b5c9da8923e865a0af081ef37155f.jpeg” [17]=> string(62) “/wp-content/uploads/9/7/0/970d226f8870ff392f2554a391b7ad74.jpg” [18 ]=> string(62) "/wp-content/uploads/1/d/1/1d13be0467a2121cda3adca58143fe19.jpg" [19]=> string(62) "/wp-content/uploads/5/c/2/5c21744bfc46617ca1813fd6d7bc55cc. jpg" [20]=> string(63) "/wp-content/uploads/0/c/e/0cecc2d9698f2dfe90f25f167fb1cc80.jpeg" [21]=> string(63) "/wp-content/uploads/f/9/ E/F9E94CB5C485252524014187FCD3D8C368.JPEG "[22] => string (63)" /wp-content/uploads/0/8/d0822827817CE1F29185858EE3B7F872F.JPEG "[23] => STRIN G (63) "/WP-Content/Uploads/ f/1/4/f1476e8435ebe22be94b090b42df3d56.jpeg" [24]=> string(63) "/wp-content/uploads/9/2/4/924505d45fbf5f237f9295bbdff1260d.jpeg" [25]=> string(63) "/wp- content/uploads/a/4/d/a4d2747e42ece73b9989b019456eea09.jpeg" [26]=> string(63) "/wp-content/uploads/f/8/b/f8b1f6329cd6c2f18e03c5a9aa1bf02f.jpeg" [27]=> string(63) “/wp-content/uploads/b/a/4/ba4f82e778de6b195b101843d634945a.jpeg” [28]=> string(62) “/wp-content/uploads/8/b/d/8bdb5825fbe1bc415ebc4951c168f2ca.png” [29]=> String (63) “/wp-content/uploads/9/a/9a08e48bf0623FB96969F1CE2D7F0939FD.JPEG” [30] => String (63) “/WP-CONTENT/UPLOOADS/1/D/11DC2781A46C915 1e13c91c99680848.jpeg ”[ 31]=> string(62) "/wp-content/uploads/7/8/f/78f6b762f3aa6876e28c2eae8b8f564a.png" [32]=> string(63) "/wp-content/uploads/0/8/d/08d7d7cf860ebb55f8826c785a4d1d0a .jpeg" [33]=> string(63) "/wp-content/uploads/c/a/6/ca6b6d3dcc2ccd1165d49c0e581fd824.jpeg" [34]=> string(63) "/wp-content/uploads/5/f /c/5fc4de9818a5495519301dded724fb03.jpeg" [35]=> string(63) "/wp-content/uploads/0/3/b/03be8514427ce0d6e3700bfaacb18c1a.jpeg" [36]=> string(63) "/wp-content/uploads /0/6/5/065567a573e28aa5c7645e676f4bf245.jpeg" [37]=> string(63) "/wp-content/uploads/d/a/9/da9445f686b364d7dad5f88297bfc8e1.jpeg" [38]=> string(63) "/wp -content/uploads/d/a/d/dad28568178686392346c8b14e73486f.jpeg" [39]=> string(63) "/wp-content/uploads/c/a/9/ca92a37758dd2421d01016f34ef7964c.jpeg" [40]=> string(63 ) "/wp-content/uploads/6/a/d/6adf8cc04fcca2dabd617b27524f8474.jpeg" [41]=> string(63) "/wp-content/uploads/6/8/b/68b93f354077a4ac483bfc36059e6409.jpeg" [42]= > string(63) "/wp-content/uploads/7/6/b/76b652ae7af26e78c2c089dbd4558d35.jpeg" [43]=> string(63) "/wp-content/uploads/8/1/6/816f7c1c864b0ba5bb1438d8e07620c1.jpeg" [44]=> string(63) “/wp-content/uploads/1/e/c/1ece95dd52318868976f25270cab6e6d.jpeg” [45]=> string(63) “/wp-content/uploads/2/d/6/ 2d686c73be2ced710ae3429bf62a6a07.jpeg" [46]=> string(63) "/wp-content/uploads/4/e/d/4ed1e84dcc5a730c6bcf3f6eee680fb5.jpeg" [47]=> string(63) "/wp-content/uploads/8/ 9/b/89b076931c4b35bfb072dc99c6a1ad46.jpeg" [48]=> string(63) "/wp-content/uploads/8/d/e/8deac246243d695fac4040ce0afb3890.jpeg" [49]=> string(63) "/wp-content/ uploads/d/7/8/d78b482e2a4f73bbd3d8ff8cb6ecd083.jpeg" } [2]=> array(50) { [0]=> string(36) "db056bfdccbe4d0b71422f9c631e0f20.jpg" [1]=> string(36) "2b8fb45266f 750dbb3ed3d8ea5f3c211.jpg " [2]=> string(36) "9445838640ad52c4792655e4f67c67ee.jpg" [3]=> string(36) "afe3f40c565f8439704259afa8970a2f.jpg" [4]=> string(36) "eeb982f19d9403368c37 b68955e94d27.jpg" [5]=> string( 36) "866b1fc044db1e591ba8244da669bcd7.jpg" [6]=> string(36) "bf7f50f5c9d390e12248ec03e0c3cb23.jpg" [7]=> string(36) "629b054d88649407015d2650c0 781de6.jpg" [8]=> string(36) "bfe62c37b83f638037b6cf4eaacc79f0.jpg" [ 9]=> string(36) "827d09cd9e9f62a9f1e1f83227935ebe.jpg" [10]=> string(36) "bc71cac81ff2133af777cdebe4a7e1a7.jpg" [11]=> string(36) "cfd5d6771a72e9e784741 883e793c226.jpg" [12]=> string(36) "cc3fcebad08ebae379de32f69ed48b98.jpg" [13]=> string(36) "25d9a6795db2f5b3096cfbc892fd4579.jpg" [14]=> string(36) "a4b7ce0c85eebe10b338197469da85a2.jpg "[15]=> string(36) "7201f8463a6195f5d830a522b96d84f0.jpg" [16] => string(37) "384b5c9da8923e865a0af081ef37155f.jpeg" [17]=> string(36) "970d226f8870ff392f2554a391b7ad74.jpg" [18]=> string(36) "1d13be0467a2121cda3adca5814 3fe19.jpg" [19]=> string(36) "5c21744bfc46617ca1813fd6d7bc55cc .jpg" [20]=> string(37) "0cecc2d9698f2dfe90f25f167fb1cc80.jpeg" [21]=> string(37) "f9e94cb5c4852524014187fcd3d8c368.jpeg" [22]=> string(37) "d0822827817ce 1f2291858ee3b7f872f.jpeg" [23]=> string(37) "f1476e8435ebe22be94b090b42df3d56.jpeg" [24]=> string(37) "924505d45fbf5f237f9295bbdff1260d.jpeg" [25]=> string(37) "a4d2747e42ece73b9989b0194 56eea09.jpeg" [26]=> string(37) "f8b1f6329cd6c2f18e03c5a9aa1bf02f.jpeg " [27]=> string(37) "ba4f82e778de6b195b101843d634945a.jpeg" [28]=> string(36) "8bdb5825fbe1bc415ebc4951c168f2ca.png" [29]=> string(37) "9a08e48bf0623fb969 f1ce2d7f0939fd.jpeg" [30]=> string( 37) “11dc2781a46c93151e13c91c99680848.jpeg” [31]=> string(36) “78f6b762f3aa6876e28c2eae8b8f564a.png” [32]=> string(37) “08d7d7cf860ebb55f8826c78 5a4d1d0a.jpeg" [33]=> string(37) "ca6b6d3dcc2ccd1165d49c0e581fd824.jpeg" [ 34]=> string(37) "5fc4de9818a5495519301dded724fb03.jpeg" [35]=> string(37) "03be8514427ce0d6e3700bfaacb18c1a.jpeg" [36]=> string(37) "065567a573e28aa5c7645 e676f4bf245.jpeg" [37]=> string(37) "da9445f686b364d7dad5f88297bfc8e1.jpeg" [38]=> string(37) "dad28568178686392346c8b14e73486f.jpeg" [39]=> string(37) "ca92a37758dd2421d01016f34ef7964 c.jpeg" [40]=> string(37) "6adf8cc04fcca2dabd617b27524f8474.jpeg" [41] => string(37) "68b93f354077a4ac483bfc36059e6409.jpeg" [42]=> string(37) "76b652ae7af26e78c2c089dbd4558d35.jpeg" [43]=> string(37) "816f7c1c864b0ba5bb1438d 8e07620c1.jpeg" [44]=> string(37) "1ece95dd52318868976f25270cab6e6d .jpeg" [45]=> string(37) "2d686c73be2ced710ae3429bf62a6a07.jpeg" [46]=> string(37) "4ed1e84dcc5a730c6bcf3f6eee680fb5.jpeg" [47]=> string(37) "89b076931c4b35b fb072dc99c6a1ad46.jpeg" [48]=> string(37) "8deac246243d695fac4040ce0afb3890.jpeg" [49]=> string(37) "d78b482e2a4f73bbd3d8ff8cb6ecd083.jpeg" } }
Two-color and gift item
Using ribbons of two different colors you can create an elegant and stylish decoration. This technology is suitable even for beginners. This product can be used to decorate a stylish elegant dress and a beautifully styled hairstyle. It is necessary to prepare a wide and thin piece of tape, each 15 cm long.
Step-by-step instructions for creating DIY ribbon bows:
- First you need to measure the tape of the required size.
- Place one on top of the other and roll it into a ring.
- It is necessary to connect the product blank with glue, and then iron it.
- Tie a narrow ribbon in the center of the bow to cover where the ends meet. You should get a knot.
- The ends need to be cut and glued.
- If you decorate the gift box with a handmade bow, it will look much better. Depending on the situation, it can be made lush and voluminous or modest but elegant.
This option is very simple and easy to make if you follow the instructions:
You need to take a tape up to 2 meters long
It should be wound around the open palm of your left hand, and then carefully removed. The end must remain free
On one side of the workpiece you need to cut off both corners, approximately 5 millimeters. To ensure that the tape does not unravel when cut, it must be carefully burned. The same procedure must be done on the second side. Next, the workpiece must be aligned so that the cut parts are connected in the center. The ribbons should be tied with the free end. After this, each petal is straightened to give shape and volume.
In order to make such a bow, you need to have 6 pieces of ribbon 5 cm wide and 12 cm long, as well as 6 blanks 3 cm wide and 11 cm long. Each one will need to be burned carefully around the edges so as not to unravel. Additional materials will be a piece of feta, small beads and thin elegant braid.
How to make a beautiful bow from a ribbon step by step:
- First, take the wider pieces and fold them in half.
- After this, sequentially assemble onto one thread, pull together well and secure.
- Repeat the same manipulations for narrow segments.
- Cut a circle of feta, the diameter of which should be approximately 4 centimeters, and then glue a large blank to it.
- Take a thin braid, the length of which should be 12 centimeters. You need 6 such pieces. Fold each into a ring.
- Place it on the petals and glue them on the front side.
- Fix the product on top with a narrow variation.
- Pour a small amount of glue onto a piece of fabric with a diameter of 1 centimeter.
- Place the beads tightly in a circle and cut out.
- Place the decor in the center and secure with glue.
Using a fork you can make a small decoration for a card. The process should include the following steps:
- You need to take a fork in your left hand.
- Loop a small ribbon over it so that the edges are on the right.
- Next you need to throw the far end behind the fork over the lower front end.
- To do this, it needs to be brought out between the teeth in the center and brought out from behind.
- The other end must be inserted into the same hole, only from above.
- After this, you need to turn the fork over and tie both ends with two knots.
- Remove the resulting decoration from the fork and trim the ends. To prevent them from blooming, they need to be carefully scorched.
The simplest classic bow
The basic bow that any beginner should learn to make is presented below. For it, you can take either a narrow or a very wide ribbon - it will work from any one.
Work process:
- Fold the ribbon by placing the two halves over the index fingers of both hands.
- Cross the halves and insert one into the other.
- Tighten the product. Ready!
You can make a chic decoration based on such a bow. It will be enough just to fill it with waterproof glue or shiny acrylic varnish, then attach the rings to which the chain will be fastened.
The same bow will not be difficult to tie on a fork; with its help it will turn out more neat and even (although you can create a very beautiful accessory on your fingers). There is also a limitation for such an “assistant” - it is useful only when creating very small bows; for larger products you will have to resort to the traditional method.
Tying methods
For convenience, there are ready-made instructions on how to tie a bow on a dress beautifully and correctly. They explain the sequence of actions step by step. The choice of method depends on the material used and the location of the decoration.
Traditional
It is a classic option that is hard to go wrong with. Before making a bow, fabric with a loose texture must first be ironed. You need to tie a bow on a dress according to the following pattern:
- Two loops are formed from both ends.
- Place one of them on top of the other.
- The end of the loop on top is threaded into the bottom.
- Tighten the bow and straighten it.
With one loop
Suitable for various types of material, but looks best with satin ribbon. Looks stylish and aesthetically pleasing. The combination of the simplicity of the knot and shiny fabric gives the image a special charm. They tie it like this:
- First, make two identical loops, as in the classic version.
- Then one of them is wrapped around the second and threaded halfway into the knot.
- The loop from the half-threaded end is pulled through the knot completely.
With four loops
An option for those who want to decorate their outfit with a voluminous accessory. The pattern consists of two traditional bows tied on top of each other:
- A couple more loops are made from the ends of the ribbon of a bow made in the classical way.
- A second bow is tied from them.
- Straighten out all the loops.
- The remaining ends are wrapped around the resulting knot in the center.
Corrugated
Looks good on light, slippery fabrics. You will need a wide, long ribbon for this. The materials used are viscose or voile:
- First, uniform folds are formed along the entire length and the fabric is wrapped around the waist.
- Then they put the right end on the left, twist and bend it, bringing it under the freely hanging second tip.
- Tie an incomplete knot.
Bow flower
It’s not without reason that this beautiful multi-layered bow got its name. Clothes with such an accessory look festive and beautiful. You need to be very careful when working with this decorative element:
- At least a dozen petals are made from ribbon, strung on a thread and pulled together.
- Then the upper tier is made from shorter petals in the same way.
- They are fastened with a stitch in the middle and straightened.
- A bead is placed in the middle.
Business
Suitable for the neck of a dress. In spring and summer, satin and chiffon scarves are used to create business bows. In winter or autumn they are made from warm scarves on outerwear. Algorithm:
- Tie a knot, leaving the right end slightly longer.
- Wrap it around the left side and tighten it, threading it into a loop.
- After forming two loops, thread one of them into the other and tighten.
Free loop
The advantages include unobtrusiveness and speed. Suitable for tying at the front. The material should not be smooth so that the accessory does not fall apart:
- A wide belt is folded in half and circled behind the back so that a loop is formed in one hand, and two ends in the other.
- Place the ends into the loop and tighten.
Half bow
This option looks like an unfinished knot. Suitable for fashionistas who consider a traditional bow to be too pretentious. The texture of the material should be non-slip.
- The belt is pulled back and the ends overlap.
- Then they are brought forward.
- The right end is placed on the left and brought inside. The inserted tip is bent down and brought out under the second free end.
- To form an ear, a fold is made at a short distance from the intersection.
- The resulting eye is threaded into a loop.
Complex multi-layer
For those who are interested in how to beautifully tie a bow from a satin ribbon, this option is suitable. It looks quite voluminous, so you shouldn’t add any other accessories. Manufacturing algorithm:
- Several loops are made from a long length of tape.
- Place them in a stack and secure them with a pin.
- Turn the loops in the opposite direction and attach them to the belt.
- The number of layers should not be more than seven.
If you know how to beautifully tie a bow on your belt, shoulder, neck or chest, you can make your look unique. By spending a minimum of time and effort, you will be able to qualitatively transform your wardrobe. But don’t forget about style, because the accessory doesn’t always look appropriate.
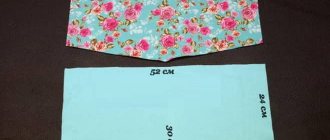
Belt with bow
Now that you already know exactly how to sew a bow, let’s finally learn how to create original belts with bows that will benefit any outfit. To make it, you need to take a piece of silk fabric measuring 40*80 cm, from which you cut out a rectangle measuring 14*80 cm, which we fold in half, inside out, to end up with a rectangle measuring 14*40 cm. Then we sew the part along the short side, leaving there is a small hole for turning it inside out, sew the bow along the long side and pierce it with a pin exactly in the middle. Next, we cut out two rectangles measuring 16*20 cm from the fabric, fold them inside out, sew them together and turn them inside out.
Next, in the same way, we cut out two rectangles measuring 5*8 cm from the fabric, which are also sewn and turned inside out. After this, we iron all the details of the belt with the bow and put it together, for which the bow should be pulled together with a thread in the center, its tails should be folded towards each other and sewn to the edge on the jumper. In the end, all that remains is to make a belt from the same fabric as the bow, and thread it through the jumper on the reverse side.
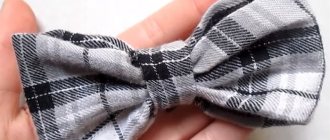
DIY grosgrain bows with openwork ribbon
Rep ribbon is characterized by strength; it holds the shape of the bow firmly and for a long time.
What we need:
- blue grosgrain ribbon 4 cm wide
- openwork ribbon 2.5 cm wide
- rubber
- decorative pearl strip
- needle
- black thread
- lighter
- glue gun
1 Prepare 2 pieces of grosgrain ribbon, 20 cm long, and go along the edges with a lighter. Fold it in half in the center so that one edge overlaps the other by 0.5 cm.
2. Sew the edges of both strips together and tighten to create a double bow.
3. Take a strip of grosgrain and a strip of openwork ribbon, both 20 cm long, place them on top of each other, and touch the edges with a lighter. Fold the edges so that they are in the center of the piece, sew and tighten.
4. Cut 2 strips 10 cm long from the openwork ribbon, trim the ends beautifully, and burn them with a lighter. We lay the strips crosswise on top of the double bow and glue it. After that, glue a single bow on top.
5. We tighten the center of the bow with a narrow braid several turns, and seal the end. We decorate the top with a pearl stripe.
6. Using a glue gun, glue the elastic band from the inside out.
Watch how to make a bow from grosgrain ribbon with your own hands, step by step video.
Bow for discharge from the hospital
- Newborns (and children in general) deserve the best! That's why I found for you a beautiful bow that will suit both girls and boys. For this you will need a fairly long ribbon (at least three meters).
- In the middle, make a winding of several layers and then a knot as in the photo. After this, you will need to pull out several petals formed by the previously folded rings.
Why leave such long ends around the edges?
The fact is that you will need to tie them around the long-awaited package, leaving a beautiful middle in front. At one time, I actually bought a five-meter ribbon - the nurse tied it into such beauty that we still remember it with a smile with the whole family.
How to tie a terry bow from ribbon
To tie such a bow, it is better to use hard material, which will make the bow richer and also prevent it from losing its shape.
1. Roll the ribbon into several rings - their diameter will be equal to the diameter of the final bow.
2. Smooth out the loops and make several diagonal cuts (see image).
3. Roll the loops again, but this time you need to make sure that the cut triangles are centered on the folded strips of material that you see in front of you.
4. Now, using tape or regular thin wire, pull the slits tightly, after which you can straighten the loops one by one. It is advisable to start straightening the inner loops. This should be done like this: one loop to the right, and the other to the left.
5. You can make the bow more magnificent.
Photo instructions:
1. First make a blank. Twist the tape into 8 turns.
2. Fold the twisted ribbon and cut at the corners.
3. Fold the coils flat again, but this time change the central axis. This must be done so that the corners you cut off are in the middle.
4. Bandage the area with thin tape.
5. Lift both parts of the bow up and hold them in your hand.
6. Now begin to gradually straighten the petals of the bow and twist their axes. Alternate: one petal down, the other up.
Large bow made of satin ribbons in the shape of a flower
For work we prepare:
- wide satin ribbon (for this bow a width of 8 cm is used, less can be used) -150 cm;
- scissors;
- threads;
- a needle;
- beads or rhinestones;
- pin-brooch for the core;
- felt;
- glue gun
Master Class
Option one
We fold the long ribbon into an accordion and tie it in the center with matching thread.
We turn out each loop and carefully straighten it. We sew large rhinestones or beads between the loops.
Option two
More complicated, but more careful.