Today, you can most often see a round hem pocket on denim trousers or skirts in the same style. It has the following parts - a scoring barrel and two burlap bags (large and small). For the pocket burlap, you can use the main fabric or lining fabric if the base material is very dense or thick.
In our case, one half of the burlap is cut from the main fabric, one-piece with a trimmed side. We'll call it big. Small burlap is cut from lining fabric. We will also use one more additional detail - a facing to process the entrance to the pocket, glued with a special adhesive material to protect the cuts from stretching.
Primary marking and cutting
First of all, you need to decide at what height the pocket will be located along the side seam and what dimensions it will have. It all depends on your personal feeling of convenience.
Marking is carried out in several stages:
- To process the side sections of the skirt, it is customary to leave a seam allowance width of no more than 2 cm. If you want to place a pocket here, then you will need to step back about 3-4 cm from the edge of the product. This is exactly the allowance needed to create the side seam itself and the inner pocket, located in it. We retreat 4 cm from the edge and draw a line along which the side seam of the trousers, skirt or dress will run.
- We determine the location of the entrance to the pocket and the size of the entrance to the pocket. These indicators are purely individual. Determine the top limit and length of the pocket. The last indicator corresponds to the width of the palm when half opened. The average entrance length is 15–16 cm.
- Add about 2 cm of seam allowance to the resulting lines. We cut off all excess.
- Now you need to take lining fabric or burlap. We will need two pieces of such fabric. It is from these that the inner part of the pocket will be formed.
- We apply the pieces of burlap folded together to the upper border of the pocket entrance and to the side seam.
- Determine the shape of the workpiece. To do this, place your half-open palm on it and draw a dotted line around it. This step is very important, so make sure that the dimensions of the pocket in the seam correspond as much as possible to your understanding of convenience.
- Now the workpiece should be cut out in two layers so that the length of its side cut coincides with the entrance to the pocket of the main part.
- The allowances for entering the pocket must be glued with double-lined non-woven material.
We have prepared for you a detailed video course “Sewing Basics”
Get it now for free!
get a course
Let's start creating a pocket located in the side seam
Once the marking and cutting have been completed, you can begin stitching the parts. This is done as follows:
- We apply one piece of the lining to the front side of the front piece, and the second to the front side of the back piece. We connect them with pins.
- We retreat 1 cm from the cut of the entrance to the pocket, give a line along the front and back halves.
- We bend the lining parts and iron them.
- Now we connect both halves of the product parts with their front sides facing each other. We combine the side seams and the lining parts, securing them with pins.
- We start stitching along the side edge, then we reach the line of entry into the pocket. Here you need to switch the machine to the tack mode, stitching about 1.5 cm in this way. Next, switch back to normal mode and connect the lining parts with a machine stitch. The lower border of the pocket entrance should also be strengthened by laying a bartack.
- Turn the workpiece over to the front side and iron it. The inside of the pocket in the seam should be adjacent to the front half of the skirt.
In addition to ease of operation, a pocket in the seam has another important advantage - inconspicuousness. Therefore, such a pocket is the best option for a skirt or an elegant evening dress. Use a thin lining fabric so that the inside of the product does not protrude outward, and the side seam looks aesthetically pleasing.
Welt pocket with set-in leaf.
Hello, dear readers!
Today, dear readers of the blog, you will get acquainted with a welt pocket with a leaf with set-in ends (set-in leaf, mortise leaf).
And we get to work right away!
First of all, we mark the location of the future welt pocket on the product.
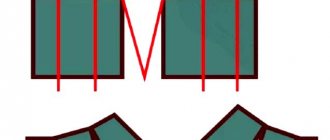
A welt pocket with a leaf with set-in ends is applied to the product using four lines. These lines determine the dimensions of the pocket.
Dimensions of a welt pocket with leaves with set-in ends (for adults): the length of the entrance to the pocket can be 14 - 16 cm, the width 2 - 5 cm.
The distance between the two horizontal lines is the width of the finished pocket (leaves). The valance and leaf are sewn along these two lines (see further in the article).
The distance between the two vertical lines is equal to the length of the pocket (leaf) in its finished form.
It is advisable to draw all lines long, protruding far beyond the boundaries of the pocket. Then it will be more convenient to combine the pocket parts using them.
On the reverse side of the product, the place where the future permanent residence of the pocket is marked, we strengthen it with a dolevik.
Now let's start cutting out the pocket parts.
Leaflet.
This is what a leaflet looks like prepared for making this kind of welt pocket.
You can read in detail about how such leaves are made in the article “Leaf of a welt pocket”.
Valance.
Dimensions of this part: the length is exactly the same as the leaf,
and the width is twice as large as the width of the finished pocket (leaves).
Lining (burlap).
We cut out two identical pieces from lining fabric of a suitable color. Their length is the same as the length of the finished pocket (leaves), and the length of the valance.
But the width (pocket depth) according to the model, as needed.
Go ahead. This is what our leaf looks like from the front side (this side will be visible on the product and it is reinforced with non-woven fabric).
Turn the leaf over to the other side and “upside down”.
And on this side of it, with the front side facing this side of the part, also “upside down”, we place one of the lining parts.
We combine the sections of the parts with each other, sweep them away
and connect them with a machine stitch. Seam width 0.7 – 1.0 cm.
We secure both ends of the stitching with bartacks.
Iron the completed seam allowance onto the lining.
Now we “move on” to the valance. This is the front side of the valance and this is how this detail will be placed on the product.
We place the second piece of the lining on the valance with the front side and “legs up”.
We combine the sections of the two parts, sweep away the parts,
and then join with machine stitching. The seam width is 0.7 - 1.0 cm. (We perform bartacks at the ends of the stitching).
Iron the completed seam allowance onto the lining.
This part of the burlap pocket can be “made up” of two parts (valve + lining for today’s article), or you can also use a valance - a one-piece piece, as in the article “Welt pocket with stitching sheet.”
Now we “migrate” directly to the product. Combining the lines previously drawn on the parts (the lower, horizontal line of the frame, on the product + the line of width of the finished leaflet, on the leaflet), we place the leaflet with the lining part sewn to it on the marked place under the pocket.
The leaf is placed with the main, “front” side facing the product, fold down, with the “legs” (the lining stitched to the leaf) up.
To prevent the parts from moving relative to each other, carefully sweep them away.
And then along the line that determines the width of the finished leaf, we lay a stitching line.
The machine stitch is laid only up to the marks that show the short sides of the finished pocket (leaves). This stitch is best done without bartacks. And to secure the ends of the stitch, you can go back a couple of centimeters.
We discard the lining piece in the opposite direction.
The valance, connected by a seam to one of the lining parts, is placed right side on the front side of the product. We align the location of the valance with the edges of the already stitched leaves.
We combine the seam line on the valance (seam width 0.7 - 1 cm) with the upper horizontal line of the frame on the product and baste the parts.
Then we lay a stitch line along the aligned line.
The machine stitch is laid only up to the marks that pass through the extreme points of the previously completed stitch (the line of stitching the leaf to the product).
And this stitch is also best done without bartacks, and its ends can be secured by sewing a few centimeters of stitching in the opposite direction.
Further. Now you need to cut the shelf along the entry line into the pocket. To make this “procedure” more convenient to carry out, we draw a frame on the wrong side of the product, connecting the ends of the completed lines with lines. We draw another line in the middle of the frame. From points on this line, at a distance of 1.3 - 2 cm (according to the model) from the short transverse sides of the frame, draw four more lines to all four corners.
How to correctly cut a part along the line of entry into the pocket?
The part is cut along the line of the middle of the drawn frame
and further along the lines to the corners, not reaching the end points 0.1 - 0.2 cm.
We cut it very carefully! None of the parts should get under the scissors from below!
We turn all the stitched parts into the resulting cut onto the wrong side of the product.
We straighten out all the details, seams, etc. and sew out the seam for attaching the valance and leaves with oblique stitches
And then, we baste the edge of the leaf to the pocket frame so that the part of the leaf does not warp.
The seam allowances for attaching the valance can be pressed onto the valance or ironed out (according to the model). When the fabric is thick or the product will be made with a lining, the seam can be ironed. To do this, marking the allowances is done.
If the fabric is not thick and the product does not have a lining, the allowances of this seam are ironed to the valance. Then the width of the allowances of this seam is equalized with the width of the part of the frame that is folded up, and then, at the very end of making the pocket, all open sections of the completed pocket can be processed to prevent fraying.
Further. Along the line on the short, transverse side of the frame on the product, we bend the part on which the pocket is made to the wrong side.
We sew together the edges of the valance and the leaves using hand-stitched stitches so that when stitching the main fabric they do not warp relative to each other.
And along the line of the frame, we lay a line.
To better hold the corners of the pocket along the base, it is advisable to lay as many as three lines (on each side). At the last stage, using the same line, simultaneously with securing the short sides of the pocket (leaflets), we also lay a line along the lining parts, “turning” them into pocket burlap.
Lightly iron the entire pocket, securing all parts, folds, etc. in their places, then remove the manual auxiliary stitches and perform a full ironing of the pocket.
Here it is, a handsome man, a ready-made welt pocket with a set-in leaf!
Such welt pockets can be located on products vertically, horizontally and at an angle.
We had a welt pocket with a leaf with set-in ends, where the leaf has the shape of a rectangle. But there are also welt pockets where the leaf can be shaped like a diamond. Such pockets are made on products only at an angle.
But there is nothing supernatural in their production. They are made in the same way as welt pockets with a leaf - a rectangle. The only difference in their execution is that the valance and leaves are adjusted to the product along lines that are slightly offset relative to each other to the sides.
Good luck to all! See you in the next article! Sincerely, Milla Sidelnikova!