Preparation
To create a truly beautiful product, you need to work hard at the preparatory stage. You should start by choosing a pattern. In this case, each needlewoman can rely on her own taste. The main thing is to compare the repeat of the selected pattern with the calculations, the technology of which we will study a little later. And it is also worth considering that for knitting patterned cocoon cardigans you should choose plain yarn. Moreover, it can be pastel shades or rich acidic ones.
If a person who is just starting to get acquainted with the basics of knitting is going to knit the product being studied, it is wiser to focus on unusual yarn. For example, patchwork, variegated, gradient, etc. In this case, it is permissible to alternate knit and purl rows or knit on both sides only with knit stitches.
Model measurement features
The cocoon cardigan, of course, refers to products that are called oversized. But despite this, knitting it, as they say, at random, is completely unreasonable. Therefore, next we will find out what parameters are required in order to make a product that exactly fits the figure. There are only two of them:
- width of the product - from the base of the neck to the expected lower edge;
- the length of the product is from the intended end of one sleeve to the other (arms spread to the side parallel to the floor).
Measurements and pattern preparation
To crochet a cardigan, you need to take the following measurements:
- Chest circumference. The tape runs parallel to the floor along the highest points of the chest.
- Neck circumference. The measuring device is placed at the base of the neck.
- Length of the product. Measure the distance along the back from the highest point of the body to the desired length.
- The length of the sleeve. The tape runs from the shoulder joint, through the elbow and to the wrist.
- Hip volume. Measured parallel to the floor at the protruding points.
After taking measurements, you need to compare them with the dimensions of the pattern. You will need to find the half-girth of the chest and hips, multiply by 2, and then compare with the measurements. If these units match, nothing needs to be adjusted. Otherwise, you will have to “push apart” the pattern in certain areas. The difference between the values of the pattern and measurements is recorded, and then special horizontal lines are used, along which it is evenly distributed.
How to take measurements for knitted items
Pattern and knitting pattern for an openwork cardigan
Technology for calculating loops and rows
Regardless of whether the cocoon cardigan is made with crochet or knitting, the mathematical calculations preceding the work will be identical. But first you should prepare a square sample of the selected pattern. To knit the product under study, a fragment of 10x10 centimeters is enough.
We prepare it, count the number of loops and rows, and then divide by 10. As a result, we find out how many required units fit in one centimeter. Now we divide the width of the product by the number of loops, and the length by the number of rows. We write down two new values. After all, they are the ones who will help us knit the desired piece of clothing that will exactly suit our figure.
LADIES PALS. ru
openwork cardigan is knitted in the popular “frost flowers” pattern and made using a simplified pattern of rectangles. Description of knitting a cardigan from designer Joan McGowan-Michael translated from “Vogue Knitting” spring-summer 2021 magazine.
Dimensions:
S (M/L, XL/1XL)
Back length in the center – 84 cm,
Length from center back to cuff – 68.5 (73.5, 78.5) cm.
Necessary materials:
Yarn Stacy Charles Fine Yarns/Tahki Stacy Charles Patti (100% cotton; 89 m / 50 grams per skein) – 12 (13, 14) skeins.
Required tools:
Knitting needles No. 5.5, removable markers.
Knitting density:
17 loops and 22 rows = 10 cm of openwork pattern, after steaming.
Mesh Pattern:
(number of loops is a multiple of 3+2 edge loops)
1st row (purl): purl loops.
2nd row (front): 1 front loop (edge), 2 front loops, * 2 knit loops together with a slant to the right, 1 yarn over, 1 front loop; repeat from *, 1 knit stitch, 1 knit stitch (edge).
3rd row: purl stitches.
4th row: 1 knit stitch (edge loop), 2 knit stitches, *1 yarn over, 1 knit loop, knit 2 knit loops together with a slant to the right; repeat from *, 1 knit stitch, 1 knit stitch (edge).
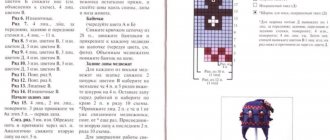
Comment:
First, two openwork panels are made with elastic along the bottom side of the panels and along one side. The closing rows of panels are sewn together. This seam is located in the center of the back. Loops are cast on along the bottom edge of the resulting part and a mesh pattern and elastic are knitted. Then the cuffs are made.
Right panel:
Starting from the cuff side, cast on 120 stitches.
1st row (front): *1 front loop, 1 purl loop; repeat from * to the end of the row.
Repeat this row of elastic until the knitting height reaches 4 cm.
Beginning of the openwork pattern:
1st row (front): [1 front loop, 1 purl loop] – 8 times (for tying with an elastic band of 16 loops), place a marker, 1st loop of the openwork pattern, knit a repeating repeat of the openwork pattern 3 times 34 loops, the last loop of the openwork pattern.
2nd row (purl): 104 loops of openwork pattern, marker, 16 elastic loops.
Continue knitting in the established order until 132 (144, 156) rows of the pattern are knitted, ending with the 24th (12, 24) row of the openwork pattern. The knitting height should be 65 (70, 75) cm from the cast-on row. Close all loops.
Left panel:
Cast on stitches and knit rib as for the left panel.
Start knitting pattern:
1st row (front): 1st loop of the openwork pattern, knit a repeating repeat of the openwork pattern of 34 loops 3 times, last loop of the openwork pattern, place a marker, [1 knit stitch, 1 purl loop] – 8 times (for tying with an elastic band of 16 loops).
2nd row: 16 elastic loops, 104 openwork loops.
Continue knitting in the established order until the height of the knitting is equal to the height of the right panel. Close all loops.
Completion:
Sew the closing rows of both panels together. This seam runs down the center of the back.
Bottom harness:
Place markers on the bottom edge, 23 cm from the sides towards the center. On the right side, cast on 137 (152, 167) stitches along the bottom edge from marker to marker.
Start of the grid pattern:
1st row (purl): purl loops.
Starting from the 2nd row, knit 19 cm in a mesh pattern.
Then knit 4 cm with 1x1 rib (1 knit stitch, 1 purl loop).
Sleeve cuffs:
Place markers on the sides of the bottom trim, 7cm from the bottom edge up. Place markers along the edges of the panels from the bottom edge up at a distance of 7 cm, as shown on the pattern. On the front side, cast on 52 loops on each side between the markers. Tie 4 cm with 1x1 elastic band. Close all loops.
Sew the side seams of the sleeve cuffs and above at a distance of 7 cm, leaving the edges of the cuffs open.
Lightly steam the openwork cardigan .
He who screams in rage is funny, but he who is silent in offense is terrible. Han Xiangzi
Author: Galina © All rights reserved
Mittens with plaits and beads
Women's cardigan "Frederick"
Warm cape “Estate”
Christmas angel
Blanket from the motifs “A Night on the Tiles”
Kettle warmer “Kingfisher”
If you find this article useful, please tell your friends about it:
- Simple Beanie with Drop Stitches - This simple beanie from designer Kara Gott Warner is so easy to knit that it is affordable even for those who often "run away"...
- Knitted pillow with a geometric pattern - The knitted pillow for the sofa is made with a simple pattern, in which you can add an accent color to decorate...
- Men's Jacquard Knitted Pullover - Crisp colors - black and white, yin and yang. These opposites make a knitted pullover for men eye-catching and unforgettable. Motive...
Tags: Knitting
- Natalya: May 6, 2021 at 5:13 am Galina, thank you for the beautiful cardigan! The patterns really are like frosty flowers.
- Galina: May 6, 2021 at 6:10 am
Please, Natalya! - Mauri: November 21, 2021 at 8:19 pm
Sito molto bello con diverse idee interessanti.Grazie - Galina: November 22, 2021 at 5:02 am
Per favore, lavora a maglia per la salute!
We knit a cocoon cardigan according to the description
Whether the intended product will be made with knitting needles or crochet is not so important. If desired, you can combine the work of two tools. For example, knitting the cuffs and collar with knitting needles, and crocheting the main part. In any case, the technology involves the following actions:
- We cast on a number of loops equal to the width of the product.
- We knit an even fabric, without making increases or decreases.
- When we reach the intended length, close the loops.
- Mark the width of the cuff in the middle of the smaller side.
- Take a needle and thread and sew the fabric along the lines shown in green in the diagram.
- If you wish, you can complete the work here. Or complement the cardigan with cuffs and a collar.
- To do this, prepare a hook and cast on new loops in the required areas. If we continue to use knitting needles. Or immediately crochet cuffs of the required length.
- We design the gate in the same way. But in this case we move not in a circle, but back and forth.
Step-by-step instructions for creating a cardigan
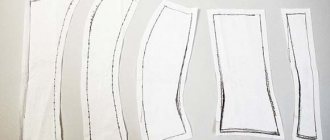
What is a cocoon cardigan?
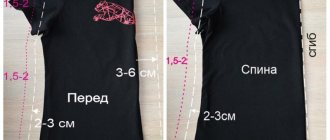
Structurally, it is a rectangle, folded in half and with stitched sides. This is easy to understand from the drawing with the diagram. No patterns are needed, we start sewing right away. Fold the rectangle of knitted fabric in half along the length of the product. For example, if the length is 80 cm, then, folded, you get 40 cm and the corresponding width (1.4 or 1.5 m). Now you need to mark the holes for the arms. To do this, measure down 7-8 cm along the fold line on each side of the canvas and make a mark. The width of the cuff can be adjusted at your discretion. Measure down 4-5 cm or 10-11 cm. From this mark down you need to sew the side seam on the overlocker. That's it, the product is almost ready. All that remains is to sew on the cuffs and finish the edge of the product.
The edge of the product can be processed in three ways, depending on the capabilities of the machine:
- Fold inwards and secure with a stitch on the sewing machine. However, not all machines can handle thin knitwear. Therefore, other methods may be relevant.
- Apply bias tape around the perimeter; again, this should be done on a sewing machine; there will be no problems with this method. But for the binding you need to choose a suitable fabric that the machine can handle.
- And one more way using an overlocker. A long strip is cut out of the same knitwear, folded in half, and sewn on with an overlocker. It looks very interesting.
Important! You should choose a method of edge processing that will not create a wave if, for example, you sew thin knitwear on a machine. Instead, the seam should be smooth and neat.
The belt is sewn last, if the idea requires it. To do this, cut a strip of 7-8 cm, bend it in half and sew it on an overlocker, turn it inside out, and sew the ends. Now the product is completely ready!
Pants styles for obese women photo
Why is there a second button on the jacket?
Cardigan from bottom to top
To knit this version of a cocoon cardigan with crochet or knitting needles, you should perform slightly different manipulations:
- We multiply the number of loops in one centimeter by the length of the product, and the number of rows in one centimeter by the width.
- We cast on the calculated loops.
- And we knit the fabric of the required length without increases or decreases.
- Then we assemble it in the same way as described in the previous paragraph.
- However, it is important to note that the reader can make a two-tone cardigan if desired. To do this, you should knit the product until halfway, and then switch to a different color of thread.
As you can see, the principle of operation is quite simple and quite accessible even to novice craftsmen. Although this does not mean that the finished product will be simple or uninteresting. Experienced needlewomen advise “revitalizing” it using a combination of unusual yarn and a simple pattern, or a monochrome knitting thread and a complex pattern. In any case, the work ahead will be creative and very exciting. Therefore, we recommend that the reader use his imagination.
Cardigan cocoon with sleeves
A very fashionable cardigan model now is the version with sleeves. The placket is made to any width you need and can be folded to any width along the neckline. The cardigan is made without shoulder seams in one piece. For sleeves, pick up loops along the edges of the fabric and knit an elastic band lengthwise or crosswise. Sizes: 38/40; 42/44; 46/48. The work consists of two strips (at the beginning and at the end) and a canvas with a pearl pattern between them. The arrows in the diagram show the direction of knitting.
199w,
768w, 785w" style="font: inherit; outline: none; margin: 0px; padding: 0px; border: 1px solid rgb(227, 222, 220); vertical-align: baseline; max-width: 100%; height: auto;" width=”670″ />
To work you will need:
- Asparo yarn (50% polyamide, 25% wool, 25% alpaca, 75 m / 50 g), 500, 500, 550 g.
- Yarn Hommage (mohair, polyamide, 235 m / 25 g, ) 70, 75, 100 g.
- Circular knitting needles - 7 and 8 mm.
Knitting density and patterns
Thick knitting needles 8 mm, density:
Front stitch: 1st row - knit, 2nd row - purl, 10 p / 15 p = 10 / 10 cm.
Pearl knitting or Large pearl knitting (optional): 10 p / 18 p = 10 × 10 cm.
Thick knitting needles 7 mm, density:
Rib: 2/2 or 4 rows. and 4 rows of purl. 11 p / 17 r = 10 / 10 cm.
292w,
768w, 1459w" style="font: inherit; outline: none; margin: 0px; padding: 0px; border: 1px solid rgb(227, 222, 220); vertical-align: baseline; max-width: 100%; height: auto;" width=”670″ />
Description of work
Cast on on circular knitting needles thickness. 8 mm 111 p (111 cm); 117 p (117 cm); 123 p (123 cm). and for the first bar, perform 14 cm (22 r.) in stockinette stitch. Then knit with pearl pattern 53; 56; 58 cm (80; 84; 87) r. Next - another 14 cm faces. satin stitch, and bind off all stitches like knits.
300w,
768w,
1536w, 1999w" style="font: inherit; outline: none; margin: 0px; padding: 0px; border: 1px solid rgb(227, 222, 220); vertical-align: baseline; max-width: 100%; height: auto;" width=”670″ />
Next, fold the canvas in half and mark the middle with a marker (red dot). For sleeves, cast on needles 7 mm on both sides from this point along the edges of the fabric 30; 34; 36 p. on average 29;31;33 cm and perform an elastic band: either 2 knits/2 purl, or 4 rows of knits, 4 r. purl.
At the same time, we reduce on both sides for bevels:
In every 4th r. 2 times 1 p. and then in every 6th r. 4 times 1 p. = 18; 22; 24 sts. After 36 r (21 cm) from the beginning of the sleeve, we close all sts. Exactly the same sleeve is made on the other side.
Then we fold the work inside out, matching the 2 red dots on the diagram. We take a needle, sew the sleeves and side parts (red lines in the diagram). We turn it inside out. We fold exactly as in the previous work.
The bar can be folded at the top and made into a collar.
683w,
768w, 800w" style="font: inherit; outline: none; margin: 0px; padding: 0px; border: 1px solid rgb(227, 222, 220); vertical-align: baseline; max-width: 100%; height: auto;" width=”200″ />
683w,
768w, 800w" style="font: inherit; outline: none; margin: 0px; padding: 0px; border: 1px solid rgb(227, 222, 220); vertical-align: baseline; max-width: 100%; height: auto;" width=”200″ />
In the latest version of the cardigan, the strips are not knitted together with the fabric, but separately, knitted. satin stitch, and sewn to the main part. The width of the strap is according to your wishes, you can take 14 cm * 2 = 28 cm faces. iron. The wider the placket, the more voluminous the cardigan looks.
Video: How to knit a cocoon cardigan with a wide placket.
OVERSIZED RECTANGLE CARDIGAN
Scheme for size 42-44:
245w,
768w, 1000w" style="font: inherit; outline: none; margin: 0px; padding: 0px; border: 1px solid rgb(227, 222, 220); vertical-align: baseline; max-width: 100%; height: auto;" width=”670″ />