Now you know how to hide scratches on leather goods. If you do everything carefully, no one will even notice that there were defects on your boots, handbag or jacket.
And now you can watch a video tutorial in which a shoemaker explains in detail all the intricacies of making “liquid leather.”
Now about the restrictions. “Liquid leather” is only suitable for the restoration of surface-coated leather. On uncoated leather (suede, nubuck, velor) it will stand out and differ sharply in structure from the rest of the surface.
“Liquid skin” is applicable only on surfaces that are not subject to fractures, mechanical stress and surface friction. “Liquid skin” does not have adhesive properties and cannot seal large through holes.
Giving things a second life is creativity! We offer you step-by-step instructions on how to give a second life to old jeans and turn them into a stylish travel bag! Give useful recommendations to your friends, they will surely be grateful.
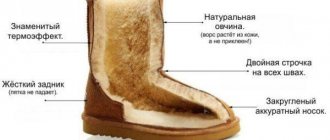
How to glue the sole of a shoe at home: rules, nuances, examples
We've all experienced a situation where a crack has formed on our favorite pair of shoes. The question arises, how to glue the sole of a shoe at home. To do this, you will need to select some materials, study the procedure and completely follow the instructions.
When walking, it is the sole that suffers the most, so it wears out faster. Over time, cracks and holes form on the sole of the shoe, which are difficult to eliminate. You may need your everyday boots tomorrow, so you need to know how to seal your shoes at home. First of all, you will need to choose glue.
Ideally, it is better to contact a specialist if the sole of your shoes is cracked. They will be able to quickly fix everything in the shortest possible time. In order for the work to turn out beautiful and of high quality, it is necessary to choose the right adhesive depending on the characteristics.
Restoration in dry cleaning
Important! The disadvantage of restoring shoes at home is the risk of damaging the material due to the lack of sufficient experience and knowledge. If you are not confident in your abilities, you can always contact a dry cleaner.
There you will be offered a full range of services:
- Removing stains and dirt;
- Removing reagents from the material;
- Elimination of abrasions;
- Restoring the shape of shoes;
- Color update;
- Application of water-repellent coating and much more.
Specialists will carry out all the necessary procedures using special equipment and professional tools. In addition, many establishments organize various gifts and participation in promotions for their clients. However, you should prepare in advance for the fact that you will have to incur significant financial expenses.
What should I use to glue the sole?
If you do not want to ruin your shoes, it is recommended to select a special adhesive. Usually the packaging contains a corresponding mark. You can choose one of the following options:
- "Moment Marathon". The substance is intended specifically to repair broken soles. It is characterized by high resistance to humidity and other adverse weather conditions. Can be used in hot or severe frost. For some types of manufacturing materials, use is not recommended. This list is on the packaging, so please read it carefully before purchasing. Quite easy to use. You can wear the boots within 24 hours after gluing them.
- "Shoemaker" or "Nairit". The composition uses natural materials that provide high adhesive properties. Makes it possible to easily glue a broken shoe sole. Can be used for gluing the inside of boots, as well as small cracks. It is recommended to leave the work for several days to dry completely. Otherwise, rapid re-breakage is possible.
- Epoxy resin. Is a powerful adhesive. It has a high density, which is suitable for boots that are actively used every day in aggressive conditions. It will take several days for the damp surface to dry completely. After this, the shoes can be worn at your usual pace.
- Bonikol or Kenda Farben. Industrial imported products that are used in professional crafts. Suitable for problem areas, gluing heels, soles, socks, insoles. One of the best options for how to seal shoe soles at home.
"Desmokol". Used for shoe repair. Helps against burst soles. More suitable for synthetic materials and suede. Sold only in specialized stores. Used in practice by professional workers.
Which adhesive is not recommended to be used?
The substances listed in the previous section are the best options for gluing shoes yourself. There is also a group of products that are not recommended to be used if cracks have formed on the sole of your shoes. Do not buy these products:
- Super glue. A fairly hard material that roughly fixes and deforms the sole. Repairing the sole with such material is not recommended, as you will completely ruin the shoe.
- Ceiling tile adhesive. Can handle rubber and leather. This will leave traces that will be difficult to remove with improvised means.
- PVA. It is not stable. It is not recommended to seal a crack in your shoes, as it will immediately fall apart.
How to glue the sole at home using improvised means?
After choosing the glue, you can try one of the ways to repair the sole of your shoe if it has burst. To do this, you need to carefully follow the instructions and follow the technology. Otherwise, you will not be able to achieve the result. Follow the algorithm:
- Clean your winter shoes from dirt and dry everything thoroughly so that no wet marks remain.
- Inspect the work surface for integrity. If the leather on the sole is cracked in several places, it is recommended to completely tear it off and glue it back. Also consider the surface texture. This is very important as the procedure will be different for different types.
- Clean the surface from any remaining old adhesive. Treat with alcohol to degrease the surface.
- Take something to seal the sole with. Apply to surface according to package directions. The adhesive layer should not exceed a few millimeters.
- Wait a few minutes for the surface to set. Press the sole down so that there are no untreated areas.
- Now leave the shoes under high pressure. To prevent it from deforming, place pieces of newspaper inside. You can use clothespins to secure the seam. Do this carefully so as not to damage the leather on your boots.
This is a cold technology for gluing winter shoes. The hot methodology is as follows - you need to heat the adhesive and carefully press the surface of the shoe. After this, you can wear your favorite pair of shoes after a few days.
Shoe repair rules
Preparation of contact areas is done in the following sequence:
- dry and clean from dirt, sand if necessary;
- degrease with alcohol (solvent, cologne) and wipe dry with a clean, dry cloth;
- apply glue in one or several layers depending on the desired strength of the seam and dry for 5–15 minutes;
- connect the surfaces with considerable force and secure with clamps or weights for a day.
Excess liquid that appears must be removed immediately; later it will be more difficult to do so. The strength of the seam after complete drying depends on the load that will be applied to the bonded surfaces in the first minutes.
The glue emits a strong odor, so the room must be ventilated.
If the adhesive composition is selected in accordance with the recommendations, then the shoes will serve no less than new ones. There is no need to skimp on the quality of the glue - the cost of purchasing it will more than pay off.
A torn boot is a great reason to buy a new pair. But this is not always possible. If the damaged shoes are expensive, very comfortable or well-loved, it would be a shame to throw them away. And here the question arises: how to seal boots securely and neatly?
It is better to take expensive boots to a workshop. Careless handling of glue can aggravate the situation. Professional shoemakers have a lot of experience, and they can make sure that not a trace remains of a hole. But if your hands are not for boredom, and curiosity outweighs the risks, then you can try it!
How to glue the sole of sneakers?
Sports shoes are subject to a lot of pressure. While running or walking, the sole of a shoe can easily burst or a sock can come off. Therefore, it is necessary to know the sole repair procedure.
What to do with holes?
On sports shoes, the sole is very soft and sensitive, so it can easily break in half. If there is a large hole, you will need to fill it with glue. To ensure surface integrity, it is recommended to use special construction tape. It allows you to maintain the original shape of the product.
For gluing it is best to use a specialized sealant. It allows for the highest gluing density, which extends the service life of the product. Moreover, the cost of such compositions is much more expensive than conventional glue.
What to do with cracked socks?
Socks are the part of sneakers that deteriorate the fastest, as they are subject to a lot of pressure. If you urgently need a working method on how to seal the soles of sneakers, you first need to treat the working surface. Use alcohol to get rid of fat. Apply the patch, glue it and leave the shoes until all the glue has dried.
What to do with voids in shoes?
In winter, problems with shoes often arise due to unfavorable weather conditions. Let's try to figure out how to restore it. Winter boots most often have a porous surface, so you will need to fill the voids or completely replace the insole. Remove fats from the surface with alcohol and treat with glue.
Overview of methods
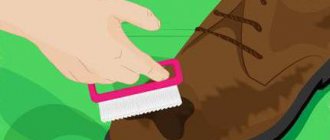
How to clean dirt from suede shoes
The basic rule for caring for suede shoes is to promptly clean their surface from dirt and stains.
Before you begin the suede renewal process, you first need to remove all dirt from your shoes. You cannot begin the process of restoring the structure of the pile without first cleaning it, otherwise the material may be damaged. Therefore, all abrasions on suede can be removed only after cleaning the dust and other contaminants from the surface of the boots or shoes.
Any type of contamination, for example, stains from dirt or grease, can be removed after drying. Otherwise, these spots will spread across the surface even more.
To clean suede shoes, you need to stock up on a sponge or microfiber cloth. If this does not work with a dry cloth or sponge, then you need to moisten it a little and try again.
REFERENCE! It is strictly forbidden to place suede items under a tap with water, as the material will deteriorate.
If you got rid of dirt and stains, now you need to find out how to return your boots to their original look and color. The following methods will help you do this.
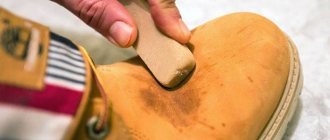
How to restore suede at home
An ordinary school eraser can help restore the pile. After cleaning from dirt, you need to start updating a pair of boots, which means restoring the pile. You can do this in several ways:
- A regular eraser helps lift up worn suede fibers without damaging the surface.
- Steam baths also give a good effect. To do this, hold the shoes over the steam, and then rub the suede a little with a special brush or dry cloth.
- If your boots have scuffs at the top, you can try ironing them from the inside out with an iron, and then combing the pile.
- If you don’t trust traditional methods, you can restore your shoes using special chemicals sold in the store.
After cleaning and restoring suede shoes, it is recommended to treat them with a special spray with a water-repellent effect.
REFERENCE! You cannot put boots on immediately after this treatment, as they need to dry completely at room temperature.
If you know how to keep suede shoes in order, you can maintain their attractiveness for a long time.
Cleaning suede shoes from stains
Not only shoes are made from suede, but also bags, gloves, and other accessories. They are also in great demand, but they do not get dirty much less than shoes.
Purchasing a new pair or thoroughly altering it requires a large investment, and this is not available to everyone. Therefore, you need to know how you can renew suede on bags, shoes, and gloves and clean it from stains.
The biggest danger to suede is oily stains. However, if you know how to get rid of them, you can avoid the problem. It happens like this:
- First you need to take a cotton pad and soak it in purified gasoline.
- Contaminated areas should be rubbed with this cotton pad, and then sprinkled with talc on the treated areas.
- Now you need to wait until the grease, previously dissolved with gasoline, is absorbed into the talc, and clean it off with a soft brush.
If you need to restore suede shoes and remove stains from them, you can use a special stain remover.
REFERENCE! When buying it, be sure to see on the packaging that the product is suitable specifically for suede.
The substance must be spread over the dirt and then cleaned with a soft brush. At the same time, you should not try too hard and put great effort into rubbing the surface, as this can damage the material.
To ensure that suede boots do not lose their attractiveness, they need to be updated from time to time and cleaned regularly.
How to remove scuffs on suede
Many people become alarmed when they discover scuff marks or shiny areas on their suede boots. But in reality, it's just crushed lint. To restore it, you need to use one of the remedies available in almost every person’s home. The most common methods are:
- You need to prepare a solution from a glass of milk and 1 tsp. soda Use the prepared product to wipe the surface and leave the shoes to dry. In this way you can effectively get rid of scuffs.
- Another way to repair scuffs is to use fine salt. It should be applied to the suede and lightly rubbed, then remove the residue with a brush.
- A solution made from 4 parts water and 1 part vinegar will help restore lint on suede. The surface of suede boots should be treated with the prepared vinegar solution and then wiped with clean water. At the end, you need to wipe the shoes again with a vinegar solution, but with a different consistency (1 tsp of vinegar per 1 liter of water).
- Steaming the surface of suede shoes can be used with caution. To do this, the shoes need to be held over a boiling kettle or treated with a steam generator. After this, the damaged areas need to be treated with a brush. REFERENCE! Freshly cleaned shoes should not be worn immediately. First, they must dry thoroughly, with the crumpled paper inside.
How to return suede shoes to their original color
Suede items can not only get dirty, but also fade from incorrect cleaning methods or fade in the sun. If a product has lost its color, then you need to find out how to restore it correctly and quickly.
To do this, you can use special paint if you do everything strictly according to the instructions. But there are also folk remedies for suede shoes that help restore color. These include the following:
- To prepare the product, you need to mix half a glass of skim milk and half a teaspoon of soda ash. The prepared solution must be used to treat problem areas. If the effect is not 100% the first time, then the procedure can be repeated.
- A solution of ammonia will help restore the color of a suede product. To prepare the solution, mix 4 parts water and 1 part ammonia. The surface of boots or shoes should be treated with this solution and then wiped with a damp cloth. Now you need to leave the shoes to dry.
REFERENCE! Before completely treating your shoes, it is better to first test the selected product on a small area of suede so as not to harm them.
How to glue the sole yourself? Which glue to choose?
Even the highest quality and strongest pair of shoes gradually becomes damaged during frequent or constant wear from the influence of moisture, dirt, reagents and simply time. The sole is exposed to a greater degree of stress, which is often the reason for going to the shoe workshop.
In an ideal scenario, it is better to replace a damaged pair of shoes or take it to professionals, however, if this is not possible, you can glue the sole or fix a small defect yourself. The durability of “home” repairs depends on the quality of the chosen glue.
In this article, we will tell you what to do if the sole has come off, what kind of glue you can use to glue the sole of a shoe at home, what compounds are best not to use, and we will also share life hacks for repairing different types of shoes and damage.
How to return color to suede
In order to restore the brightness and richness of the color of suede shoes, today there are many products that are presented in a variety of forms. The most common options are:
- Creams with added pigments;
- Sprays.
Attention! Before painting your shoes, make sure they are well dried and free of dirt. It is important to carefully straighten the pile by combing it with a special brush or a regular toothbrush.
This way the paint will be better absorbed into the material and the color will be more uniform. Wear rubber gloves to avoid getting your hands dirty. Cover the floor with newspapers or plastic wrap, and put away clothes and other items.
This is interesting: Tips for caring for nubuck, velor, patent leather shoes
Dyes for suede shoes have a strong, specific odor, so it is important to ensure that the room is well ventilated. If this is not possible, you can carry out the procedure on the street.
Remove the laces, and also pre-tape areas on the shoes (for example, stripes or soles) that you do not want to get paint on.
Electrical tape works well for this purpose.
The inside of the shoes can be stuffed with rags or paper: this way you will not stain the lining.
If you are using a color spray:
- Spray it at a distance of 20 cm from the shoes, not forgetting to treat hard-to-reach places;
- Wait for the paint to dry.
If using colored cream, squeeze or sponge the required amount of product and distribute it evenly over the entire surface of the material. If some places are not painted well enough, the procedure can be repeated.
How to glue the sole of a shoe?
To ensure that the repaired pair of shoes does not fall apart on the first day or, even worse, does not deteriorate completely, you need to choose an adhesive suitable for shoe repair. Below are adhesive compositions that can be safely used:
- “Desmokol”
is a transparent adhesive composition with polyurethane, intended for gluing PVC, repairing leather and suede products, including gluing shoe soles. This composition has earned the trust of professionals and is sold in specialized stores. - Moment Marathon glue
is specially designed for repairing shoes. It is water and frost resistant, as well as elastic and resistant to negative environmental influences. Not suitable for gluing a number of materials (styrofoam, polyethylene, polypropylene, plasticized PVC). Consumers love this glue for its ease of use. Within a day, the shoes are ready for use. - Epoxy resin (B7000)
- after drying, the composition turns into a durable, elastic, waterproof layer, which is excellent for shoes that, by their nature, are always in motion. When mending shoes, it produces minimal shrinkage, but may require 1-2 days to dry completely. - “Nairit”
or
“Sapozhnik”
adhesives contain polychloroprene rubber, adhesive enhancers and organic solvents. Designed primarily for shoe repair. These compounds glue the leather upper of shoes well to rubber soles (except for polyurethane), and are also suitable for gluing insoles, linings and other elements. You will be able to wear the repaired product only after three days. - Kenda Farben
and
Bonikol
are special compounds for the footwear industry from European manufacturers. Guarantees reliable adhesion. Suitable for gluing leather and leather substitutes, as well as heels, insoles and cork.
How to glue natural and artificial leather
When repairing leather products, a patch is usually used, which is fixed at the site of damage from the outside or inside. For reliable and long-term fastening of the patch, the glue must be thick and viscous, preferably transparent, set quickly and have an elastic structure after drying.
Types of glue suitable for fastening leather and leatherette, fixing additional parts:
- « ».
It has a light shade and thick consistency, is easy to work with, and dries quickly. Nairite compounds are often used in the repair of shoes and various leather goods. - PVA for leather.
It applies well, dries quickly, leaves behind a film that is resistant to temperature and mechanical influences, moisture and sunlight for a long time. - The consistency is viscous and elastic, used for durable gluing of leather and leatherette to each other. Convenient for joining cuts and restoring leather clothing and accessories.
- Universal and fast “Moment”.
It is used for small volumes of work and requires fast and precise movements, as it instantly adheres materials. It is better to remove excess substance immediately, since in a dried form, traces of second glue are difficult to remove. - .
This composition is suitable for connecting materials of different structure and quality to each other, including leather and eco-leather. The peculiarity of using silicone glue on the skin is that for high-quality hardening, the skin must first be stretched and securely fixed until the adhesive seam dries completely.
When working with genuine leather, suede and faux leather, dressmakers often use adhesive tapes for leather or thick fabric. Especially when a leather product needs to be folded or a zipper needs to be replaced.
Which glue is better not to use?
The range of adhesive compositions goes far beyond the scope of the listed products and some of them can also cope with the task. In order not to confuse you, we decided to indicate which adhesives should absolutely not be used, since they either will not provide sufficient strength or will further damage the pair being repaired.
- PVA glue
is not waterproof, so the shoe will fall apart after the first puddle. - Superglue (Moment glue, Second glue, etc.)
assumes a rigid connection, and the sole and material of the shoe are deformed when walking. The material simply cannot cope with such a load. - , adhesive for ceiling tiles
copes with the repair of leather, textile and rubber products, but leaves stains on them that cannot be removed.
Gluing the soles at home?
To glue the sole on yourself, you need to follow simple instructions:
- Thoroughly clean the damaged boot and dry it completely.
- Carefully inspect the sole; if it comes off in several places, it is better to tear it off completely and re-glue it. In addition, some shoes have honeycomb soles, which require special care.
- Using a spatula, clean the surface of old glue and degrease (acetone or alcohol).
- Apply sole glue to both surfaces according to the instructions. Most often we are talking about a thin layer of glue - no more than 3 mm.
- Wait a few minutes and press the sole firmly against the shoe so that there are no gaps between them.
- Secure the boot in this position for at least 10 hours. You can put a weight on top, having first tightly stuffed the boot with paper or newspapers so that it does not lose its shape. The second option is to fasten the seam with clothespins, just be careful not to scratch the skin.
The described method is called cold. The hot method differs only in that the applied composition must be left until completely dry (about half an hour), and then heated with a hairdryer and pressed firmly onto the surface for 20 seconds. You can wear repaired shoes after two days.
How to repair suede at home
If you are going to repair suede at home, it is important to do it correctly. Proper restoration of suede shoes should take place in several stages:
- Cleaning. Use a brush to remove dust and dirt particles from the surface of the material. Treat shiny areas with a special eraser for suede or a regular rubber band;
- Drying. Stuff the shoes with paper to prevent them from losing their shape and leave to dry at room temperature;
- Coloring. Use a spray or colored shoe polish to update the color of the product, not forgetting to treat hard-to-reach areas. This way you can remove scratches, cracks and disguise other defects;
- Impregnation. When the paint has dried, treat the shoes with a water-repellent spray or gel to increase the life of the product;
- Final cleaning. Straighten the pile with a brush to restore the velvety texture of the suede.
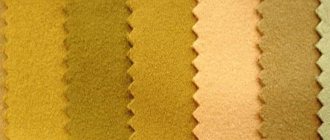
Faux suede
Compared to natural suede, artificial suede is more rigid, but it also has its advantages:
- Does not fade in the sun;
- It has high strength, since the backing here is woven or non-woven fabric;
- Manufactured in various color options;
- The smell is weak synthetic or completely absent;
- Thanks to modern production technologies, the appearance is practically no different from the natural one.
This is interesting: Inexpensive clothes in large sizes - stylish looks
Many consciously choose artificial suede not only because of the lower cost, but also because of the unpretentiousness of the material. If desired, such shoes can even be washed at a temperature of 40 degrees.
The main disadvantage of the material is that it is difficult to protect it from abrasion. In addition, faux suede can begin to break down if it gets too dry. Also, when caring for shoes, do not use solvents or bleaches. Instead, it is better to purchase regular liquid soap.
Natural suede
Information. Natural suede is usually made from deer, sheep or goat skin. It is a finely crafted leather with a velvety surface.
Compared to artificial suede, natural suede allows air to pass through better, allowing your feet to breathe, but at the same time retains heat. This is a great option for those who suffer from excessive sweating.
Natural suede has a specific smell. It is highly water-repellent, so your feet will remain dry even while walking on a rainy day.
When caring for natural suede, the same rules that apply to shoes made of artificial material remain relevant.
Do not dry them near the radiator, store shoes in separate boxes and clean them from dirt after each walk.
Then its appearance will remain close to the original throughout the entire time of wear.
How to glue the soles of sneakers?
One of the most common problems is with sports shoes, namely sneakers. Due to intensive use, the toe may come off or the sole may puncture while jogging.
How to seal a hole?
Due to their specific nature, sports shoes (sneakers, sneakers) often have rather soft soles, so stepping on something sharp can leave a hole. The problem can be solved at home using glue. The edges of the hole must be cleaned and degreased, and then sealed with glue. In the large hole you need to additionally put a fiberglass mesh.
To ensure that the sole remains level, after filling the hole with glue, it is better to seal it with construction tape until the composition dries completely.
As for glue, the best option would be American polyurethane glue and sealant Seam Grip
. This composition is used to repair rubber boats, so you can be sure of the durability of the repair. The problem is that it cannot be found everywhere, and it costs more than other adhesives.
An alternative may be domestic epoxy glue
or imported
DoneDeal
.
How to seal the toe of a sneaker?
The second weak point of the sole of a sneaker is the toe. To repair, the thinning area must be treated with sandpaper and degreased. Next, you need to cut out a patch from rubber or polyurethane, sand its edges and apply glue to both surfaces. Press the patch firmly onto the sneaker for 15–20 seconds, and then leave it under pressure for another day.
How to seal it
Owners of suede shoes know that suede is a rather delicate material. If you don't take care of it, it can burst, crack, and tear. In this case, the defect can be eliminated using glue, but not all types of glue are suitable.
The most common mistake made by those who decide to glue suede shoes on their own is the use of PVA glue. Excellent at gluing paper, it is completely unsuitable for shoe repair because it has too weak a concentration. In addition, PVA is made on a water basis, so during the first walk the part glued with it will fall off under the influence of moisture.
The same recommendations apply to Moment glue. It is good if you need to glue some hard parts (for example, metal, wood or glass) during construction work. However, it has a destructive effect on suede. The fact is that when it hardens, it becomes very hard. For example, the toe of a boot glued in this way will soon begin to burst.
Ultimately, you have to go to a shoemaker and pay extra money to restore the shoes, since repairing them after such repairs will require much more effort.
This is interesting: How to repair cracked leather on shoes - repair methods and available tools
Therefore, if you decide to glue sneakers, shoes or other shoes at home yourself, it is better not to save money by using improvised means, but to purchase special shoe glue.
A small tube will be enough for you, since the need to glue something on your shoes does not arise very often.
How to seal a sole with voids?
Quite often, demi-season and winter boots are made with honeycomb-shaped soles, in which voids appear over time. Repairing such a pair of shoes yourself is a little more difficult: the empty honeycombs need to be filled with scraps of micropore or other porous rubber; for this, most likely, you will need to bend the insole. Next, fill them with sealant. In some cases, it makes sense to tear off the insole and replace it with a new one.
After the sealant has hardened, you need to degrease the surface again and seal it using the usual method.
What can I do to prevent my shoes from slipping?
You can also use glue to prevent shoes from slipping. Apply the pattern with Moment glue or other superglue to the sole, let it dry, and then rub it with coarse sandpaper. For greater effect, you can sprinkle a little sand on the still wet composition.
This anti-slip protection will last 1-2 weeks.
You can also glue special anti-slip/anti-icing pads.
How to properly seal suede boots
Before carrying out repairs, suede boots should be thoroughly dried and the shoes should be cleaned from dirt.
Working with the sole
- To restore the adhesive seam, it is necessary to prepare the sole and the tightening edge of the boots. Use sandpaper to remove dirt and glue residues from surfaces. The resulting dust is cleaned with a brush.
- A layer of Desmokol glue is applied twice to the edge of the upper of the product and the inner surface of the sole . The glue can be applied with a flat brush or toothbrush.
- Be sure to follow drying conditions.
IMPORTANT! After the first application of glue, the film is dried for 10–15 minutes, after the second application, 30–40 minutes.
- Before gluing, the surfaces of the adhesive films are heated to a temperature of 60–70 degrees . To activate the films, you can use a hairdryer; the films can be heated over an electric stove burner.
- After this, the sole is pressed tightly against the edge of the shoe top, it is advisable to trim the adhesive seam . It is not always convenient to do this at home without additional devices. The strength of the sole is checked after the adhesive seam has completely cooled .
Gluing the top
If there is a tear in the upper material on the product, the defect can be repaired by gluing in an internal patch .
Video: How to seal a leather jacket?
The video describes in detail how to glue a cut on a leather jacket at home: So, if a leather jacket that you really like is torn, there is no need to buy a new product - everything can be fixed even at home.
You won’t spend much time, the only thing is that you need to choose the right glue, be patient and start repairing your favorite leather product. For home handicrafts, crafts and souvenirs. To fasten natural leather and leatherette, adhesives with completely different compositions are used - based on rubber and polyurethane, polyamide, perchlorovinyl and polyvinyl acetate substances. It is worth understanding their features and rules of use.
What products to use for suede
It is important to remember that shoes with suede uppers require constant care.
Cleaning the pile surface of leather should be done without much effort, using soft cloths or clothing brushes.
After cleaning, shoes should be treated with water-repellent impregnation from Salamander. The spray protects shoes from getting wet and salt stains.
If stains appear, they can be removed with a solution of water with the addition of ammonia and liquid soap.
It is recommended to use rubberized brushes to lift the pile, and to restore the color, tint the shoes with aerosols.