How to quickly sew a fleece jacket with your own hands
Have the best day everyone!
Today I’m bringing you a new portion of useful things for needlewomen. I've been wanting a soft and warm blouse for a long time, and finally I made myself a fleece blouse. For anyone interested, I want to share with you my idea of creating it.
The style of the product is more sporty, but in principle this model can be worn with a skirt and with jeans or trousers. Fortunately, today fashion allows you to combine incompatible things. Therefore, this option is suitable for those who love not only beautiful, but also comfortable clothes.
Fleece blouse with raglan sleeves - small MK
Grandmothers don’t knit sweaters for us, so we sew them from fleece.
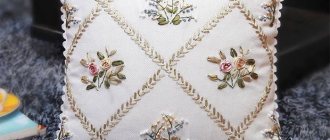
First I sewed a lilac blouse (the influence of our lilac cow continues). For the first time I did embroidery with an elastic stitch on a machine. I liked it, but I need to train, and also buy water-soluble non-woven fabric.
For those who are interested and want a continuation, welcome to the cat.
To replace this blouse, I sewed the same one, but in a different color (the magic of the cow finally released).
I decided to capture the process and share it with you. I'm not a professional, so advice and corrections are accepted. Pattern from Ottobre 2006-01-18.
Virgo, posted on Yandex for download:
Pattern in PDF - CLICK HERE - convenient to print on A4 - when printing, select the “poster” option, the sheet will automatically be divided into 12 sheets. Print and glue.
So, let's start with. I sewed size 98, the consumption was approximately 0.6 m of fleece and a detachable zipper. Well, threads.
We cut out the details from fleece, do not forget to allow allowances on the sleeves, front and back. I did not make allowances on the cuffs, waistband and collar (you can judge by the stretchability of your fabric). Don’t forget to make marks on the sleeves to later identify the front part (the one that is sewn to the front).
I did the embroidery on the lilac jacket at the end and it was inconvenient to turn the entire product under the needle. Therefore, here I decided to do embroidery right on the shelf:
We connect the raglan seams: we sew the sleeves to the front and back. It turns out like this:
Next, fold the blouse inside out and sew the sleeve and side seam with a single seam:
Repeat for an encore with the second sleeve and move on to the cuffs. We fold them face inward and stitch them:
Turn it inside out. It turns out to be a double cuff.
We insert the cuff into the sleeve and, stretching evenly, sew it to the sleeve.
Sew and turn the sleeve over the face:
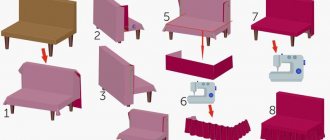
Let's move on to the collar and belt. We fold the belt face-to-face to the bottom of the jacket and evenly stretch it and pin it (baste it). We do the same with the collar:
Stretching it a little, sew it together:
We sew the edges of the shelves and the sections of the belt and collar (along the perimeter):
Fold the collar and belt in half lengthwise and mark the fold point with a pin - the middle. Like this (there should be a slight overlap on the seam):
Take one half of the zipper and pin it to the corresponding shelf face-to-face. At the bottom of the belt, the end of the zipper should be aligned with the middle of the belt (pin):
We put the remaining part of the belt on top of the zipper, we get a belt-zipper-belt sandwich:
On the collar, I bend the zipper a little before reaching the middle of the collar:
We place the remaining end of the collar on the zipper in the same way as a belt:
We sew on a machine and trim off the excess zipper:
Turn out the collar and belt:
We fasten the second half and mark on it the points where the belt and collar combine:
We unfasten it and sew it to the second shelf in the same way as the first part. Turn it inside out, fasten it - beauty:
All that remains is to tuck the collar and belt. Fold over the seam slightly and baste:
We sew along the front side exactly into the seam for attaching the belt/collar. All is ready!
We dress the baby and rejoice)))
By the way, on the lilac blouse I made the hem of the belt and collar by hand using a hidden seam - it looks neater. Only if you do this, then at the stage of sewing on the zipper you need to immediately turn the seam allowance inside out:
Thank you for your attention. I hope it will be useful to someone.
Master class on how to sew a women's fleece jacket
I didn’t have any special pattern, I took the one I had, it was a shirt pattern with darts. You can take any one that suits your size. You can find it in any magazine with patterns or download and print from the Internet.
My piece of fabric is 0.7 m long and 1.5 m wide. My size is 42 Russian. or 34-36 euros. I fit into this section butt-to-butt, if your size is larger, then you will need more fabric accordingly. For a larger size you need to take the length of the product + sleeve length = the required amount of fabric.
Fold the fleece in two layers, right side inward. We outline the finished pattern with soap or tailor's chalk.
Depending on the pattern, you need to cut taking into account seam allowances.
A little secret for beginning seamstresses: To transfer the dart to the other side of the product evenly first, you need to lay running stitches along the entire dart, leaving a tail of about 1-1.5 cm.
On the other side you get a regular running stitch.
Now we pull one side away from the other so that the thread stretches between the parts.
We cut all the threads in the middle.
And now we have darts visible on both sides. We do this with all existing darts.
Next, we stitch all the darts on a machine.
Back detail with closed darts, all that remains is to remove the basting threads.
We connect the parts of the shelves and the back together, grind the shoulder sections.
The next step is to pin or baste the sleeves to the armhole.
We stitch on a machine.
By the way, I process all the internal cuts on a regular sewing machine with an overlock stitch, on my machine it is number 8. (this is the penultimate line in the first row, so you can understand what it looks like).
Next, cut out the pockets, you should get 4 parts. Unfortunately, I only had enough fleece for two, so I had to cut two more pieces from brushed footer.
In the side seams, you need to clearly define the entry point into the pocket and mark it equally on both sides. Although it is not necessary to make pockets, if this moment is difficult for someone, then this step can be skipped.
For those who still want pockets, you can see my version of sewing them in (although I’m not sure that this is the completely correct way, but I did it this way). One piece of the pocket was sewn into the side cut of the back, the other piece into the side cut of the shelf.
Next, the pocket parts need to be joined together and stitched along the edge.
This is what the pocket looks like from the reverse side.
The side cut to the pocket and grabbing the sleeve cut can be sewn with one seam.
You also need to stitch the side of the product from the pocket to the bottom edge.
My hem will be straight, it needs to be glued with non-woven material and stitched on a machine.
Video
Time codes
More details
0:44 – Review of the sweater 1:00 – Materials used 1:15 – Pattern details 1:23 – Cut out the front part (front) 1:58 – Cut out the back part 2:23 – Cut out the sleeve 3:03 – Cut out the collar 3: 20 – Details of the jacket 3:28 – Sewing the jacket 3:31 – Stitching (stitching) and finishing the shoulder seams 4:34 – Stitching (sewing) the sleeves into the armhole and finishing the seams 6:16 – Stitching (stitching) and finishing the side seams 7: 21 – Stitching (sewing) of the collar, one edge 8:16 – Stitching (sewing) of the zipper, the first half 10:14 – Cutting out and preparing the part to protect the zipper 10:39 – Stitching (sewing) the part to protect the zipper 11:15 – Stitching (sewing) the second half of the zipper 12:24 – Processing the edges of the zipper with braid or bias tape 13:37 – Processing the collar, stitching (sewing) the second edge 15:03 – Processing the bottom of the jacket 16:41 – Processing the bottom of the sleeves 18:55 – Review of the finished product sweatshirts
[collapse]
Fleece jacket with stand-up collar
I will have a jacket with a stand-up collar, I make a pattern for the collar and try it on for size so that everything matches.
You need to cut two parts.
I also didn’t have enough material for two solid parts, so I made the second one from two parts.
I connect the two halves into one collar piece.
A single piece will go to the front side, so we chop it off first at the neck.
We machine stitch and then place the second part of the stand face to face.
We machine stitch along the side and top edges.
We cut off the corners so that when turning them inside out there is no thickening in those places.
Turn it inside out and stitch 0.7 mm from the edge.
We bend the inner lower edge of the collar inward and sweep it away for convenience.
We stitch on a machine.
And the last moments are to bend the bottom of the product and sleeves and hem them.
The finished jacket turned out to be very cozy, soft and comfortable. The only thing I made a little mistake with was the length, I wanted it to be a little longer, but in principle it will do. This type of blouse is useful at any time of the year in cool weather.
If the article was useful to you, be sure to click on the social media button, I will be very pleased)
I also recommend looking at the article on how to easily sew a sweater from knitwear.
And I say goodbye to you until new master classes. Have a great day and creative inspiration everyone!
Pockets
We take measurements of pockets according to the old scheme. We need to sew them onto the front. When taking measurements, leave a few centimeters for allowance. To sew a pocket, you need to secure it. Use pins or tailor's needles and secure at the corners. Then fold one centimeter inward and start stitching. It is necessary to bend the centimeter so that the edges do not stick out and the seam turns out smooth and beautiful. When you have laid one line, fasten the thread and lay the second one next to it. Using the same system, sew the second pocket. If you have some kind of design in mind, before sewing, attach both pockets and check if everything fits together.
The money tree pleases with lush flowering: my secret is in caring for the leaves
If there is little snow, there will be no harvest: December 16 is Ivan the Silent Day
“We are still friends”: Derevianko commented on the breakup with his wife
Modeling lesson: Sew a sweatshirt
In the winter (and not only winter) cold, we all want to dress in warm and cozy things that will bring us joy. It’s especially nice when this item is a sweatshirt, sewn with your own hands.
Today we will model a simple and cozy sweatshirt that will keep you warm throughout the cold season. In the lesson we will also look at two collar design options and four types of pockets.
Any warm knitted fabric is suitable for a sweatshirt - fleece, velor, footer, velsoft. Feel free to experiment with colors and, if you want, choose printed fabric.
To model the sweatshirt you will need your basic dress pattern. If you already have it, then feel free to start modeling. And if you don’t have it, and you don’t know what it is, then I’ll tell you.
A basic pattern is a standard pattern made individually to your size. Using a basic pattern, you can create a variety of outfits for yourself. With the help of our website, you can get this pattern and use it an unlimited number of times. To do this, you need to follow the link and enter your basic measurements, and the program will do the rest for you! All you have to do is print out the pattern, and you can safely start modeling with us.
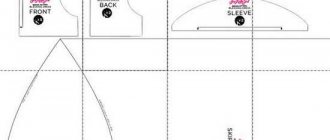
First step . First, move the chest and shoulder darts to the armhole. To do this, we need to step back from the armhole of the front along the shoulder section to the right, a distance equal to the size of the chest dart, and finish drawing the shoulder section as shown by the red dotted line in Figure 1.
Pattern
We build the sweatshirt pattern on the basis of a drawing of the base of a men's top shirt with a stand-up collar . Let's go to the page Drawing of the basis of an upper men's shirt with a stand-up collar. We indicate your measurements and click the “Build pattern” button.
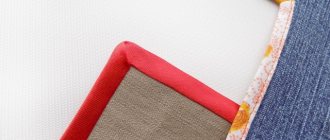
Among the required measurements, there are two that require additional explanation: - Cuff width - this model does not provide cuffs, so we indicate 0 (zero). — 1/2 increase for a loose fit along the chest line is the amount of fold of fabric on the finished product obtained with a tight fit along the chest line. (see photo, it’s better to see it once).
1/2 increase for loose fit
The resulting drawing in a scale of 1:6 can be printed on A4 format and redrawn in full size; if you have the appropriate skills, you can save the drawing to your hard drive in a scale of 1:1 and then work with the drawing using graphic editors.
For demonstration, the front and back are drawn using the traditional method, and the sleeve drawing is printed in full size on several A4 sheets and then glued together. You can read how to print a drawing on several sheets on this site.
We redraw the drawing to full size
Sleeve drawing printed on an office printer
Connecting the parts
So, let's put all the details together. Place all the parts in the correct order on the surface in front of you. For the front part you should end up with four pieces. Using a sewing machine, select a straight stitch with a large pitch, at least three. First we sew the front parts. Don't forget that you left a couple of centimeters for allowances. We start sewing from the inside. We sewed one line, secured the thread, turned it inside out and smoothed it out. In this way we connect all the parts of the shelf, then take hold of the back. We sew them on the inside, then smooth them out.
Why French children behave well: eight ways to raise them
Smooth and fresh skin: dermaplaning, or why a woman needs to shave her face
A student at the Vietnam Police Academy shared how she takes care of her facial skin.
To join the front and back pieces, place both pieces right sides together and stitch at the shoulders. Don't forget to secure the threads. Alternatively, all seams can be ironed to make sure that all the parts fit perfectly together and there is no need to cut off anything extra. If you have a steam generator or active steam function on your iron, even better. The shoulders are connected, now we go down and sew the sides. We secure the threads so that they do not unravel. The machine has a special function.
It won't be difficult to sew in sleeves if you didn't make a mistake when taking measurements. Start sewing the sleeve from the bottom, from the armhole side, and work your way up. If the fabric is a little short, stretch it slightly. We are not processing the sleeves yet, we will return to them later.
Modeling
Modeling a sweatshirt based on a drawing of a shirt
To get the pattern, we need to make simple changes to the main drawing:
- shorten the length of the product by 3-4 cm. - expand the neck as indicated in the drawing. — we build a drawing of the collar based on the measurements of the resulting widened neck. - cut the pattern along the chest line. *Derogations are recommended on this point. It is recommended to lower or raise the height of the “chest seam” depending on the length of the zipper, taking into account the height of the collar stand. (see picture)
Adjusting the height of the cutting line
— we draw the facings in accordance with the drawing.