- May 31, 2019
- Family
- Natalia Penchkovskaya
Painting T-shirts with acrylic is a fun and creative activity. Not every fashionista can sew a unique and stylish outfit for herself, but absolutely anyone can independently apply a design to clothes using acrylic paints. This is a water-dispersed coating based on polyacrylate polymers, which are esters of acrylic acid. Why use acrylic paints for drawings on a T-shirt?
They will not flow after washing, like gouache ones, and will not harden into a hard crust, like oil ones. It is convenient to apply them to fabric, since if a mistake is made, the line can be washed off with water, and after drying, a new one can be drawn. It looks bright on the finished product and does not crack when bent or washed. Handmade masters use them for painting on any surface - plastic and ceramics, metal and wood, fabric and leather, glass, etc.
In this article we will look at how to create colorful and unique designs on T-shirts using acrylic paints, and how to do such work accurately and reliably. You will learn how to apply a design to fabric, what available tools craftsmen use, and how to cope with the work if you do not have artistic abilities. After reading the step-by-step instructions for performing this type of work, any novice fabric artist can complete the task. If you get the hang of it and learn how to create beautiful things with your own hands, such art can be turned into a profitable business.
How to use paints
Acrylic paints for drawings on a T-shirt are not purchased at construction paint and varnish stores. You can buy them in the craft department or sewing supply stores. These are small jars of different colors, so you can choose the desired shade to decorate things. You can make it lighter or darker by simply mixing it with white or black paint.
Acrylic paints for drawings on a T-shirt can be diluted with water, but immediately after the procedure do not rush to apply it to the fabric, as excess liquid can cause the paint to spread and ruin the picture. It is advisable to have a piece of cardboard on hand for blotting the brush. To compose several colors of the desired shade, it is most convenient to use a plastic palette.
If the paint is too thick, it is diluted with water. The same procedure is also performed if the drawing should be translucent.
Types of painting on fabric
Painting on fabric with acrylic paints also requires preparation of the material itself.
Important! Before applying at home, the material must be placed in cold water and washed, then left to dry and ironed at low temperature.
Hot batik
This type of technique includes working with hot (hence the name) wax, paraffin, stearin, as well as their mixtures. This composition is applied to the fabric as quickly as possible so that it does not harden. A regular batik brush is not suitable for this. A bristle brush is used. There is also a special device, chanting, which is widely used in this technique.
Chanting
This way the paint does not touch the waxed areas. At the end of the work, the wax is removed using an iron and paper.
You may be interested in Sewing ties by hand - beautiful patterns
Hot batik is made in several layers of different colors, from 2-3 to 5-6 layers, depending on the contrast of the work. The history of this technique dates back to Indonesia and India long before its appearance in Europe. You can also use the “craquelure” technique, this is a method when, after the cold batik technique, a thin layer of wax is applied to the fabric and lightly broken to form cracks on it. These cracks are filled with paint, after which a thin layer of delicate cobwebs or an imitation of cracks in an aged painting is formed.
Hot batik
Cold batik
This technique is much simpler. Instead of wax, batik reserves and special contours are used. These materials are sold in craft stores. There are colored (indelible) and colorless reserves, which are removed after washing. The master applies the reserve without breaks so that the paint does not leak beyond the bounding contours - this is the main rule. The primary contours are drawn with a simple soft pencil before applying the reserve.
Special glass batik tubes are also sold, with which the cold reserve is applied. This technique is often used on chiffon and silk. It does not use high temperatures, as in the hot batik technique, which is why this type of painting is much safer and simpler.
Cold batik
Knot batik
A technique that beginners start with. It is used to decorate T-shirts, T-shirts, and also looks great on tablecloths and napkins. This type involves tying areas of fabric into knots with threads: sometimes randomly, and sometimes following a certain pattern, and then the fabric is placed in a calcined solution with dye. The pattern appears depending on the thread binding system.
Knot batik
Free painting
There is no need to adhere to a specific technique; there are no exact step-by-step instructions. The result literally becomes unique. The performer must manually draw the image. In this case, they experiment with adding alcohol for the effect of moisturizing the tissue, adding reserve elements and salt.
Free painting
Airbrush
This look is characterized by its airiness and ease of execution. As a result, the contour turns out to be a little blurred, as if melting. Here it is possible to combine a wide variety of colors and shades, just like with a spray can. Depending on the angle and distance of the airbrush from the fabric, the pattern turns out different, but still delicate and blurry.
You might be interested in this: How to make fabric pot holders yourself
Airbrush painting on fabric
Blowing dye through a straw
May also be called "blotography". The technique is rarely used, but the process is quite entertaining. A drop of paint is transferred to the fabric with a brush, which is then blown with air using a cocktail tube. This technique may need to be refined using other techniques.
Necessary materials for drawing
Before you make a drawing with acrylic paints on a T-shirt, prepare all the necessary materials so that in the middle of the work you do not have to run to the store for the missing element. First of all, choose a drawing you like on the Internet or draw it yourself on a separate sheet. Depending on the color scheme, purchase acrylic paints in the desired colors. They usually paint on fabric with a brush made of natural hairs. Prepare several pieces of different widths just in case.
Depending on your desire, choose a T-shirt without a pattern. It can be with short or long sleeves, of any style, the main thing is that the space for the design is sufficient and clean. The only general requirement for T-shirts for applying acrylic designs is that they must be made from natural cotton fabric.
Some artists make an acrylic print on a T-shirt by mixing paint with decoupage glue. It is believed that when these two chemicals are combined, the result is a more flexible mixture that does not crack after drying or washing, and the item will last longer. However, most artists apply the drawing with pure acrylic paints, without combining them with anything.
You will also need a palette, a natural napkin for blotting the brush, a hand towel, a piece of thick cardboard, a jar of water for diluting paint or for washing brushes. The contours of the future picture are drawn either with simple chalk, sharpened on one side, or with a pastel pencil.
Choosing fabric for painting
Before you begin, you need to know which acrylic fabric paints you should buy and how to use them depending on the fabric. Determining the right acrylic is not difficult.
You may be interested in this Rules for using Janome manual sewing machines
Fabrics made from natural materials are ideal for painting.
To understand what kind of paint you need to purchase, you should look at the label.
- Silk sign. This means that the stiffness of the fabric will not be affected, and the dye is suitable for light and thin items, such as chiffon or silk.
- Textile sign. This dye is suitable for dense and stiff fabrics (jeans, leather, linen), it does not spread as much and is easy to work with on such a surface.
The paint packages indicate what kind of fabric they are suitable for.
For work, it is best to select things from light or white fabric - this way, the acrylic colors retain their original color.
On a dark product, shades may change.
Making a sketch
For a novice master, we can advise you to choose the simplest drawing and practice on children's things, for example, depict a cartoon flower with five round or oval petals, or a mushroom with a red cap. First, practice drawing a sketch on a piece of paper, then transfer the outlines to fabric, and paint over the design with acrylic on a T-shirt.
If you don’t know how to redraw even simple drawings, don’t worry, you can always reglaze the image. To do this, print the selected design of the required size on a printer, place the sheet under a layer of an ironed T-shirt. Place it on a glass surface and illuminate it from below with a table lamp. The design will be clearly visible, and its contours can easily be redrawn onto the fabric. For example, for a girl, you can draw the character from your favorite Disney cartoon, Ponochka, and then just color it with paints, following the example in the photograph of a duck.
We paint flowers with acrylic on clothes
I, Ekaterina Amelina, an artist, will share with you the technique of painting clothes. I draw a lot with pastels, acrylics, ink and, among other things, I paint clothes: T-shirts, T-shirts and even shoes. When I started painting clothes, I noticed that I now look at things in stores completely differently. Now these are canvases for painting, I choose only light, monochromatic things, watch how they sit and imagine the next flower. It doesn’t work out any other way.
So let's get started. The technique is simple, similar to watercolor. I think you will succeed.
For this we will need materials:
- A T-shirt or T-shirt in a light color, maybe white. The fabric is cotton, possibly with a mixture of synthetics.
- Acrylic paints for painting on fabric. I use French paint "Deco Textil".
- Round brushes No. 3 and No. 6, flat brush No. 12. Other numbers are also possible.
- A jar of water.
- Palette (you can use a white saucer).
- Cardboard size 40x50 cm.
- Photo of the flower we will draw.
- Black fabric pencil or disappearing fabric marker.
- A toothbrush or a special brush for applying paint splashes.
1. If the T-shirt is new, then it can be washed, dried and ironed in advance, then the water will be absorbed into the fabric and the technique will be more like watercolor. This time I didn’t wash because I couldn’t wait to start the process.
2. Select a photo of a flower from which we will draw. If the T-shirt has a color, then it is better to match the color scheme to this color. I chose iris.
3. We stretch the T-shirt onto the cardboard so that the back side does not get dirty with paint and for ease of drawing. If the cardboard is smaller than the T-shirt, you can use paper clips to stretch the fabric.
4. Make a sketch of the flower with a fabric pencil or directly with a thin brush. I didn’t really like the pencil, as it didn’t erase well later. You can use a disappearing fabric marker, but expect it to disappear within a few hours and paint immediately after applying the marker. Drawing flowers is convenient because you don’t have to be afraid of making mistakes in proportions; you’ll still end up beautiful.
5. We begin to draw the petals with yellow, plum and brown colors. The fabric absorbs paint little, so the technique is done with a dry brush.
6. You can apply the paint in layers, first a layer of liquid paint with a lot of water, and on top, on the wet side, you can draw details with a thin brush.
7. At the very end, when the drawing is completely ready, apply splashes with a wide brush or toothbrush to give an artistic effect. Wet the brush in thinly diluted paint and spray it onto the drawing. You can practice on paper first.
I myself wear things with my own designs, and I can say that splashes also have practical benefits. For example, if in a cafe or restaurant you drop sushi in soy sauce, the stains on your T-shirt will not be visible
8. I quite like the result, I hope it worked out for you too. The cost of a T-shirt starts from 600 rubles. increased to several thousand, and most importantly, you received an exclusive designer item. Wear it with pleasure and good luck at the Crafts Fair!
Painting on a T-shirt with acrylic paints: master class
It is recommended to wash the T-shirt before starting creative work. Some manufacturers coat new items with a special adhesive, which will prevent the dyes from penetrating into the threads of the fabric, and the design will quickly be erased. Be sure to iron the fabric so that the surface of the future image is smooth. Lay the T-shirt on the table, insert a sheet of cardboard or thick paper inside so that the paint does not stain the back of the item. You can pin him down so he doesn't fidget back and forth. It is advisable to stretch the T-shirt fabric slightly, but do not overdo it so that the design does not become deformed later.
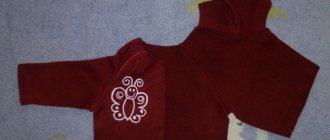
First of all, transfer the contours of the selected image onto the fabric. In the sample below you can see that beautiful flowers are painted on the T-shirt. To make such a drawing carefully, first draw the lines of the stem with chalk, then circles of flowers and leaves. Also mark with dots the places of the cores of each flower and the central line of the green leaf.
Next, dip the brush into the chosen base color. In our case, it is light lilac. Draw all the petals, leaving a void in the center. Use a soft green tint to paint the outlines of the leaves. Before painting further on the T-shirt with acrylic paints, let the bottom layer dry thoroughly. Thin strokes of a darker color are applied with a thin brush. If a drawing requires several colors, then you need to wait until all the previous ones dry, and only then proceed further.
Preparatory work
Before painting with acrylic paints on fabric, it is recommended to carefully prepare the selected base: immerse it in cold water for an hour and wash it a little. After rinsing in clean water, it is best to dry the fabric and then iron it with a warm iron.
If the material is thin, such as cambric or silk, then it is better to stretch it on a wooden frame and leave it to dry completely. If you decide to decorate a piece of clothing, it is best to isolate one layer from the other using cardboard or thick paper.
On video: how to paint fabric with acrylic paints.
Using glue
If you want to make your drawing more elastic and durable, take the advice of experienced craftsmen and add decoupage glue to acrylic paints. The proportions are 2 to 1, that is, for 2 parts of this glue you need to put 1 part of the paint of the selected color. It is believed that this connection will make the texture of the fabric more resistant to creases, the paint on the folds will not crumble and crumble, and the fabric will be dyed more evenly. In addition, the structure of the paint becomes flexible, and the fabric will not be “wooden” after drying.
Pin a picture
You already know how to make your own designs on T-shirts using acrylic paints. However, for the picture to be of high quality, the image needs to be mounted correctly. Most craftsmen leave the T-shirt for a long period to dry naturally. Some speed up the process by drying in dryers, ovens or even microwaves. But here it is important not to overdry the item so that the paint does not melt. If you are not in a hurry, then it is best to wait until the drawing dries itself, and then strengthen the picture with an iron. To do this, use waxed or plain paper, laying it on top of the T-shirt, and then run the iron over it.
The design will retain the freshness of the paints longer if the first wash is carried out not immediately after its application, but after some time. It is also recommended to wash hand-decorated items by hand, do not rub the area of the design too much, act carefully, and do not use chlorine bleaches.
How to care for a painted product
Once the item has been painted and dried, it is followed by proper care, thanks to which the paint will last a long time and remain bright.
- The product should only be washed at a temperature not exceeding 40 degrees.
- The amount of powder should be minimal; the product is used without bleach.
- When washing by hand: do not twist the fabric or rub in the area where the pattern is located.
- Before washing, the product is turned inside out, and then straightened out and hung on a clothesline.
- The item cannot be soaked.
- Iron carefully, from the inside out.
You might be interested in Ready-made patterns and instructions for sewing lambrequins for curtains
If you follow the recommendations, acrylic painting on fabric will last a very long time.
Acrylic lettering on a T-shirt
Acrylic paints are often used to create various inscriptions. This could be a child's name or a funny phrase, an athletic team logo, or a school class number. To make the inscription even and clear, use stencils. To do this, first write the desired word on a sheet of thick paper, then cut it out with a sharp stationery knife along the outer contours. Iron the T-shirt well and place thick cardboard or a piece of plywood inside. The main thing is that the place of the future inscription is well laid out. Attach the stencil with tape or masking tape on all sides so that it does not move as you work.
To fill the voids inside the letters, use a foam swab. To avoid getting your hands dirty, you can attach it to a wooden stick, as in the photo above. Then all that remains is to dip it in acrylic paint, and then blot the desired areas on the fabric. Wipe excess paint onto the edge of the jar to prevent it from running.
After all the inscription is completed, let the paint dry, only then carefully remove the stencil.
Methods of applying acrylic paint
There are several different ways to paint a design on fabric using acrylic paints. They are suitable for both beginners and people who have been drawing for a long time.
- Copying. The simplest method, which does not require any specific skills. The most necessary thing for this method is the ability to clearly transfer the pattern onto the thing. The desired design is first printed (preferably the outlines are thick and dark), then the fabric is stretched over a piece of cardboard or plywood and fixed. The printed drawing is placed under the product and the outline is redrawn. After this they begin to paint.
You may be interested in Choosing sewing threads for a sewing machine: prices
Drawing with stencils
- Another fairly simple way is to use special stencils. You can make them yourself from paper, or you can buy them in a store. This technique is suitable for those moments when the same design needs to be copied (for example, for uniform T-shirts or original fabric napkins). The stencil is attached to the desired location, and paint is applied on top.
- A more complex method is to draw a sketch by hand and then paint it. If you have enough imagination and skills, you can try this method. Some professionals don't even sketch and work straight away with color, but it's better to start with a pencil drawing. First, you should also sketch your future work in an album or sketchbook in order to know exactly the location of the sketch, its size, etc.
Thanks to manual work, unique things are obtained.
To start working with a certain method, you should consider some recommendations:
- Before purchasing, be sure to check the price, manufacturer and expiration date. This will help you avoid purchasing low-quality and old paints.
- The presence of toxins and allergens in dyes and the presence of an unpleasant odor are also checked.
- Before dyeing, apply the dye to some unwanted fabric to check the color and the nature of the application.
- Brushes, sponges and rollers are made from synthetics.
- A new layer (if there is no purpose of mixing paints) is applied only after the lower one has dried.
- A day after the picture is ready, iron it for 5 minutes.
High-quality dye remains stable after heat treatment.
To begin any work, the artist must have the following tools and materials:
- The paints themselves (there are different dyes in stores; they can be labeled “acrylic paints” or “acrylic”, and will differ little).
- Soft synthetic brushes.
- Pins, clothespins, hooks.
- Frame, hoop, plywood or piece of cardboard.
- Thinner (also available at art stores).
- Sponges, cotton swabs.
- Palettes, containers for diluting paints and water.
- Hairdryer and iron.
The work room should be spacious and bright, well ventilated
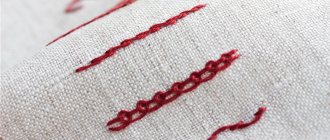
Drawing stripes
You can make different designs on T-shirts with acrylic paints with your own hands, embodying any creative idea. Let's look at how to turn an ordinary plain item into a striped one. You will need masking tape, which will delimit the distance between the elements of the design, and also “nail” the fabric to the surface of the table so that it does not wrinkle.
If you need to depict diamonds, a checkered pattern or other geometric pattern, then after the first layer of paint has dried, remove the tape and stick it on the other side of the product. By acting sequentially, you will get the desired pattern, and you can also use different colors.
Punching
To apply a repeating pattern to fabric, all you need to do is buy the necessary stamps. They look like regular printing and are sold in a large variety on Internet sites.
To avoid a lot of paint and a stain on the fabric, you need to pour the acrylic into a flat container for dipping the stamp, and for the first time try to leave a print not on a T-shirt, but on a sheet of paper.
Using a roller
To apply a stencil design to the fabric of a T-shirt, you can use a roller instead of a brush. This is done in cases where there is no need to highlight small details with a separate color. It is convenient to use a small foam roller for a single-color design, inscriptions, or covering a large area of fabric.
The stencil is drawn, as usual, on a sheet of thick paper and cut out along the contours with a stationery knife. Then the T-shirt is stretched to avoid wrinkles, and the stencil is attached with tape. Don't forget to always insert a sheet of cardboard inside before applying paint. It not only straightens the fabric, but also prevents dye from leaking onto the back of the garment.
How to draw on fabric?
If you are trying to do this for the first time, then it is advisable to choose a simple design, without small details and excessive colors. Subsequently, having filled your hand, you will be able to apply more complex images to clothes.
Here and here it is well described how to transfer an image to fabric. Use a simple pencil or a self-disappearing phantom felt-tip pen.
Be sure to place a piece of cardboard under the fabric so that the paint does not print on the second layer.
If your design requires an outline, use a special fabric outline . Use a fine tip to follow the lines of the image. Wait a few hours for everything to dry.
Acrylic paint is good because it covers the fabric thickly without bleeding into the fabric fibers, unlike water-based batik paint. This is why your drawing will be successful even without a backup outline.
Paints can be mixed with each other to obtain a different, intermediate shade. There is no need to dilute them with water.
We take a brush, dip it in paint and carefully apply it to the details of the drawing. Be careful not to make the dirt already on your “palette”, do not allow the edges of the design on the fabric to blend. It is more convenient to start with light tones, gradually moving to darker ones.
Thick layers are not acceptable. Otherwise, your paint will crack after one or two washes.
The easiest way to get an image on a product is stamping. Here are master classes on this technology:
https://irenabatik.ru/batik-obuchenie/batik-texniki/kalamkari-nabivka-risunka-shtampami.html
https://irenabatik.ru/batik-obuchenie/batik-texniki/rospis-shtampami-v-domashnix-usloviyax.html
https://irenabatik.ru/batik-obuchenie/batik-texniki/texnologiya-nabojki-po-tkani.html
After the work is completed, it is necessary to let it dry for about a day . Now we fix our drawing. This is easy to do: iron the product with a hot iron (according to the type of fabric) from the wrong side for 3 minutes on every millimeter of space. It is also possible to iron from the front side by placing gauze under the iron before doing so.
This painting will be firmly attached to your product. It can be washed without fear of abrasion, but still carefully, no more than 30-40 degrees, and preferably by hand washing. Naturally, you cannot use bleach - otherwise the drawing will become faded and then completely erased.
Decorating crafts
After the paint has dried and fixed it on the T-shirt with a hot iron, you can further decorate the item by adding volume to the design. This can be a lush bow or pompom on the character’s head, or you can sew a voluminous braid or rope edging along the edge.
In the photo above, the ballerina depicted has a full organza skirt attached to her. Even such a small decorative element can transform a thing beyond recognition. Now it is fashionable to make removable decorative elements. So, if you sew a strip of Velcro at the ballerina’s waist level, then at the child’s request you can change her skirts of different colors.
Using acrylic paints for fabric
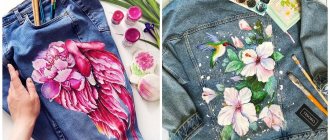
We examined in detail how to draw a design on a T-shirt with acrylic paints. But you can apply an image not only on summer things. You can decorate jeans and skirts, fabric bags and cotton sneakers, wallets and belts, caps and jackets with a unique design. It's very fashionable to wear hand-painted classic denim jackets this season. The image can be small, for example, on a pocket or on a sleeve, or it can cover the entire back of the product.
Imagine, create, apply new technologies and decorate your life with bright colors!