Share on social media networks:
Autumn and winter are cold and at the same time beautiful seasons. But the charming decline of nature is not at all a reason to become despondent, since autumn always pleases us with something new. During this period, many people begin to mobilize new projects, to implement previously planned, but for some reason postponed until a better time. Meanwhile, autumn brings certain difficulties into the lives of women, since they have to radically change their wardrobe. Sundresses and dresses go to the shelves, and warm, cozy things come to the fore. A jacket or sweater can be an excellent alternative. In this article we will tell you how to sew a jumper from knitwear yourself.
Sewing a light knitted cardigan with your own hands
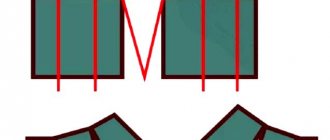
First of all, let's find out how to sew a stylish summer jumper from thin knitwear like a cardigan, because summer has not yet completely receded, but in the evenings it can be quite cool. If you decide to start making clothes yourself, then it is better to use the option without using a pattern. Even without sewing skills, you will get a great item. The work will take literally thirty minutes. It is better to sew from rectangles, because in this case you will get a transforming item.
A cardigan is made according to this pattern:
- On the fabric, draw a rectangle 100 cm long and 140 cm wide, then cut it out.
- Measure the width of your back.
- Fold the fabric with the right side inward, set aside half the measurement (back width) from the fold line and draw a straight line, approximately 30 cm long. This will give you the shoulder point.
- Draw the armholes. It is enough to measure 13 cm from the shoulder point and make a cut.
- Make sleeves from two rectangles 30 cm wide and 70 cm long. Just fold the fabric in half, then sew it on the machine. Make all stitches using a zigzag stitch.
- Sew all the details.
Important! This lightweight cardigan can be worn open or pinned with a brooch.
Sewing a blouse with a dropped shoulder
The off-shoulder blouse is a model that has remained at the peak of its popularity since the beginning of the century. It is not difficult to make, based on patterns from old products or those presented on the Internet. It’s also easy to construct by studying a step-by-step master class from other experienced craftswomen.
All you need is to take high-quality stretch fabric at first, needles, cotton threads, a sewing machine and chalk for drawing. It will also be possible to take fittings for finishing.
You might be interested in Ready-made patterns for fabric mice and rats: sewing with your own hands
Note! All sewing looks like this: first, patterns are created and sewn together. The preliminary jacket is tried on and if everything fits perfectly, the final stitches are made using a sewing machine.
Jacket pattern 46 44 size raglan sleeves with dropped shoulder
Making a knitted pullover
Do you want to diversify your wardrobe with trendy clothes? Then sew a knitted jumper with your own hands. You don't need a finished pattern; we'll build it as we go.
This master class includes the following steps:
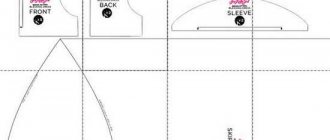
- Use old clothes that fit you perfectly as a basis for creating a pattern. Or take all the necessary measurements, transfer them to the fabric, then cut with regular scissors. As a result, you should have the details of the back, front, sleeves, and collar.
- Next, stitch all the sections of the back, front and sleeves. Fold the back and front parts facing each other, exactly matching the top edges, and pin together. Sew the shoulder seams, leaving a 35 cm long section for the neckline unstitched in the middle. Make bartacks along the edges of all seams. Press seam allowances.
- Sew the side seams, leaving an open area at the top of each side for armholes 25-27 cm long. Not reaching the bottom edge of the back 31 cm, finish each line. Press the seam allowances along the edges of the slits to the wrong side.
- Fold the collar piece right side inward, stitch the edges along the length of 39 cm. Iron the seam allowances. Fold the collar in half, inside out. Sew open edges together.
- Pin the open edges of the finished collar into the neckline, face to face, aligning the collar seam with the middle of the back. Sew in the collar, interrupting the stitching only at the shoulder seams.
- Fold each sleeve in half lengthwise, facing inward. Sew them along the length of 58 cm. Iron the seam allowances in the same way as the rest of the parts. Pin the sleeve into the armhole with the front part facing the front side, aligning the sleeve seam with the side seam. Sew in the sleeve, starting and ending near the side seam.
- Place allowances on the edges of the cuts. Press the hem allowances to the wrong side, stitching at a distance of 1.2 cm. Turn the seam allowances back to the wrong side and stitch them in the same way, stitching crosswise at the ends of the cuts. Follow the same pattern to process the hem.
Jacket with raglan
The fashionable oversized hoodie has filled the stores. But you can not only purchase it, but also make it using simple patterns.
How to sew a hoodie?
To sew a sweatshirt with raglan sleeves and a hoodie for size SM you will need:
- 1.10 m of dense natural fabric (interlock foam, velsoft, knitwear, futor);
- up to 4 spools of thread of the required color;
- long lace;
- For cuffs, the preferred material is that it stretches well (ribana).
- All parts need to be folded with the front side inward, fasten them with pins along the armhole lines. Then, with an allowance of 1 cm, connect these elements on a sewing machine.
- Attach a piece of sleeves, a piece of the back along the armhole lines with pins, then connect them using a machine.
- To avoid shedding of materials, use an overlocker.
- Iron the warp allowances to the bottom edge.
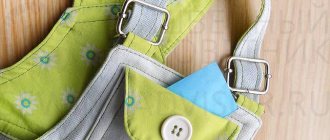
- The pocket details are sewn on a machine. By turning the sections inside out, you can sew the hem yourself.
- With chalk you need to mark the middle of the front part along the bottom edge, then make another mark after 2 cm.
- Having determined the middle, place the pocket with the front side inward, be sure to secure it. Sew a pocket the width of the foot from the edge and press.
- Having pinned it to the front with needles, find the middle and sew along the chalk mark.
- Pin part of the front, sleeves along the side sections, parts of the back, then connect with seams, pressing the seam allowances.
- Fasten the hood elements together and sew them on a machine. Using an ironing pad, iron seam allowances.
- Repeat the procedure with all other parts.
- To insert the cord, turn the hood inside out, make a line 2.5 cm from the edge, in the middle of the neckline, leave a mark. Having aligned the points of the halves of the hood and the neck with a pin, sew the elements together by sweeping the cut, ironing and stitching the seam allowance towards the back and front.
- Secure the cuff parts with needles and sew.
- Fold the cuff in half at the middle back, dividing it into exactly 4 zones with chalk.
- You need to sew the pieces of ribana folded into a ring along the bottom edge, distributing it evenly. Using an overlocker, overcast, iron, and stitch seam allowances.
- Sew them immediately along the side sections. Allowance in different directions, cuffs in half.
- Having marked the middle of the bottom edge, apply the parts, securing them with pins. Sew on the cuffs and bottom using a machine.
Now it has become known how to sew a hoodie by choosing a specific material and design of varying complexity.
We sew our own knitted jumper
Perhaps you've never sewn something out of knitted fabric. In fact, it is a great pleasure to work with such material. In this section we will tell you how to sew a jumper from knitted jersey, using old things that have long been lying around on the shelves in the closet. Every housewife can find knitted items at home that can be transformed in incredible ways. The work is divided into three important stages, we will consider each of them in detail.
The first stage is cutting
There is nothing complicated in drawing up a pattern; it happens according to the following scenario:
- First of all, wash the fabric so that it does not shrink or become deformed during wear. It is better to wash with wool detergent, then dry on a horizontal surface.
- Then you can take up the scissors. To get the job done faster and ensure a perfect fit, use an old jumper that fits well. Lay it out on the double folded fabric and outline the sleeveless one, taking into account the shoulders. Decide for yourself which length you prefer.
- Shape the neckline to your liking.
- There will be a few seams - on the sides and at the bottom of the sleeves, that is, two long seams - from the beginning of the sleeves to the very bottom of the jumper. Therefore, it is recommended to cut the product in such a way that the top line of each sleeve falls on the fold of the material.
- Then measure the length of your arm from the shoulder, put the resulting value on the fabric from the shoulder in two opposite directions.
- Measure the width of the sleeve at the wrist area, placing it perpendicularly down from the sleeve line.
- Draw a line from the tip of the sleeve to the beginning of the waist to create the desired silhouette. Add 1 cm for seam allowances, 4 cm for hem and sleeves.
Second stage - sewing
How to sew, because this peculiar fabric, quite shaggy and holey, will probably crawl out from under the presser foot, be distributed unevenly, and the needle will not be able to grab it? There is a solution - all you have to do is sew by hand.
It is better to do this with an overlock stitch, so that later the edges do not unravel, and everything looks neater from the inside out. The work itself consists of sewing together all the details with matching threads and a needle; there is nothing difficult about it. Fortunately, on such fabric the seams do not stand out.
The third stage - edge processing
First, fold the edges of the sleeves and the bottom of the jumper, carefully press them, then steam them through the fabric. Then carefully sew with an overlock stitch, while picking up a few threads from the main knitted fabric. This will hide the seams as much as possible.
Important! It is better to process the neck with a crochet hook and sewing thread. You need to tie it with three rows of single crochets, then everything will turn out beautifully.
Sweatshirt with scalloped collar
For beginners, this cut option is perfect.
To sew such a model, first of all you will need knitwear, some guipure, thread, a sewing machine, and non-woven fabric. Patterns and their measurements apply to size 44.
- You need to cut out all the details, leaving 1 cm for seams.
- Place the guipure elements onto the main fabric and sew with a basting stitch. Connect the threads first on the yoke, why on the shoulders.
- Grind off the sleeves, sew them into the armholes, but so that the guipure does not slip along the edges of the yoke.
- Sew the side seams.
- Cut out the remaining components: the placket at the bottom, cuffs, neckline, leaving a centimeter margin for stitching.
- Attach a pair of buttons vertically to the collar.
- Pick up the excess threads after the overlock stitch and iron the finished garment.
If desired, complement the model with different decor: stripes with animals, flowers, symbols, stickers. You can place a print, drawing, or embroider a bright inscription on the finished product.
How to sew without a pattern
Sewing a cardigan without a pattern is quite possible. To do this you need:
- Take the fabric from which the cardigan will be sewn and cut a square from it with sides of 150 cm or more;
- Find the center of the square by folding it in 4 layers;
- Inscribe a circle in it with chalk with the center in the center of the square;
- Take any sweater from the closet that is ideal for your figure, and lay it on the fabric in the center, retreating 20 cm from above;
- Transfer the armhole lines of the back and front of the sweater onto the fabric;
- Make holes for future sleeves and make a collar from old leather or denim, stitch it to the top along the circle. This will be needed for the collar or hood;
- Make sleeves and sew them with an internal seam to the back of the product.
Cardigan without a pattern for women
How to sew a knitted sweater
It’s easy to sew a knitted sweater by making some kind of darts. You can try not sewing anything up, but simply wash it in a washing machine on high. Another interesting option for sewing a knitted sweater is cutting off the parts and replacing them with others. This non-standard method is used by many beginning needlewomen.
Note! There is also the option of sewing up a knitted sweater, cutting it into halves and turning it into a product with buttons or a zipper.
You may be interested in this: Creating a pattern and sewing a flared skirt for beginners
Sewing a knitted sweater
In general, sewing a sweater with your own hands is not difficult, if you have knowledge in the field of creating patterns and ready-made step-by-step instructions. It is important to understand that the main task will be the selection of material. For beginner craftswomen, fleece or synthetics are better until they get the hang of it and learn how to take measurements correctly and move away from the edges. It is best to first try to reshape an old product and decorate it, turning it into a new one.
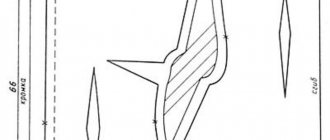
Cardigan pattern
Correct cutting of the canvas is the basis for the beauty of the future product. Cutting involves laying out patterns on a knitted fabric, modeling the future front and back, modeling sleeves and cutting out all the details for subsequent sewing.
Pattern layout
For this process you need:
- Take the shelf pattern and lay it out on the canvas so that the top point of the shoulder coincides with the mark of the total length of the future product;
- Take the back pattern and lay it out on the canvas so that its center coincides with the fold of the fabric;
- Check the distance between them. It should be equal to twice the width of the allowances on the sides.
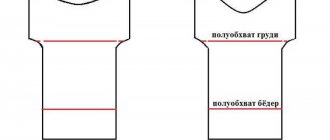
Modeling the shelf and back
It is important that the control lines on the patterns are at the same level. The first step is to outline the details with chalk or soap, and then proceed to the dart, which can be converted into an armhole for less visibility. This is also suitable for those who have large breasts and will eliminate the likelihood of creases and folds in the armhole. The last step is to shorten the dart by 4 cm from the center of the chest. There is no need for a back dart. It is enough to shorten the shoulder seam by the width of the dart and raise it by one centimeter. From this point, draw a line until it coincides with the highest point of the throat and mark the width of the shoulder and armhole allowances by one and a half centimeters.
Sleeve modeling
The sleeve is located in the upper part of the fabric near the edge. In order to do this, set aside the length of the sleeve at the top from the front shoulder allowance and add an allowance at the bottom of about 4 cm. The width of the sleeve, as well as the elbow and internal lines, are determined in accordance with the model and style of the future cardigan and pattern. You should also apply allowances: one and a half centimeters along the edge, and 2 cm along the elbow and inner lines.
Important! The entire structure should be checked again for width and length. The main thing is not to forget to also add allowances for a loose fit to the body, which depend on the type and fullness of the figure and model.
Cutting out parts
After modeling all the details, taking into account the allowances, you can begin to cut out the cut details. To prevent them from moving, it is advisable to pin them together with pins.
Men's cardigan
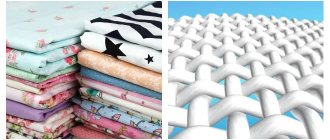
Sweatshirts made of different materials
At the moment, sweaters for men, women and children are made from different materials. Therefore, sewing a blouse from knitwear is not difficult. Some try to combine fabrics with each other. For example, cotton is combined with openwork lace inserts, polyester is complemented by synthetics, wool is decorated with guipure and satin, and knitwear is combined with polyester. There are also more daring combinations, where sweaters are created in the style of patchwork knitting. This style involves combining pieces of different materials into one product, which you can knit yourself. The result is an authentic outfit.
Note! It is worth pointing out that the best material for a flowy hooded sweatshirt or jacket is knitwear. This is a light and breathable material for boys and girls, thanks to which you can design a jacket in different variations.
Creating a product in patchwork style
Silk, chiffon
Silk and chiffon are materials that needlewomen try not to work with when creating a jacket or sweatshirt, even for a Barbie or Monster High doll. These are the materials on which it is difficult to make drawings and patterns due to their mobility, flowability, and transparency. In addition, the difficulty of working with them lies in the visibility of needle punctures and sensitivity to water and detergents. Silk does not like washing and ironing, so if the material is wrinkled, it will be difficult to draw a drawing on it and try to connect the necessary parts together.
The finished silk product requires careful treatment and proper wear so that it does not gradually shrink and lose its shine. Therefore, creating a blouse from such material is not the best solution.
You might be interested in this. Several patterns and instructions for sewing a long floor-length skirt
Finished silk product
Chiffon is a little more pliable than silk, but still difficult to work with. It is recommended to supplement it with other materials. For example, products with the addition of cotton fabrics, in addition to chiffon, look great.
Finished chiffon product
Knitwear
Knitwear is an excellent material for creating a light, airy and stretchy sweater, as it consists of natural yarns and silk, linen, cotton and wool threads. Often, it is created from acetate, viscose, lycra and elastane. It is distinguished by softness, hygiene, practicality, a wide variety of colors, elasticity, ease of care and breathability. It’s very easy to make a jacket out of it, based on the available master classes and step-by-step instructions.
Note! Its advantage is also that even if you make a mistake in miscalculations, the material stretches well and fits perfectly on your figure.
Knitted model
Sweater jacket
It's very easy to recut a sweater and make a cardigan out of it. This does not require darts, patterns or other drawings. All you need is to pick up scissors, needles, threads and a sewing machine. If the sweater included a neckline, then it needs to be cut off. Next, you can trim the sleeves or make interesting holes along the shoulders or back. You need to sew another material in place of the cut parts. As a rule, many people use lighter fabrics for this purpose to create a decorative sharp transition. Next, the finished product can be decorated with a belt, buttons, etc.
DIY sweater