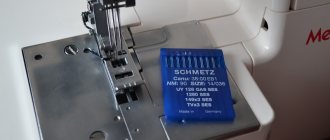
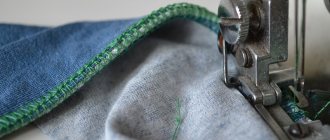
How to thread a sewing machine with elastic thread?
You need to wind the elastic thread onto the bobbin, and it should be wound under slight tension. To do this, we thread the tip of the thread into the hole on the bobbin, install the bobbin into the mechanism, pulling the thread crosswise, and wind it, holding the tip of the thread. You can wind the thread by hand, but you also need to wind it under tension - the degree of tension will determine how tight the product will be. Now you need to insert the bobbin into the shuttle, pass the thread under the plate and install it in the machine. We use a simple thread as the upper thread. We thread the machine as usual, by turning the flywheel we pull out the lower thread and check its tension. It is important that the thread is not pulled out too tightly. The degree of tension can be adjusted using the bolt on the shuttle - it can be loosened a little so that the plate does not fit too tightly and the thread comes out of the shuttle freely, otherwise the thread will break. It is advisable to increase the tension of the upper thread to 6-7. We will sew with a simple straight seam with a stitch length of 3.5-4 mm on the front side - there will be a simple thread on top, and an elastic thread on the back. First we lay a test stitch on an unnecessary piece of fabric, adjusting if necessary.
What is an elastic thread
An elastic thread is a stretchy thread made from an internal rubber strand covered in a colored braid. Thus, it begins to look like a fabric thread and is practically invisible on the canvas if the color of the braid is chosen correctly. There are a huge number of colors in which such threads are dyed.
Application on children's sundresses and dresses
An elastic thread can have varying degrees of elasticity and differ in other properties. The most common thickness is 1 millimeter and is shaped like a regular coil.
Black sample with a thickness of 1 mm
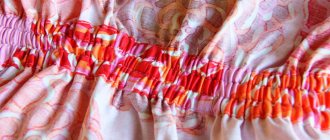
How to make a flounce or ruffle using an elastic thread?
We attach the flounce to the base and pin it together. An elastic
thread allows you to quickly and easily assemble flounces and ruffles, and the assembly is uniform along the entire length of the part without much effort. Before sewing on a flounce or ruffle, it is necessary to process the bottom of the part in one way or another - in our case, this is a simple double hem. We sew a stitch with an elastic thread along the opposite edge of the shuttlecock at a distance of 1 cm, focusing on the markings on the plate of the sewing machine. We tie the ends of the threads together so that they do not unravel. We apply the shuttlecock to the base face to face and pin it together. You can baste a millimeter from the elastic thread. We change the bottom thread to a regular one and sew a line on a sewing machine, adjusting the thread tension. Stitch length 2.5-3 mm. We will sew directly under the elastic, making fastenings at the beginning and at the end. We process the edge using an overlocker or using an overlock-like stitch on a sewing machine. Iron the seam up - the shuttlecock is ready.
Why and where can you use a thread with an elastic band?
Rubber threads are very often used when sewing clothes in order to increase the fit of certain parts of things to the body. These could be cuffs, a waist, a corset, a turtleneck neckline, and so on. This type of thread is also used to create elastic gathers of canvas or fabric. Its qualitative difference from elastic braid is that the elastic does not require drawstrings and is hung directly on the fabric.
Use for knitting
The elastic thread is thin enough that you can easily thread it into a sewing machine, just like regular natural or synthetic threads. As already mentioned, the wide range of colors of the products allows you to completely hide the threads on any material of different textures. This means there is no need to sew on the front side.
Gathering on the dress
If an elastic band is used for knitting, then it is added to any type of yarn. This is done to make the fabric more elastic. A good assistant is spandex, which is used for the upper part of the socks. Thanks to this, the elastic of the sock fits quite tightly to the foot and prevents the skin from coming into contact with the rubber.
You might be interested in learning how to sew leather goods by hand and on sewing machines
Important! Despite all the positive aspects and areas of use, rubber is short-lived. The more it is used (worn, washed, dried), the faster it becomes unusable.
Color-matched elastic for knitwear
How to make cuffs using elastic thread?
We bend the lower cut of the sleeve using a roller seam on an overlocker.
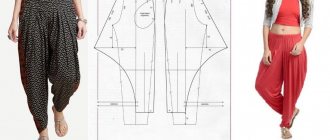
We take a detail of the sleeve - it should be expanded downward at least twice, since there will be an assembly here.
There will be a ruffle at the bottom of the sleeve, so measure the desired length at the bottom of the sleeve and add 0.5 cm to the hem (in our case it is 3.5 cm). Now you need to measure the desired length of the cuff (in our case it is 6 cm). We will lay a line with an elastic thread every 1 cm along this length - we draw a line for each line. Now we sew the lines on the sewing machine, leaving the ends of the threads quite long. We bend the lower edge of the sleeve using a roller stitch on an overlocker or in any other way (this can be done before laying the stitches with an elastic thread). Fold the sleeve in half, face inward, and secure with pins, starting from the finished edge of the sleeve, while aligning the seams with each other, connecting the elastic thread into a ring. To be sure, you can baste at a distance of 1.5 cm. We sew a line on a sewing machine from edge to edge, making bartacks. We trim the threads and finish the edge with an overlocker or an overlock-like stitch on a sewing machine, and hide the remaining threads in the seam using a gypsy needle. Iron and place a bartack at the bottom of the sleeve so that the seam does not protrude.
DIY Sewing Tutorial with Adding Elastic Waistband
When I first wrote about this adorable dress, I mentioned the wide waist and suggested some easy DIY "fixes." Based on your requests, here's a step-by-step guide to one of my favorite quick tricks to elevate shapeless clothes: by adding a partial elastic waistband. This is a very simple method (sewing experts...don't judge) but it takes 10 minutes, is convenient, and is easy to undo if you get better later!
My sewing machine is 20 years old (she's my baby!), but if you're shopping for one now, I bought this inexpensive Brother sewing machine for family members and would recommend it. It has the basic features and stitches without the unnecessary extra features, and I've found that it is easy and simple to use for beginners.
You will need
Sewing machine, elastic, thread the same color as your dress/top, and pins.
Banknotes
Before we begin, please note that this tag method works best on casual dresses or unlined tops or garments where the lining is a separate layer not attached to the waist. In this tutorial, I'm only adding a portion of the elastic along the back of the waist. This partial elastic is enough to gather a few inches at the waist and make it noticeably more fitted.
If you are new to sewing, I would practice doing a few basic hems and stitches before working with the elastic.
Step 1:
Turn the dress inside out and lay it flat (I moved the dress to the side in these photos).
Step 2:
Cut a strip of elastic a few inches shorter than the width of the dress waist (here I cut a strip of elastic about 9 inches).
Step 3:
Find the center point of the dress waist (pin “B”) and the center point of the elastic band. Pin both together. When attaching the elastic, do not catch both layers of the dress fabric (front and back).
Step 4:
Mark with fabric chalk or pins how far you want to stretch the elastic band (pins “A” and “C”).
Note: The total distance that you stretch the elastic band while sewing is the approximate amount that the waist will be "gathered" and narrowed. For example, I marked pins A and C about 2 inches further than each end of the unstretched elastic. After stretching and sewing the elastic to pins A and C, the entire waist of the dress will be gathered approximately 3-4 inches.
Set your sewing machine to a wide zigzag stitch like #3 here (do not use a straight stitch on elastic)
Step 5:
Holding the dress inside out and right side up, place the sewn dress and elastic on the sewing machine. Align one end of the elastic with pin C, remove the pin and use a wide zigzag stitch to secure the elastic to the dress. Make a few backstitches to keep the thread from unraveling.
Step 6:
Continue sewing the elastic between Pin C and Pin B using a wide zigzag stitch , using both hands at the same time to stretch the elastic evenly , until the dress fabric is smooth and taut.
The hand further away from you should pull the fabric and elastic evenly through the sewing machine. The hand closer to you should pull the elastic towards you while squeezing the fabric of the dress to keep both pieces in place (I do this with my thumb and forefinger below ). This part can be a little tricky for beginners. Later today, check out my Instagram stories for a short video clip on how to stretch an elastic while sewing!
Continue this process section by section. When you reach the last pin, remove it and backstitch to secure the loose ends before cutting the thread.
That's all! Here's what it looks like close up, with the dress still inside out (sorry for the uneven stitches):
This is what it looks like from the outside. The waist is now gathered for a more fitted look.
PS - I also suggested adding two darts at the back of the waist instead of elastic, but that won't work here because it's a pullover style dress and doesn't have a zipper. If you make the waist smaller without stretching it, it will be difficult to put the dress on and off over your head.
.
How to create the perfect fit for a loose bodice?
A simple way to create a perfect fit for a loose bodice.
Let's cut out the part of the front and back - in this case it is a 62x45 cm rectangle. We process the upper sections with a roller stitch on an overlocker. Measure 1.5 cm from the cut and draw the bodice with lines at a distance of 1 cm from each other. Sew the stitches using an elastic thread. Let's put the parts face to face, connect with pins, starting from the overlocked seam and combining the elastic bands, and lay the side seams at a distance of 1.5 cm from the cut with a simple thread, process the cut with an overlocker, and iron. Let's try it on. The bodice fits perfectly!
More useful tips on online sewing courses!
How to sew an elastic band to a dress at the waist yourself
An elastic band (elastic band) is attached to the waistline of those dress models that need to be fitted. A belt (cut-off or one-piece) is not used in this case. The density of the folds on both sides of the elastic is preserved.
The elastic is attached to the product using a sewing machine or by hand. You can narrow the dress at waist level using elastic threads (rubberized threads), which are used to sew the fabric on a machine.
cujournal.ru
Product preparation
Before sewing the elastic to the dress model at waist level, you need to prepare the cut details.
- Align the front part of the dress with the back with right sides facing inward. Place stitches on the sides.
- Process the top of the model.
- If desired, you can also process the bottom at this stage.
Sewing rules
Regardless of the type of rubber belt, it is necessary to attach it to the base by following the basic rules.
- Do not pierce the rubber veins of the tape with a needle. Punctures can lead to deformation of the elastic - once damaged, it stops stretching. When stitching by hand or by machine, it is recommended to stick the needle between the rubberized veins of the tape. In this case, the zigzag stitch is considered safer.
- During operation, the tape should be evenly tensioned. If the degree of tension of the rubber band changes, the folds at the model’s waist in different areas will be different in thickness.
blogspot.com
Sewing methods
There are three main and two additional ways to sew elastic tape to the waist of a dress. The methods differ from each other in the type of rubber material (elastic tape, elastic thread), the type of seam (simple, zigzag), as well as the technique of applying the seam (manually, using a sewing machine).
Basic
Manually or with a simple machine stitch
When manually “fitting” a dress model onto an elastic band, preference is given to loose, easily stretchable elastic bands, about 6 mm wide. If there are several rubber layers, the top one can be made in the form of a wider strip.
As a result of using this method of fastening the elastic, the model will be equipped with soft folds.
- Mark a line on the fabric along which the rubber belt will go.
- When stretched, according to the waist circumference measurement, cut off the rubber fragment. The elastic band can be measured by wrapping it around your waist without too much tension (it should touch your body, but not sag).
- Connect the segment into a ring. Another version of this operation involves dividing the tape in half. One part will be attached to the front of the model, the second to the back.
- Pull the rubber ring evenly and sew it into the waist area of the dress. In the second option, sew on a rubber strip, pulling it tight.
- To ensure that the elastic is evenly distributed throughout the fabric, you need to divide the rubber ring into 4 equal parts using pencil marks. Similar marks are made on the fabric. If the rubber belt is attached in parts, each fabric and rubber section must be divided into sections.
- The resulting marks are stitched together. Machine stitch by pulling the rubber strip under the presser foot. Pull the elastic with two fingers of one hand and simultaneously straighten the fabric fragment.
- If the tape is sewn by hand, the initial distances between the stitches are divided again and stitched again. The operation is repeated until the entire belt is inside the product.
blogspot.com
Using a zigzag seam
- Cut the elastic band into two equal pieces and set them aside.
- Use another piece of elastic equal in length to the width of the product itself.
- A long rubber fragment is placed under the machine foot. A zigzag type of seam is used, with a wide zigzag step. The fabric should be pierced with a needle 1-2 mm from the edge of the tape.
- Press the elastic line to the fabric with a curly stitch. In this case, the tape can remain movable. Afterwards it can be tightened.
- After the entire rubber fragment is under the stitching, next to it place half of the elastic that was cut at the beginning of the work.
- Two marks are applied to the elastic underneath the stitching, corresponding to the edges of the short section.
- Tighten the long rubber band until the previously made marks are aligned with the edges of the model.
- Secure the edges of the elastic tape to the edges of the fabric.
rukopedia.ru
Drawstring assembly
- Measure the length of the seam along which the rubber band will be sewn.
- A fabric strip of similar length is cut. The width of such a strip should be equal to the width of the elastic, taking into account the additions for making seams.
- A piece of fabric (drawstring) is sewn into the area where the belt is located.
- Pass a rubber band through the formed channel, attaching a safety pin to one edge.
- First, it is recommended to fasten the back edge of the elastic to the fabric, and after threading, the front edge.
magazineindex.org
Additionally
Additional methods concern securing a certain number of rows of elastic threads in the waist area of the product.
kupivip.ru
Simple stitch
- The sewing machine is threaded from below with elastic thread. We place a regular thread on top with a loosening of tension, which will allow, if necessary, to tighten the bottom thread after laying the stitch.
- The “face” of the product is stitched with a slightly weakened top thread.
- A tension stitch is placed on the wrong side.
- Having laid a line from one edge of the base to the other, tighten the rubber thread to the desired limit. The rubberized thread should “walk” freely inside the loops formed by a simple thread.
Zigzag stitch
- Elastic threads are applied to the corresponding lines drawn on the fabric.
- A zigzag seam is laid on top.
- The threads are stretched until the desired degree of fitting is achieved.
Recommendations for performing work
- Before starting work, you can draw a waist circumference on paper, mark on it the centers of the back and front of the product, and then divide the resulting fragments in half, marking the side points. Divide the resulting parts in half several times. A circle with a smaller radius is drawn inside the first circle - this is an elastic band. The outer circle marks are transferred to it.
- Divide the fabric base (to which the rubber belt will be attached) into equal parts by successively folding the fabric at the waist line. Marks are made as the folding fragments decrease.