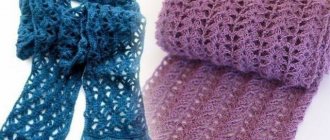
A scarf is an accessory that no person can do without. Even the most inexperienced needlewoman can knit it using any yarn.
There are many types of scarves. This is a simple rectangular scarf, a snood scarf, a collar scarf, and even a so-called transformable scarf, which will be discussed in this article. It was developed by Western fashion designers, and can be used instead of many other things, that is, to diversify and replenish your wardrobe.
Most often , a transformable scarf is a model that transforms into a blouse or jacket with sleeves, or remains an ordinary scarf. Any of these models can be made with your own hands.
Transformable scarf with sleeves
An example of a transformer is a model in which the fabric gradually turns into sleeves. This design allows you to transform, that is, transform the canvas into a variety of forms, and put on the item in different ways.
One option is to cross the fabric on the back, the other on the front of the body. In this case, you will get different types and shapes of blouses.
Any of them goes great with summer items, like shorts and a top, or a beautiful dress. To knit the model you will need a pattern diagram. Knit a transformable scarf with knitting needles in accordance with the pattern and its dimensions, and it will have the correct shape.
If you knit a transformer according to this pattern, using yarn of a different color, you will get this original coffee-colored scarf.
Does anyone like colored transformable striped scarves rather than plain ones? You can use another scarf model and take it as a sample.
This is a stylish, bright and effective transformer, having a canvas with colored stripes of very warm autumn shades. The model is very noble and will be able to satisfy the most sophisticated needs of modern fashionistas.
In this case, the knitting pattern is somewhat different from the one we saw earlier. There is such a detail as the neckline, which is made with an elastic band. You can wear it in different ways, but the scarf always remains expressive and extremely stylish.
LiveInternetLiveInternet
Quote from the message Neskuchnaya_mama
Read in full In your quotation book or community!
Sweater-scarf with sleeves Sciarpone. Knitting. Video master class
Scarf with sleeves. Knitting.
The Italians have developed a new interesting type of clothing - a sweater-scarf with sleeves
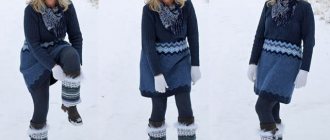
Here are some interesting ideas for scarves with sleeves. Their original shape allows you to transform them into an ordinary scarf, blouse, jacket or original jacket. Several options will show how practical and convenient this model is.
This product is knitted quite simply - like a scarf. You can tie it with an English or fluffy elastic band, and the ends of the sleeves with a simple 1x1 elastic band, this will give the effect of narrowing the ends.
Canvas 70 x 250, sleeve height 40-50 cm. Drapes more freely and fits better... 500 grams of yarn no less. Knitting needles 2-2.5
A snow-white transformable scarf made of fine knitwear is designed for a summer wardrobe. Delicate, raised stripes create a spectacular pattern on a white background. The shape and pattern on the sleeves complements this picture. The scarf fabric turns into sleeves, which allows you to use your imagination and dress it in a variety of ways. With crisscrossing lines on the back or front of the garment, you get different shapes of wonderful jackets. This item will look great with a summer dress or T-shirt and shorts in a variety of colors.
Exactly the same scarf of a beautiful coffee color is a delicate, knitted fabric. Thanks to its plasticity and softness, it creates the perfect silhouette. This wonderful item will be a beautiful addition to your evening dress during formal receptions or visits.
An openwork transformable scarf of pale blue color is knitted in a special shape, which in the best way allows you to create a wonderful, comfortable jacket. The product is a delicate lace fabric with sleeves just at shoulder level. All that remains is to put on the scarf and tie it in front, creating a beautiful drapery. The summer version of the scarf with sleeves can be worn with jeans, classic trousers or loose-fitting, original skirt.
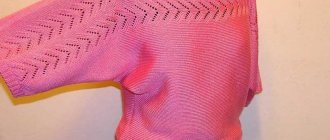
A super fashionable knitted accessory, a scarf with sleeves is knitted in one piece. Universal size. Doing the job does not require any special skill. Any soft yarn is suitable for knitting, for example 100% Baby Alpaca (116 m/50 g). Smaller knitting needles for rib (for example 3.5 mm) and larger needles for the main fabric (for example 5 mm). Moss pattern (odd number of loops). 1st row: *k1, purl 1; repeat from * to the end of the row. 2nd row: knit over the knit stitches - purl and over the purl loops - knit. Repeat row 2. Description of work. Determine the knitting density. Cast on the required number of stitches (for example 40) for the rib on smaller needles. Knit 20 cm with an elastic band, k1, p1. In the last row you need to evenly add an odd number of loops (for example 11). Switch to larger knitting needles and continue knitting in a double-sided moss pattern until the length of the fabric reaches approximately 220 cm from the cast-on. At this stage, you can try the fabric on yourself and determine the desired length. In the last purl row, evenly decrease the previously added loops, switch to smaller needles and knit another 20 cm with an elastic band (see diagram). Perform blocking. Sew the sleeves to the required height.
Site materials used
Transformable scarf with asymmetrical shape
This asymmetrical transformable scarf is made of warm yarn, but knitted with an openwork pattern. This combination makes it unlike other scarf models.
The unusual asymmetrical shape of the transformer, which has one sleeve, as well as a delicate, elegant openwork pattern, looks especially stylish. For needlework you will need 500 grams (g) of warm mixed yarn, as well as knitting needles No. 6. The density of the fabric is 16 loops (P) and 20 rows (R) in a piece of fabric 10x10 centimeters (cm).
We knit an openwork pattern of leaves according to pattern 1, on which only the front rows are present. In the purl rows, knitting is done according to the pattern, and the yarn overs are knitted with purl loops.
We start knitting by casting on 40 loops for the sleeve. We knit 3 rows in garter stitch. This is necessary to complete the plank. After this, we proceed to knitting the pattern according to pattern 1. Having knitted 30 rows after the bar, we will add loops to form sleeve bevels. First, add 1 loop along the edges of the row. Next, in every eighth row we add 1 loop three times, in each 4 R ten times 1 loop, and in every second R we add 8 times 1 P.
Knitted transformable scarf with knitting needles
An interesting transformable scarf with knitting needles with diagrams and descriptions, we suggest knitting for more experienced craftswomen. Here we use the technique of knitting relief and pearl patterns, with additional elements - buttons. Decorative additions will turn the scarf into a fashionable warm vest, which will not only warm you up, but also add originality and style to your outfit.
Size of the finished product: width – 40 cm; length – 150 cm.
Materials:
- Yarn (100% wool, 87m/50g) – 3 skeins;
- Circular knitting needles No. 5.5, length 80 cm;
- Decorative buttons – 2 pcs.
According to the 10x10cm pattern, the density of the product is: 16 loops and 22 rows (for a pearl pattern).
Knitting pattern for “pearl” pattern
Description of the scheme:
The first and second installation rows are knitted with knit stitches on the front side and purl stitches on the wrong side.
All odd rows starting from 1 are knitted like this: P1, K1.
All purl rows starting from 2 are knitted with purl loops.
Knitting pattern for 2x2 elastic
Description of the scheme:
Starting from the first row: K2, P2.
2 r: knit stitches are knitted over the knit stitches, and purl stitches are knitted over the purl stitches.
Thus knit to the desired height.
Relief pattern diagram
Legend
Description of the scheme:
Set row: P2, *K4, P4* - to last 5 stitches, P3, K2, edge, turn.
1 r: edging, slip 2 stitches onto a auxiliary needle, knit the next 2 purls, and knit 2. with aux. knitting needles, knits, * 2 p. remove at work, knit 2, with auxiliary. 2 persons * - repeat until the end of the pattern, that is, until the beginning of the pearl pattern.
Rows 2, 4, 5, 6, 8: knit over knit stitches, purl over purl loops.
Next it is knitted according to the pattern.
Progress:
Cast on the knitting needles the required number of stitches, in our MK it is 115 + 2 chrome.
All edge stitches are knitted at the end of the row and removed onto a working needle at the beginning.
Knit with an elastic band 2x2 - 30 cm, the last row of the elastic should be purl-sided.
Knit 1 row with knit stitches. Turn.
Edge, knit 63 loops with a “pearl” pattern, then switch to a relief pattern and knit it to the last loop, edge. Turn.
Then knit according to the pattern diagrams until the desired length of the product. finish knitting with a 2x2 elastic band. Close the loops.
On the penultimate row of ribbing, form two buttonholes at equal distances.
When finished, sew on the buttons.
Moisten the finished product and dry it flat on a flat surface.
Transformer with a three-dimensional pattern
This transformable scarf has a simple, but at the same time very original design.
The advantage of such a transformer is that the scarf does not require a pattern. The size of the scarf can be varied at your discretion.
As for patterns and ornaments, there are also practically no restrictions. If you took a smooth simple yarn, then it is best to choose a relief and voluminous pattern, which will allow you to create a spectacular and original transformer.
When choosing simple patterns like stockinette stitch or garter stitch, it is better to combine them with interesting yarn, similar in structure to swan or rabbit down. In this case, any canvas looks extremely impressive, rich and unique. This master class shows a model of a transformable scarf knitted with braids and arans. Such wicker reliefs always make an excellent impression, look attractive and very cozy.
The width of such a transformable scarf should be at least 40 cm and the length 150 cm. Having knitted the fabric of the required length, moisten it and carefully lay it on a flat horizontal surface, securing it with special pins. When the product is completely dry, you need to crochet it, using single crochets, in each loop.
Then we sew the scarf fabric from the edges to form the shape of a ring. We fold it into a figure eight and try it on. Let's lower one part of the transformer to the waist, and place the second on the shoulders. In the waist area on the back, where the edges of the figure eight touch, they must be sewn with yarn.
If you decide to knit such a transformer with your own hands, then use the diagram that is present in the lesson.
Simple transformable scarf knitted for beginners
The simplest model of a Japanese scarf does not require any special skills to perform. Here the main role is played by the yarn, which should stretch well, but then return to its original state. In our example, this is “grass”. The yarn is 100% artificial fiber, but it is the polyamide in the composition that makes the thread elastic.
Material:
- Yarn of choice (100m/50g) – 5-6 skeins;
- Circular knitting needles, yarn size, length – 80 cm;
- Hook No. 3.
Progress:
The product will be knitted in the round, using knit stitches only. The length and width are calculated using a knitted pattern of 10x10 cm. To do this, you need to knit the square with facial loops and count how many loops there are per 1 cm. Then calculate the length of the product by multiplication, for example, the required length of the product is 80 cm/40 cm (folded). There are 2 loops in 1 cm, which means you need: 80x2 = 160 loops.
To start working, cast on 161 loops, close the circle and knit only with facial loops. Until you reach the required height. Close the loops using any known method. Break the thread.
To ensure that the product does not stretch too much and retains its shape for a long time, the edges of the accessory must be crocheted. To do this, at the beginning of the row, attach a thread and make 2 air loops. And in each loop of the transverse row, knit a single crochet, at the end, finish the row with a connecting stitch and repeat all the steps again.
Turn the knitting over and tie the second open edge of the accessory in the same way.
Moisten the finished product with steam or a wet towel, lay it out on a flat surface and dry it.
Now the transformer can be used as your imagination or the current situation dictates.
Video: Ways to wear a miracle scarf
We knit a transformable scarf from three parts
The next model of a transformable scarf is made up of three separate parts, which makes it original and unusual.
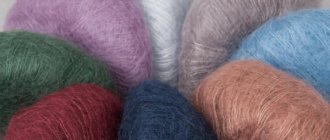
Knit a scarf from mixed yarn (mohair and viscose). You will need 400 grams of gray yarn, and 200 grams of green, as well as knitting needles Nos. 5 and 6.5. The density of the fabric is determined from a standard sample of 10x10 cm, and is 17 loops and 16 rows vertically.
This model is made up of three separate parts, each of which is a wide strip with an openwork pattern. These parts are worn both together and separately from each other.
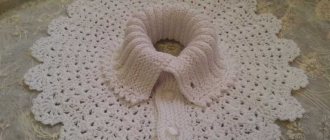
A wide openwork snood collar looks great as a poncho.
The transformable scarf is knitted using a single pattern according to this pattern.
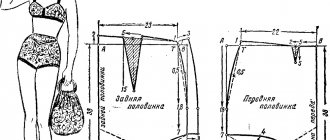
In addition to the diagram, there are patterns with dimensions for each individual part.
- We start by knitting the left component element of gray color. It is performed by vertical knitting, first casting on 47 stitches on knitting needles No. 5 in Italian cast-on.
- Then the knitting needles are changed to No. 6.5, and the pattern is knitted according to the pattern.
- Next, they knit with openwork according to the pattern, up to a height of 120 cm, then all the stitches are closed.
- For the second component of the scarf, cast on 180 P with green threads and knit horizontally with a main relief of 25 cm.
- Then all the Ps of the last P are closed.
- A set of 110 pipe collar loops should be made on knitting needles No. 6.5.
- We knit with the same openwork according to the 50 cm pattern, after which we close the last row.
- To assemble the product, you need to sew the collar and pipe, and also sew the individual parts at the only point indicated on the pattern with a circle.