- 15623
- 13-10-2020
- Author: Mysekret Team
- 0
Crocheted mitts are a beautiful accessory that can be both warm and perform decorative functions, especially when it comes to airy openwork fingerless gloves. Creating them using a crochet hook is quite simple, especially if you choose simple patterns with descriptions for beginners, like those presented below.
These fingerless mittens can be given to girls, boys, women and men - there are a huge variety of styles and models of mittens, and many of them have their own individual charm, which is transmitted to those who wear them. This is why many beginners want to learn how to knit mitts with their own hands, because this way you can please not only yourself with an interesting job, but also those around you with a beautiful and comfortable thing.
Another interesting fact is that mitts are crocheted for all occasions - from everyday casual style to wedding style. There are many options for various schemes. Let’s take a closer look at those that even beginning needlewomen can knit.
Knitting lesson for beginners
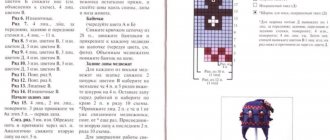
In order to knit mitts, you need to learn all the nuances of knitting. Let's look in more detail at the step-by-step instructions for knitting half gloves with wedges for the thumbs, for knitting which five knitting needles are used.
Before starting work, you need to measure the circumference of your thumbs and palms above the thumb. We calculate the tightness of the knitting and the required number of loops for the initial casting around the forearm.
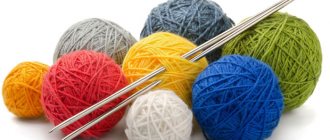
To make the product you need to purchase:
- Yarn
- Set of knitting needles.
Having prepared the necessary material, you should follow these steps:
- Take two knitting needles and fold them together. The required number of loops is cast on them. After casting on the 44th loop, tie the securing “tail” with the main thread in a knot.
- Then knitting occurs in the form of an elastic band, the set is performed in the form of one loop, knit and purl.
- Having cast on eleven loops, take a second knitting needle and cast on the same number of loops in the same way. As a result, after finishing the row, you should end up with four knitting needles. Leave the fifth as a working one.
- We continue knitting according to the elastic pattern until about five centimeters in height. Having knitted five 5 cm, we move on to the main pattern and reduce the number of loops to 40.
- The location of the upper side of the product falls on the first and second knitting needles, the lower side on the third and fourth.
- After we have knitted three rows from the elastic, we proceed to knitting the thumb wedge. For mitts on the left hand, it is done at the end of the fourth knitting needle, on the right hand at the beginning of the third.
- Let's start knitting mitts. Observing the required number of loops.
- For the wedge of the thumbs, we transfer eleven loops to the pins. We cast on six additional loops.
- After you have knitted the required length of the product, knit three rows using the elastic method. After this, the loops should be closed.
- Thumbs are knitted using three needles, the fourth should be a working one. After finishing knitting the thumb, the loops also need to be closed.
In order not to make mistakes and not get confused in the knitting needles and loops, for beginners on the Internet there is a detailed video of knitting mitts, loop calculation schemes and types of patterns.
During the entire process, be sure to try on, this will help you adjust the required number of loops. Using the same principle of action, you can easily knit long mittens.
Half gloves with braids
Braids and plaits look quite interesting. There is nothing difficult about knitting most of them. It is only important to correctly calculate and place the drawing on the canvas. First of all, make basic measurements and find out the number of motif repeats that will be on the thing.
The outer part of the product is usually decorated with braids and plaits, while the inner part is knitted with the front or back stitch. This makes the patterns look more impressive. As a result, it is necessary to calculate only half of the cast-on loops. Experienced needlewomen advise to definitely draw a diagram of the pattern on paper. This will make the job easier.
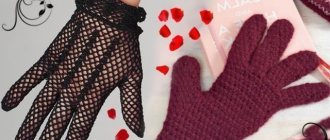
Crochet mitts
You can knit mitts not only with knitting needles, but also with crochet. Many people have a question: how to crochet mitt gloves? To do this you need:
- Yarn
- A hook that matches the thickness of the threads.
When making half gloves using a hook, you should perform the following steps:
- Calculate the arm circumference and length of the product
- We cast on a row of thirty chain stitches. The set should not be done tightly
- We crochet rows of single crochets of the required height
- After knitting the required number of rows, you need to fold the product in half and sew. We sew using a chain stitch, not forgetting to leave a wedge for the finger
- We move on to knitting the finger and fasten it at the end.
Video for beginner needlewomen
It is difficult for beginners in any business to navigate work recommendations the first time, since they cannot know some details due to inexperience. This also applies to crocheting. In this case, practical video lessons with master classes for beginners help you work faster and better.
Video “how to crochet beautiful mittens”:
Share with your friends!
- 13
- 5
- 4
- 22
Shared
Subscribe to our Yandex.Zen channel or Yandex.Messenger
Variety of patterns and types of mitts
There are these types of knitting patterns:
- Stocking
- Shawl pattern made of thick threads
- Narrow diamond pattern
- Rubber
- Cartridge type of knitting
- Honeycomb
- Shell
- Openwork type of knitting
Types of half gloves:
- "Pipes"
- Fingerless gloves
Gloves with thumb wedge
All types of patterns have their own knitting principle, execution technique and more suitable type of yarn.
If you follow the technique, you can easily knit fashionable and practical gloves. Knitted or crocheted mitts will become an indispensable accessory in your wardrobe, which will suit any style of clothing and will warm your hands in cold weather.
Do you need an elastic band and how to knit it?
The elastic band will allow the mitt to fit more tightly to the hand and, thanks to stretching, it will be easier to remove and put on.
We will show you the types of rubber bands:
Learn more about each type, choose which one you like best.
English gum:
There are various options for knitting elastic, let's look at the simplest one.
It fits like this:
- We take measurements and cast on the 1st loop, as well as a number of chain loops equal to the desired width of the elastic band.
- Knitting all elastic loops with single crochets over the front half of the loop. So we knit in one direction until the end of the row and turn and knit in the second.
- We repeat until the elastic band reaches the desired length, equal to the circumference of the arm, and try to make sure that the entire arm fits into the resulting ring before sewing.
- If your hand does not fit through, tie it enough so that your entire hand, including your thumb, fits through. If you knit tightly, the elastic will not stretch well, but the mitts will be warmer; if you knit loosely, the elastic will be looser and will stretch easily.
- Upon reaching the end of the row of the required length, fold the beginning and end and knit with connecting stitches or single crochets in 2 loops through 2 parts.
- For beginners, as noted above, it is recommended to knit in stitches with 1 double crochet in 1 pass, knitting all the loops on the hook; it is also called a strong stitch.
- We knit in the round until the length of the mitt reaches the base of the thumb.
- Place the mitt on the model or look at the measurements, making sure that the seam is at the bottom and on the inside of the elastic stitching.
- Mark the cut location for the thumb, calculate how many loops need to be left for it, and also keep in mind that the finger is voluminous.
- To do this, having reached the place where the finger begins, we cast on the required number of air loops to close the ring, the volume should be equal to the size of the hand without the thumb; we measured this measurement at the beginning of work, or try it on the model and knit according to it.
- On the sample, when knitting with single crochets, 10 air loops are knitted.
- We knit in the round without increasing to the place where the fingers begin at the hand, only around the fingers without the thumb.
- Having knitted to the beginning of the fingers, we can finish knitting - this is for beginners, for advanced ones, if desired, you can knit ½ or ⅓ fingers.
- After finishing knitting the middle part, cut off the thread and knit it, pull the thread and finish the knitting, hide the thread inside the knitting.
The mitts are ready.
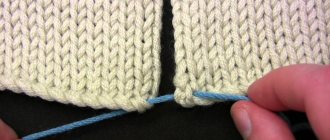
Important: when combining, make sure that the loops “go” loop to loop and there is no displacement. We knit the mitts themselves, then in the circle, with single crochets - it’s like in the photo, in the video format, knitting with single crochets.
Photo instructions on how to knit mitts
NOTE!
- History of women's dresses.
- Lego constructors. Story.
- What should you pay attention to when choosing a toy for your child?
NOTE!
- Glass beads.
How to crochet a flower to decorate clothes: diagrams with explanations and photo ideas of flowers for clothes (80+ photos)
The best options for DIY knitted hats: step-by-step instructions and tips