Nuances of patchwork technique
The term “patchwork” is of English origin: “patch” means patch, “work” means work. This type of creativity involves making objects from colored pieces of textiles.
The most striking example is a patchwork quilt. Made by hand, it can be decorated with different patterned ornaments or depict any specific things - it all depends on the imagination of the needlewoman.
Nowadays, patchwork has become a separate stylistic trend, which is often used in design projects. Experienced craftsmen have become adept at creating real works of art from scraps.
Looking at the photo of the quilt, you can see that it can fit into more than just a country style setting. It will also be appropriate in loft and hi-tech styles.
The undeniable advantage of all products made using the patchwork technique is that they are accessible to the population. In the case of independent creation, it is worth noting the simplicity and ease of finding the materials needed for this type of needlework.
How to sew a patchwork bedspread
A small master class on how to make quick squares from fabric.
Just four steps:
- Take two different pieces of fabric and cut two equal strips from them;
- Fold them with the wrong side and sew, secure the sewing by carefully smoothing the seam;
- Now measure the width of the resulting product, and from the third piece of fabric, cut out the same strip (of the same width);
- You need to fold it with the resulting part right side out, and make seams on both sides.
As a result, you should end up with a kind of double-sided sleeve. Place this canvas on the table and cut out squares from it using a template or a special ruler.
In order to cut the squares correctly, it is important to use a template or ruler
It’s difficult to come up with a simpler scheme than this; any beginner will repeat this master class. This will be followed by the stage of connecting the squares. From the details you can get whatever patterns you want - simple geometric, fantasy, snakes, and mosaics. For the first time, you can lay out a simple ornament to make it easier to handle and you won’t get confused about what you are going to sew.
When you have decided on the pattern, the squares can be sewn together. First comes the sewing of the longitudinal stripes, after which you must iron the seams. Then we sew the resulting strips into one fabric. And again the next stage is careful ironing. After this, you will see that the front side is finished.
How to assemble a block from scraps (video)
Patchwork quilt options
The sequence of actions when sewing a product in patchwork depends on which method of execution is chosen for it. The manufacturing technology determines the immediate design of the patchwork quilt.
The following techniques are distinguished:
- traditional;
- watercolor;
- crazy patchwork;
- knitted;
- Japanese;
- well;
- chessboard;
- Russian square.
True masters do not limit themselves to the techniques listed above and invent their own. Any order of combining pieces of fabric is appropriate. There are no strict rules and regulations for this direction of creativity.
Working technology step by step
The main stages of making patchwork bedspreads with your own hands:
- drawing a sketch;
- choice of material;
- stitching flaps;
- formation of the finished product;
- Drawing a sketch.
The most important part of the process, because the appearance of the product depends on it. You can draw a sketch on paper, take it from the Internet, or lay it out on the floor from fragments, following the patchwork style. Many ideas on how to sew a bedspread are available in master classes, which greatly simplifies the creation process.
Material selection
Choosing fabrics to match is not easy, but it is very important. The appearance of the bedspread depends on this. In this matter, it is worth relying on the taste preferences of the craftswoman. For two-color products, the only choice rule is dark and light colors. With multi-colored bedspreads the situation is more complicated. Colored fragments should be sewn not in disorderly chaos, but by laying out a pattern, based on existing patchwork patterns.
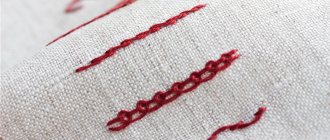
Technique of stitching flaps
The sequence of actions when stitching fragments is as follows:
- You need to cut two equal strips from textiles of different colors.
- They are folded inside out to each other, stitched, and ironed.
- Now from the textile of the third shade you need to cut a strip equal in width to the first two.
- The third and first two are folded right sides together and stitched.
This technology allows you to make a double-sided sleeve, from which squares are then cut. Next, you need to decide on the pattern, and then you can start connecting.
Fragments of a certain shape are sewn together in pairs if the pattern is complex. Then you should connect 4, 8, and so on until the composition is complete. If the bedspread is made of squares, the joining technology is slightly different. Square blanks are sewn into strips, and after carefully ironing the seams, they are assembled into a finished patchwork product.
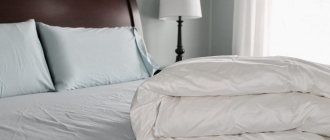
Formation of the finished product
When the front part is ready, you should start sewing the back side. To do this, a piece of selected fabric is laid out on any flat surface, face down. If the bedspread is insulated, then a layer of synthetic padding should be placed on the reverse side.
The front side with a patchwork pattern is placed on top, and the product is stitched around the perimeter. The edging is made from a strip of fabric approximately 8 cm long, sewn along the edge. If the edging according to the sketch is wide, then more fabric is needed to make it.
For different styles
Those who think that the use of patchwork items is only permissible in simple designs, for example, in Provence, are wrong. Such textile details can be integrated into such complex modern trends as loft, country, art deco, as well as ethnic and marine styles. Patchwork accessories in any interior will become an element that brings coziness and comfort.
Types of fabrics
Patchwork does not impose any requirements on the choice of fabrics. A blanket can combine fabrics of different textures. However, not every material is flexible to use.
Note!
Duvet: TOP-170 photos + video reviews of duvets. Advantages and disadvantages of filler, choice of cover and quiltingBed linen for newborns: requirements for bedding for a newborn. Variety of sizes, materials and patterns of children's underwear (photo + video)
Double bed linen: TOP-170 photo reviews of new designs, choice of size, color and material
Chintz is considered the ideal option. You can also sew a blanket in patchwork:
- From jeans.
- Made from knitwear.
- Made of silk, staple, organza.
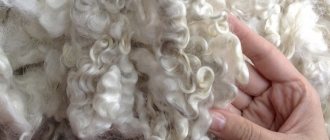
- Made from wool.
- From drape.
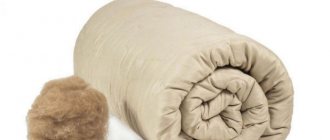
Fillers, insulation
Products made using the patchwork technique come in two types: thin and insulated. There is nothing complicated in creating warm models - just select and sew insulation between the front and bottom parts of the future blanket.
The most popular heating materials are:
- foam;
- padding polyester;
- batting;
- holofiber.
In some situations, the choice of filler depends on the external material. Thus, thin and difficult-to-care fabrics like silk require the use of only foam rubber or batting, since only such padding can give the desired shape to the blanket.
What is needed to create a patchwork bedspread
Quilters who do not yet have enough experience with patchwork can safely take on the task of creating such a home decor item with full confidence that they will be able to do it.
The only skill requirement is the ability to use a sewing machine. Therefore, even an ordinary seamstress who is not going to delve into the secrets of handmade can sew several scraps together. Read about slimes here.
To create a patchwork bedspread with your own hands you will need:
- Fabrics. Since the bedspread will be created using the patchwork technique, flaps are the most necessary material. For a blanket of a standard format - 1.5 by 2.3 meters - you will need square flaps of 23 cm on each side. The appropriate size, like the future bedspread, you need to take the linen, it will become the back of the blanket, and you should also prepare a synthetic padding lining with sides 1.3 meters by 2.1.
- Threads must be selected in accordance with the tone of the backing fabric and the color of the patches that are most often found in the bedspread. Thus, two types of thread will be enough.
- Sewing machine with needles and pins.
- Tailor's scissors.
- Fabric knife.
How to choose flaps
One of the most difficult and important tasks in creating a quilt is choosing the right colors for the patches. It is necessary that they match in tones. All this depends on the taste of the craftswoman. You can create a bedspread from two types of scraps, but it is more interesting from a larger number of colors. This is where you need to be very careful.
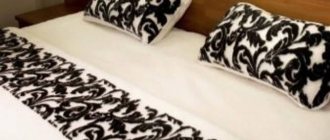
Patchwork bedspread in two shades
It is advisable to choose plain fabrics for flaps. It is best to combine 30 pieces of pastel color and the same amount of dark color. If the choice is still on fabrics with a print, then it is better that it is quite small and only on light-colored fabrics.
If you don't have a clear idea yet, use the following color combinations for your work: lemon-caramel blanket, pink (milky) and burgundy, ivory patches can be combined with dark chocolate. The texture of the canvas is chosen entirely to the taste of the master, the main thing is that all the flaps are the same in density and thickness.
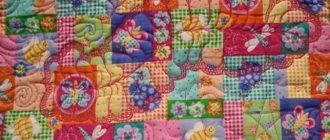
Multicolored patchwork bedspread
For a multi-colored creation, you should select several shades of fabrics, without neglecting, however, the advice of experienced craftswomen: do not use more than seven different types of rags. At the same time, only one color of the shreds can be the main one, the rest should be much smaller in number.
Applicable to the above bedspread format, 25 of the 60 patches must be one dominant color. The remaining colors should be divided between the remaining 35 patches, and they will not necessarily be in the same quantity, it all depends on the desired pattern as a result.
The easiest way to select shades that suit the leader is by selecting additional colors to the main one.
Dimensions
When choosing the size of a blanket, you should be guided by the dimensions of the sleeping place, your own parameters, the degree of your activity at night and individual wishes.
Note!
Pillow for pregnant women - TOP 160 photos + video reviews of pillow designs for pregnant women. Properties and purpose of the pillow. Types of fillers and covers- Sofa decks: TOP-130 photos and videos of sofa deck design options for a sofa and armchair. Features of application, choice of color and material of manufacture
Envelope blanket - TOP 150 photos + video reviews of baby envelope blanket designs. Types of safe fabric materials, colors and prints of blankets
The standard length for a product for a single bed is 180-190 cm, maximum width 130 cm. For a one-and-a-half blanket, the parameters are as follows: length - 190-200 cm, width can vary from 140 to 180 cm. Double beds require more massive blankets, the length of which can exceed 200 cm, and the width can reach 4 m.
Tips for a beginner on where to start sewing using the patchwork technique
Simple tips to make it easier for beginners to sew patchwork bedspreads with their own hands:
- determine the exact size - a lot depends on this parameter;
- choose a color - the organic nature of the entire product depends on their compatibility;
- prepare the fabric - soak for 10 minutes in hot water;
- To make working with textiles easier, it is recommended to starch and iron it;
- cut into fragments of the required size, leaving allowances;
- prepare the backing textile.
Prepare your tools:
- needle and thread;
- scissors;
- pins;
- sample;
- pencil;
- sewing machine
Colors and prints
The most popular pattern for things sewn using patchwork technology is geometric. A patchwork quilt can be made according to one of two schemes:
- From squares.
- From triangles.
In addition, it is allowed to create entire appliqué compositions from fabric. The subject can be any - plants, animals, characters from books and films. An interesting idea is a blanket made in the form of a mosaic or collage with photographs.
Sew a patchwork bedspread: the final part
The front side is not the whole product. Next, you must sew the front part to the back with your own hands. Chintz is an excellent backing fabric. Batiste can also be made inside out.
Related article: Popular Eurocube sizes and other characteristics
Next, adhere to the following work scheme:
- Place the piece of fabric for the backing face down on the table;
- Place padding polyester on top of the backing fabric if your bedspread has the function of a blanket (otherwise padding polyester is not needed);
- The next layer is the front side, that same patchwork of squares;
- Either baste it yourself, or you just need to pin the entire product together and quilt it on a sewing machine.
In order for the bedspread to have a shape, it is necessary to use a sealing material in the form of padding polyester.
How to quilt an item correctly? The easiest way to do this is along the borders of the squares, but if you envision some kind of pattern, you can quilt along the pattern. True, for beginners this is a rather difficult task (a separate master class on stitching will help you in this case).
The last stage is edging. This is easy to do: take a strip of fabric approximately 8 cm wide, and the length should be slightly longer than one side of the product. The fabric needs to be folded in half, applied to the front side of the item and sewn. Fold the excess edges of the edging to the wrong side of the item, fold the edging onto the wrong side of the product and stitch from the front side. The line will go across the canvas. The other sides of the item are edged in the same way.
Having comprehended the basic basics of this skill, you can move on to more complex ornaments.
This is the simplest master class; such a product doesn’t really need diagrams. The main thing is not to overdo it with the patchwork pattern.
This blanket can be used to decorate a bed, sofa, and sometimes it is also used as a tablecloth. Well, what if you decide to make a patchwork product for a children's bed? Maybe this is where you should take your first step in patchwork?
Children's models
The principle of creating a blanket from scraps for a child is the same as for an adult. The key difference will be the size. The maximum length of a standard children's model is 140 cm, and the maximum width is 100 cm. Fabric requirements:
- comfortable to the touch;
- safety and environmental friendliness;
- high quality;
- softness;
- brightness of color.
Patchwork: DIY baby blanket
To decorate a baby’s bed using patchwork technology, you need to prepare almost the same as for the previous work.
Related article: Plastic door device: characteristics
Fairy-tale colors are the main distinguishing feature of children's interior items
You will need:
- Fabric (4 types);
- Fleece;
- Sewing machine;
- Needles;
- Threads;
- Scissors;
- Ruler or templates.
You can sew a baby blanket from 48 squares. The side of one square is 8 cm. Don’t complicate your debut work, a patchwork quilt of 48 squares is easy to sew, and most importantly, everything will be clear, it’s difficult to get lost.
A colorful patchwork bedspread can become a bright piece of furniture in a child's room.
Then everything is simple:
- The resulting squares must be slowly sewn together and ironed very well;
- Place the patchwork fabric on fleece, it will be the wrong side of the product;
- Cut off all excess and round the corners;
- Sew both fabrics along the edges, the indentation is 1 cm.
That's all, a cute DIY patchwork bedspread is ready! It will decorate a child's bed and will look great as a cover while walking in a stroller. You can sew it in literally a week, just don’t rush the sewing - all the squares should be even. Patchwork sewing cannot be rushed.
How to have a quilt
A patchwork blanket can be purchased in a store or ordered online. Another solution may be to make it yourself.
Note!
Children's blanket: criteria for choosing a blanket for children. A variety of sizes, materials and patterns of children's blankets. Rules for caring for a child’s blanket (photo + video)Bedspread for a sofa: TOP-140 photos and videos of design options for a bedspread for a sofa. Features of the use of the bedspread, choice of color and material
Wool blanket: options for using wool blankets. Advantages and disadvantages of wool, varieties of sizes and shapes of blankets (photo + video)
Today on sale you can find ready-made kits for working with patchwork techniques, including templates and other necessary items.
DIY patchwork blanket sewing instructions
First prepare the material. For blocks, you can use leftover fabrics or buy ready-made scraps for patchwork. It is desirable that the pieces are made of the same material, then it will be easier to work with them.
Necessary materials:
- cotton fabric for the base;
- padding polyester;
- scraps of fabric;
- scissors;
- pins;
- threads of different sizes;
- iron;
- needles;
- sewing machine;
- soap.
The simplest option made from squares of fabric, which is convenient to start mastering the technique with.
For beginners, a bedspread made from square pieces of fabric is suitable. The larger the parts, the easier it is to assemble the blanket. First you need to make a drawing of the product on a checkered sheet, choose colors and their combinations.
Step-by-step description of production:
- Iron all fabric used. Using a bar of soap, draw into squares 20 by 20 cm with an indentation of 1 cm. Cut the parts.
- Arrange the flaps the way they will look on the finished product.
- Sew horizontal rows. To do this, you need to put the squares on top of each other with the right sides inward and stitch them. Sew the remaining parts in the same way to create a line.
- Make strips like these from the remaining rows. Press all seams well.
- Sew the finished rows horizontally to create a single piece of fabric. It is important to align all the seams with each other.
- Sew the front part together with the lining, connecting them with the wrong side out. Leave a small hole.
Related Posts
Crafts from vegetables and fruits using carving technique for beginners
- Turn the blanket inside out and sew up the hole by hand.
Triangle option
This quilt will require pieces in the shape of right triangles. Two such elements form a square. Otherwise, the manufacturing technique is similar to that described.
Round patch quilt
The circle blanket takes more time. Each detail is worked out and stuffed separately. Using round parts you can create simple patterns.
Step-by-step description of production:
- From two flaps, cut out two circles of different colors of the same diameter. The size can be any.
- Sew the circles together from the inside out, leaving a small space for turning them inside out.
- Turn the element right side out and stuff with padding polyester.
- Draw and cut out a stencil of an equilateral triangle from thick cardboard. Place on the piece and trace with a bar of soap.
- Sew a few dozen more of these elements. Attach two adjacent ones and sew along the marked line on the front side, as shown in the picture.
- Similarly, fasten the remaining parts until you get a blanket of the desired size.
Block blanket
A variety of patterns are made from multi-colored strips. Separate blocks are used for this. The work is painstaking, you need to clearly measure and carefully iron each seam. Often blocks are made according to special patterns.
A selection of simple block diagrams
Multi-colored patches are placed on top of each other and stitched together to create an interesting pattern. In the diagrams, colors are indicated in different shades. The seams are shown with dotted lines. The simplest blocks consist of geometric shapes.
Step-by-step instructions for beginners on how to sew a patchwork block
The simplest block consists of strips of fabric. The parts must be of different colors and widths.
- Sew 4-6 long strips of fabric together to make one wide strip. Iron seam allowances to one side.
- Measure the width of the strip. Cut it into squares, indent the measured distance.
- Square blocks can be combined into any pattern. To avoid confusion, you should first draw a sketch on paper.
- The resulting squares can also be cut into triangles to create more complex patterns.
- All blocks are stitched together using the methods already described.
Manufacturing instructions
There is nothing complicated in creating such a product. Here are instructions on how to sew a patchwork quilt with your own hands:
- Draw a sketch of the future thing.
- Guided by it, cut out elements of the chosen shape from the fabric.
- Assemble the front part of the blanket by sewing the fabric parts together.
- Make the lower part of the product in the same way.
- Finish the edges of the blanket components. Sew them together, adding insulation.
- Quilt the finished item.
A patchwork quilt will be a bright accent in any interior. For greater effect, it can be combined with pillows made using the same technique.
DIY patchwork bedspread
Review more than one master class to decide not only what your product will look like (you can also see this in the photo gallery), but whether you, as a beginner, can handle all this technology. A detailed master class, of course, simplifies the work, but do not take on a difficult task right away. The first sewing should be a pleasure, but wading through the jungle of unfamiliar techniques can discourage you from further trying your hand at patchwork.
Any high-quality handicraft not only decorates the room, but also brings an atmosphere of comfort, warmth and natural brightness to the interior
Where does tailoring begin? Follow the instructions:
- Determine the size of the bedspread;
- Choose a color scheme that will match the interior style of the room where the product is intended;
- Prepare the fabric: strips, pieces, shreds, squares;
- Prepare the fabric that will become the wrong side of the product;
- The tools you will need are: scissors, needles/pins, thread, sewing machine, pencil and square ruler (but you can also use a square template).
Let's say you are making a product out of squares. Why from squares? This will definitely be easier for a beginner to do - for beginners, cutting different shapes with their own hands and then connecting them in a pattern is a real challenge.
You can choose any pattern for the bedspread that you can
Related article: Design of a staircase in the interior of a private house - a beautiful rise to the second floor or attic
Of course, if there is a photo or video of a master class, view it in detail. But even if you only have diagrams in front of you, you can start sewing with them.
An important point: before you start preparing squares, the fabric should be prepared for work. Just soak it for ten minutes in hot water, and then just rinse it in clean warm water.
If we are to be completely consistent, it would be nice to show real class and starch the fabric. It’s worth doing this - it will be easier to work with the material. And, of course, iron the fabric thoroughly.