The first frosts are coming and the cold season is approaching. Winter will last for several months, and the sun will no longer delight you with its warmth, and snowstorms and frost will become faithful companions for the near future. The human body is designed in such a way that the skin fulfills its natural protective function - retaining heat and protecting vital organs from hypothermia.
Hands are the part of the body that is subject to cooling faster than others, giving off its heat to the external environment. If your hands are warm, then the feeling of comfort will be constant and you can easily enjoy a winter walk. But as soon as you leave them unprotected, they will very soon begin to turn red and go numb, tingling the skin unpleasantly. A pair of gloves or fleece mittens that are easy to take with you will help keep your hands warm - they won't take up much space, but will keep you warm in any weather.
The amazing properties of fleece
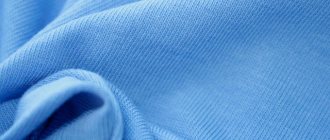
Fleece is a general term for various synthetic fibers that has a brushed surface on the fabric. This effect is obtained by adding free fibers to the knitted fabric, which are bonded together by exposure to high temperature or chemical reagents. The best known method is the use of polyester fiber, but other fibers are also commonly used - wool, cotton, acrylic or viscose. Fleece is very lightweight compared to the thickness of the fabric, retains heat well and dries quickly, does not shrink or wrinkle.
In recent years, fleece has become very popular and is used to make sportswear, children's or casual clothing. A characteristic feature of fleece fabrics is their ability to resist moisture absorption, as they remain warm and dry for a long time. Products made from it are ideal for traveling and many people prefer to take them on the road rather than heavy ones made from wool.
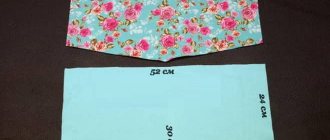
Pattern for mittens
How to sew mittens from fleece? The pattern will help you make cute mittens that are ideal for everyday use - they are not bulky and are easy to put in your purse or pocket. If necessary, they will reliably protect your hands from wind and low temperatures, maintaining their water-repellent properties for a long time, and dry quickly.
These properties will help your hands stay dry and warm for a long time, even during rain or snow. To enhance the warming effect, sew fleece mittens with your own hands. They will be much warmer than gloves since the fingers are not isolated from each other and this will help overall heat transfer. You can make them two-layer - the lining for fleece mittens can be very diverse; here they use a knitted base or make internal parts from fleece to enhance the insulating effect.
Made from fleece mittens, the pattern of which does not take much time, can be decorated with embroidery or beads, appliqué, and the work itself will bring real pleasure. These mittens will be an excellent solution for children who love to frolic in the snow and often do not notice that the mittens get wet and their fingers begin to freeze.
They can withstand washing well and dry quickly - this will allow your child to look clean and tidy every day and keep his hands safe.
Sewing children's products is always a joyful activity that you do with love, wanting to create clothes that are not only beautiful, but also practical. For making mittens, children's hands are so tender, fleece is ideal - it does not require additional processing of the cuts, its edges do not fray or fray. This quality is very useful, because children's fingers are very tiny, and the baby should be comfortable and safe. Cutting them will take no more than 30 minutes, but they will become a very important and functional item in your little one’s wardrobe.
The shape, type and method of processing parts can be very diverse - this allows you to choose the model that you like best.
Sewing potholders using patchwork technique
Housewives often sew oven mitts from everything they have at home. Working in the patchwork style not only saves money from store-bought options, but is also a very beautiful attribute for a housewife. In order to make such a product you need:
- Prepare scraps of various fabrics and cut them into squares, join them together on a machine;
- Cut pieces of fabric into arbitrary shapes: birds, hearts, etc.;
- Prepare the base of the potholder and attach decorative elements to it;
You might be interested in this: Patterns and instructions for sewing an A-line skirt
Important! For potholders, it is better to use different classes of fabric with different shades and designs.
Patchwork potholders
Mittens for babies
Before starting work, you need to make a template of a child’s hand - this can be done by placing your palm on a sheet of thick paper or cardboard.
You should not make the pattern too wide or narrow, as the mittens will either fit loosely on the hand or squeeze it too much. In this case, the girth in the area of the hand can be free and slightly elongated - this will allow you to hem the bottom and insert an elastic band for better fixation of the fleece mitten.
The pattern is made as follows: take a piece of fabric and fold it in half, transfer the mitten template along the contour lines, leaving a small distance for the side cuts. To do this, you can use soap if the fabric is dark, or a special marker that will disappear after washing.
Machine stitch along the contours of the parts, making sure to secure the stitching in the cuff to avoid tearing of the stitching and delamination of the parts in the future.
Hedgehog mittens
The pattern of fleece mittens for decorative accessories is done in a similar way. It’s just that in addition to the main details, elements such as ears, paws, tail or mane are thought out. To make cute hedgehog mittens, you will need two colors of fabric, eyes (two pairs) and some black material for the nose. When cutting out the base, do not round the section for four fingers, but make it slightly pointed. This shape will imitate the face of an animal.
After this, cut several little voices that will serve as needles. They are sewn onto a mitten that has not yet been sewn. The eyes will complement the hedgehog's face. Today, hardware stores offer a large selection of eyes for toys. If you can’t find anything like this, then use regular beads or buttons. The nose is made from a black circle. It is sewn onto the sharp tip of the product.
This cute hedgehog will delight any child. This way you can make different animals. It all depends on the preferences of the children and your imagination.
Mittens for babies with elastic
Let's look at how to sew mittens from fleece step by step. The pattern of the mitten part, if it is made with an elastic band, is laid out on the table, wrong side up. Place the elastic band at a distance of 1.2-1.5 cm from the edge of the mitten. Turn the flap inward and cover the elastic.
Sew along the folded edge, making sure not to catch the elastic. When the stitching on the first mitten is almost finished, take the second half and fold the bottom edge along the elastic in the same way as you did with the first part of the pattern. It is necessary to sew the elastic into both parts of the mitten, without tearing the thread - in one continuous line.
Place the resulting pieces together, right sides inward. Gather the fabric and stretch the elastic to achieve the desired stretch result.
Now machine stitch along the entire perimeter of the mitten, and make a tack at the junction of the parts and the elastic. When you reach the end of the stitch, almost to the opposite wrist, pull the fabric back to finish the seam. In this place it is necessary to tension the fabric so that the seam is not very rough. Trim the threads and excess ends of the elastic.
Sewing is finished. Turn the pieces right side out. The product turned out great, and you can get ready for a walk, you just need to put on mittens. Children's fun is now not scary.
How to sew mittens with your own hands
To sew mittens we will need:
- the main fabric is 35 cm by 35 cm, it can be velvet, or soft coat or suit fabrics, you can try sewing it from fleece footer, the main thing is that the material is plastic and warms well;
- dublerin 35 cm on a knitted base and the same amount of fleece for the lining so that our mittens are warm;
- matching thread, one spool;
- elastic band, 10-15 cm with a width of 1.5 cm;
- sewing machine;
- tailor's scissors, pins for chopping, needle for handwork and pattern;
- you can use the pattern.
Before cutting, it is important to decant all materials so that the finished mittens do not decrease in size after washing. Follow the recommendations for caring for your material; velvet, for example, should be ironed very carefully.
Now the important point. Dublerin is needed only to strengthen soft synthetic velvet on a knitted basis or for similar ones. If you sew from a denser material, you can skip the duplication step. The pattern is designed for hand size 17.5, this is the distance from the base of the palm to the tip of the middle finger. If your size is larger, for example 18.5, lengthen the pattern by 1.5 cm plus 0.5 cm increase for freedom and lining. The lining details are indicated by a dotted line; they are 0.5 cm narrower than the main parts.
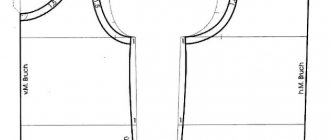
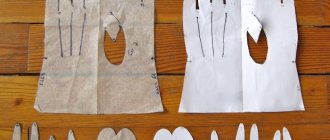
Before us are three details of the pattern:
- The outer side of the mitten - you need two parts for the right and left hands.
- Inner, where the part for the finger is sewn, two parts are needed
- And the part of the finger with a bend, also two parts.
If you are working with a material that has a pile direction, be sure to mark the direction of the pile on the wrong side with an arrow, it will help us correctly position the pattern pieces. They also indicate the direction of the pile with an arrow. Fold the piece of fabric along the edge with the right sides facing inward. We lay out the parts, taking into account the direction of the pile. We fix the pattern with pins, outline the contour with chalk and set aside seam allowances, 1 cm will be enough. If you are not sure about the size, add 2 cm. Due to the allowances, you can expand or lengthen the parts. The same parts need to be cut out from the lining fabric.
First, following the markings, sew the elastic band to the inside of the mitten using a zigzag stitch.
We fold the finger part with the front side inward, pin it together, and secure it with a running stitch.
If you want to make sure whether this size is right for you, it is better to first sweep away all the parts, try on the mitten, and then sew the machine stitches. We connect the parts with machine stitching. We remove the running stitches and cut the allowances to 3 mm. The seam needs to be ironed.
I pin the finger piece to the hole for stitching, placing the pieces right sides together. I sweep it, grind it on a typewriter. I also cut off the seam allowances, leaving 3mm.
The stitching seam also needs to be ironed.
Now we fold the two main parts of the mitten with the right sides facing inward. I pin and sweep along the contour, leaving the bottom unsewn. We connect them using a sewing machine, not forgetting to put fasteners at the beginning and end. We cut off the allowances and iron the seam. We turn the mitten right side out, straighten the finger, and carefully iron the finger along the contour.
While the lining has not yet been sewn on, you can decorate the mitten with beads or appliqué.
Let's do the same with the lining, but leave the hole on the side unsewn, through which we will turn the finished mittens inside out.
Let's connect the main part with the lining. Place the right sides inward, aligning the bottom cuts, secure with pins, and sew a seam stitch on a sewing machine. By removing running stitches and pins, the allowances do not need to be shortened. We turn the mitten through the hole, tuck in the lining and try it on. If the mitten fits well on your hand, fasten the lining and base together using hand stitches along the seam allowances and sew up the opening to turn it inside out. Let's sew the second mitten by analogy and our wonderful pair of mittens is ready.
- More useful information in our online sewing courses.
- More patterns can be found here.
Recommendations for making patterns
When the child is already an adult and very active, the mittens are made according to a different pattern. Fleece mittens, the pattern of which gives the thumb unlimited freedom to play, are cut out of several parts. Use the template provided. The parts are cut out after making all the necessary changes. To do this, you need to correctly determine the size of your child's palm. Take note of a few recommendations:
- 1. When making a template, add 1.0 cm to the pattern for a loose fit - this will allow you to connect the side sections without damaging the model.
- 2. The connection of the palm parts for processing the thumb sections is performed with a seam allowance of 0.7 cm.
- 3. If the mittens are double, then the fleece mitten lining should be slightly smaller than the upper parts - this will ensure freedom of movement.
- 4. In the area of the hand, the girth can be made longer - this will avoid exposing the area of skin between the coat sleeve and the mitten, especially when playing with snow.
- 5. Details can also be made with a decorative lapel, like cuffs. In this case, the inner part is cut out a little longer, so that when turned up, the lower (inner) part overlaps the upper one.
Fleece mittens for teenagers
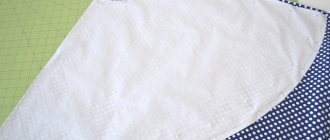
Before you start cutting fleece, cut out the parts of the mitten on a piece of waste fabric. Try it on, make adjustments, and if necessary, make adjustments to the existing template. After all the corrections, transfer the template to a piece of prepared fleece, trace the contours, and make patterns for the parts.
At the first stage of work, sew two parts of the palm. The stitch should be made around the thumb, continued along the seam crossing the palm, and secured.
Place the top and bottom pieces together, align the side edges, and sew.
Repeat connecting the parts for the outer parts of the mittens.
Connect the resulting mittens along the bottom line, as shown in the picture.
Leave a small gap in the seam so you can turn it right side out. Machine stitch along the bottom of the mitten, at a distance of 1.8-2.0 cm from the bottom edge - this will allow you to fix the two parts together. Turn the mitten halves right side out. Close the remaining cut with a needle using small stitches.
Mittens: selection of material and preparation for work
How to sew mittens with your own hands? Even sewing beginners can do this job!
If you or your children sometimes spend time in a cold room or, for example, in a car, you can sew warm and cozy mittens only from fleece: double-sided or with a thinner lining.
If you want to sew mittens for severe frosts, you can additionally insert a layer of thin modern insulation, such as Thinsulate.
So, let's sew mittens with our own hands!
Constructing a pattern
Take a sheet of any paper and a pencil. Place your hand on the sheet with your thumb slightly tucked into your palm. The remaining fingers should lie freely. Trace the palm, leaving an allowance of about 5-8 mm. Mark the top and bottom of the thumb, as well as the bottom border of the mitten.
Draw a loose shape for the mitten, the width of the bottom edge should be equal to the width at the level of the thumb. From the top point of the thumb to the bottom, draw an oval, divide it in half and draw a horizontal line until it intersects with the edge of the mitten. Apply your hand again - the horizontal line should start from the bottom edge of the thumb on the inside.
Separately retake the general outline of the mitten, cut out one part from the first pattern and draw a third part, as shown in the diagram.
Uncover
Cut two pieces A, B and C from fabric for the outer side and two pieces A, B and C from fabric for the lining.
If the lining fabric is voluminous, for example thick fleece, cut the parts from the facing fabric larger by 2-3 mm along all contours.
The allowance along all edges is 1 cm.
Progress
Prepare tools and materials:
- Outer fabric and inner fabric parts
- Elastic band, threads
Fold parts B and C in pairs with the right sides inward, matching the contour of the thumb. Sew the horizontal seam and the outline of the thumb. Finish the stitching at the level of the horizontal seam.
Trim the seam allowances with zigzag scissors or notch the seam allowance in the rounded areas. Press the horizontal seam to the sides. Place the stitched parts and parts A with the right sides facing inward. Place your “thumb” down and stitch from the place where the thumb stitch ended, all the way down to the bottom of the mitten.
Lift the finger piece up and stitch from the bottom of the mitten to the thumb, stopping exactly where the previous lines ended.
Trim the seams.
Unscrew the outer parts of the mitten from the bottom edge to the elastic line and mark it along the front side.
Turn the inner mittens right side out. Place the outer mittens inside. Make sure the thumbs on the outer and inner mittens match.
Pin the edges of the outer and inner mittens.
Sew along the marked line from the front side.
Step back from this stitch to the edge by the width of the elastic plus 2 mm and make a second stitch, leaving about 1 cm open.
Insert the elastic into the open seam using a safety pin. Stitch the edges of the elastic and sew up the open part of the seam.
Fold the edges of the inner and outer mittens inward and pin or baste.
Sew along the edge. Turn the mittens inside out and straighten your thumbs.
Mittens for the whole family
Master class (MK) “Fleece mittens” – over! The mittens are ready! Now the child is not afraid of either snow or frost. We start a snowball fight, and even an ice fortress is within our power, because our fingers are safely hidden, and we have fleece mittens on our hands. Did you find the pattern difficult? Sew mittens for your husband, and make a warm scarf from the leftover fabric - this will be a good gift, because love and tenderness, the warmth of caring hands are invested in it.
We sew fleece mittens for the whole family! This slogan will be your calling card, and improvising with various details and finishes will help you create beautiful and original products that will bring creative joy from the work done.
LiveInternetLiveInternet
SOURCE
1.
2. MITTENS (for 3-6 years, for a height of approximately 98-122 cm.)
PROTOTYPE
SEWED MITTENS
At one time, about 4 different models of mittens were tested, and only one turned out to be the most successful - the sewn-in elastic bands gathered the fabric well and, when necessary, stretched, and the Velcro strap held the mitten on the hand perfectly, the mitten never fell off.
Long cuffs—gaiters—were worn directly over the sleeves, and when wallowing in the snow, nothing got inside the sleeve; the elastic band held the mitten on the sleeve and prevented the lower part from “lifting up.” In other mittens, the mittens had to be adjusted 5-10 times throughout the walk. Even more expensive models were not so successful. When the need arose to buy the same mittens for the fourth time, I decided to try to sew the same ones myself, and took the pattern from the ripped mittens. The pattern was taken from a finished cut product, so minor flaws and inconsistencies are possible. In addition, the insulation in the finished mittens was faux fur; I used Thinsulate 100 and fleece as insulation and lining. The mittens turned out a little thicker than the finished ones, so you can keep that in mind. Thinsulate could easily be “halved”, i.e. make it thinner by layering it in two. The lower part - the leggings - can be made longer. In addition, you can make mittens of a larger or smaller size; I have only seen one universal size on sale. The pattern of the main product consists of 4 parts (on the sheets the lines are given with a simple blue pen), given without allowances (1 cm for allowances along all lines is enough): 1. part A - this is the part of the mitten that goes along the outer (back) side of the palm 2. part B – the lower part of the inside of the mitten 3. part B – the upper part of the inside of the mitten 4. part D – strap (or strap) The pattern of the insulated lining consists of 3 parts (on the sheets the lines are given with a green felt-tip pen), given with allowances , except for the bottom (stitch 05.-07 cm from the edge): 5. part A - this is the part of the mitten that goes along the outer (back) side of the palm 6. part B - the lower part of the inner side of the mitten 7. part B - the upper part the inside of the mitten Sewing: Details of the main product are cut out with allowances.
Part D is given in folded form, so it needs to be “doubled” and allowances given. Fold in half, right side inward, stitch along the lines, cut off the corners at the corners, turn them inside out, iron them, you can stitch them, stitch a piece of Velcro along the marked lines (aka Velcro, aka Velcro tape, etc.) - the brushed part (that , which is softer). Place reflective tape on part A (if the tape is wider, focus on the upper border) and a piece of Velcro on the side with the hooks. Along the edge on the front side, pin or stitch the finished part G a little closer to the edge. To do it right right away, this strap starts from the side opposite the finger, goes around the palm on the inside along the elastic band and “sticks” on the outside with Velcro, i.e. . it needs to be placed in the place where there is no finger (near the piece of Velcro on part A), face to face (the front part of part A and that part of the strap where the Velcro is not visible), with the long part towards the finger. If it’s not entirely clear, you can stitch the Velcro onto the strap later, the main thing is not to forget to put the strap between the parts. Sew parts B and C to the mark (along the finger line). Notch and trim allowances where necessary. On part B, sew an elastic band (you can use a regular straight stitch) from the inside along the intended line (the length of the elastic is about 5.5-6.5 cm, excluding allowances). Sew parts B=B and part A, aligning the marks and the stitched elastic (make sure that the ends of the elastic get into the seam). Sew an elastic band onto the resulting mitten from the inside out in a circle along the intended line (it is this elastic band that will be the “bottom” of the mitten), what is lower will then turn upward into the inside of the mitten. For an insulated lining, cut out parts A, B, C from fleece directly along the contour lines, cut them out, then trace them onto the insulation material (for example, Thinsulate), pin them to the wrong side and stitch approximately 0.5 cm from the edge of each part separately with this or a part made of insulation. Then the insulation needs to be cut as close as possible to the laid line. The sewing is the same as for the main part of the mittens, but no elastic bands, Velcro, etc. are sewn on. In addition, for turning, you need to leave a small section unsewn; this place is marked on the pattern (from the thumb down). You can “try it on” - put the insulated part of the mitten into the main one, if the insulated underpad does not “fit” (the main part wrinkles or lumps and creases are felt inside), you can reduce it by sewing a little further from the edge of the parts. Then sew the insulated lining and the main part - turn out the main part, put the insulated part into it (the face with the face inside, i.e. the face of the raincoat fabric and the fleece together). It turns out that the line will be laid along the wrong side of the main part of the raincoat fabric, and on the other side there will be insulation (thinsulate). Stitch along the intended line, while the main part will be a little longer, and the elastic will get in the way a little. And make sure to stitch the left with the left, and the right with the right (the thumb should be on the same line, and not in a mirror image). Trim the seam allowances, turn them inside out, and hand-sew the seam section left unsewn for turning them inside out. In addition, after this I also sewed loops from cotton braid so that there would be something to hang it on hooks. PATTERN (applied to A4 sheets)
Here is a photo where you need to make a notch after stitching parts B and C together so that it doesn’t pull together. The notch should be made almost to the stitching seam.
3. Option for a pattern of mittens for children (sizes 2, 4, 6, 8 years; 2002 No. 4 mod.11).
The mittens were cut with allowances. Other girls on the forum, on the contrary, complained that they were too small. My mittens are for 2 years, and my daughter is 1 year and 9 months. - The mittens are a little too big. I sewed from duspa, maida, and fleece. The pattern was lined, the fleece did not make it smaller.
4.
from Jeanna : I sewed mittens using this pattern. It needs to be wider at the entrance (Or maybe you just need to move the child’s arms wider). Otherwise it’s difficult to dress the child himself... I will sew others where I will take this into account.
from Angelolya:
I added ribbed cuffs and made them in the toe area as I saw in the store. To do this, I lengthened the back part by 1 cm, shortened the front part, and then gathered the back part to the length of the front part. and also made the thumb one piece and thicker.
from Kalinka:
I took this pattern as a basis and made it for myself. I sew mittens for myself with fur (shorn rabbit). I changed the pattern a little: I made the seam connecting the palm to the small part of the finger in an arc, so it’s more comfortable on the hand. The rest is fine.
First, I sewed a chintz sampler, tried it on, and refined the pattern. Now the fur inner part is ready, we need the top. I want to use a piece of black taffeta left over from a dress. The mittens are sewn under the motto “we use only internal reserves, we don’t buy anything.”
5. Leggings No. 2
Raincoat, thermofin 200, fleece. Pattern . Here's how to sew . Shortened the length by 3 centimeters. Since my printer was blocked, I had to remove it from the screen. I traced my daughter’s hand on a piece of paper with a pencil and cut it out. I attached it to the monitor and increased the scale until the pen fit, it turned out to be 75% - this is for 2.5 years... but we are thin and, accordingly, our pen is small. I didn’t change anything, it was easy to sew - in a couple of hours, including cutting
6. Pattern of mittens for children 1-2 years old.
There are 4 parts in total: 1-2-3-4-9-5-1 1-2-3-4-9-7-8-1 1-6-7-9-5-1 1-6-7-8 -1
I sewed the first mittens - I didn’t like the result a little, because... I didn’t widen the pattern towards the bottom - it’s a bit difficult to put on. The second ones are the best! I didn’t model the top of today’s mittens (but on the pattern I showed the top of the front and back modeled halves with a dotted line - the finished height of the mittens was 0.5 cm higher). Both have fleece lining. Unlike raincoat fabric, it is cut without allowances and sewn “on the foot.” Allow allowances at the bottom depending on the type of processing. For the first ones, the fleece was cut without allowances, and the raincoat fabric (at the bottom) had a 2cm “sag”. These centimeters were used for a double hem. For the second ones, I added length to the lining, trimmed the edge with curly scissors, folded it over the face and added a stitch.
7.