Materials and accessories
Bralette is underwear that is easy to sew with your own hands. This uses a few tools and materials that are easy to buy:
- The main material for sewing is lace, but you can also use other textile options - cotton.
- You will need a wide or narrow elastic band. The choice of value is selected in accordance with the selected design of the model.
- Satin ribbon, which will match the color of the main textile.
Brallette option
- You need sharp scissors and a steamer, a needle and thread, and safety pins.
- Measuring tape, chalk, pencil, chalk, awl, paper.
- Accessories in the form of fasteners and regulators.
Material and accessories for manufacturing
Please note ! It is advisable to choose natural fabric. This will protect the user from allergic reactions and will be more comfortable to wear.
Additionally, you can take other finishing materials and types of fittings.
How to make an organizer for underwear?
It is inconvenient to store linen in the closet. It is constantly mixed and you have to waste time to get the right set. Organizers are suitable for organizing storage. They will ensure order in your wardrobe.
What you will need:
- Shoe box;
- Wrapping paper;
- Scissors;
- Pencil;
- Glue;
- Stationery knife;
- Double-sided tape;
- White paper.
Step-by-step instructions on how to make an organizer for underwear:
- From the bottom of the box up, measure the desired height. Trim off the excess with a utility knife.
- Cut out the partitions from the lid. The height should match the height of the future organizer.
- Cover the edges of the partitions with white paper.
- Glue tape to one side of the partition and glue wrapping paper onto it, wrapping it around the partition.
- Make slits in the partitions up to the middle, having previously marked the required cell size.
- Inserting the partitions one into the other, assemble all the parts. The design should fit easily into the box.
- Cover the inside of the box with white paper.
- Cover the outside with wrapping paper.
- The top can be decorated with lace braid.
Watch the video that clearly shows all the steps:
Equipment, stitches and seams
Patterning a lace bra is not the beginning of making a garment. It is advisable to immediately select the necessary equipment, set up the sewing machine and decide on seams and stitches. A few recommendations:
- Before work, be sure to check the overlock settings on the lace from which the item will be made.
- When using a regular needle when sewing lace and elastic, the machine may skip stitches. It is recommended to immediately insert the needle for knitwear.
- The tails from the overlock seam should be hidden under the stitching, pulling it through with a special hook, and the remaining threads should be carefully trimmed.
- According to sewing technology, only an overlocker is enough to join parts. But it is advisable to sew the allowance along the face with a machine stitch, slightly stretching the part during the sewing process so that the stitching retains its elasticity.
- Elastic tape should be basted first. This is necessary in order, firstly, to stitch it evenly, and secondly, to check whether its tension corresponds to the required volume under the bust.
- To sew the elastic, a multi-pierced zigzag is used. This gives additional seam strength and elasticity.
- In difficult, thick places, for example, when sewing a side seam where there is two layers of elastic, the overlocker may begin to “slip.” To help him, you need to pull the part a little away from you.
You might be interested in this. We sew a beautiful top with straps using a pattern
Preliminary machine settings
This is enough to understand not only how to sew a bra correctly, but also to make the piece of underwear beautiful and comfortable.
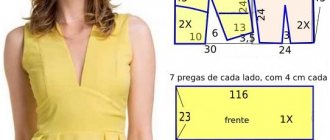
Pattern
To make the bralette pattern neat and correct, you need to take measurements. It is worth using the following parameters:
- Distance from the middle of the shoulder to the bottom of the chest.
- Chest circumference under the bust.
- Chest circumference at its widest part.
- Distance between nipples.
Taking the necessary measurements
Only after this can you cut and sew a product that will definitely fit your figure perfectly.
Working with pencil and compass
First you need to build a base, which will then be adjusted in size and shape. The sconce pattern begins with the construction of a regular circle, which is then transformed into a “triangle”:
- Transfer onto paper the measurements that correspond to half the girth of the torso under the chest.
- Measure half of the line - this is the center of the product, relative to which future “cups” will be placed.
- Then the centers of the breasts are determined on the line. To do this, move the length of the distance between the nipples so that the cm are divided in half by the central mark. Mark the position of the nipples.
- Transfer the measurement that determines the distance from the nipple to the edge of the chest. Do this on both sides of the marks.
- From the central points of the nipples, draw perpendiculars upward relative to the first line.
Bra sketch
Important ! It is advisable to transfer all measurements onto paper using a compass, which is first applied to the measuring tape. This will help avoid huge errors.
After making these marks, you can begin sketching the shapes of the cups. They are usually triangles, but there may be other variations in shape.
Rounding pattern lines
The lace sconce pattern will look more attractive and neat if you make the lines more rounded. It is necessary to smooth out the lines of the triangles, and divide the previous blanks and process them separately. You can use the following scheme:
Working on the pattern
The resulting parts need to be further adjusted to size and the ideal pattern is almost ready.
Adjusting the pattern to size
You need to cut out all the parts of the patterns from paper. When the bralette pattern seems almost ready for further processing, you need to check again the size of each part. It is worth rechecking every measurement taken previously. Sometimes you even have to try on a paper base.
You might be interested in Ready-made patterns for fabric mice and rats: sewing with your own hands
Latest additions
Otherwise, basic measurements and measurements are enough to build a suitable item.
How to sew a bralette with your own hands
To sew a beautiful lace bodice you will need the following materials:
- 0.9 - 1.15 m stretch lace,
- straps - 2 pcs.,
- elastic band (elastic band) 1 cm wide,
- cups (optional),
- linen accessories for adjusting the length of straps,
- pattern.
Lace bodice pattern
size table
| Size | Bust |
| S | 76 - 86 cm |
| M | 86 - 96 cm |
| L | 96 - 106 cm |
| XL | 106 - 112 cm |
Download free bralette pattern ⇓
Download the pattern, print and glue the sheets. Measure the OG and cut the pattern to the appropriate size. Transfer the details onto the fabric.
Sewing a lace bodice: master class
Cups
Sew the details of the cups with a small zigzag stitch, leaving 1 cm from the edge. Cut the seam allowances in half.
Cut out the cup pieces
Pin and stitch, leaving 1 cm from the edge
Cut off half the allowance
Mark the middle of the cups on the bottom of the bralette. Align the center seam of the cups with the mark you made earlier. Sew the cups to the bottom of the bodice using a zigzag stitch. Allowance - 1 cm.
Mark the middle of each cup on the bottom of the bustier
Connect the cups and the bottom, aligning the center seam and the marks made earlier
Measure the elastic along the bottom of the bralette and cut it off. Pin the elastic with pins, tucking the top of the lace over it, as in the photo. Under the cups, the allowance left earlier will go to the hem of the elastic.
Measure the elastic
Pin to the ribbon, turning the top edge under
There is an allowance under the cups at the hem
Sew the center seam on the back of the bodice using a zigzag stitch.
Place a seam on the back
Straps
Measure 2 strap strips 50 cm long (measurement in inches in photo: 20 inches = 50 cm).
Straps 50 cm
Measure two pieces of tape 2.5 - 3 cm each, put a linen accessory (ring) on each and sew these parts to the back of the bralette at a distance of 17 - 20 cm.
Put rings on small pieces and sew them to the back
Pass the straps through the hardware slider and the previously sewn rings. Secure. Sew the straps to the cups.
Thread the strap through the slider
Then through the ring
Again through the slider and sew
Sew the other end of the strap to the cup
Your DIY bralette is ready!
Back view
Lace Bustier
Cups (optional)
You can sew thin foam cups on the reverse side; these will give the lace bodice additional support and make it a little more modest.
If desired, you can sew on foam cups
This is what a bodice with cups looks like
A little more modest and voluminous
With clasp on the back
Usually the manufacturing problem is forming the correct cups. If this stage is passed, you can think about how the bra will be fixed. The standard is a back clasp.
DIY bralette pattern with back clasp
Important! You need to sew together all the already prepared parts, securing them with a thin elastic band. A base fastener with hooks or plastic fasteners is sewn at the back.
Bralette with back clasp
The first thing I chose to model was the bralette model from Victoria's Secret.
The modeling is quite simple. I edited the shape of each part of the bra cup according to the photo. Here you need to approach the matter creatively and focus primarily on the lace that you have chosen for sewing this model. Perhaps it itself will dictate the shape of the cup for you.
Important! Pay attention to the symmetry of the scallops of the lace and its patterns when cutting the left and right cups of the bra.
Tip : for a tighter fit to the chest and protection from stretching, sew a thick elastic band 0.5 cm wide to the longitudinal sections of the cups. Using a zig-zag seam (yes, along the internal sections too, sew directly onto the lace in the scallop area with the wrong side sides) slightly lowering the fabric.
For the straps, use a special elastic band (it’s called a bra strap) of a suitable color. Accessories - from an old bra, or buy in a store.
Do you remember that during wear, the bra belt always stretches? Here, for this, when cutting out lace, shorten its length. A thin but dense elastic band sewn to the seam connecting the cups to the bralette belt will also help to strengthen it from stretching.
To ensure that the seam connecting the parts of the cups is not rough, it needs to be covered on the wrong side with a smooth braid that matches the color, simply stitching it over the seam.
With closed back
You can sew a sconce with your own hands even with a closed back. Then the item will look more like a top, but with highlighted cups. Mesh or the same lace as for making cups can be used as a base.
You need to create a bracelet base for the elastic band that will go under the bust. It is necessary in order to fix the item on the chest.
Bra without clasp
How to sew a bralette with your own hands without a cup
The pattern of a lace bodice is no different from the complexity of the simplest bralette. You can sew such a bodice using basic instructions. A master class on making a bra looks like this:
Master class on making
To avoid creating a “mat bra” without clear details, you need to be careful when preparing the pattern for the soft cup.
The bralette is considered a very comfortable and beautiful option for underwear. If the preparation is done correctly, then such a product will not be sewn for long. The necessary parts are usually made of lace. Such lingerie will have a very attractive and sexy look.
Cup bra
And it is possible to make such a bust, having all the necessary accessories for linen at hand.
- Ready-made cups (they can be purchased in our store) are placed between pieces of fabric (of any shape) and stitched on both sides. The bottom one - the one that is attached to the belt - remains unsewn.
- If you sew only the bottom layer to the cup, then the top layer can be laid in a beautiful drapery and pinned.
- Sew the upper part of the bodice to the waistband and finish the seams.
- Fold the allowance under and sew so that it forms a drawstring for the bones.
- Sew on the straps, not forgetting about the adjusters and clasp.
This is a fake method, but if you wish, you can use a pattern. Sewing the belt is similar to the previous descriptions. 3 tailoring options – 3 types of busts. Fabric, accessories and instructions from Tekstiliya - and you can sew any items for yourself.