A vest for a baby is a universal form of clothing that is very easy to knit even for beginner needlewomen. Today we’ll look at several options for knitting various sleeveless vests for every taste with detailed descriptions, so you can choose a vest that suits you.
Baby vest with button
The sleeveless vest with buttons is suitable for newborns and up to three months.
The vest size is 56/62 and the following materials and tools are required:
- yarn (acrylic);
- buttons – 1 pc.;
- knitting needles No. 3 and No. 3.5.
Now let's start knitting, starting with the back of a newborn's sleeveless vest.
- Use knitting needles to cast on 41 stitches.
- The elastic band is 1 knit x 1 purl to a length of 3 cm.
- Change needles to No. 3.5 and continue according to the following pattern: 5 purl stitches, 31 according to pattern No. 2 and 5 purl stitches. On the reverse side, purl outermost p. knitted in the same way, and the middle 31 - according to the pattern.
- After 11 cm from the cast-on edge, armholes begin, which are marked with a marker or a thread of a different color on both sides and knitted straight to a length of 20 cm.
- All loops are closed, marking 5 pcs in the middle. for the neck.
We knit the vest fronts.
- For the right front, cast on 26 stitches using size 3 needles.
- The elastic band is repeated (as on the back) up to a length of 3 cm.
- Close 5 pcs., change knitting needles to No. 3.5 and continue knitting in this way: 3 purl stitches, 13 according to pattern No. 2 and 5 purl stitches. On the reverse side, the outermost 3 and 5 go purl, and the central 13 according to the pattern.
- Having reached a total length of 11 cm, armholes are marked on both sides.
- After 20 cm from the start of knitting, 18 loops are closed from the shoulder side, and three are made with knitting needles another 2 cm.
- The left shelf is performed symmetrically.
Assembling the product:
- The shoulder seams are sewn along the marks and the side seams.
- For the neckline, a binding is made from fabric and sewn on.
- Mark the place for the hole for the button, this is about 1.5 cm from the cast-on edge.
- A hole is sewn in this place, and a button is sewn on the left front of the sleeveless vest.
The vest for the newborn is ready.
How to guess with sizes
To knit something that fits your size, you need to take measurements. At the same time, I conditionally divide the period of up to a year into several stages (like manufacturers of children's clothing). For babies 0-3 months old, take your measurements, then increase the size in length, but you may need a narrower base. The next stage is from 6 months to 1 year. The babies grow quickly the first year and rapidly gain weight. Therefore, you will have to bandage the product several times, but it is quite simple.
What to look for when choosing a pattern
It is important to choose the appropriate pattern. Many mothers want to receive a product with a complex, intricate pattern of large braids and various “bumps”. But for babies under one year old, I choose the simplest patterns - garter or stocking stitch. The knitted base of the vest with voluminous patterns can press and dig into the skin if the baby is still lying on his back, and restrict movement while crawling or walking. Therefore, the simpler it is, the more comfortable it is for the baby.
Vest with shoulder fastening
This baby vest, knitted with a relief pattern, has a fastener on the shoulder, so it is easy to put on your baby.
To work on a sleeveless vest, you will need the following materials:
- yarn;
- knitting needles No. 4.5;
- buttons – 2 pcs.
The first thing to start doing is the back of the baby's sleeveless vest.
- Use knitting needles to cast on 56 stitches.
- The purl stitch comes first.
- Then knit according to the pattern: edge, * 9 purl, 6 relief pattern, * between * * repeat, 9 purl, edge.
- The relief pattern is performed in this way: 1st, 3rd, 7th, 9th row, alternating 3 front and 3 purl; second and all even ones - purl only; 5th, 11th - remove 3 on an auxiliary needle before work, 3 p. and knitted with auxiliary knits. The result is a repeat of 12 lines in height, then repeats from the beginning.
- After 16 cm, armholes are formed; for this, two loops are reduced on each side, and another one every other row.
- At a product length of 25 cm, 35 pieces are closed on the right, 15 (for the fastener) another 1.5 cm are knitted, then the process of making the element is completed.
The next step is to complete the front of the vest.
- 56 stitches are also cast on with knitting needles and the back is repeated to a length of 22 cm.
- Then the neck begins, for which the central 6 pieces are closed. and the two parts continue separately.
- For a cutout along the inner edge, first 3 pieces are reduced on both sides through a stitch, then 2 and then 1 piece.
- Having passed 6 lines from the beginning of the neckline, holes for buttons are made on the left: hem, 1 according to the drawing, 2 knit stitches. together, yarn over, 7 according to pattern, k2. together, yarn over, 2 according to pattern. On the other side, the yarn overs are knitted purlwise.
- At a total height of 25 cm, knitting is completed.
All that remains is to assemble the sleeveless vest: sew the side and shoulder seams, sew on the buttons. After moistening and drying, the sleeveless vest for a newborn is ready.
Knitting a vest with buttons in front
This vest is sized for a child aged 6 to 9 months. The braid pattern is suitable for both boys and girls. And you can knit it quickly and easily.
To work you will need:
- cotton yarn;
- knitting needles No. 3;
- buttons – 5 pcs.
The back is done this way.
- Use knitting needles to cast on 89 stitches.
- A double elastic band is knitted 4 lines, for this half of the loops are cast on with a thread of a contrasting color: the first line is knitted with working thread 1 knit, yarn over, this pattern is repeated until the end; second - the yarn over is knitted with the front one, 1 is removed as a purl unknitted, thread before work, this is repeated until the end; the third and all the following - 1 knit, 1 is removed as a purl before work. When completed, the contrasting yarn unravels.
- Next 4 lines are knitted with an elastic band, 1 knit x 1 purl.
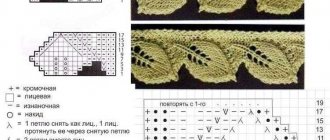
- Now a 7 cm pattern with braids begins: 7 purl, *12 braid pattern, 9 purl*, between * * repeats, 12 braid pattern, 7 purl. Braid pattern: four rows of faces; Row 5 – 3 on an additional knitting needle while working, 3 knit stitches, knit 3 knit stitches. from additional, 3 to auxiliary before work, 3 persons.p., 3 go with auxiliary persons.p. The first time five rows are knitted, then from the second to the fifth.
- Next, purl stitch with decreases: 20 stitches are decreased evenly once, after 17 cm to form a raglan on both sides, after the first two and before the last two, 1 pc is decreased every other row. 4 times.
- After 21 cm, the back is laid down.
For the right side of the baby's vest front:
- Cast on 48 stitches.
- Again, 4 rows of double and 1x1 elastic, with the first 3 loops going double all the time.
- Next 3 double, 5 regular 1x1, 12 braids, 9 purl stitches, 12 braids, 7 purl stitches.
- After 7 cm, everything except the first 8 pieces. (they continue according to the pattern), knit purl, at the same time 7 pcs are evenly decreased. every 17 cm for raglan according to the same principle as on the back, through a line one at a time 4 times.
- At a total height of 21 cm, knitting is put aside.
The left side of the front part is performed similarly to the right, only symmetrically.
Product assembly:
- The knitted elements of the sleeveless vest are sewn together at the sides.
- The resulting sleeves are decorated with a placket: 41 loops are raised and the first 8 lines of the vest are knitted with elastic bands.
- To decorate the neck, take 37 pieces. on the right side of the front, 41 from the right sleeve placket, 61 pcs. from the back, 41 left sleeve, 37 from the left front and knit: 3 double elastic bands, 5 regular 1x1, *12 braids, 9 purl stitches*, from * to * repeat, 12 braids, 5 regular 1x1, 3 double.
- In this case, every three lines, 2 pieces are decreased. in areas made from purl. 4 times (two together at the beginning and end of the section).
- The last crossing of the pattern is accompanied by a decrease of 4 pieces. in every braid.
- After 5 cm of the vest yoke, the first and last 12 loops are closed and 2 pcs are decreased every other row. on both sides 3 times.
- At a height of 7 cm of the yoke, the neck strap of the vest is knitted: 40 neck loops are cast on and 4 lines are knitted with a regular elastic band and 2 lines with a double one.
- That's it - the work is completed. The shoulder seams are sewn together and the buttons are sewn on. For the holes for them, the space in the strip web expands slightly.
The finished vest for a baby or toddler needs to be slightly moistened and dried.
Two-tone model
In this master class we invite you to knit this cute vest for a newborn girl with a small raglan sleeve:
Related article: Openwork Christmas tree: crochet pattern with diagrams and description
This product will not take much time to complete, and the knitting technology will be understandable even for beginners.
We use mohair threads in two shades – lilac and milky white. We choose the thickness of the knitting needles depending on the desired knitting density - the thinner the knitting needles, the tighter the knitting. For the fastening in this case you will need small buttons.
Let's get to work. For the first row, cast on 71 stitches and knit in this order: knit 25, purl one, knit 3, purl 1, knit 30, purl 1, knit 10. 2nd row – purl 10, knit one, purl 30, knit 1, purl 3, knit 1, purl 25. 3rd row – purl 22, knit 3, purl 5, knit 30, knit 1 more, purl 10. 4th – knit 11, purl 30, knit 5, purl 3, knit 22.
We repeat the pattern from the first to the fourth row 6 times, while in every fourth row we add 1 loop to bring the neck line closer to shoulder level. As a result, from the 25 loops cast on at the beginning of the work, we get twenty-nine.
Let's move on to performing the raglan. To do this, when knitting according to the pattern in the direction from the bottom row to the top, we do not knit the remaining 3 loops on the right knitting needle, turn around and continue knitting according to the pattern downwards. Having skipped one row in the direction from bottom to top, we leave 6 loops unknitted on the right knitting needle and turn around again. As a result, we get a raglan line on the right front of the vest.
Gradually reducing 26 loops, we remove the remaining forty-nine on an additional knitting needle.
To knit the shoulder, we will do the opposite - gradually add 3 loops, unrolling the knitting. We also continue the pattern according to the pattern until the number of loops is equal to 26. The width of the shoulder is equal to eleven repeats of the pattern. After this, we shorten the loops, forming a raglan line - we leave three loops undone eight times in the direction from bottom to top.
Related article: Knitted cap for amigurumi boy
We connect the upper part of the sleeve with the lower one, removing the loops from the auxiliary knitting needle. To imitate a side seam, we knit 2 rows with purl loops. We knit the back fabric with the same pattern, we make decreases for the raglan according to the same principle as on the shelf. Having reached the top of the neckline, we make 12 repetitions of the pattern along the entire length of the back.
We knit the second sleeve and the left front symmetrically to the right one, using threads of a contrasting color.
We knit the bar with stocking stitches, its width is 2-3 cm, on the right side we leave loop holes for buttons. We decorate the neckline with a 1 by 1 elastic band two centimeters wide.
That's all, all we have to do is sew on the buttons and steam the product if necessary.
Some more interesting master classes in these videos: