Good afternoon. Today I decided to write a separate special article on how to competently and correctly sew elastic into clothes. The article was written specifically for beginners in sewing, and therefore I will show everything in detailed step-by-step pictures. And I will give a more detailed explanation of how to sew in an elastic band in each of the FOUR WAYS.
Yes, yes, in this article I posted all FOUR methods of sewing in elastic . And for those who have a modern machine. And for those who have an old hand-made Singer, and even for those who do not have a sewing machine, I will tell you how to sew in an elastic band by hand.
- A NOTABLE METHOD for uniformly sewing in elastic (for those with a machine without a zigzag stitch).
- Manual method of sewing in elastic (for those who do not have a machine)
- ZIGZAG METHOD of sewing in elastic (without pulling it during the sewing process, but only after sewing)
- STANDARD METHOD of sewing in elastic (for any machine)
- BOBBIN METHOD (will help you sew in an elastic thread on a regular sewing machine)
I already talked about some of this in the article about beach dresses with elastic. But I wanted to consider all possible cases of using elastic bands in clothes. And give a more detailed and understandable method of sewing them to clothes.
But before that, we will proceed directly to our lesson. I want to inspire you with beautiful pictures of clothing models using elastic bands. You can sew stitching into all these clothing models yourself following the lessons from this article.
So let's admire, and therefore let's learn.
Elastic on sleeves
The sleeves are also partially rubberized for decorative purposes - in the cuff or shoulder area.
And, of course, sometimes in all of the above cases, fashion designers can replace the elastic with ordinary non-elastic twine pulled into a simple drawstring.
The fabric will also gather and fit, but such gathering on twine, of course, will not give elasticity.
Well, now let’s proceed directly to our master classes on sewing in elastic.
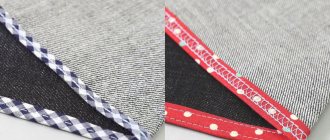
You and I will often model a tunic, dress, hat or swimsuit that will have an elastic band. And we will need to sew it in. There are two types of rubber bands...
Simple ways to sew in elastic bands
Simple ways to sew elastic into fabric include using simple stitches. This seam can be made either by hand or on a sewing machine. However, in the latter case, it is most reliable to use a zigzag stitch.
There are several ways to sew an elastic band with a machine.
Note! The zigzag seam promotes good tension of the fabric without the formation of deformed areas.
Using a typewriter
Sewing in elastic using a machine is an easier method than doing it by hand. It is better, of course, to use those devices that have many functions that help facilitate and speed up the process. The most effective sewing machines for this purpose are Janome, Singer or Brother brands.
Using a sewing machine, elastic can be sewn into fabric in several ways:
- Noteworthy. This can be done even on the most ordinary machines. Before sewing an elastic band to the fabric using a machine, you must first mark a line on it along which the sewing will take place.
- Zigzagov. A very convenient way. You need to attach a circular stretch tape to the fabric with the same length and press it tightly with the foot of the machine. Before work, you need to set the zigzag size regulator to the maximum width.
- Rocker or rocker. Additionally, you need to prepare a separate strip of fabric so that it is slightly wider than the elastic band and reaches the length of the section of fabric on which it will be sewn.
- Bobbin or bobbin. In this case, it is not the elastic itself that is sewn on, but special stretch threads are used, which are threaded into the machine along with regular threads.
You might be interested in Sewing a linen dress using a pattern with your own hands
The manual method is not practical
Manual method
You can sew an elastic band by hand not only with a regular straight stitch, but also with a zigzag stitch. In order for everything to be sewn evenly, you must first divide the length of the fabric into several equal parts. Then apply a round elastic band and stretch it along the entire working length and secure it in the previously designated places. This method will make the work much easier, and you won’t have to redo it several times.
An easy way to sew an elastic band BY MANUAL (without a machine) is by stretching it on the edge of the table
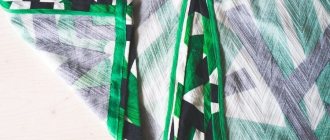
Yes, yes, elastic bands can even be sewn in by hand - if the fabric is variegated or bouclé, that is, it is not afraid of crooked stitches, for the reason that they are simply not noticeable on it. Moreover, after sewing the elastic, the fabric at the sewing site will wrinkle greatly and all the stitches (no matter how crooked they may be) will be hidden in wrinkles and folds.
I sewed my first peasant blouse with elastic at a time when I was still afraid of a sewing machine. I used the same method of drawing marks on the elastic and on the fabric that I described above. The only difference is that when sewing, I did not put the fabric under the machine foot. I simply stretched the fabric with a span on the edge of the table (to make it easier to pry with a needle and thread) and sewed it tight with ties. The fabric tightened and hid the crooked stitches.
In one evening I had an exclusive item, absolutely handmade.
ZIGZAG METHOD is the simplest. Suitable for both regular elastic and elastic thread.
This method is generally the easiest for those who have a zigzag stitch on their machine. And it can even be done manually - after all, a zigzag stitch can be done manually
This method can be used to sew both elastic thread and elastic tape .
It is remarkable in that even an ordinary underwear elastic will be sewn evenly - and there is no need to make any fixation marks.
I’ll show you how this happens in pictures.
Step one - create a sample of the ideal piece of elastic.
We also start by wrapping the elastic band around the waist, choosing the optimal tension for us. Cut off this rubber girth. And we cut it in half - but we will not sew on this particular half.
She will serve as a model for us later. Now you will see and understand everything.
Step two - sew a wide zigzag behind the edges of the long elastic band.
Take a new piece of elastic the same length as the width of the product or longer.
We place it under the machine foot and select a zigzag stitch such that the zigzag step is wide enough and the needle never touches the elastic itself, but makes a zigzag, piercing the fabric a few millimeters from the elastic - Fig. 13.
That is, as you already guessed, we need the elastic band to move freely inside the zigzag.
Step three - try on the sample elastic band to the elastic band under the zigzag.
And when the entire elastic band is under the zigzag, we put our sample next to each other and make 2 marks on the elastic band under the zigzag - at the same distance as the edges of the sample segment - fig. 14.
Step four - tighten the zigzag elastic band to the desired length.
Now we pull the ears of this “zigzag” elastic band until the marks are near the edges of the product. There they need to be fixed - that is, manually sewn to the edges of the product with several strong stitches.
All is ready. By the way, you can do this zigzag manually - it’s very convenient and fast.
Under such a zigzag - but with a smaller stitch pitch, of course - you can also place elastic threads. You also put an elastic thread on the elastic sewing line. And in the same way, you cover it on top with a zigzag stitch - without piercing the elastic thread itself anywhere. And then we tighten the elastic thread inside this zigzag to the degree of tightness we need.
You can also place the elastic not under the zigzag stitch, but under a specially sewn strip of fabric - that is, a drawstring. Here's the method:
THE ROCKET METHOD is very simple and suitable for any machine.
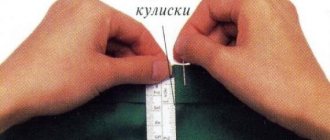
We measure the length of the elastic sewing line with a centimeter (Fig. 17). We measure a strip of fabric (Fig. 18) of the same length. The width of the strip should be sufficient for our elastic to be hidden in the future drawstring - that is, the width of the elastic + seam allowances is equal.
We sew the drawstring to the line of passage of the future elastic - Fig. 19. And we pull our elastic into the resulting “tunnel” - that is, the drawstring.
We pull it in using a safety pin - we pin it on one end of the elastic and pull it through, feeling the pin inside the drawstring with our fingers, pushing it forward, wrinkling the fabric along the pin. The pin is slippery and fits well under the fabric, and pulls the elastic along with it.
To prevent the back end of the elastic from slipping inside the drawstring, it is better to first sew it to the entrance edge of the drawstring. And then, when the forward tip of the elastic appears on the other side of the drawstring, it will also need to be sewn firmly to the outlet hole of the drawstring.
Then the elastic will be firmly fixed at both ends of the drawstring and will never pop out.
Basic rules for sewing elastic bands
Since there are many ways in which elastic can be sewn into fabric, there are rules for each method.
It is better to sew rubber threads parallel to each other
Sewing rubber threads in a spool
It has already been mentioned above that this method is carried out using a machine and rubber threads. The finished work will stretch well and not tear under strong tension. This method is good for use on fragile and stretchy fabrics: silk, knitwear, satin. But jeans or thick cotton are unlikely to work.
When sewing, you need to tighten the tape
Before sewing, stretch threads must be threaded into a spool, and ordinary threads must be used as the other face thread. If sewing is done with a simple straight stitch, then it is better to wind the fabric in several parts separately. This way, the shape of the finished garment will be uniform and symmetrical; it will not gather in folds in one place and stretch in another.
tacking elastic bands under tension
This method is used for clothes of complex structure and tailoring, which have many details, folds and various assemblies. First, mark the line on which the elastic will be sewn, for example, at the waist or leg. Then the tape is divided into two parts, one will be sewn separately at the front, and the second at the back. On the sides, at the end of the work, both ends are carefully and discreetly attached to each other. When sewing, you can tighten the elastic at your discretion.
The compression ratio must be measured in advance
For your information! The stronger the tension, the more noticeable and voluminous the folds will appear.
Rubber compression ratio
It is worth considering the compression ratio of the thread, especially when assembling material over a large area of fabric. This method is widely used for processing belts and belts of skirts and trousers.
The final product must have uniform folds and gathers
To measure the compression ratio of an elastic band, you first need to take a sample piece of fabric. Then stitch to the end, turn the work 90 degrees and machine stitch the row again. While sewing, the fabric must be stretched while holding it with your hand. Next, measure the resulting stitches and distance. And then, if necessary, you can reduce or increase the stitch width.
Gathering with elastic band
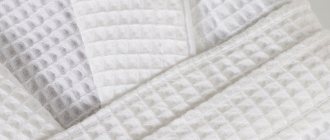
It is recommended to collect with elastic tape thick materials or multi-layered clothing. Simply put, a regular underwear elastic is sewn onto it. Its width should not be less than 5 millimeters, otherwise it will not have a tightening effect on thick fabric. Elastic tapes are sewn in several rows parallel to each other.
A wide ribbon should be sewn into the trouser waistband
You need to place the elastic on the wrong side of the material and pull its edge from below. It needs to be sewn on using a straight, regular machine stitch. To sew several elastic bands together, it is better to immediately draw the lines along which they will be attached, otherwise the final item will turn out crooked and deformed.
You might be interested in How to sew fabric puffs yourself
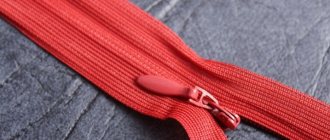
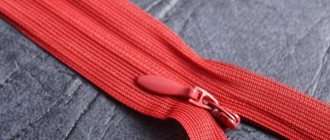
Elastic under the drawstring
Elastic bands can be secured not under a zigzag stitch, but under a special strip of fabric that is sewn over them. The width of the drawstring is selected according to the size of the elastic - you need to have enough space for it and for seam allowances. This is a simple method that can be done on all household machines.
Progress
- You need to measure the line along which the elastic will be sewn and cut the fabric according to this value. The fabric is sewn to the line of the tape to create an improvised pipe.
- One end of the tape is sewn to the entrance to the “pipe” so that it does not slip inside.
- The tape is pierced with a pin and pulled through the drawstring, collecting and distributing the fabric along the part.
- Sew the second end of the elastic to the end of the drawstring.
club.season.ru
The rubberized insert sewn at the ends will not bunch up inside the drawstring. Thanks to the sewn fabric, the rigid tape does not rub the skin. The technology is suitable for sewing children's clothing. With the help of a drawstring, you can avoid “bubbles” and unwanted folds: the elastic passes freely inside, and you can form the gathers to your liking. The method is not entirely suitable for working with elastic threads - there are other options for them.
How to sew an elastic band to panties
Sewing an elastic band to panties is not that difficult, but it is worth noting that it can quickly stretch and lose its elasticity. In this case, you must adhere to certain actions. This method is suitable for sewing and repairing linen not only for adults, but also for children.
For sewing women's underwear, it is better to use decorative openwork elastic ribbons. They need to be sewn on from the front side because of the decorative patterns. You need to leave 5 millimeters along the edge of the fabric. Secure the elastic band to the fabric with safety pins and sew with a sewing machine. Now you can cut off the edges of the material that peek out from behind the elastic band.
You might be interested in this Instructions for creating a pattern and sewing a clutch yourself
The elastic under the drawstring will not deform the fabric
Then you need to switch the sewing mode of the sewing machine to zigzag. If the machine is multifunctional, then you need to choose “elastic zigzag”. You need to sew the elastic closer to the top seam line.
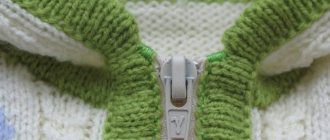
Sew the elastic into the sleeve
If you want to sew elastic into the sleeve of a blouse or turtleneck, then this can be done quickly and without problems at home.
- We set the type of stitch on the machine to zigzag, and the stitch length to 3. Your needle should be “stretch”, which is suitable for working with elastic tape.
- Take the sleeve of the product and turn it inside out. Then we place it under the machine foot.
- We put the elastic over the stitching on the sleeve and attach it, not forgetting to pull it a little.
The end result is these beautiful products with elastic in the sleeves:
Don't miss: Why am I not losing weight? Reasons for weight gain
Beautiful methods of lacing ends inward
Many sneaker lovers often find their shoelaces come undone. To prevent this from happening, there are several proven methods, thanks to which you can not only lace your shoes securely, but also hide the ends inside.
Hidden node
A popular way to tie laces on sneakers and sneakers without a bow. Step by step technique:
- Take and pass the lace from the inside and bring it parallel into the loop on the outside. The result should be a straight line;
- The next line starts from the hole one row below, and so on until the end;
- At the final stage, you need to go back in the opposite direction and bring the eglet into the free holes.
The secret of this method is that the bow is hidden in the inner side of the loops, and only the created pattern is visible in the frontal area.
Tangled Trail
It is considered one of the most difficult methods, but it looks very unusual in appearance. Step by step description:
- Take and pass the eglet through the top hole, then zigzag it through the next three loops and pull it out into the fourth hole;
- Before the penultimate hole, you need to move to the last loop and continue performing the same actions on the other side.
Just a few minutes and your sneakers will look new and very attractive. This method of tying will be useful for those who are used to attracting attention to their person.
Crisscross
A simple method that is especially suitable for men's boots. The technique is as follows:
- Take the lace, thread it through the loops at the bottom from the outside and bring it to the front side;
- Pass one end through the next loop on the other side;
- Do the same action with the second lace, the result should be a crossing;
- The final step is to lift the tongue of the shoe and tie the laces behind it.
This method is perfect for both men's and women's shoes.
Without a bow
An ideal method for those whose shoelaces constantly come undone. Step by step description:
- Take the left end of the aglet and insert it into the left hole on the outside of the shoe. With the right end, do the same only on the opposite side;
- Perform these movements one by one; the ends of the laces can be tied into a knot on the wrong side.
The “No Bow” method allows you to beautifully hide the laces inside the shoes.
Cross with double knot
Cross lacing is one of the most common. It is with this type of lacing that sports shoes are most often sold in stores. Not everyone knows what the knots are called, but the method of performing a double knot is familiar to many.
If you are looking for how to tie your sneakers without having to untie them every time, then a double knot is the most suitable option. With it you can freely take off and put on sneakers.
The knot itself will be hidden inside the boot. Description of the process:
- The ends of the lace are threaded into the lower eyelets from the inside to the outside and pulled tight.
- The left tip of the lace is threaded into the next right eyelet from the inside out. The right one is taken to the left side and threaded in the same way into the second hole on this side. This way the stitches are arranged crosswise.
- According to this scheme, the lace is brought out to the end of the holes to the tongue.
- The laces are inserted into the last eyelets so that they are on the inside of the shoes.
- Next, the ends of the lace are pulled forward and stacked on top of each other in the toe area of the shoe. One end is wrapped around the other and tightened. This is repeated twice. No need to tighten the knot. Its purpose is to secure the ends of the lace in the toe area and hide them. The knot will be located inside the shoe.
With three holes
This method visually lengthens short laces. Step by step description:
- Take and thread the eglet through the bottom eyelets, leaving the ends inside the shoes;
- Pull the eglet vertically through the next pair of holes;
- Cross the ends and insert them into the next holes;
- Continue doing the same steps until the end. Tie a knot inside the shoe.
The “Three Hole” method is best used only for sneakers with short laces, as well as boots, oxfords, boat shoes, etc.
With a gap in the middle
Girls with high insteps may experience foot pain when wearing sports shoes for a long time. The following lacing option helps to relax this part of the foot and avoid discomfort.
This lacing method without a bow looks beautiful and original. When wondering how to tie the laces on sneakers or sneakers so that they are not visible, girls rarely pay attention to this option first.
However, when they see a photo of shoes laced in this way, they usually change their minds. The node can be changed to another one - more reliable, but you will need to follow the instructions step by step.
- Insert the eyelets into the bottom eyelets from the inside out.
- Cross the ends and insert into the second holes.
- After crossing, thread the ends again into the next holes from the inside out.
- There is no need to cross the ends of the lace before the fourth row of eyelets. They are threaded through the holes from the outside to the inside.
- Next, the ends of the lace are threaded, as at the beginning - crossed and into the next row.
- The ends are inserted into the outer holes from the outside. But before you put the laces inside, the ends should also be crossed.
- The bow is hidden inside so that the ends of the lace do not dangle.
This lacing option looks great on shoes with 6 holes.
Straight lacing
Straight lacing will make the shoes attractive in appearance and will make you stand out among your friends. Step by step description:
- Take one piece of lace and thread it through the bottom right loop. Pass the other part through the left hole, which is closest to the beginning of the boot;
- Insert the right lace into the opposite loop to make a straight line;
- Pull it out from the bottom and pass it through the bottom loop through the next hole;
- Continue performing the same steps until the very last stitch;
- At the end of the work, tie a knot and hide it in the inside of the shoe.
Straight lacing will look good on high-top sneakers.
Lace-up with hidden knot
When the knot is hidden inside the shoe, it looks beautiful and attractive:
- It is recommended to tie sneakers using the straight lacing method. The right end should be longer than the left;
- The left part of the lace should be left unlaced, and the right part should be brought to the top of the shoe;
- Pass both parts inside the shoes and tie the laces.
This method is ideal for tying the laces on sneakers so that they are not visible. As practice shows, lacing with a hidden knot is especially popular among athletes.
With decorative knots
This lacing method has several advantages:
- It looks impressive.
- Suitable for different styles of shoes.
- Can be used on sneakers with both 4 and 7 holes.
- In addition, the degree of tension can be adjusted separately on each pair of eyelets.
How to do it:
- The ends of the lace are threaded into the bottom pair of eyelets.
- Then they are pulled up and tied into a regular knot, after which they are threaded into the next pair.
- According to this pattern, lacing is done to the top of the shoe.
- The ends are hidden on the sides or tied in a hidden bow under the tongue.