Choosing material for sewing a coat
Officially, there are several varieties of the product:
Demi-season
When sewing this option, you should give preference to soft and moisture-resistant materials. The selected material should not be dense: such products do not have a lining.
Demi-season option
Winter
In the winter version there are several layers, each of which performs its own function:
- Wind protection;
- Insulation;
- Lining.
Winter version
Important! Before purchasing material, you need to pay attention to the composition of the fabric.
There are the following types of fabric intended for sewing coats:
- pile;
- double-sided;
- curly;
Curly fabric
- raincoat;
- textile;
- "goose foot";
- lumps;
- jacquard;
- velours;
Velours
- rubberized;
- structural;
- Jersey;
- coupon;
- Varenka;
- felted"
- "herringbone";
- cashmere;
Cashmere
- vigogne;
- diagonal;
- moleskin;
- gabardine;
- faux suede.
Textile fabric
Each material from which a pattern can be made has a number of advantages. However, among the variety of matters, the following should be highlighted:
- Cashmere is a delicate material that looks presentable. Advantages: thermal insulation, wind resistance, strength.
- Tweed - has the characteristics of cashmere. It looks inexpensive, but quite original.
- Raincoat. The product does not look so expensive, but has all the necessary properties. The main advantage is the quick cleaning of glossy material from dirt.
Raincoat
Attention! Sewing a coat is a responsible process. It is for this reason that the choice of material will vary depending on the seasonality of the product. For example, a summer coat pattern is made from soft fabrics, while a winter coat will be made from more durable fabrics.
Materials, tools
To work you need the following:
- Material (wool, drape, cashmere);
- Non-woven fabric;
- Lining.
- Sewing machines;
- Threads (for basting, for stitching);
- Chalk or a piece of soap;
- Scissors;
- Pins;
- Needle for basting.
Attention! Before sewing the coat, the material is washed in warm water and glued with non-woven fabric. Similar steps are repeated after the oversized coat pattern is made.
Sewing tools
What measurements will be required?
Required measurements:
- ОШ - neck circumference.
Measure the base of the neck.
- OG;
- FROM;
- ABOUT. If there is a belly, you need to place a magazine or ruler.
- CG;
- ShG;
- ShS;
- DTS;
- VB;
- DTS1;
- VG;
- road accident;
- Accident1;
- Chest dart solution;
- military industrial complex;
- VLOOKUP (bottom);
- ShP;
- Druk;
- OP;
- OZ.
Increases
Adjacent - semi-adjacent:
| Abbreviation | Increase | meaning |
| PDT | To the length to the waist line | cm + 40 mm (under the belt, if any) |
| POG | To chest circumference | 100-200mm |
| SWEAT | To the waistline | 80-220 mm |
| FOB | To the circumference along the hip line | 100-140 mm |
| PShS | Bring your arms together in front, measure the width of your back - width + increase | 80 mm |
| PSHG | To chest width | 60 mm |
| Shoulder | Shoulder seam | Up to 2 cm |
| Pdli | To product length | 2 cm |
| Pop | To shoulder circumference | 90-150mm |
| Pdlr | To sleeve length | Up to 2 cm |
If you are sewing a straight-cut coat, the following increases will be required:
| Abbreviation | Increase | meaning |
| PDT | To the length to the waist line | 10+ 50 mm (under the belt, if provided) |
| POG | To the circumference along the chest line | 200-300 mm |
| PShS | Back width | 80-100 mm |
| FOB | To the circumference along the hip line | 200-300 m (when sewing a trapezoid, the increase must be increased) |
| PSHG | Back width | 60-90 mm |
| Shoulder | Along the shoulder seam | Up to 3 cm |
| Pdli | By product length | Up to 2 cm |
| Pop | By shoulder circumference | 150-200 mm |
| Pdlr | On the sleeve | Up to 2 cm |
You may be interested in this Instructions for sewing a pareo with your own hands, as well as creating without sewing
Pattern of a model with a voluminous collar
A coat with large collars should be sewn by modeling the drawing according to the basic pattern of the jacket. This way the lines will be balanced and harmonious. The work begins with a drawing of a shelf on which there is no need to make darts. The side seam is adjusted to remove the flare, and the shoulder seam is shortened by the amount of opening along the chest dart. On the back you need to make a slot for a third of the length of the product - about 8 cm wide.
ekaterinasmolina.ru
If you want to remove the chest dart on a magazine pattern, you need to cut the front, close it, leaving 1-1.5 centimeters for the solution. The waist dart will need to be opened by moving the side part away. It is removed along the back.
The sleeve is modeled based on the diagram of a classic single-seam element. Its width is determined by adding 10-12 cm to the circumference of the upper arm for a loose fit. To measure the parameters of the bottom, you need to measure your wrist, adding 15-16 cm to its girth.
The main decorative element - a voluminous collar - is modeled from the collar. At the shoulder line you need to put 2 cm to the right, and at the waist - 7-8 cm up and to the right. From the resulting point, draw a vertical line to the bottom of the front and up to the shoulder - this is the bend of the lapel. Its configuration is drawn by drawing a horizontal line along the lower point of the neck. The selection is cut out separately.
How to sew a coat without a pattern with your own hands
Building a pattern is an optional requirement for sewing a coat. Not every woman knows how to sew a coat without a pattern, but in many ways, sewing such a product greatly simplifies the life of the craftswoman.
To do this, give preference to wool, cashmere or double-sided fabric: the material should look beautiful both from the front and from the back (the coat will be sewn without lining).
“Burda” can suggest patterns for similar products. The pattern for a men's coat is often published in this fashion publication.
Taking measurements
Taking measurements:
- chest girth;
- waist;
- hips;
- neck;
- shoulder length;
- sleeve and raglan (if available).
All measurements are optional, but when sewing anything can happen (measurements are recorded).
Attention! Simple styles of the product are sewn without a pattern: there are no darts or folds on the coat (the coat is straight-cut, not very close to the figure).
Simple style
Increases
The rectangular parts of the back and shelves correspond in terms of the width of the half-circumference of the hips, with an increase of 5 cm for the freedom of fit.
To build a one-piece sleeve, the shoulder width is measured from the neckline, and the length of the sleeve is added here.
There should be no questions with a stand-up collar: a strip of material is taken in length corresponding to the neck and with the parameters of the required length (stand height parameters).
The side seams are sewn using a machine, the stand-up collar is processed and sewn in, the hem of the sleeves is hemmed, and the lower part of the product is sewn in.
To make the fastener, it is necessary to process the sides of the shelves. You can sew a coat without fasteners, but in this case you need to make a belt from leftover fabric.
Ready product
Coat pattern
So, the first and most important thing is the pattern for the base of the coat. A good fit depends on correctly taken measurements and a carefully constructed pattern. In practice, the base pattern is the basis of the basics, forgive the tautology. You can build it yourself using any method, but there is another way - build it using the pattern generator on our website.
Just enter your measurements into the form, press a button and our system will instantly create your basic coat pattern. You can print it in full size on a printer of any format. Here we explain how to create it, and here we explain how to print it.
It is indeed very convenient, fast and costs very little money. Perhaps the most important thing that will be required of you, I repeat, is to take the correct measurements. Increases in looseness of fit are already included in the pattern. Their sizes can be seen there, on the page of the basic pattern of a women's coat.
We have the pattern for the base of the coat, we will model it. Let's look at the technical drawing of the coat.
The silhouette is cut at the waist and widened towards the bottom. Set-in sleeve. The collar is a one-piece stand-up collar. There is a barrel. Concealed button closure. Belt.
Let's take some preparatory steps for the main modeling.
— Mark points C (P3 for those who build on their own) on the back armhole and D (P6) on the front armhole, with a bolder color.
— From the points down to the bottom line of the product, draw perpendiculars.
— We will design a dart for the back deflection with a solution of 1.5 cm, starting from the level of the shoulder blades approx. 14 cm down the middle of the back, towards the hip line.
— We’ll measure the dart openings for fitting, and remember the value of their sum (it’s better to write it down). We will need this figure to calculate new dart solutions, which we will design next.
Classic coat pattern
The pattern of a demi-season coat is modeled on the basis of the basic pattern of a women's coat with the addition of 70 mm for a loose fit, and the basic pattern of a two-seam sleeve.
Classic coat pattern
Back modeling:
- The location of the back line relief. From point A, 70 mm is deposited along the shoulder to the left. A relief seam line is drawn.
- The line of the middle back seam is straightened and drawn under the ruler from the waist line. The back piece is cut along the waist line.
- A flare is made along the lower part of the back parts by 50 mm.
Shelf modeling:
- From point B along the shoulder, 70 mm is deposited to the right. The chest dart is moved, and the line of the raised seam of the front is drawn. The waistline of the shelf rises along the side seam by cm;
- From the line running in the middle of the front, 60 mm are deposited to the right and left. The shelf is flared sideways at the bottom by 120 mm.
- From point C, 20 mm is laid down and the lapel is drawn. 230 mm is laid down from the horizontal line;
- The shoulder line is extended to the right and laid down along it;
- The lapel fold line is drawn. The neck line deepens, the lapel configuration is built - 14 cm;
- A turn-down collar is constructed, cut and spread along the upper edge by 25 mm;
- Loops and buttons are marked;
- The side of the shelf and the shelf and the edge are removed. The double-breasted sleeve is cut unchanged.
What the classic version looks like
Attention! To prevent the product from stretching or deforming, all parts are duplicated with gray non-woven fabric.
Additionally, the edges of the sides, armholes, fold line of the lapel, neckline, collar corner, and outer part of the valve are duplicated with the shared edge.
To sew a product, you need 3 m of loden with a width of 1.5 m. The parts of the back, front and sleeves are cut with allowances of 15 mm, allowances at the bottom - 40 mm.
Perfectly duplicates the figure
Classic model with two-seam sleeves
The pattern of a classic-style coat fits well on cloth - for example, gray. It will need a lining, buttons and threads to match. For a standard product of sizes 44-48, length from waist 65 cm, choose about three meters of fabric. From similar material you can sew another classic model - double-breasted, with an “English” collar and set-in pockets. The lining in it can be stitched or detached.
miltex.su
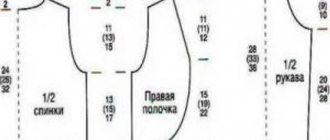
The front half of the product consists of three parts: central, side and side.
You need to model two seams on the sides (raised) - from the chest and waist darts and from the center of the armhole.
The seams are lined up according to the pattern, rounding the lines on the chest and cutting the details along the edges of the darts. The back of the coat is constructed in the same way. The two-seam sleeve, collar and lapel are formed separately. You can also make a flap for the pockets or embed them with a stitching sheet.
On the classic model, either a detachable collar or a stitched stand is made. For them, you first need to measure the neckline in front and back. It is done along the control points AB of the base rectangle. The sleeve length will be about 4 cm, and the width is determined by the parameters of the upper half.
The pattern of a women's coat with a modern straight silhouette is similar to the classic one, but the sleeves in it, as a rule, are single-seam and have one-piece cuffs.
The shelf is cut along the waist line. Folds are made in the seams on the shoulders and waist - one on top of the other. It is advisable to expand the shoulder girdle.
Basic drawings can also be used to design winter clothing, but you will need to add additional allowances for a layer of insulation.
How to cut and sew a coat using patterns
Before you begin directly sewing the product, learn how to sew a coat, you should decide on the type of product: sewing a straight-cut coat will differ from making a loose-fitting coat, the sewing technology with a lining will have its own characteristics.
Type of cocoon coat, pattern
It doesn’t matter who will wear the coat - a girl or an adult woman - not every novice craftsman can accurately cut out a children’s set, and if there is a hood and other details, the complexity of the product increases, and the class of skill increases accordingly. The best mannequin for improving practical skills is a doll.
You might be interested in: Features of paint for denim products
Processing the bottom of the sleeves with facing
There are many ways to process the bottom of products and sleeves. In many ways, the choice of technology depends on the type of product - cardigan or poncho, as well as on the equipment available to the master and his professional skills.
Pattern No. 2
Facing is often used. This type of sleeve processing is performed according to the following algorithm:
- The facing is sewn to the sleeves;
- The parameters of the seam allowance for turning the facing are adjusted;
- The stitching seams of the facing are ironed, the edging from the main part is straightened;
- The facing is secured with hidden stitches;
- The bottom is ironed.
Bottom facing
Pattern of a two-seam sleeve for a coat
Draw a rectangle ABCD. Coat sleeve width. The lines of the rectangle AB and DC are equal to 18 centimeters (1/3 of the semicircle of the chest by measurement plus 2 centimeters for all sizes): 48: 3+2 = 18. Sleeve length. The lines of the rectangle AD and BC are equal to 58 centimeters (sleeve length according to measurement).
Sleeve hem height. From point A, 17 centimeters are laid down and point P is placed (3/4 of the depth of the jacket armhole plus 2 centimeters for all sizes): (20: 4x3) + 2 = 17. From point P, a straight line is drawn to the right until it intersects with line BC and a point intersections are designated by the letter P1.
Elbow line. The PD line is divided in half. From the division point, 2 centimeters are set aside upward and point L is placed. From point L, a straight line is drawn to the right until it intersects with line BC and the intersection point is designated by the letter L1. Construction of the upper half of the sleeve
Front seam. From points P, L and D, put 4 centimeters to the left and connect. 2 centimeters are set aside from point L to the left. The front seam line is drawn through points 4, 2, 4.
Sleeve hem line. Line AB is divided in half and the division point is designated by the letter O. 5 centimeters are laid upward from point P. Points O and 5 are connected by a dotted line, divided in half, and the division point is designated by the letter O1. Points A and O1 are connected by a dotted line and divided into three equal parts. The lower division point is designated by the letter O2. From point P, dividing the angle in half, set aside 2.5 centimeters. 5 centimeters are laid upward from point P1 and point P2 is placed.
Through point P2, a dotted line of arbitrary length is drawn to the right and left. 4 centimeters are set aside from point P2 to the right. The distance VP2 is divided in half, the division point is designated Oz. Points O and O3 are connected by a dotted line, divided in half, and 1.5 centimeters are set aside from the division point upward at right angles to the dotted line. The sleeve hem line is drawn through points 4, 2.5, 5, O2, O, 1.5, Oz, 4.
Elbow seam line. From point L1, 4 centimeters are set aside to the right and connected to point 4 (upper). From point 4 (top) 9 centimeters are laid down. Then, from point D, 14 centimeters are set aside to the right (the semicircle of the wrist by measurement plus 5 centimeters for all sizes): 9 + 5 = 14. Points 14 and 9 are connected by a dotted line, divided in half and 1 centimeter is set aside from the division point to the right. The elbow suture line is drawn through points 4, 9, 1, 14, lengthening it down by 3 centimeters.
Bottom line. The bottom line is drawn through points 4, D, 3.
The fold line of the front of the sleeve. From point L, 2 centimeters are set aside to the right. The fold line is drawn through points D, 2, P and further until it intersects with the sleeve hem line.
When ironing, the front seam line is pulled back, and the elbow seam line is ironed.
Basic lining sleeves
When sewing a product, not always everything turns out as planned. Sometimes it happens that the sleeve was intended to be single-seam, and when the product is ready for fitting, it becomes clear that the sleeve width is not enough. In this case, the appropriate option is to sew on a two-seam sleeve, which means that a foundation is required.
2 lines are drawn on the sleeve, defining the position of the inner and elbow seam (the minimum distance is taken). The width of the allowances is marked - 15 mm and the part is cut out along with the seam, which acts as a pattern.
What does the lining look like?
Construction of the front of the coat
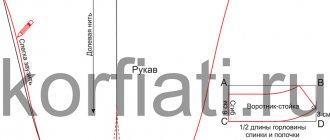
Coat neckline. From point W, add 7.5 centimeters to the left (1/3 of the semicircle of the neck by measurement plus 1.5 centimeters for all sizes): 18: 3+1.5=7.5. From point W, 8 centimeters are laid down (1/3 of the neck semicircle by measurement plus 2 centimeters for all sizes): 18: 3+2=8.
Points 7,5 and 8 are connected by a dotted line, dividing it in half. From point Ш through the division point of the dotted line, 7.5 centimeters are laid out. Points 7.5 are connected to point 8 by a concave line.
Shoulder length from neckline to chest dart. From point 7.5 (top), 4 centimeters are laid to the left and then down - 1 centimeter. Points 1 and 7.5 (top) are connected. From point G1 to the left, 10.5 centimeters are set aside (neckline from point W to point 7.5 plus 4 centimeters - shoulder length from neckline to dart minus 1 centimeter for all sizes): 7.5+4-1=10.5 .
Points 1 and 10.5 are connected.
Coat chest dart. The right dart line is equal to the distance from point 1 to the armhole line minus the increase in the depth of the floodplain (in this case it is 3 cm). The right line of the dart from point 1 to point 3 is divided in half and 4 centimeters are set aside from the division point to the left (the semicircle of the chest according to the measurement minus the semicircle above the chest according to the measurement): 48-44 = 4.
The left dart line is drawn through points 9.5 and 4 with a length equal to the right dart line, and point P3 is placed.
Shoulder length from bust dart to armhole. Point P3 is connected by a dotted line to the upper division point of line PG2 (back). From point P3 along the dotted line, put 9 centimeters to the left (the length of the shoulder according to the measurement minus 4 centimeters is the length of the shoulder from the neckline to the chest dart): 13-4 = 9.
Point 9 is connected to the lower division point of line P2G3. From point 9, 2 centimeters are laid down and connected to point P3.
Coat armhole line. The dotted line from point 2 to the lower division point of line P2G3 is divided in half and 1 centimeter is set aside from the division point to the right. From the lower right corner of the armhole, dividing the corner in half, set aside 2.5 centimeters. The armhole line is drawn through points 2.1, the lower dividing point of the line P2G3, point 2.5 and, touching the descent line of the armhole, to point G4.
Side seam of the coat. 2 centimeters are set aside from point T2 to the right. The side seam line is drawn through points G4, 2, L2 until it intersects with the DC line and point H is placed.
Designing the waistline of the coat on the pattern. From point T1, 2 centimeters are laid down and connected to point 2 (side seam).
Coat hip line. 2 centimeters are laid down from point L1 and connected to point L2.
Bottom line of the coat. From point C, line BC is extended downward by 2 centimeters and connected to point H.
Dart at the waistline of the coat (front). From point 2 (waist line) 9 centimeters are set aside to the left (distance from point 10.5 to point G1 minus 1.5 centimeters for all sizes): 10.5-1.5 = 9.
Point 9 is connected to point 10.5. From point 10.5, 5-6 centimeters are laid down.
From point 9 to the left, 3 centimeters are set aside and connected to point 5-6.
The depth of the front dart of the coat is divided in half and a dotted line is drawn down from the division point until it intersects with the hip line. 2 centimeters are laid upward from the intersection point and connected to points 9 and 3.
Dart at the waistline of the coat (side). From point G3, 2.5-3 cm is set aside to the right and a dotted line is drawn down until it intersects with the hip line. From the point of intersection of the hip line, 2 centimeters are laid upward, and from point 3, 4-5 centimeters are laid down. From the point of intersection of the dotted line with the waist line, put 1 centimeter to the right and left and connect them to points 4-5 and 2.
Increase for coat fastener (side). From point 8 (neck) and point 2 (bottom line) put 4-5 centimeters to the right and connect them.
From point 8, 1.5-2 centimeters are laid down. A smooth line is drawn through point 1.5-2 to point 5. From point C and from point 2 (descent of the waist line) 3 cm are set aside.
Points 3, 3, 5 are connected.
Note. Pattern drawing calculations are given for a single-breasted coat. To pattern a double-breasted coat, add 8-10 centimeters to the side. If the semicircle of the hips according to the measurement (together with an increase of 3 centimeters for all sizes) turns out to be greater than according to the pattern drawing, then when cutting, make the corresponding increase: 1/2, the difference between the semicircle of the hips according to the measurement (together with the increase) and the pattern drawing is added to front and 1/2, the difference is towards the back.
Coat pattern: fourth stage of construction (sleeve)
Processing pockets in darts
There are many types of pockets used in tailoring. Among them is a pocket with a leaf: often used when sewing coats. Making this pocket is not difficult if you strictly follow the instructions:
- The pattern is applied to the front shelf, the location of the pocket is noted. The corners of the pocket are pinned;
- The pocket frame is stitched (basted);
- The location of the pocket is duplicated on the reverse side of the product. A strip of dublerin is cut out (the proportion of the material coincides with the vertical of the pocket part). The parameters of the dublerin strip are 3 cm larger than the pocket and 4 cm longer than the frame of the part;
- From the inside, the part is glued with dublerin and ironed;
- The pocket leaf is cut from artificial leather or other fabric - wool, contrasting material. Additionally, the leaf detail is duplicated if it does not have the required density.
Leaflet parameters:
- Width – frame width + 30 mm;
- Length – frame length + 30 mm.
The leaflet is folded in half and stitched. It is placed in the middle of the frame in a vertical position and sewn on, falling into the blazed border of the frame.
Attention! The frame has perfect angles - the machine stitching does not extend beyond the blazed line even a millimeter.
This is necessary so that when you turn the pocket inside out, it doesn’t warp, and all the corners are straight.
Type of pockets
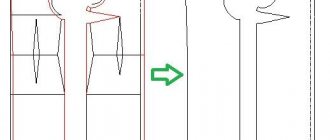
Cut out the linings
There are several ways to cut the lining.
According to patterns
The width of the facing and hem is subtracted from the middle patterns of the back and front, an increase is made in the places of “subtraction”, and a double allowance is added.
If the patterns are cut, they are combined.
The pattern is glued along the waist line, end-to-end, with tape, the middle parts of the front and back facings and hems are cut off from the patterns.
Attention! The sleeve is cut out by combining the top and bottom patterns, and a double hemming allowance of 7 cm is added along the bottom of the product.
The remaining allowances are made in the same way as for the “top” parts.
Design of the barrel lines and side lines of the back and shelf
- The lines of the cutting barrel in the upper part should have a smooth, slightly curved configuration, so that the product does not narrow under the armhole after stitching.
- Below hip level, widen the side seams towards the bottom by 5 cm to give the coat a slightly flared silhouette.
- The coat model is cut at the waist line, that is, the waist line in the base pattern drawing corresponds to the cut line in the pattern we are modeling. We will use it to cut the parts later.