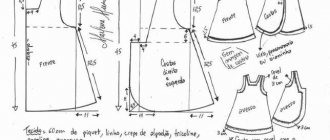
Constructing a pattern
For sewing you need a pattern for a children's vest. It's very easy to build. You should take a T-shirt of the appropriate size, turn it inside out, lay it out on paper and trace the shoulder and side borders, as well as the armhole lines. Now you need to work on the resulting sketch and make two separate templates: one for the front and the other for the back. Here you must take into account that along the canvas of the shelves the cutout for the arms and neck is a little deeper. To make the workpiece symmetrical, you can use a little trick: fold the paper in half. This will allow you to create identical cuts along the armhole, shoulder and sides.
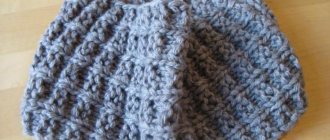
Sleeveless vest for a baby up to one year old
Little children under one year old very often get colds and get sick. Therefore, for the youngest children, a vest made from natural yarn is the best way to protect themselves from various ailments. Knitting stages:
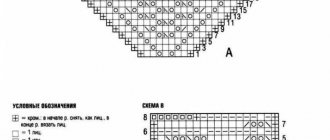
After the baby’s measurements are taken, you should decide on the length of the sleeveless vest. For a small child, it is better to make a long version of the product so that the back and butt are covered.- Of course, before you start knitting the product, you need to make a sample with a set of the appropriate number of loops.
- After the loops have already been cast on one knitting needle, you have to make an elastic band of small width - up to a maximum of two centimeters, no more. This is due to the fact that a vest for a girl under one year of age will be very small, so making wide elastic bands does not make any sense.
- After this, you should do garter knitting: the outer row is knitted on the front side of the product, and the back row on the reverse side. This knitting option is considered the simplest, which is important for beginner knitters. If you have experience in knitting, then you can use any other technique for making a sleeveless vest, taking into account the individual parameters of the child.
- After the back of the product is knitted (remember about the armholes), you need to remove several loops from the left and right edges of the product. In this case, the front and back of the workpieces must acquire a rounded shape.
- The front part of the product is made using the same principle.
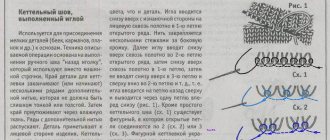
- After both parts are knitted, they need to be turned inside out and sewn together using a thick thread.
After the product is ready, all that remains is to trim off the excess knots and threads. The finished knitted vest can be decorated with an ornament or any other decoration.
Formation of style
The next step is modeling. This means it's time to designate the neckline, the location of the clasp and pockets. As a rule, the cut of the shelves is made in the middle, however, this is not necessary. It can easily be moved to the side or made obliquely.
The pattern of a children's vest can have darts along the back - this will allow you to create a fitted silhouette. But it is best to outline them during the first fitting, when the item is directly on the child. It is absolutely not necessary to measure the baby’s figure and painstakingly calculate the centimeters of darts for the paper blank.
If you plan to sew more than one vest, then you can transfer the darts to the template after trying on the fabric blank. The pattern of a children's vest without darts is considered universal. It can be used to sew absolutely any vest, both classic and sports type.
Material selection and cutting
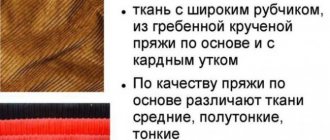
The pattern of a children's vest for a girl differs only in the location of the buttons and loops, if the model includes them. Naturally, if the little beauty still has zero breast size and additional model lines are not required. For children's products, everything is decided by the choice of material texture and color. A vest for a boy can be made of cotton, suit or corduroy. But girls have a much larger choice: velor, velvet, brocade, plush, satin, fur or guipure.
The texture of the canvas determines the processing allowances. Therefore, when cutting, it is important to take into account the thickness and “flowability” of the material. For a suit, it is better to leave an indent of 0.7-1 cm, and for cuts that are resistant to fraying, 0.5 cm will be enough. If the product is lined, then the “non-flowing” sections do not need to be weighed down by processing on an overlocker. But it is recommended to treat the edges of elements made of “loose” fabric, otherwise the vest will quickly become unusable during wear and washing.
For cutting the lining, the same template is used as for the main fabric. Here the allowance should be at least 0.7 cm, since this material is often very loose. It is better to process the sections with an overlocker or adhesive web.
Style design
Do you want a sports vest with a zipper, insulated with padding polyester, for your baby? No problem! To make it you will need raincoat fabric, lining and a piece of padding polyester. The pattern of a children's vest for a boy, drawn using a T-shirt, should be slightly enlarged. In addition to the allowances, 0.7 cm in the armholes, 1 cm on the sides and shoulder lines are indented along the contour of the template. Such models are often made with an elongated back and a smooth transition to higher shelves. Therefore, measure the required length and design the hem. Next, cut out the back and front parts from materials and insulation.
Typically, padding polyester vests are made quilted. To do this, markings are made along the top of the raincoat fabric, and insulation is pinned to the backside. All that remains is to add the seams and the quilt is ready. Assemble the parts starting from the shoulders. The collar is made from a strip of raincoat fabric. It is folded in half and duplicated with padding polyester.
In the case of a model without lining, everything is much simpler. The parts are processed using an overlocker before assembly. Immediately combine the side and shoulder sections, and then turn the material inside out and iron it. All that remains is to lay the lines, departing 0.5 cm from the edge of the fold. In a style without lining, it is important to make the correct allowances when cutting, approximately 1 cm.
The pattern for a children's vest made of fur is the same universal paper blank. For a fur product, it is slightly enlarged along the contour, as for a sleeveless vest with padding polyester, and the parts are assembled.
You can nurture the idea of sewing fashionable clothes for a child for a long time, or you can just get to work and soon proudly enjoy the result!
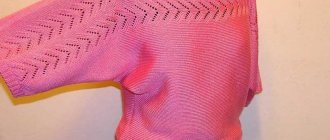
Tutorial on sewing a simple fleece vest.
Hi all. As promised, I will show you my first MK. Perhaps something was not done according to the rules, but I like the result, and perhaps you will like it. So, there will be a lot of photos and some letters)) Let's go!
We sew a vest like this:
We will need: thick fleece (mine is 280g), a little rib or other knitwear for the edging of the sleeve armholes, a zipper, pins and needles, scissors, a sewing machine, and a sewing machine if you have one (although not necessarily, the seams will just be slightly different on the inside) .
I decided to make the pattern one-piece, without side seams. You can take a pattern from magazines and join it along the side seams into a single one, or you can take a child’s loose blouse, outline the back and two halves of the front, and make armholes for the sleeves. Half of such a pattern will look like this:
Fold the fabric in half along the grain. We pin the pattern to the fold of the fabric in the middle of the back and cut it out with extra for sewing. I make less stock at the armholes. I cut out the collar placket right away, but I usually cut it to fit the neckline when I sew the shoulder seams.
We cut out a strip for the edging of the sleeve armholes.
And we sew it to the front side of the fleece along the edge, stretching the jersey a little (so that it lies softly on the folds).
This is what it will look like. Scary? This is just the beginning)))
We wrap our knitted strip on the inside and stitch it. I did this on a stitching machine, but you can do it on a machine with a double needle, or even just one line, if the knitwear allows it.
This is what it looks like from the inside out. Take sharp scissors and cut (without touching the threads from the seam).
Now it looks like this:
We connect the hangers and sew them with a straight stitch.
Trim off the excess.
To cover the thick shoulder seam, I came up with a decorative element - sew a placket from the same jersey.
Cut, fold and sew on the front side.
Turn it to the inside.
And we stitch it on a typewriter. Inside view of the hanger:
View of the shoulder from the face. I thought it was quite nice))
More:
Pin the front side of the collar placket to the front side of the neckline.
We stitch it.
On the lapel it looks like this:
Take the zipper and sew it to one side
One half is sewn:
Then we sew on the other half. We decorate the lower ends of the zipper.
Turn it inside out and it turns out:
We sweep the bottom hem of the vest and stitch it.
Beauty!
As we decorated the bottom edge, we also decorate the top. The only thing was that the zipper was too long, I bent it in the right place inside the gate and stitched it.
Turned out:
We draw up the second edge and compare in height.
We baste the collar and stitch it in the same way as the bottom edge (I forgot to make an extra frame).
We finish sewing with two lines - I sew the zipper again to hide the edge of the fleece and the zipper will hold much stronger.
So, the general view of the vest: Backside-Face
:
I hope some of you will like it and find the MK useful, don’t bother too much, I’m showing the whole process for the first time))
Happy sewing!