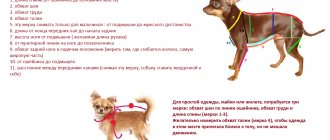
Features and nuances of knitting a mohair scarf
Mohair is made from the wool of Angora goats with the addition of other fibers - silk or acrylic. In its pure form, wool breaks easily.
The finished thread has unique properties:
- Hypoallergenic. Even people with hypersensitivity can wear mohair products.
- Fluffiness. The finished items are light, fluffy and very warm.
An important feature of mohair is that the scarf can be knitted in any pattern and in one fold, because the product is knitted with straight fabric in the shape of a rectangle. This allows you to complete a drawing of any complexity.
There are several types of mohair scarves, which differ in knitting techniques:
- Scottish. This is the name for a neck accessory with stripes or large checks. In this case, the color of the knitted fabric depends only on the aesthetic preferences of the owner.
- Indian. The coloring is a bit reminiscent of Scottish patterns, but the shades of the scarf are different. The peculiarity of Indian models is a wide canvas made of very fine yarn. Most often, men's mohair scarves are made in this style.
- Products knitted with patent (English) elastic. The models are denser and more voluminous, designed for the cool season.
- Cobwebs. To knit such patterns, you need to take kid mohair. This is yarn made from the wool not of adults, but of young Angora goats up to six months old. Kid mohair scarves are recommended to be knitted in an openwork pattern with large loops. Then the finished product is very reminiscent of a cobweb. The size of the scarf should be long and wide.
Before you start knitting, you should familiarize yourself with the nuances of the work. Mohair yarn requires proper selection of tools and calculation of the number of loops.
It is not recommended to unravel finished items. The fibers of the yarn interlock with each other, and the thread loses its fluffiness after unraveling. Therefore, correct calculation will allow you to avoid this.
For the summer openwork web model, it is recommended to take knitting needles one number larger to get an airy effect. A winter scarf should be knitted in a tight pattern (patent rib, braids, stockinette stitch). The size of the knitting needles must match the number indicated on the label or be 1 number smaller.
When describing scarf models, abbreviations of the most frequently occurring words will be used. For example, p. - loops or loop, r. - rows or series.
The emergence of technology
One of the oldest human skills is the craft of knitting. The Romans and Greeks were familiar with it. They made threads from plant and animal fibers and created a simple knitted fabric. It was used for sewing clothes. Simple items like socks also had a place.
The complex craft gradually shifted to the East, where it became the privilege of the male population. From there, thanks to the crusaders, art came to Europe. Women fell in love with needlework and began to actively develop it, creating new motifs and knitting patterns. The designs for the canvases were borrowed from related types of creativity - weaving and embroidery.
However, only society ladies could afford such an activity. Manual processing of cotton and twisting the thread from it took a lot of time, which made the price of yarn prohibitively high. Mechanization of processes helped solve this problem and make the material publicly available. This was to the benefit of the peasants, who had a chance to make good money by making lace, which was in demand at that time. During the famine, there was even special support like a modern government order - peasants received orders for knitting lace, for which good money was paid. Thus, a pair of royal silk stockings was comparable in cost to the annual salary of a shoemaker.
Article on the topic: Crochet blouse with patterns and descriptions for summer for obese women
The invention of the knitting machine jeopardized the creative side of knitting. Now it was possible not to sit on work for a long time, but to get results much faster. Experienced knitters pass on their knowledge to the younger generation in order to preserve the ancient form of needlework.
Nowadays, knitting is no less in demand. It sets fashion trends and allows you to create unique accessories using knitting patterns; you can see the new items for 2019-2019 in the photo below.
Simple knitted mohair scarf
The model should be made in the most ordinary version - a simple pattern in the form of a long rectangle. The width of the finished product is 40 cm, the length depends on the style.
In our case, the scarf has a length of at least 1.8-2 m. According to the style, it is recommended to wrap it around the neck several times. The basis of the pattern is stockinette stitch. What you will need
A mohair scarf with knitting needles, the pattern of which is very simple, can be knitted in 1-2 days.
For fruitful work you need to prepare:
- merino yarn Kid mohair, blueberry color. 200 g is enough for the product.
- Straight knitting needles , diameter No. 5, material: plastic or wood.
- Pattern diagram . Stockinette stitch is worked with knit stitches in odd rows and purl stitches in even rows. Such a model will have a front and back side.
Graphic display of the picture:
Knitting process step by step
In order for the calculation of the loops to be correct, you need to start working by knitting a control sample. To do this, you should cast on the knitting needles 20 sts + 2 edge stitches and knit 10 r. After finishing work on the fragment, you need to count the number of stitches and rows. 1 cm of canvas.
Based on the result obtained, the number of stitches in the initial row is calculated. The width of the scarf is 40 cm, there are 3 stitches in 1 cm of the sample, which means that the first row will consist of 120 stitches (40 x 3).
Algorithm for further actions:
- You need to cast on 120 stitches on needles No. 5.
- The first row should be knitted with knit stitches, then turn the work and continue with purl stitches (2nd row).
- Repeat alternating rows throughout the entire work process. At the beginning of each row, remove the first edge stitch without knitting.
- The fabric must be shaped into a rectangle without adding or subtracting stitches.
- When the length of the scarf reaches 1.8 m, bind off all the loops at the same time in one row.
It is recommended to lightly moisten the finished product from a spray bottle, lay it on a towel, and let it dry. A mohair scarf must be washed manually or in an automatic machine on the “delicate” cycle without spinning. Wring out in a towel, dry on a cloth, first straightening it along the entire length.
Patterns with moved loops for knitting a scarf
Light and beautiful patterns with displaced loops are suitable for both women's and men's scarves.
Double-sided elastic band 2x2 with relocated loops
View of the elastic on the other side:
Knitting pattern for double-sided elastic with moved loops
Ι front loop - purl loop
/ going around the first loop, first knit the second loop, then knit the first loop
Double-sided elastic with repositioned 2x4 loops
View of the elastic on the other side:
Knitting pattern
Ι front loop - purl loop
\ first knit the second loop in the back with a knit stitch, and then the first loop in front with a knit stitch
Beautiful reversible pattern with repositioned stitches
View of the pattern from the other side
Knitting pattern
Ι front loop - purl loop / going around the first loop, first knit the second loop, then knit the first loop
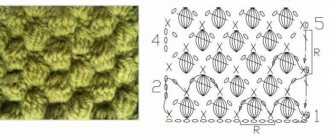
Pattern with spikelets for knitting a scarf
This is what the “Spikelet” pattern looks like from the reverse side.
Description of knitting pattern “Spikelet”
- 1st row: edge, * purl 3, 3 loops moved to the right - first knit the third loop, going around the first two in front, then knit the first and second loop. All three loops are lowered from the left knitting needle, 3 loops are moved to the left - the first loop is removed onto an additional knitting needle and left in front before work, then the second and third loops are knitted, and after them the first loop from the additional knitting needle *, purl 3, edge;
- 2nd row: knit according to the pattern;
- 3rd row: repeat from 1st row.
Knitting pattern for the “Spikelet” pattern
I front loop
- purl loop
Knit even rows according to the pattern.
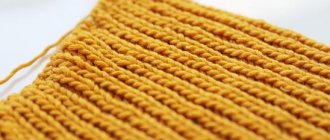
Pattern "Spikelet" in garter stitch
The pattern is made by alternating stripes of garter stitch and spikelets of 6 knit stitches.
Pattern for knitting spikelets in garter stitch
I= knit stitch
-= purl loop
Openwork mohair scarf
The model is made in a combination of a delicate pattern and the finest yarn. To knit an openwork scarf, you should choose thin threads of a single color.
The scarf is knitted with an openwork pattern. A beautiful zigzag is obtained at the ends of the product, so the edge does not require processing.
The parameters of the openwork scarf are width 45 cm, length 140 cm. The product is knitted from two halves, which are connected at neck level.
What you will need
It is recommended to knit an openwork pattern from thin yarn. In this case, the size of the knitting needles must be 2-3 numbers larger or smaller than that indicated in the table for determining sizes.
For this model you will need to prepare:
- Kid Seta Super threads – 3 skeins with parameters 210 m/25 g. Composition of royal mohair – silk 25% and mohair 75%.
- Straight knitting needles made of wood or plastic No. 3.5.
- Additional knitting needle (diameter does not matter).
- Scheme of an openwork pattern (No. 1), which indicates the front rows, and garter stitch.
Graphic image of openwork and scarf pattern:
Knitting process step by step
A knitted mohair scarf, the knitting pattern of which is presented above, must be started by making a control sample.
This must be done to:
- calculate the required knitting density;
- Make sure you select the correct spoke diameter.
If you need to change the density, then the tool will need to be changed. For a denser fabric you should take 1-2 numbers less, for a more airy one - 1-2 numbers more.
Work algorithm:
- You need to dial 106 p., the first 4 p. knit with scarf pattern No. 2.
- Then you should switch to an openwork pattern according to the diagram, but distribute the loops like this - 4 stitches of pattern No. 2, 7 repeats of pattern No. 1, 4 stitches of pattern No. 2.
- It is necessary to continue working until the fabric length mark is 70 cm, knit 3 rows. knit stitches and remove all stitches onto a pin (do not bind off).
- Set aside the canvas.
- Now you need to start knitting the second part of the scarf. To do this, you need to repeat all the steps that were done with the first part.
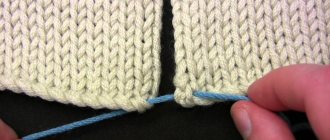
- When the second half is ready, you should connect both parts with a loop-to-loop seam.
The product needs to be slightly moistened and laid out to dry on a flat surface.
Mohair scarf - stylish protection from frost
From time immemorial, knitting has remained one of the most attractive methods of needlework. This hobby turns out to be not just interesting, but also useful. After all, with your own hands, using mohair, wool or some other yarn, you can knit the thing you dream about. This could be a scarf, sweater, hat, mittens or socks.
An additional advantage of knitting clothes is the savings in material resources. Please note that you are given the opportunity to choose the color of the product and its style at your own discretion.
DIY scarf: features of mohair knitting
Having chosen this material as the basis for creating this or that thing, you need to take into account several important points and follow certain recommendations. First of all, of course, you shouldn’t forget that the choice of yarn depends on what exactly you want to knit.
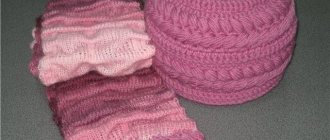
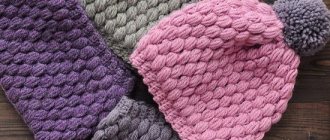
Pink mohair scarf
Selection of yarn and knitting needles
Having answered this question, you can go shopping for knitting needles and yarn. Here, pay attention not only to the color of the thread, but also to its description. In this case, carefully read the label located on the skein of mohair. It should indicate which knitting needles to knit the scarf with.
Don’t also miss the thickness of the mohair, because if it doesn’t meet the standards, the scarf may not be warm enough or, on the contrary, you will be too hot in it. It is these factors that have a primary influence on how a mohair scarf will turn out in a toga, knitted with knitting needles with your own hands.
Let's get started
So, if your goal is to create an openwork, elegant mohair scarf, then you will need to use knitting needles several times thicker than the thickness of the thread.
Typically, knitting needles are taken 3–4 times thicker than the thread. If you plan to knit a warm mohair scarf, the size of the knitting needles should be small.
This is what will allow you to create a dense mohair fabric that protects from wind and frost.
Openwork mohair scarf
Next, once the knitting needles and mohair are selected, you can begin to directly create the scarf. In most cases, warm scarves are knitted using fairly simple patterns, so there shouldn’t be any particular difficulties here.
But still, in order to rationally use the time and material allotted for knitting, you should practice a little. To do this, you can use old yarn, which is similar to mohair, but it is best to use mohair, since you need to get used to it.
This is especially true for those needlewomen who are just starting to knit. A thin thread sometimes turns out to be not strong enough, so before starting the so-called finishing work, it’s worth getting your hands on some elements.
How to knit a mohair scarf with your own hands
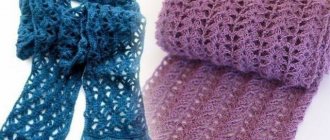
Blue mohair scarf
In general, the technique and technology of knitting a mohair scarf with knitting needles is no different from knitting with any other threads. The algorithm for performing this activity corresponds to the direct knitting order. First, to knit a mohair scarf, you need to calculate the number of loops. In this case, again, you need to take into account the thickness of the thread.
Accordingly, the thinner the thread, the more loops should be cast on and vice versa, thick mohair means casting on fewer loops for knitting a scarf. Most mohair is thin, so you will have to cast on at least 60 loops. As an option, you can consider joining two threads, then the knitting will be tighter and fewer loops will need to be cast on.
Some tips
You can knit a scarf with your own hands from mohair tightly and without resorting to folding several threads. This becomes possible thanks to a special pattern. It consists of alternating purl and knit stitches over a certain distance. Such an “elastic band” can be quite tight (when 1 or 2 loops alternate) or airy, but at the same time voluminous.
And yet, it is better to knit mohair scarves into one thread for the spring-summer season, because they will not be able to protect you from severe cold, but will mainly serve decorative functions, perfectly complementing your look. In order to get a beautiful and effective scarf, you need to use special openwork patterns that are knitted.
Mohair snood scarf
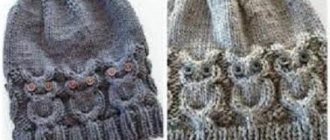
Mohair scarf with braids
A mohair scarf can be knitted not only in an openwork version . For a winter fluffy product, a wavy pattern with braids works well.
Warm, voluminous mohair scarf knitted in a “braid” pattern
Thanks to the weaves, the scarf looks voluminous. The size of the finished item is 35 cm x 130 cm. The color is turquoise. The model is made in the form of a rectangular canvas without additional edge processing.
What you will need
To knit a warm women's scarf you need to purchase:
- Mohair thread NAKO Mohair Delicate 500 m/100 g in an amount of 150 g. This is Turkish fluffy yarn without long pile, which allows you to clearly see the pattern.
- Straight knitting needles with a diameter of 3.5 cm. The yarn manufacturer recommends using tool No. 3.5-4.0.
- Crochet hook No. 3.5.
- Markers for knitting.
- Pattern diagram.
Designations – front stitch (I), purl stitch (-). The pattern is based on a 2 x 2 elastic band and a 24-p braid. The weaves are done in a checkerboard pattern.
To make the finished product fluffy, it is recommended to knit with a density of 18 sts and 24 r. 10 cm of canvas.
Knitting process step by step
According to the graphic representation of the figure, repeat = 48 p.
You need to cast on knitting needles (straight) No. 3.5 130 stitches, which are distributed as follows: 4 stitches of garter stitch + 48 stitches of rapport x 2 + for symmetry 24 stitches of repeat + 2 edge stitches + 4 stitches of garter stitch. For quality work, it is recommended to mark the rapport with markers.
Purl r. should be knitted according to the pattern.
Rows 1-8 should be knitted in the same way: 1 edge stitch, 4 stitches in garter stitch, 2 x 2 rib repeat to the end of the row, 4 stitches in garter stitch, 1 edge stitch.
Row 9 – 1 edge stitch, 4 stitches in garter stitch, *braid of 24 stitches with a cross to the left, 24 stitches, elastic 2 x 2* (repeat rapport 2 times), 4 stitches in garter stitch, 1 edge stitch.
Row 10 needs to be knitted as the stitches look (according to the picture).
Rows 11-18 should be worked as rows 1-8.
Row 19 – 1 edge stitch, 4 stitches in garter stitch, *braid of 24 stitches with a cross to the right* (repeat 2 times), 24 stitches, elastic 2 x 2, 4 stitches in garter stitch, 1 edge stitch.
Row 20 according to the drawing.
Next, repeat the pattern from rows 1 to 20 to the desired length.
At around 130 cm, you need to finish the work and carefully mask the ends of the threads.
The next stage is wet-heat treatment of the finished product. Soak the scarf in warm water, gently wring it out in a towel and dry it flat.
Chess patterns for knitting scarves
Knitting a scarf with a checkerboard pattern
The scarf can be knitted with a geometric and double-sided pattern such as “checkerboard”. This is an alternation of squares made from knit and purl stitches. A scarf knitted with this pattern will retain its shape well.
Description of chess knitting
- 1st row - 1 edge, 8 knit, 8 purl, 8 knit, 8 purl, etc. , purl the last loop;
- 2nd row - knit according to the pattern;
- 3rd, 5th, 7th rows - knit as 1st row;
- 4th, 6th, 8th rows - knit as 2nd row;
- 9th row - 1 edge, 8 purl, 8 knit, 8 purl, 8 knit, etc. , purl the last loop;
- 10th row - knit according to the pattern;
- 11th, 13th, 15th rows - knit as the 9th row;
- 12th, 14th, 16th rows - knit as the 10th row;
- 17th row - repeat from the 1st row
Knitting pattern for the checkerboard pattern
I=knit loop
-= purl loop
Knit even rows according to the pattern.
Checkerboard pattern of vertical rectangles for knitting a scarf
Another variant of the previous “checkerboard” pattern. This is an alternation of rectangles.
- 1st row - 1 edge, 4 knit, 4 purl, 4 knit, 4 purl, etc. , purl the last loop;
- 2nd row - knit according to the pattern;
- 3rd, 5th, 7th, 9th, 11th rows - knit as 1st row;
- 4th, 6th, 8th, 10th, 12th rows - knit according to the pattern;
- 13th row - 1 edge, 4 purl, 4 knit, purl, 4 knit, etc. , purl the last loop;
- 14th row - knit according to the pattern;
- 15th, 17th, 19th, 21st, 23rd rows - knit as the 13th row;
- 16th, 18th, 20th, 22nd, 24th rows - according to the drawing;
- 25th row - repeat from the 1st row.
Knitting pattern for a checkerboard pattern with vertical rectangles
Checkerboard pattern of horizontal rectangles for knitting a scarf
Similar to the previous patterns, you can knit a scarf using this pattern, when narrow and long rectangles of 8 knit and 8 purl loops alternate.
Knitting pattern for a checkerboard made of horizontal rectangles
Beautiful chess pattern of squares of different knitting
Squares of 10 loops alternate in a checkerboard pattern: a 1x1 rib pattern and a pattern of knit and purl stripes. The pattern looks good when done with light gray yarn and is suitable for knitting men's scarves.
The pattern is double-sided and on the reverse side it looks like this:
Knitting pattern for a double-sided checkerboard pattern made from squares of different knits
Legend:
Ι = front loop - = purl loop
On the wrong side, knit the pattern according to the pattern.
Mohair and silk scarf
The model should be made from yarn that contains silk thread. It is recommended to knit a thin scarf from kid mohair with silk in one fold in an openwork pattern.
To create a warm item, you need to fold the thread into 2-3 folds and choose a pattern with weaves or voluminous elastic.
Openwork pattern
A mohair scarf with knitting patterns, the knitting pattern of which is a bit like a frosty pattern. The spectacular model is made in the form of a straight rectangular canvas. The width of the product is 60 cm, length 140-145 cm. For a delicate scarf, it is recommended to choose light shades - white, pink, beige.
What you will need
For quality work you need to prepare:
- Delicate mohair yarn on a silk base. The Drops Kid Silk thread option is suitable. Number of skeins – 6 pcs. (100 m/25 g).
- Tool. You need to take knitting needles with a diameter of 4 cm and a crochet hook with a diameter of 2.5 cm.
- Pattern schemes.
This model is made using two openwork patterns.
The first (No. 1) is the border, which is located along the edges of the product. Graphic image:
The second pattern (No. 2) is the main one that makes up the fabric of the product . Scheme:
Even rows should be worked with purl stitches.
Knitting process step by step
Before starting work, it is recommended that you carefully read the drawing diagrams. The openwork effect is created by yarn overs arranged in a certain order.
First, you need to knit sample pattern No. 1 in order to calculate the number of stitches in the cast-on row for the outer zones of the scarf. You should knit with the same thread tension so that the calculation is correct. It is required to maintain the same thread tension throughout the entire operation.
- The repeat of pattern No. 1 is 9 p. After calculating the number of stitches in the cast-on row, it is necessary to symmetrically arrange the fragments across the entire width of the fabric. For example, if the calculation results in 80 stitches for the first row. You should take into account the repeat of the next main pattern No. 2, which is equal to 12 sts. Therefore, you need to add 7 sts (87 sts) and then knit like this - 1 edge stitch, 2 knit stitches, 9 repeats of pattern No. 1, 2 sts. faces., 1 edge stitch.
- Having knitted 14 r. pattern No. 1 (border), you need to switch to the main openwork pattern. In the first row, you should remove 1 stitch. To do this, immediately after the edge stitch, knit the first two loops of pattern No. 2 together with the front stitch, 86 stitches will remain.
- Then you need to knit the pattern strictly according to the pattern, distributing the loops like this - 1 edge stitch, 12 repeat stitches (repeat 7 times), 1 edge stitch.
- Having knitted 140 cm, you need to switch to pattern No. 1 again, adding one loop to the last purl row of the main pattern No. 2. Then you should continue with the “border” pattern.
Features of mohair
Mohair is a wool yarn. The raw materials for its production are obtained by shearing Angora goats. Therefore, a thread made from such wool is also called angora. The high strength of the yarn is achieved by introducing other fibers into its composition - silk, acrylic, and other woolen threads. Therefore, the content of goat wool here does not exceed 83%.
Mohair is considered a high-quality material. It has a number of advantages compared to other types of yarn. Products made from it:
warm;- lungs;
- soft;
- elastic;
- fluffy;
- hypoallergenic;
- do not wrinkle;
- easy to drape;
- have a characteristic shine;
- absorb moisture well;
- pleasant to the touch.
A variety of mohair labeled “Kid mohair” is obtained from the hair of small goats when they are first cut. These are very thin, delicate, silky and soft threads, but they do not have a particularly pronounced shine, characteristic of angora.
Working with mohair does not cause any difficulties. But there are a number of nuances that need to be taken into account:
- For knitting, you may need a slightly larger number of loops than usual, since the threads are very thin, although they seem more voluminous due to fluffing.
- You can knit in any pattern, but knitting that is too tight is not suitable for mohair. For craftswomen who knit very tightly, it is better to take thicker knitting needles. For the same reason, crochet is less preferable, especially for beginner knitters who cannot control the tightness of the knitting to a sufficient extent.
- Real mohair holds its shape well, but finished products can still be supplied in width or length. Therefore, before starting work, you need to not only knit the sample, but also wash it. Determining the knitting density should be started only after the fabric has dried.
- To help things retain their shape better, thin wool or bobbin cotton thread is added to mohair during knitting. Usually it matches the tone. If you take a contrasting color, you get an interesting melange effect.
- Angora hair gets very tangled. Because of this, it can be very difficult to unravel even newly knitted rows. Therefore, when knitting complex patterns, you need to be extremely careful so as not to get lost.
- Due to its strong tangling, mohair is not used for making tassels or fringes. They can be made from a different type of thread.
- It is not advisable to reuse yarn by unraveling a boring item. The thread will no longer be as fluffy and attractive as new.
Mohair scarf with fringe
In addition to the delicate mohair structure, the model has a decorative finish. The fringe is knitted from the main yarn and serves as decoration and addition to the relief pattern.
So that the product can be tied or wrapped around the neck, the length of the fabric is 230 cm, width 26 cm. The color of the scarf is curry. For the cool season, it is recommended to choose bright shades.
What you will need
Before starting work you will need to prepare:
- Yarn containing mohair (75%) and silk (25%). For a scarf, 100 g (4 skeins) of thread with parameters 225 m/25 g is enough.
- Wooden or plastic straight knitting needles, tool diameter 4.5 cm.
- A diagram of a pattern of diamonds, a graphic image of which is presented below.
Knitting process step by step
Before casting on loops for knitting a pattern from mohair threads, you should make a fragment from yarn of a different composition. It is important that the thickness of the thread is the same. This technique will prevent unnecessary unraveling of the fabric and will help determine your qualifications.
The initial number of loops must be calculated as follows: the number is a multiple of 20 + 7 + 2 (edge).
For a scarf with fringe, you need to cast on 49 stitches. How to distribute the additional 7 stitches can be seen in the graphic image of the pattern diagram - 3 stitches at the beginning of the row after the edge stitch, and 4 stitches at the end of the row before knitting the edge stitch.
The figure shows only knit stitches; purl stitches need to be done according to the pattern (as the stitches look).
First r. after casting on the loops you need to do this - 1 edge stitch, 1 purl. p., 1 persons. p., purl 1, pattern repeat (repeat 2 times), knit 1. p., 1 p. p., 1 persons. p., 1 p. p., 1 edge p.
Second r. - according to the drawing.
You will need to knit rows 1-34 once, then repeat rows 3-34 19 times, and finally knit rows 1 and 2. Now you need to close the loops.
Assembling the product: fringe should be woven into the first and last rows. To do this you need:
- cut threads 40 cm long;
- weave bundles of 12 threads into the braids at the ends of the scarf.
The interval between the bunches should be 1 cm. When finished, the length of the fringe is 19 cm.
Mohair scarf with sequins
A thread consists of an interlacing of two threads. The main one is mohair with acrylic and an additional thin woolen one with strung sequins.
It is important to know that when working with such yarn, you need to accurately maintain the tension. Otherwise the scarf will look a little wrinkled. Model for the warm season. Product width 45 cm, length 160 cm. Product edges without additional decoration.
Thanks to the openwork pattern at the ends of the scarf, a wavy edge is obtained.
What you will need
A knitted mohair scarf, the knitting pattern of which includes 2 patterns, can be made in any color.
For this model you need to prepare:
- Alize Gold Star thread. One skein with parameters 410 m/100 g will be enough for a scarf.
- Knitting needles No. 4.5. This is the optimal size; a skein diameter of 4 cm or 5 cm is recommended.
- Patterns for knitting fabric. You will need to take patterns of openwork pattern No. 1 and pattern No. 2 - garter stitch.
Graphic images of patterns:
Pattern No. 1
Pattern No. 2
When combined with a mohair scarf with sequins, the pattern will look like this:
Knitting process step by step
You need to cast on 87 stitches of the initial row, and then knit 1 edge stitch, pattern repeat 5 times, 1 edge stitch.
When alternating an openwork pattern and a garter stitch, you should knit evenly without decreasing or increasing. During the work, you need to carefully monitor the execution of the drawing so that you do not have to unravel the product.
When the length of the scarf reaches the desired mark, close all the loops.
For experienced knitters
For those who know how to knit at a high level, you can try making a stole with a pattern of peacock feathers. The work on it is incredibly complex and time-consuming, but the result is simply stunning. So, the accessory will be a great addition to an evening outfit. It is light, airy and at the same time elegant and luxurious.
The patterns for the product were taken from Chinese magazines and translated by the needlewomen of the Osinka portal.
Craftswomen use mohair and silk yarn. Look at what a stunningly beautiful stole it turned out to be.
Related article: Decorating a box using the Kinusaiga technique
Mohair scarf with lurex
The model is made with an openwork pattern in the form of a stole.
The combination of pattern and luminous lurex makes the scarf very elegant. Dimensions of the finished product: width 75 cm, length 170 cm. Color white.
What you will need
To work you should prepare:
- Yarn. You need to take 3.5 skeins of Mona mohair threads with parameters 210 m/25 g. Composition – 58% Kid mohair, 30% polyacrylic, 9% lurex, 3% wool. This combination allows you to make an airy scarf that holds its shape well.
- Knitting needles No. 3.5. It is better to take a tool with a cable or fishing line. This will make it easier to maintain the width of the canvas at 75 cm.
- Pattern diagram. Graphic image showing the front and back rows:
Visual image:
Knitting process step by step
You need to cast on the number of stitches on the knitting needles in multiples of 13 + 4 stitches + 2 edge stitches. For a scarf width of 75 cm, you will need to cast on 97 stitches - 1 edge stitch, *pattern repeat 13 stitches (repeat 7 times)*, k2. p., yarn over, 2 in. Persons with a slant to the left, 1 edge stitch.
The fabric must be knitted evenly without decreases or increases. Be sure to maintain the same thread tension. When the length of the scarf reaches 170 cm, carefully close the loops.
Lightly moisten the finished scarf with a spray bottle and dry on a flat surface.
A mohair scarf is an excellent decoration for any stylish look. Any pattern is suitable for knitting - from the finest openwork to voluminous braids. It is important to carefully follow the rules for working with mohair yarn and try to avoid unraveling the fabric.
Stylish brown scarf for men
The two scarves in the photo are knitted using the same pattern.
Dimensions: scarf width 30 cm, length 215 cm. To knit a men's scarf you will need: – Bergere de France Magic yarn (50% acrylic, 50% wool, 80 met/50g) – 500 g; – knitting needles No. 5.5.
Garter stitch: knit all stitches. Front stitch: in knitsev.r. – persons.p.; in purl.r. – purl. Purl stitch: in knits.r. - purl; in purl.r. – facial. Main pattern (=4 stitches): 1st row: k1, p2, k1. Rows 2 and 4: purl 1, knit 2, purl 1. Row 3: K1 next to below (insert right sp into the loop of the previous row, k1, lower the loop from the left sp), purl 2, k1. next below. Pigtail 6 p. wide: knit according to pattern 1. Do it once with 1-18 r., then repeat with 7-18 r. Relief pattern (=28 stitches): knit according to pattern 2. Work 1 r. from 1-48 rubles, then repeat from 7-48 rubles. Density: 28 p. = 13 cm (relief pattern)
Knitting pattern for a men's scarf:
Cast on 60 sts and knit as follows: 3 sts in scarf stitch, 6 sts in braid, 3 sts in purl stitch, 4 sts in main pattern, 28 sts in relief knot, 4 sts in main knot ., 3 p. purl., 6 p. braid, 3 p. scarf.in. Finish by completing half of the raised stitch and bind off the stitches.
Knitting pattern for a brown scarf.
Voluminous mohair is always in trend
The knitting pattern for a scarf from design studio Drops made from mohair threads is very simple: offset braids against the background of a regular 2 by 2 elastic band.
Scarf dimensions : 30 by 150 cm.
Required:
- 5 skeins of Drops Kid Silk yarn (75% mohair fibers, 15% silk, 100m/25g),
- knitting needles number 5.
Density : 17 p. and 22 p. = 10 by 10 cm (in stockinette stitch, 2 threads).
Description of knitting:
Cast on 68 stitches with yarn in 2 folds and knit according to the diagram. When you knit to approximately 150 cm (so that the outer braid is knitted and 5 rows after it), close the stitch above the faces. - face, above back. - purl