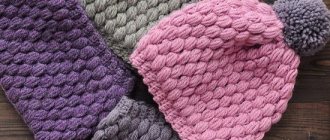
Beanie hat for stylish people
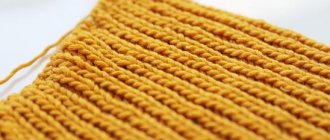
A beanie hat is commonly understood as any headdress that fits tightly around the head and is not secured with a clasp or ties. A hat made with English rib using circular knitting needles is very original, voluminous and incredibly beautiful. Its knitting pattern is simple. But before we proceed directly to knitting a hat, let's remember how to knit an English elastic band in the traditional way.
Necessary materials:
- yarn;
- knitting needles of the appropriate diameter.
Step-by-step description of the process:
- Before you start knitting a hat, knit a small sample of approximately 10x10 cm in size with the selected yarn. This way you can not only hone your skills and practice knitting with an English elastic band, but also determine the knitting density, which is very important when calculating the loops.
- In our work we will be guided by this scheme.
- Cast on an odd number of stitches on the knitting needles using the classic method.
- In the first row, after the edge stitch, we knit one knit stitch and yarn over. We remove the next loop without knitting, holding the working thread behind the fabric.
- In the next row, we first yarn over, then remove the loop without knitting. Now according to the drawing there is a pair of loops and yarn overs. We knit them simultaneously with a knit stitch.
- In the third row, we knit the loops with the yarn overs using knit stitches, then we make a yarn over, and we remove the next loop without knitting, holding the thread behind the fabric.
- The repeat of the pattern in height is two rows. Will alternate between the second and third rows.
Now that you have determined the knitting density, you can start knitting a beanie hat. A hat knitted with melange yarn will look very beautiful.
Necessary materials:
- melange yarn – 100 g;
- knitting needles size No. 3 – set.
Step-by-step description of the process:
- A mohair hat is knitted in the same way using English rib using circular knitting needles. You can use a set of double needles or knitting needles on a fishing line. Each needlewoman chooses what is convenient for her.
- When knitting 1x1 elastic, we will knit the front loops behind the back wall, and knit the back loops in the classic way.
- We will knit an English rib using this rapport. In the first row we knit one front stitch, yarn over and slip off the next stitch without knitting. In the next row we slip the front loop together with the yarn over, and then we knit the loop with the yarn over with a purl loop.
- In the next row, we knit the removed loop with a yarn over, perform a yarn over, then remove the loop without knitting. The vertical repeat of this elastic band is two rows. In circular knitting we will alternate the second and third rows.
- We cast on 104 stitches on the knitting needles using the classic method.
- Distribute the same number of stitches on four knitting needles. This results in 26 stitches on each needle. We close the set row into a circle.
- We knit the first eight rows with a 1x1 elastic band, that is, we alternate one front and one purl loop.
- Next, we move on to knitting the main pattern - English elastic.
- We knit to the desired height. On average, we knit with an English elastic band in a circle of 18-20 cm in height.
- Now let's start making decreases. We remove one front loop without knitting, knit the next loop. Now with the left knitting needle we grab the unknitted loop and throw it over the knitted loop.
- Thus, we continue to decrease the loops so that their total number is halved.
- We knit the next row completely with facial loops.
- In this row, we again perform decreases according to the algorithm described above.
- When the minimum number of loops remains on the knitting needles, we transfer them from the knitting needles to the working thread and carefully pull the top of the hat together.
Small nuances
Knitting needles that are used for knitting can be divided according to several characteristics: wood, plastic, metal. Knitting needles are made from these materials. Many housewives began to give preference to wood, because, unlike iron, such knitting needles do not bend. But, as they say, all knitting needles have different tastes and colors.
Number of knitting needles in sets. Regular sets consist of two or five knitting needles. Gloves, mittens and hosiery are usually knitted with five knitting needles. As well as some types of hats and some types of scarves and collars. Two knitting needles are used when working on regular scarves, clothing, hats, blankets and some types of rugs.
Knitting needles are also circular. These are two ordinary knitting needles, fastened together with a cable, most often rubber or thick but soft fishing line. They are used when knitting in the round or vasing straight products. If you are new to knitting, we recommend starting with these needles.
The knitting needles are also divided by numbering. The number of the knitting needle, for example No. 2, indicates its thickness. The diameter of the knitting needle is selected depending on the desired thickness of the product, the thickness and density of the yarn you are working with. To determine the diameter of the spoke, you can use a special calibrator.
Related article: Crochet blanket with motif diagram
So let's get started.
Voluminous hat with English elastic band using circular knitting needles
Every woman wants to look irresistible, and severe frost is not a hindrance to this. In a voluminous hat knitted with an English elastic band, you will look fashionable and stylish.
On a note! It is very easy to knit a hat with English rib with a lapel using circular knitting needles. You need to knit a longer fabric, taking into account the height of the lapel. And the decreases for rounding the cap on the head are made identically to other models.
Necessary materials:
- yarn – 200 g;
- circular knitting needles size No. 4;
- Sock knitting needles size No. 4.
Step-by-step description of the process:
- In addition to the English rib, we will knit a hat using a scarf pattern. In the front row we knit all the stitches with knit stitches, and in the purl row, respectively, with purl stitches.
- Cast on 90 stitches on the knitting needles using the classic method.
- We close the knitting in a circle and knit four rows in height from the cast-on row in a garter pattern.
- Now we move to the front stitch and knit another 10 circular rows.
- We switch to the shawl pattern again and knit four rows.
- From the next row we will knit a hat with an English elastic band.
- Repeating the pattern repeat, consisting of two vertical rows, we knit 30 circular rows.
- From this moment we begin to decrease the loops. In each paired row we will decrease five stitches evenly and symmetrically.
- So, after one row we decrease until five stitches remain on the knitting needles.
- We break the working thread and throw the remaining loops onto it. We carefully tighten the crown of the hat.
Advice! You can knit a hat entirely with English rib. To get a lapel, additionally knit the fabric 8-10 cm high. A hat with a double lapel is even more voluminous.
How to decrease loops in a hat
You will need
- Circular knitting needles
- Two straight knitting needles
- Yarn
- Side seam needle
- Hook
- Cardboard
- Scissors
Instructions
Master decreasing stitches in a simple round hat. Your task is to knit the product with circular knitting needles with the main pattern to a height of approximately 12-16 cm. The beginning of decreases (rounding of the model) is calculated individually. To do this, you need to try on an unknitted hat on your head.
Decrease on knit rows. For example, every ten loops, knit two loops at once. On the next knit row, decrease by counting 8 stitches. Thus, knit two loops together on every second working row through 6, 4 loops, etc.
As a result, you should be left with a ring of 10-12 loops.
Gather the remaining loops onto a double-folded thread of the same color and pull the top of the hat tight. Using a hook, drag the remaining “tail” to the wrong side of the knitted product. Try decreasing the loops in the cap hat.
You will get a narrower and shorter cap if you start gradual decreases in the hat almost from the very beginning of knitting. So, knit about 4 cm of fabric on two knitting needles using garter stitch or 1x1 rib. Now you can create a “Pinocchio” type model, alternating colored stripes, or choose any other pattern.
Immediately start knitting two loops together from the front side of the product. Decrease at equal intervals every third row. So remove one loop 5 times; then four loops 3 times. Continue until you have only a dozen stitches left on the needles - this will be approximately 30 cm from the start of work.
Pass the cut working thread through the open loops and pull off the top of the model. Sew the sides of the knitted hat together. For a wider and longer cap, you need to knit 20-25 centimeters of fabric, and only then start decreasing the loops in the hat. At the beginning and at the end of each row, you need to knit two loops together.
Continue doing this every sixth working row. Pull the remaining top of 10-12 loops as in previous cases.
Helpful advice
To give your beanie hat a finished look, master the technique of making a pompom. Cut out two identical circles from thick cardboard (their size depends on the required size of the pompom), put them together and draw a small circle (about the size of a ruble coin) in the center. Cut out the center circle.
Now wrap the yarn very tightly around the cardboard frame, passing the threads through the middle. Using scissors, cut the threads along the edges of the folded cardboard circles. Tighten a fairly long “tail” between them (with its help you will attach the pompom to the hat).
Make a strong knot and remove the finished pompom from the cardboard base.
Sources:
- hat with knitting needles decreasing stitches
In crocheting, there are many patterns and products that require decreasing stitches - these are mittens, socks, scarves, hats, backs, shelves, sleeves of pullovers and sweaters and much more. Decreasing stitches in a knitted fabric reduces it, and adding more stitches increases it.
Instructions
If you have already knitted a row and then need to decrease a few stitches, knit them with single crochets, then continue knitting the stitches of the pattern until a certain point at the end of the row - so that at the end there are as many stitches not knitted by you as you decreased at the beginning row.
To smooth out the uneven edge left by decreasing the stitches, tie it later with single crochets. If the loops need to be decreased not at the beginning, but in the middle of the knitted part, knit two stitches together in one row, passing an equal number of loops between them.
For example, through one or two loops, knit stitches not as usual, but in the amount of two at once. To do this, insert the hook into the loop and pull the picked up thread through the loop. Then insert your hook into the next loop and pick up the yarn again, then pull through the loop.
Knit together the three loops that ended up on your hook after these steps. Continue decreasing stitches in this manner until the row ends. Another method of decreasing stitches is to knit stitches through one loop.
By skipping every second loop in knitting, you thereby reduce the number of loops and narrow the fabric. This method is faster than the previous one and is suitable for knitting large items that require a large time investment.
note
To obtain this shape, you will need to add or subtract loops and columns of the pattern. Decrease loops in the middle of the part. Knit two stitches in one row together through the same number of stitches and through one or more rows of the pattern. The hook is inserted into the loop of the bottom row, the thread is picked up, pulled through the loop and left undone on the hook.
Helpful advice
For high-quality crocheting of clothing and other items, you need to learn several ways to add and decrease stitches in a knitted fabric. Adding a loop inside a row. Knit two stitches into one loop of the bottom row. Method 2: Between two stitches, cast on one air loop, into which you knit an additional stitch in the next row. A simple decrease in stitches along the edge.
Sources:
- decreasing stitches when crocheting
Source: https://www.kakprosto.ru/kak-25692-kak-ubavlyat-petli-v-shapke
How to properly close (reduce) the loops on a hat, depending on the model
There are two fundamentally different ways to knit these items of clothing:
- On circular knitting needles (the product is seamless).
- On straight knitting needles (it is necessary to sew a seam along the height).
Also, the model of the headdress may imply the need to decrease the loops towards the crown, knitting the fabric using the method of shortened rows, as well as the direction of knitting from top to bottom and bottom to top.
Let's take a closer look at the most popular models and the completion features for each of them.
Easy way
The simplest way can rightly be called the option using a needle and thread. This method is especially relevant for completing work on items knitted in one piece, without decreasing or with minimal decreasing loops towards the crown. The main advantages of such hats are the ease of knitting, the ability to knit on straight knitting needles with subsequent stitching of the fabric in height, as well as a sufficient variety of patterns used.
In order to finish such a thing, you just need to thread a large “gypsy” type thread, which is used to knit a hat, and thread it through the last open loops on the knitting needle. The needle is then pulled out of the knitting and the top is tightened with thread. Its ends are brought out to the wrong side and tied with a knot. The hat can be left as is, or you can attach a pompom to the junction of the loops.
Advice! If instead of yarn you use spandex thread of a suitable shade, you can make a well-stretched hole into which you can thread hair tied in a ponytail.
Wedges
If you knit a hat on straight or circular knitting needles from the bottom up and decrease at equal intervals in the same places, at the end of knitting you will have a very small number of loops left, which can be quite easily connected using a hook or the same needle with thread.
Advice! Pull the yarn through the last stitches twice. This will minimize the size of the “hole” formed after the procedure of connecting the loops.
For a round hat
When knitting a product with a round crown, the main feature is the decrease of loops: they are decreased at a relatively short distance from the crown by knitting every two loops out of four in the first row of decreases.
Afterwards, several rows are knitted according to the pattern without decreasing, then two loops are decreased per row until 8–10 loops remain on the knitting needles. To complete work on such a thing, you should thread it through the loops using a hook or needle.
Advice! To knit a hat “in the round” at the end of knitting it is not at all necessary to switch to stocking needles. It’s enough just to have circular knitting needles on a long fishing line in your creative arsenal.
On a stocking cap
These models are also called beanie hats. The easiest way to knit them is to knit the fabric using shortened rows on straight knitting needles. With this type of knitting, wedges are formed on the hat. After knitting the required number of these elements, the product is sewn together using a hook along the height, and then the top of the hat is connected with the same hook.
Advice! This hat model is quite versatile; it can be worn with or without a lapel. And the main feature of a stocking cap is that it can be sewn in at the top of the head and you can get some kind of ears.
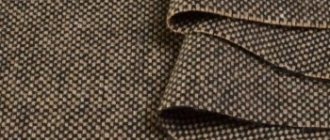
With English rubber band
English rib is a very beautiful pattern, voluminous and suitable for knitting almost all models of knitted hats. You can connect it using the description given in Diagram 1.
Pattern 1 – Knitting an English rib
The main feature of working with fabric from this pattern is the method of closing the loops . In order to do this, you need to switch from English elastic to regular elastic, 1*1 format. This transition is made in the row in which the knit stitch ends up with a double crochet. After this, the loops are reduced and closed in the manner suggested by the model you have chosen.
How to decrease loops on a hat
The simplest knitted hat can become a trendy item if it is executed impeccably. And it’s not just about the material, style, color. The main thing is to correctly reduce the loops on the top of the head so that it turns out smooth, smooth, neat and the hat fits on the head. Let's look at several options for decreasing loops.
1
How to decrease loops on a hat - an elementary way
The headdress will look without folds and protruding cone if you start decreasing in time. Knit 18 cm of the main pattern, then start cutting:
- Row 1 – knit 3 loops together (hereinafter referred to as vm.), five according to the pattern (r.), 2 vm., 5 r. and so on until the end of the row;
- from the second to the eighth row - without decreases;
- 3rd row – *2 vm., 4 r.*, repeat **until the end of the line;
- 5th row – *2 in., 1 r., 2 in., 1 r.*, then from* to*;
- Row 7 – two loops together, two in a pattern, 2 vm, 2 r., repeat;
- 9 row – *2 in., 1 r., 2 in., 1 r.*, then – **;
- Row 11 – knit all remaining stitches two together.
Pull the working thread through the remaining loops, tighten it and fasten it from the wrong side. Decorate your creation with a fluffy pompom and get an original headdress.
2
How to decrease loops on a hat - dividing into wedges
A beautiful bottom will be obtained by shortening the loops in pre-marked areas:
- Having knitted the main fabric, divide the loops into 6 parts and mark the edges of the visual wedges with a marker;
- cut at the beginning of the segments, making 2 knit stitches slanted to the right;
- knit the second and third rows with satin stitch, and decrease them in the 4th row, then repeat the steps in each row;
- leave two loops in the wedges, tighten them with thread and put them in the seam at the back.
The smooth hat will easily fit into a sports outfit, travel equipment or an outing.
3
How to decrease stitches on a round hat
This method is ideal for complex patterns.
- Make the required height of the product on circular knitting needles, divide all the loops into 4 parts and transfer them to stocking needles.
- The sequence of work for the 1st row for all knitting needles is 2 loops behind the front wall, then according to the pattern, and the last three loops according to the pattern - remove the 1st loop, the 2nd according to the pattern, pry and pull the knitted one through it, and the outer one – make a facial one.
- The next row is without decreasing, then repeating the previous point. Knit like this, alternating rows, and when 4 loops remain, crochet them at the top of the head.
4
How to decrease stitches on a stocking cap
In the popular beanie model, which young people have been wearing with pleasure lately, it is not difficult to cut the loops.
First, shape the stocking up to the crown and begin decreasing, in which the number of loops is halved.
For example: there are 20 rows left to make, and in total you had 40 loops, which means 40: 20 = 2 loops, which you will tie together when decreasing. Finish the entire cap, and tighten the remaining loops with thread.
5
How to decrease stitches on a scallop hat
A hat of this style, depending on the length of the scallop, is suitable not only for children, but also for adults.
Knit the desired depth of the product, remove the loops onto the thread. Fold the hat in half and sew the back seam. Having reached the loops, pick them up on both sides and sew them into the same seam.
6
How to decrease stitches on a hat knitted with an elastic band
Finish the model to the top (knitting - elastic band 2 x 2), then close all the loops on the wrong side, knitting two together, and get an elastic band - 1 x 1. Next - a simple front row, knit the next purl row in three loops - 2 knits. 1 purl. – 2 purl, 1 knit. and so on. Remove the remaining 10 loops onto a thread, tighten, secure - the hat is ready.
As you can see, making a neat bottom on a hat is not at all difficult. The main thing is to take your time, thoroughly study the different decreasing techniques and practice, starting with small motives. And in a short time you will be able to create stylish hats that fit you perfectly.
Source: https://SovetClub.ru/kak-ubavlyat-petli-na-shapke
Classic hat with an elastic band 2 by 2. Two ways to cover the top of the head
The main difficulty in knitting a hat with a 2 by 2 elastic band is making the correct calculation. So that it does not slip off the head, and is not too tight. The fact is that the control sample must be measured in a stretched form. Approximately how it will sit on your head.
And if you want a ready-made diagram with a description and calculation of the loops, see the models below. Check out these two knitted hats with 2x2 rib. Outwardly they are very similar. The difference lies in the choice of yarn and the design of the top. Many people wonder how to properly tie the top of a hat with a 2 by 2 elastic band? Using these models as an example, we will consider two ways to decrease loops.
Lilac hat with lapel
A completely simple, classic style of hat with an elasticated cuff is always relevant. It suits many people, the hem gives additional warmth and protection from the wind, additional volume.
Sizes: 54/56 cm, 56/58 cm, 58/60 cm. You will need: - Drops Baby Merino yarn (100% wool 175m/50g); — Drops Kid-Silk yarn (75% mohair 25% silk 200mt/25g); — knitting needles No. 3.5 Density: 20 stitches = 10 cm (two-fold thread).
You can knit a hat using this method on either circular or straight knitting needles, whichever is more convenient. The scheme is the same.
Description of knitting a hat with a lapel:
- Cast on 104/108/112 stitches and knit 2 by 2 rib (k2, p2).
- How to finish a hat using the smooth method? At a height of 24/24/25 cm, knit two loops together in all purl paths.
- Three rows - according to the drawing.
- Two loops together in all facial paths.
- Three rows - according to the drawing.
- All loops are 2 together.
- One row according to the drawing.
- All loops are 2 together.
- Tighten the remaining sts with a working thread and strengthen.
The height of the finished product is 27/27/28 cm.
Blue hat. Closing the crown with wedges
Please note: the yarn chosen is different, so the stitch calculations will be different!
You will need: - Drops Karisma yarn (100% wool 100mt/50g) - 100 grams; - knitting needle No. 3.5 Density: 22 sts = 10 cm
Knitting pattern:
- Cast on 128 stitches on needles. and knit 20 cm with a 2 by 2 elastic band.
- How to finish the crown differently? This is the wedge method. We divide the loops into 4 parts like this: * 30 stitches, 2 stitches - so that these two stitches coincide with the front track * - repeat until the end of the row.
- We will make decreases in every second row before and after these 2 knit stitches. We knit 1 stitch in front of the knit stitch together with 1 stitch from the track behind the front wall to make a slant to the right. Then we remove the second loop from the track, the next one according to the drawing and pull the removed one through it. As a result, you will end up with four ribs converging towards the center. You can knit 5 or 6 wedges in the same way, if you prefer this design.
- When 8-10 stitches remain, pull and fasten.
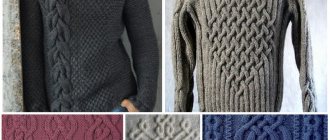
Designer Birgitz Bobble hat by Natasia Hornby
And here is a very interesting model of a designer hat for women, knitted with knitting needles, from the fashion magazine Knit Now. This type of knitting may seem difficult for beginners. But don’t rush to draw conclusions, but rather imagine that you are solving an interesting puzzle and get to work quickly.
To make it you will need 100 g of wool yarn, circular knitting needles No. 3.25, 3.75 40 cm long, sharp knitting needles at both ends 3.75, an additional knitting needle, a marker, a template for a pompom.
Knitting is performed in 20 loops of 29 rows, of which 10 cm are knitted with satin stitch (knit stitch) and knitting needle No. 3.75. The next 24 stitches are worked in a 36-row pattern, also using knitting needles No. 3.75.
The hat begins to knit from the bottom. And when decreasing, it is knitted with knitting needles with two sharp ends.
Knitting description:
- Cast on 120 stitches using 3.25 needles and gather stitches in the round. Insert a marker into the first stitch of the row.
- Knit from the 1st to the 5th row as shown in the diagram and repeat the pattern of rows 2-5 4 times.
- Change the knitting needles to number 3.75 and knit from rows 1 to 53 according to the pattern.
- Pull tightly with loose thread and cut off excess thread.
- Make a pompom according to the template and sew it to the top of the hat.
Super volume patterned elastic band
Knitting with thick, voluminous threads is now very fashionable. The so-called “oversized” style is not losing ground. Hats knitted with an elastic band using large yarn look impressive; they can be knitted in one evening. One drawback is the rather high price of the yarn. On our website TatuchkaClub.ru we have already reviewed a model from Verena magazine, we will not repeat it. Follow the link to find out the detailed knitting pattern for the model.
Video lesson:
Russian way of closing loops
The loops of the last row can be closed with knit or purl stitches. First, we consider the technique of closing with face-type loops. The two outer loops are knitted together with one knit stitch. We slightly stretch the resulting loop and transfer it to the left knitting needle, then it, together with the next loop, is again knitted using a knitting loop. Along the knitting edge, a neat chain is obtained, located on the front side of the work.
The second way to design the final row of knitting is with purl loops. In this case, the thread should be located on top of the left knitting needle. The right one is threaded through two loops, then both of them are knitted with a purl loop.
The knitted loops are removed, the thread is again laid over the left knitting needle, and the new loop is transferred to the left knitting needle. The pigtail on the edge is obtained from the wrong side. If you are knitting a scarf, the border will be beautiful and comfortable.
Romantic style
Charming white beret hat with a funny black pompom. What a miracle! It is knitted entirely with a 2 by 2 elastic band. The difference in volume between the band and the main fluffy part is created due to the different number of knitting needles.
Size: 56/57 cm. You will need: - Winter Premiere yarn from Pekhorka (50% merino wool, 59% acrylic, 150m/100g) - 1 skein; - circular knitting needles No. 3.5, No. 5.5.
The entire hat needs to be knitted with a 2 x 2 elastic band, except for the first two rows. To ensure that the hat band sits tightly on the head, we start knitting with a hollow elastic band and knit only two rows. It would be enough.
Hollow elastic pattern: 1st row: * K1, slip 1 stitch, thread in front of the loop * to the end, close the circle; 2p.: * purl stitches, remove knit stitches, thread in front of loop *
Knitting pattern:
- Using knitting needles No. 3.5, cast on 86 loops and knit 2 rows with a hollow elastic band.
- We switch to the main pattern 2 x 2 and knit 4 cm.
- Change the knitting needles to number 5.5, continue with the same 15 cm pattern.
- How to reduce the elastic using the example of a beret hat? We knit all the loops two together. In the front runners there are 2 knits, in the back ones - in the back.
- Next 4 cm with an elastic band 1 x 1.
- We tighten the loops with a working thread and fasten tightly.
- Make a pompom and sew it on.
To prevent the hat band from stretching, you can thread a double spandex thread through the loops of the first rows, making 2-3 turns.
How to knit a double hat, read the description here:
Video master class on knitting a hat with another way to design a beautiful crown:
Completing knitting a hat
When knitting a hat, many people fear that they will not be able to complete the crown. Our master class is designed for those who have already learned to knit and were able to knit a hat; all that remains is to complete it. There are 87 stitches knitted on the hat, an odd number.
The result is a simple rectangle. You can transfer all the loops of the top to a needle and thread and pull all the loops together. Don’t let the fact that there will be a hole at the very top bother you. It makes it difficult to freeze, and if you plan to place a pompom on the hat, it will completely cover it. By collecting the resulting folds, you will get a wonderful hat.
All that remains is to remove the side seam. You can gather the top edge not with the same thread from which you knitted the hat, but with spandex elastic, doubled or tripled. In this case, the hole in the hat becomes elastic, and you can thread hair gathered into a ponytail through it. This makes for an interesting hairstyle.
How to decrease loops when knitting a hat - design options and MK video
How to decrease stitches when knitting a hat as discreetly and accurately as possible? Perhaps this is one of the most pressing questions for beginning knitters! Our lesson today will reveal to you the secrets of experienced craftswomen. Read on to learn how to finish your cap in five different ways!
Reductions around the edges
As a rule, the circumference of the hat is approximately 55-57 cm, and the height ranges from 18-20 cm, excluding lapels. At first, the cloth is knitted straight, and starting from about the middle, it gradually narrows. We recommend starting to decrease stitches at the stage when your knitting reaches 12-15 cm in height.
The easiest way to decrease is to knit two or more stitches together at the very end of the row. So that you can practice, we advise you to take the previous panel and continue stocking stitch, knitting two stitches together with the purl stitch (the edge and the stitch next to it) in each knit (!) row.
Reducing loops in a circle
The easiest and most understandable way is to knit two buttonholes into one. This option is great for working on hats and berets. In particular, in a hat, you will have to get rid of unnecessary buttonholes, starting from the middle and gradually moving towards the top of the product.
To ensure everything goes smoothly, we divide the hat, starting from the middle, into four to five equal sectors. And then at the end and at the very beginning of each part we grab two loops instead of one, checking the diagram of the thing. Working in this way, we will get a semicircle that will perfectly fit the shape of the head.
Simple decreases
This method is ideal for simple knitting, for example, consisting only of knit stitches - what is needed for beginners.
First, you need to knit the base of the cap on circular knitting needles with facial loops to the required height. Next, we proceed to the formation of the crown: we switch to stocking knitting needles of the same or slightly smaller size (for example, if the base of the hat was knitted on circular knitting needles No. 3.5, stocking needles should be taken No. 3 or No. 3.5). Before transferring the loops, divide them into 4 equal (+– 2-3 loops) parts. For example, if a hat consists of 80 loops, divide them by 20 for each section.
We transfer the loops and start knitting a row with decreases: we knit the first two loops together behind the front wall, then we continue to knit the loops in the usual way, leaving the last 3 unknitted. We knit these last three loops in this way: we remove the 1st without knitting, we knit the 2nd in the usual way, after which we need to pick up the loop that we just removed and pull the already knitted one through it (we do a broach). We knit the outermost stitch of 3 stitches. We repeat this pattern on each of the four knitting needles.
The new row is knitted without decreases, but the next row after it is knitted according to the previously described pattern with decreases. Simply put, we alternate rows with decreases on each needle and rows without any decreases. We continue this until there are 4 (or less) loops left on each of the knitting needles, then you can safely tighten the crown with a thread. We advise you to grab it with a hook and carefully remove all open loops on it.
To form decreases on the top of the head, you can divide all the loops not only into 4 parts, but also into 5 or 6, but the rhythm of the decreases changes.
This method is suitable for a hat knitted in garter stitch, but you will have to divide all the loops into more than 4 parts.
If you want the hat to fit tightly enough to the top of your head, start decreasing at the top of the tips of your ears, give or take a centimeter. If you want to get an elongated cap, we recommend making decreases a little later, about 3-5 cm from the level of the top of the ear.
Working with an oblique neck
Let's consider a thing knitted with an elastic band as an example. At the beginning of every fourth row we knit 3 stitches, then the wrong side. We transfer the front loop to the knitting needle in the right hand, but leave it unknitted. Next, we knit a couple of stitches with the right side and pass through them the loop that we did not knit. We mirror the actions and finish our series. We do the decrease through one row. We knit four loops with the front ones, then the wrong side. Next, a couple of loops are again wrong side out. We mirror the left line.
Related article: Teddy bear, giraffe, squirrel and elephant amigurumi
Once we have hidden the loops, we have a braid. Starting from the right side, we knit a couple of loops inside out. Next we knit 4 persons. loops that cross to the right every 4th row. Now we take one purl and one regular loop and knit them together.
When working with the left side, it is necessary in a mirror order. The main thing is to clearly follow the “braid” pattern and do not forget to cross every 4 rows from right to left.
Let's start the herringbone pattern from right to left, with the first three knit stitches. Then we knit a couple of loops. side and, having removed these loops from the knitting needle, knit the front one behind the knitting needle. The left side is the same in the opposite direction.
Reductions in eight places
Everything is the same, only the knitting is divided into eight wedges. We make decreases at the beginning of each wedge (several times in the 4th row, then in every 8th).
The loops at the beginning of the wedge can be reduced in two ways:
- 2 p.vm. persons with a tilt to the right. Thread behind knitting. The right knitting needle goes simultaneously into 2 adjacent loops on the left knitting needle, grabbing them by the front segments, we knit them.
- 2 p.vm. persons with a tilt to the left. Exactly the same, only we grab the loops by the back segments. These are all the secrets of how to correctly decrease stitches when knitting a hat. We hope you find our lesson useful. Happy knitting!
Scallop hat
This model of hats is suitable for both men and women. Young mothers especially often knit it for their children, because they can experiment with the length of the “cap” or comb. And there are minimal difficulties with knitting such a hat.
Let's look at how to correctly decrease stitches on a hat using knitting needles if you are using a scallop:
- Just like in the first case, we knit with the main pattern to the required height.
- Next, remove the loops onto an additional knitting needle or thread.
- Take a needle, fold the product in half, and sew the back seam.
- When we reach the place with the loops, grab the loops alternately on both sides. And we sew them into the main back seam.
Beanie hat knitted with English elastic - 10 best options
A hat knitted with English elastic is very fashionable now! You probably know that chunky knitted hats, with or without a lapel, are very popular this year. A beanie hat knitted with English elastic is good because it stretches easily and fits any head size. The hat turns out to be voluminous and soft, the pattern looks good both on the front and on the inside. We present to your attention 5 options for hats knitted with an elastic band.
Hat with elastic band
Very often, needlewomen choose the pattern “elastic”, “openwork elastic”, “English elastic”, etc. for knitting hats. Products using this technique are very voluminous and stretch well, which makes them almost universal in size. How to decrease stitches on a hat with an elastic band using knitting needles? Experienced knitters advise:
- Start decreasing in exactly the same way as in the case of the “hat-stocking” model. That is, you need to accurately calculate the number of decreases needed and the rows where you will do this. Rib - the pattern is quite noticeable, and ugly or uneven decreases will immediately catch your eye.
- Depending on the type of elastic, decreases should be made evenly, dividing the product into several sectors of the pattern. For example, elastic band 1X1. You can decrease in every third sector or every third row. In this case, not two loops are knitted, as usual, but three at once. This way you will close the sector, and its absence will not be noticeable against the general background of the picture.