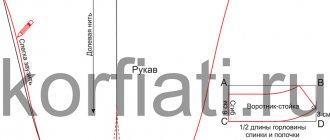
Often a well-preserved coat has been hanging in your wardrobe for years, but you don’t want to put it on because it’s an outdated style and too long. Of course, you won’t be able to remake raglan sleeves yourself, but you can shorten a coat or make a jacket out of it.
Shortening a coat in a studio is quite expensive, so try to learn how to shorten and hem the bottom of a coat yourself. No special tools or sewing machines are required for this; the main thing is to accurately determine the line along which you need to cut off the excess length of the coat.
The first video in the series on the topic “How to sew a women’s coat.” This video shows how to process a coat trim.
The second video in the series on the topic “How to sew a women’s coat.” This video shows how to process a pocket with a flap.
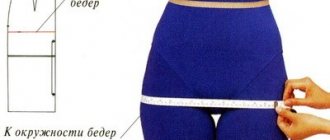
How to mark the hem line of a coat
Wear your coat with the clothes you will wear in winter or fall and have someone mark the shortening line with chalk. This is done like this: you should stand in front of the mirror without straining in the position in which you usually wear outerwear, and the other person should make the first chalk mark on the front of the coat. Gradually, you should turn to one side, and your assistant with a long ruler or triangle should remain in place and chalk marks on the front part.
The ruler should touch the floor, and the marks should be placed at the same distance from the floor. A continuous line is drawn along the marked marks, a hem allowance of 4-5 cm is added and the excess part of the coat fabric is cut off.
The hem of any coat is usually uneven (H) as the back stretches over time. This is facilitated by moisture (rain, snow), and since the drape coat is heavy, the back gradually stretches out much more than the side seams. In people with a stooped figure, on the contrary, the shelf stretches out. Therefore, you cannot rely on the factory cut of the coat and mark a new line from the old hem. In a long coat this discrepancy may not be noticeable, but in a shortened version it will immediately catch the eye. The new hem line can only be accurately determined using a ruler, taking measurements from the floor, as mentioned above.
Selection of material and preparation of parts
Sewing a new lining is most often necessary in case of damage to an existing one. Also, using padding polyester or holofiber, you can insulate the product, making it suitable for the winter period.
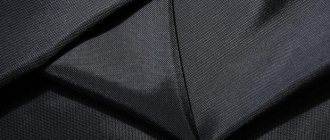
The choice of fabric must be approached with special care. It performs a large range of functions and protects the reverse side from premature wear. You should pay attention to fabric such as satin (photo). It has a dense texture and attractive appearance. However, its price is higher than other materials, so this option is not suitable for everyone.
Atlas is more budget-friendly, but no less attractive. It is often used by manufacturers to sew linings on outerwear and other wardrobe items. It retains its shape well, is protected from damage, and actively absorbs and retains moisture.
How to hem the bottom of a coat
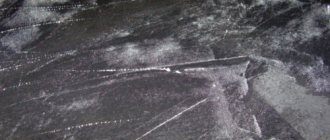
When hemming an item of heavy fabric, such as a coat, it is necessary to distribute the weight of the item evenly and to do this, make several rows of securing stitches so that the fabric does not wrinkle. A particularly high hem (4-5cm) or a hem made from heavy drape fabrics can be made using two or three rows of hand-tacking stitches, for example, herringbone, as shown in this photo. This method of hemming a coat, using several rows of stitches, will not pull back the edge of the finished product, and will evenly strengthen it along the edge.
In our example, we are considering a coat with a loose lining, that is, the hem will be attached separately, and the lining is not connected to the bottom of the coat, so the cut edge of the fabric needs to be serged or otherwise sealed.
The cut edge of a hem made from heavy drape fabrics can be finished with an edge band or an overlock stitch on an overlocker. If you don’t have an overlocker, you can use a zigzag stitch on a sewing machine. Such processing when shortening a coat is necessarily necessary for loose fabrics, since the edge of thick, heavy fabrics cannot be processed with a double hem, since jeans are hemmed. A double hem will make the seam rough and can ruin the appearance of the coat and even “print” on the front side over time.
It is very important, before hemming the coat, to glue the hem area with adhesive material. It is not necessary to glue the part that is folded, but the front side must be glued to the width of the hem. This will strengthen the fabric and prevent the bottom of the coat from appearing as a “wave”.
Press the hem line lightly. Pin the hem by pinning it halfway between the hem line and the cut edge of the fabric. Fold the edge over the pins and sew the hem from the inside using a herringbone stitch. Then re-pin the pins higher and repeat this operation.
The folded and hemmed edges of the coat must be ironed along the wrong side, being careful not to press down the iron too much. To steam the hem more strongly, you can iron it with a damp iron. It is not advisable to iron the coat from the front side, since the edge of the hem may be imprinted. See How to iron clothes properly.
Processing the bottom of products with lining.
Good day, dear readers!
It seems to me that everyone, both old and young, is aware that almost all outerwear has some special detail - a lining.
The lining is an additional, separately sewn product located inside the finished main one. The lining hides the internal design features of the clothing model from view. It extends the service life of the main product. The presence of a lining relieves the sewing enthusiast from the need to process cuts on the seam allowances. And much, much more: gasket makes it easier, reduces, prolongs.
Separate, full-fledged articles on the website milla-sidelnikova.com will be devoted to cutting out, manufacturing and methods of attaching the lining to the main products, each of these sewing operations.
Today, we will look at just one aspect of the “life of a lining” - processing the bottom of products with a lining.
The lining can be (according to the model) in length: to the waist line, to the hip line and to the bottom of the product.
Linings, those that are long to the bottom of the product, wherever this line is located (on the chest, at the waist, on the hips, at the level of the knees or ankles), can be detached along the bottom of the product and stitched.
Processing the bottom of products with stitched lining.
Stitched linings are connected to the main product at the bottom in 2 ways.
1st method.
Like this: when the bottom edge of the lining is between the main product and its hem allowance at the bottom.
a) In this case, the cut of the hem allowance on the main product may not be processed, but the hem itself may be stitched.
b) The cut of the hem allowance is treated to prevent fraying (by any of the currently existing methods). The hem allowance is stitched onto the main product.
c) A double hem is made along the bottom of the product (seam to hem with a closed cut). A double hem is stitched onto the product.
All three options for attaching the bottom of the lining to the main product, by placing the bottom edge of the lining between the main product and its hem allowance along the bottom, will be good for clothing models sewn from thick materials. Good for those cases when the main fabric significantly exceeds the thickness and density of the properties of the fabric from which the lining for this product is made. And you can be calm and confident that the lining will not “overpower” and will not pull the main fabric towards itself, to its side.
This method of processing the bottom of products is most often used when sewing outerwear. For example, jackets, windbreakers, parkas, raincoats, etc. sewn in a sporty style (or in a style close to sporty).
Option 1 is suitable for fabrics with non-fraying cuts. 2nd - for fabrics with frayed sections. 3rd - for thinner materials, but still intended for sewing outerwear.
2nd method.
This is the most common method of processing the bottom of lined products.
The bottom of the lining is first stitched to the hem allowance on the main garment. (The width of the hem allowance on the main product according to the model).
The edge of the lining is connected to the edge of the hem allowance with a stitched seam 0.7 - 1.0 cm wide. (How exactly the lining is sewn to the entire product is a separate topic, I already talked about this earlier in the article).
After turning both the main product and the lining onto the face, the hem allowance at the bottom of the product can be: stitched to the bottom of the product or not (according to the model).
- The hem allowance at the bottom of the product is stitched.
When adjusting the allowance: seam width L, type of stitch(es) (finishing(s) or simple(s)), number of stitches and thread color of the stitch(s) are determined by the model.
- The hem allowance is sewn onto the product with a special hidden machine stitch.
- The hem allowance at the bottom of the product is sewn.
If the hem allowance is sewn along the bottom of the product manually,
then the stitching must be manual, hidden and done with threads: 1) in the color of the main material, 2) or monofilament. A special transparent thread that is very similar to fishing line for fishing rods. Monofilament “adjusts” to the color of the material and becomes almost invisible on the finished product.
To sew the hem allowance to the main product, hand stitch “forward needle” with straight, unequal stitches is used.
Uneven stitches are when on one side of the product the length of the stitches is significantly longer than on the other. When hemming the bottom of lined items, hand stitches are longer on the reverse side. (From the inside, the length of the stitches is 0.5 cm, and literally 2-3 threads of fabric are pulled from the face).
Hand-stitched stitches should lie freely on the surface of the material, without tension.
Processing the bottom of products with a flyaway lining.
The first step is to process the undersides of the lining and the main product (separately).
At the bottom of the main product, various types of hem seams are most often made. L - hem width (according to model).
These can be hem seams with an open (raw) cut
and open processed (in different ways. As an option, use an overlock stitch).
And also hem seams with a closed cut (double hem).
The hem allowance can be:
1) stitched to the bottom edge of the main product
or 2) sewn by hand.
The hem allowance is adjusted and sewn on items with a flap lining, just like for items with a non-flat lining (see pictures No. 4, 5, 6, 7, 8 and No. 9 above in the article and read my comments on them).
The lining product is made from a special lining fabric. This is, as a rule, a light, thin, very free-flowing fabric. Therefore, the lower edge of the outer lining is always finished with a closed hem seam (double hem).
Folding of the material along the lower edge of the lining into a double hem seam is always fastened with stitching or zigzag machine stitches (manual stitches are not used).
The width of the seam in the hem L along the lower edge of the lining depends on whether the model being sewn belongs to a particular seasonal group. For example, for autumn-winter clothing models, the hem width can be 3-5 cm. For spring-summer models, 0.7-1.0 cm.
In this case, the lower edge of the lining is always processed so that when connecting the main product with the lining, the bottom line of the lining is: 1) 1.5 cm shorter than the bottom line of the finished product.
Or 2) the distance between the hem lines of the main product and the lining can be half the width of the hem.
For example, the hem width of the main product is 6 cm. The bottom line of the lining should be 3 cm above the bottom line of the main product.
As you can see, the bottom edge of the main product can be processed in a fairly large number of different ways.
But as for the lining, here, as I said above in the article, a hem seam with a closed cut is always made along the bottom edge of a certain width (according to the model).
Next, the main product and its lining are connected. But that's a completely different story...
Well, today we looked at just one of the many aspects of the “existence” of a lining on a product. Small, but very important and necessary for every sewing lover.
Good luck to all! Sincerely, Milla Sidelnikova!
How to shorten and sew a coat lining
After the bottom of the coat is folded and hemmed, you need to align the lining of the coat. Put the coat back on with a new hem and carefully straighten the lining on the shoulders, back and front. It is important that it hangs down without clinging to the fabric of clothing inside the coat.
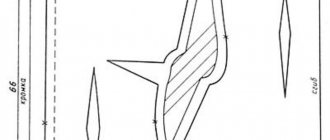
Again, with an assistant, mark the hemline, but now on the lining. From this line on the lining, 2 cm is first reduced, and then 5 cm is added. As a result, it turns out that the lining needs to be made longer than the hem of the coat by exactly 3 cm. But on the condition that the finished lining will be 2 cm shorter than the bottom of the coat. See also the article How to hem the bottom of a product with a hidden seam.
If the lining is sewn to the hem, then it is cut taking into account the placement of the fold, such as shown in this photo. It is impossible to sew a lining without a fold on the shoulders, as shown in the top photo, since it will definitely “pull” the hem or back. Firstly, it can simply cling to clothing, pulling up the edge of the coat. Secondly, some lining fabrics can “shrink” after waterlogging (rain, snow). That is why experienced tailors, before sewing a coat, perform a wet-heat treatment of the lining fabric, and in some cases, wet the lining and then dry it.