DIY patchwork blanket made from squares
For sewing you will need:
- squares of cotton fabrics, different colors, 25 cm by 25 cm – 20 pcs.;
- padding or fleece - 105 cm by 130 cm;
- fabric for the wrong side – 105 cm by 130 cm;
- threads, sewing tools.
How to sew a blanket
To sew a patchwork quilt with your own hands, we prepare the required number of square patches.
Then we lay out 4 squares. for 5 pieces, combining them by color.
Let's start sewing a blanket from multi-colored scraps with our own hands by making horizontal stripes. To do this, fold the squares in pairs with their right sides facing each other. First we will sew the sides of each pair on the right side of the stack, then we will have to sew the squares on the other side.
We continue patchwork sewing by stitching together the finished strips. One common part is sewn from them. The technique for assembling a patchwork quilt is as follows: fold the strips right sides together, pin them together, paying attention to the coincidence of the lines of the transverse stitching seams.
We combine the stripes into a common fabric.
Iron all seams.
From the sealant we cut out a rectangular piece, equal in size to the patchwork piece. We place the seal on a horizontal, flat surface, and place the patchwork piece on top, face up.
We cut out the blank for the bottom part of the bedspread and place it on the laid out parts of the seal and top, face down. We chop off a three-layer “sandwich” and stitch it, leaving an open area.
Trim off the excess seam allowance and turn it inside out.
Carefully straighten the seams, paying special attention to the corners, and iron the product. In this case, we turn the allowances in the open area inward. We sew up the open area using a machine, although you can sew it manually with blind stitches.
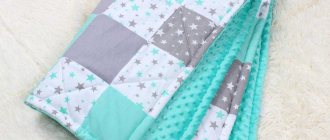
The blanket is voluminous and warm. Given the multi-layer nature, it is recommended to quilt all patchwork bedspreads. Let's do this with a regular simple line. We perform it in the seams of sewing flaps.
The voluminous bedspread is ready!
DIY patchwork bedspread
To sew a patchwork bedspread you will need:
- multi-colored rags 6.25 cm by 11.25 cm – 160 pcs.;
- two pieces of plain fabric (light and dark) – 120 cm;
- fabric for border – 45 cm;
- batting or other insulation 1.3 m by 1.4 m;
- fabric for lining – 1.3 m by 1.4 m;
- threads, sewing tools.
Step-by-step sewing instructions and photo master class
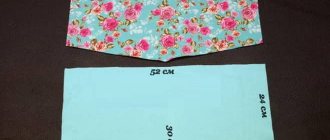
To make a blanket from multi-colored rags with your own hands, cut a light plain fabric into nine strips 6.25 cm wide. Then we divide each strip into rags 11.25 cm long. A total of 80 light rags are needed.
Using a similar technology, we cut dark fabric, obtaining 80 flaps measuring 6.25 cm by 11.25 cm.
For the border we prepare 5 strips of 5.6 cm each.
We fold the printed and plain flaps in pairs with their front sides facing each other, and sew them along the long sides. We get square blanks 11.25 cm by 11.25 cm, since part of the double width will go to seam allowances.
We lay out the blanks, orienting their seams perpendicular to each other.
When making a patchwork mosaic strip, we alternate two blanks with a light border with two blanks with a dark one. Each strip must consist of 12 squares.
When combining the flaps for the second strip, we lay the first square so that its stitching seam is perpendicular to the stitching seam of the first square of the first strip - see photo.
A completely hand-made patchwork blanket consists of 13 stripes, 12 squares each.
To ensure that a hand-sewn patchwork blanket is not only beautiful, but also warm, we use a batting pad.
We lay the material for the lining on the floor with the wrong side up, put insulation on top, and place the patchwork piece on top of it with the right side up. We cut off three layers.
We quilt the bedspread using any type of stitch.
For the border, we sew strips 5.6 cm wide into one piece and press the seams. Fold the border in half, inside out, and iron. Then we fold the cuts of both sides towards the center and iron them.
We trim the sections of the bedspread, cutting off irregularities and excess insulation. We process the perimeter of the bedspread with a border.
How to sew a patchwork quilt?
Whatever technique for sewing a blanket you choose, you need to prepare for the fact that you will have painstaking work , but its result will more than repay all the efforts spent. Before starting work, you need to think about what tools will be needed and what fabrics , and if necessary, purchase the missing material.
Tools and materials
If you don’t want to sew by hand, you can use a sewing machine - the stitches will be more accurate and the seam line will be straight. Also, many techniques use an iron to iron seams, and instead of scissors, a roller knife is used, which will greatly facilitate the work.
Stencils for patchwork
Children's patchwork quilt with trapunto embroidery
Dimensions of the finished product are 125 x 125 cm.
What you need to prepare:
- dark fabric with a small print, with a width of 1.1 m you need to take 0.5 m;
- the fabric is light, plain, with a width of 1.1 m you need to take 0.5 m;
- fabric that combines the color scheme with the previous ones, with a “peas” pattern, with a width of 1.1 m you need to take 0.7 m;
- fabric that matches the color of the underside of the blanket;
- fabric for bias tape or finished tape;
- filler;
- threads, sewing tools.
How to sew a patchwork quilt
We sew a patchwork quilt from square blocks, sewn, in turn, from rectangular and square parts.
We will combine the patchwork components according to the Irish square pattern. It is practical and versatile, easily converted to the required size of the blanket. A chain made up of squares can be single, double or triple. It depends on your choice. Embroidery or applique will look great on free areas.
The composition of the Irish square is harmoniously combined with other types of patchwork techniques and is easy to implement. This is an ideal option for beginners.
This blanket does not require a duvet cover; it can be used as a bedspread.
For convenience, the fabrics used in cutting are indicated in the photo with letters.
We cut strips of four types of fabric in width:
- plain (C) – eight stripes 16.5 cm by 27 cm;
- polka dots (B) – five stripes 16.5 cm by 27 cm;
- The rest of the fabric is cut into strips 6 cm wide.
Each block is a square with a side of 20 cm. It includes five strips of squares with a side of 5 cm. Seam allowances must be added to this size. When using a quilting foot, an allowance of 7-8 mm per side is sufficient. Accordingly, the side size of the square workpiece is 6.5 cm.
We sew the strips in the sequence C – A – B – A – C.
Then from the sewn wide strip we cut strips 6.5 cm wide.
Sew the cut out strips so that the dark squares are arranged in a checkerboard pattern.
We must prepare 12 identical square blocks.
The second type of square blocks is sewn from fabrics A and B. From fabric B, we cut out one rectangle 15 cm by 25 cm, two rectangles 5 cm by 15 cm. From fabric A we prepare four squares with a side of 5 cm. Do not forget to add seam allowances 7-8 mm each. Sew the squares together as shown in the photo.
Similar blocks in the amount of 8 pcs. sew from fabrics B and C.
We make four more blocks from fabrics A and B, almost as described above, but we place dark squares only in three corners of the element.
From the prepared square blocks we assemble the upper part of the bedspread, guided by the photo. First we connect the horizontal stripes, then we sew them vertically.
How to do embroidery
This master class uses two patterns made with straight stitches. Such patterns are best suited for embroidery using the trapunto technique. This is voluminous embroidery that requires certain skills. For craftswomen who have not previously encountered this type of needlework, it is advisable to study it first.
To complete the work, in addition to the stitched patchwork fabric, we will need a sealant and a tear-off non-adhesive stabilizer.
On each square block where embroidery will be done, we find the center point. We thread the tear-off non-adhesive stabilizer into the hoop and apply a layer of glue to it. If your cushioning layer is made of fleecy fabric, then there is no need to apply a layer of glue.
We glue the cushioning material onto the stabilizer and place a square patchwork block on top of it. In this case, it is important to orient the area for embroidery in the center of the hoop.
We fix the patchwork square with pins. Embroider the selected fragment. We embroider similarly on the remaining patchwork blocks.
Assembly
Carefully trim the filling around the embroidered fragments at a distance of 5 mm from the seam. We pin together the layers of the blanket with pins. We sew the blanket using a walking foot along the perimeter and diagonally.
Free motion stitch
We quilt the squares with central fragments of fabric B using a free-running stitch, making a “brains” pattern. You can also hand stitch along the contour of the embroidery at a distance of 5 mm from it. If you want to add extra volume to your embroidery, use microstitching.
Processing the edges of the bedspread
We prepare the bias tape and process the edge of the product either by machine or by hand.
The bedspread is ready!
Patchwork Basics
You can sew anything from scraps of fabric, for example, extremely practical things, or realize your wildest ideas, letting your imagination fly free. One of the patchwork techniques is called “crazy” (“crazy”), however, it is too complicated for beginning craftswomen.
Sewing from scraps with your own hands is not easy. The work requires time, perseverance and accuracy.
Accessories and tools for needlework
Patchwork requires a certain set of tools. Below is a comprehensive list , there may be some you don't need:
- Sewing machine. Experienced handicraftsmen who make products for sale buy a special one for patchwork. Of course, it makes the job much easier, but if you are sewing only yourself and friends, a regular one will do just fine. For convenience, you need to buy a quilting foot.
- Chalk, soap or quilting pencil.
- Tailor's ruler and measuring tape.
- Seam ripper, large and small scissors.
- Self-healing mat and roller blade.
- Iron. It must be equipped with a steam generator.
- Needles, safety and tailor's pins.
- High-quality threads of different thicknesses and colors.
- Patterns. You can buy them together with a patchwork kit or make them yourself.
- Tracing paper, graph paper, carbon paper.
Making patterns
It only seems so - we randomly cut pieces of fabric and sew anything from the scraps with our own hands. Patterns in patchwork play the same role as a pattern in creating clothes. It is with their production that work on the product begins.
The same templates can be used repeatedly, so to create them, use durable material, preferably transparent plastic, through which you can see the fabric pattern. First, the desired element is drawn (square, rhombus, triangle), then a seam allowance is added and a second contour is drawn.
The finished template looks like a frame. The details of the future product are cut out along its outer contour, and stitched along the inner contour.
Selection and preparation of fabric
It is not necessary to use a special patchwork fabric for needlework - any fabric you like will do. Perhaps the necessary materials can be found at home - pieces left over from sewing clothes or old, but not dilapidated things. Each fabric has its own characteristics:
- Cotton is cheap, easy to cut, holds its shape well and is an ideal raw material for beginning needlewomen. It is used to make bedding and kitchen utensils, curtains, and furniture covers.
- Linen is ideal for background or lining. It is durable and comfortable to sew with, but it wrinkles a lot and is difficult to iron.
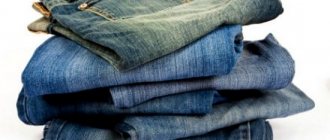
- Denim fabric is suitable for creating clothes, rugs, blankets, capes. It looks good with chintz and tartan.
- Silk will look great in any product, but it is difficult to sew with.
- Only experienced craftswomen can work with chiffon, crepe de Chine and other similar fabrics. Their shreds are usually glued to non-woven fabric.
- Wool holds its shape well, but is rarely used in patchwork. Thick fabric is cut into parts without allowance and joined end-to-end on a zigzag machine or glued onto a larger non-woven fabric and stitched.
- Drape, gabardine, and tweed are often used for tapestries, decorated with braid, embroidery, and lace.
Synthetic padding or batting is used as a gasket (middle layer).
Any fabric must be prepared before cutting , otherwise during use the product may fade, shrink, or warp:
- Old items are ripped open, all seams are cut off, and the hem is cut off on new fabric.
- The next step is washing. If this is not a problem with cotton and denim, then wool and silk are laid out in one layer on a wet sheet or towel, rolled into a roll and left for 2-3 hours.
- It is advisable to starch thin material.
- The damp fabric is ironed from the inside out along the grain thread. It is better to use an iron with a steam generator.