Magpie headdress pattern. Women's headdress - magpie.
Women's Slavic headdresses are returning to everyday use. A good hairstyle and a good headdress are a very strong amulet for a woman, and since a woman is inherently a protector of the family and clan, it is also for the family.
The magpie is a long woven fabric that is attached to the pussy and goes down to the back and shoulders.
When unfolded, it resembles a bird. Nape - a fabric with a hard base, laid at the back to cover the hair at the back of the head. Browband - an embroidered strip that covered the forehead, tips of the ears and temples. A scarf was also tied over the magpie. The woman wore magpie and golden-headed for about two years after marriage. After she gave birth to a child, and her status as a young woman changed, she was given a different costume and a different headdress: the cap, the Soroka warrior, is an ancient headdress of a Russian woman in its way of wearing it. The most famous are the Kargopol and Voronezh magpies.
All magpies are a little different. For example, the Kargopol magpie can be immediately distinguished from any other by the peculiar shape of the headband, hanging over the forehead with a sharp protrusion. Such a protrusion is created due to the pointed bottom. As a rule, most of the known species of magpies are soft, so under them they additionally wore a headdress of a rigid design, allowing them to maintain the shape of the headband. Under the Kargopol magpie, a kind of cap is put on with a hard “Hoof” over the forehead, called “sderikha”. Sderiha plays the role of a warrior, collecting and tying her hair, and the hoof serves as the basis for an elegant beaded headband.
The “Magpie” wedding headdress consisted of three parts: a kichka with small sharp horns, a back of the head and the “magpie” itself, which was heel-shaped.
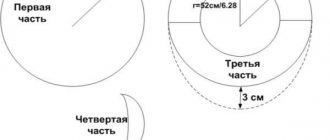
The pattern (diagram) of a magpie has 3 main parts: the headband, the back of the head and a special patch made from the main fabric, which lengthens the back of the head. The design has a rigid frame - a sewn-in cardboard strip 20 cm high. Ties 5 cm wide made of chintz fabric are attached to the headband.
Pattern “Magpie” from the magazine “Wonderful Moments. Russian folk costume."
Features of making a magpie costume with your own hands
The magpie costume is not inferior in popularity to the outfits of princesses and overseas beauties. On the contrary, its distinctive feature is the recognition of the image. The outfit should use only two colors: black and white. However, this color scheme does not look sad at all.
It’s very easy to make an outfit with your own hands because... there is no strict regulation on its content. It all depends on the author’s imagination and the availability of the necessary materials.
Reference! In most cases, the outfit consists of a main dress, a cape, a scarf and a beak. All other components and accessories can be taken ready-made.
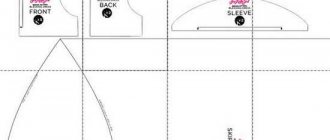
Himona headdress pattern. We sew an ancient headdress - warrior
Difficulty: medium
Working time: 2 hours
Pattern or template: download
Materials: cotton fabric, thread, scissors, pins, sewing machine, sewing needle
- I feel like a beautiful woman! I’ll walk past the mirror or look at the reflection in the window - well, she’s pretty, no words!
It turned out to be a simple headdress that I brought her as a gift to the dacha. As you already guessed, it was a warrior. And she, my Nina, lives all summer with her elderly mother, who is already 91 years old, and who simply comes to life when she is in the air, away from the city. And so every summer. Just two years ago, Zinaida Ivanovna could give young people a head start, and went to the garden alone, and worked there for two, but today she quietly walks along the paths, enjoying the silence, birdsong and the smells of nature.
I am making this lyrical digression only to interest you in the ancient headdress that women wore at the beginning of the last century. Well, I love national Russian clothes! And I think that you won’t find anything more beautiful in the world!
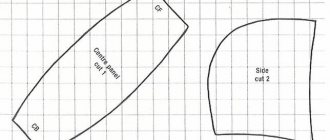
And I sewed a warrior from summer chintz, exclusively for the garden and trips to the forest. I found the pattern on the Internet on Svetlana Khachina’s page. Dimensions in centimeters are indicated in red. So, taking graph paper for convenience, as I did, draw the same one for yourself.
I want to warn you that in the title photo there is another warrior. I already actively wear it. Together with you we will sew a new one.
All components of the patterns have a lining. I didn't make any seam allowances. I cut out the lining together with the main fabric, “one to one.” Main fabric.
Lining.
We fold the bottom “face to face” with the lining. Where there were marks on the pattern - this is a designation of the boundaries of the “tail” of the warrior. In these places on the pattern I made small notches. We use a typewriter to draw the dotted line marked with a pencil.
Turn it right side out.
And iron it. Now you need to double stitch the front part for assembly.
Putting the assembly together. Distribute it around the circle. To make sure it's correct, I try it on my own head. You will immediately understand where you need to adjust or, conversely, “stretch” the assembly. As a rule, the collection is denser on the frontal part, and very sparse on the temporal part.
Now we need to assemble and sew the necklace with ties.
We sewed and ironed the seams.
Now we add “face to face” the two resulting parts. We sew the place indicated by the dotted line from the beginning to the end of the ties.
Turn it inside out.
Iron it with an iron.
We mark the middle of the edge. We will need to sew it to the front of the bottom. At the bottom we also find the middle.
We combine two parts with aligned centers on the wrong side of the bottom.
Now be sure to baste, starting from the middle, in one direction, then in the other, until the end of the ties. We sew and turn inside out.
We iron the result, and it turns out like this from the inside out.
Let's move on to the face. We also attach the headband to the bottom.
This is how we basted the front part.
When you reach the end, stop. For example, I iron the ties first.
Then I combine them, and then baste them in such a way that I can immediately stitch them on the machine.
We asked for it. The warrior is ready!
The photo cannot be positioned vertically. That's why I'm posting my image below.
Enjoy your needlework! Have a great mood, my dear beauties!
Sew a magpie headdress. DIY magpie headdress - pattern
Both everyday and festive women's Russian national costume requires a headdress. They are presented in a very diverse manner, and a modern person can very easily get confused. Moreover, most likely, they will seem almost the same to us. And in the times of our ancestors, it was by the headdress that one could immediately understand where a woman was from, what her social status was, and whether she was married. Let's try to figure it out together and make a “magpie” headdress with our own hands, the pattern of which will be very simple and understandable.
What is a magpie?
“Magpie” is an independent women’s headdress or an addition to another headdress. It is also called the crown or peg.
A simple “magpie” includes:
- Ochelye;
- Wings;
- Tail.
Important! In some variants there may be only two parts: headband and tail or headband and wings.
What do you need for work?
- To make this headdress they used silk, calico, and velvet on a canvas backing.
- Embroidery, beads, and gold embroidery were used for decoration.
Important! Some models consisted of two dozen elements, and putting it on required time, deft hands and painstaking care. Historians note that this headdress is very similar to the Scythian kalaf, which is characterized by bright colors, huge headphones and embroidered solar signs.
Often, the head decoration was the most expensive part of the wardrobe. Girls could wear rich “magpie-gold-crushers” on holidays, two or three years after the wedding. After the birth of a child, there was a change in social status, and the woman wore different clothes - a cap and a warrior.
Varieties
There are differences between the “magpies”. Let's look at the most famous types of this headdress.
Kargopolskaya
It immediately stands out because it has a unique shape: it hangs over the forehead in the form of a sharp protrusion. In order to create it, the bottom is made pointed.
Important! Usually the bindings were made soft, so under them it was necessary to wear an additional hard headdress, thanks to which the shape of the headband was maintained.
The Kargopol “magpie” was worn with a peculiar cap called sderikha. She plays the role of a warrior, who collects and tightens the hair. The hard “hoof” above the forehead acts as the basis for an elegant beaded headband.
Wedding
This headdress includes three parts:
- Kichka with small pointed horns;
- Back of the head;
- “Magpie”, which has a heel-like shape.
The back of the head was made of velvet, which was embroidered with gold threads. It was fixed to birch bark to give rigidity. This part was intended to cover the back of the head. Its top and sides are sewn with strips of silk fabric, on the edges of which there are ties. Then they need to be crossed on the forehead and tied around the horns several times. Thanks to this, the tussock and the back of the head are tightly held together.
Important! A small golden “magpie” is placed on top of the horns. The main motif of the embroidery that decorates the back of the head and the top of the headdress is “trees”. The same pattern is used to decorate the sleeves of a wedding shirt.
Sew a magpie
We are no worse than our ancestors, so we’ll look at how to sew a “magpie” headdress with our own hands. Of course, we take modern realities into account and replace the birch bark with cardboard.
Preparation required:
- Thread;
- Needles;
- Lent;
- Sequins;
- Braids;
- Scissors;
- Centimeter tape;
- Sewing machine.
The entire scope of work will be as follows:
- Cut the fabric. Its dimensions: width – 20 cm, length – head circumference.
- On about ten centimeters out of twenty we sew various decorations: braid, sequins, ribbons.
Important! Don't forget to leave two centimeters of fabric at the bottom for hemming.
- Fold the fabric in half and stitch the edge of the fold.
- Cut out another piece of fabric measuring 50 by 70 centimeters. In this case, your back will be slightly covered.
- Find the middle of the length and round off the top using scissors.
- We decorate the bottom with various little things or tassels.
- The corners can be left straight or slightly rounded.
- The lower part from the middle of the length is trimmed using bias tape.
- We process the upper rounded part with double stitching.
- After this, you need to pull the ends of the threads to form a beautiful assembly.
- Then you need to combine the headband and the gathering, but do not sew them together.
- Everything is turned over to the wrong side and a piece of cardboard measuring approximately 30x7 cm is applied.
- We insert ribbons or fabric, trimmed or hemmed, into the headband.
- The place where the cardboard is located must be stitched so that it does not move.
- We process seams using a sewing machine.
That’s it, the “magpie” headdress is ready with your own hands!
We hope our article was useful to you. Now you know exactly how to be the most original at a fair or holiday, because such a costume, made with your own hands, will certainly be remembered by everyone.
Methods for constructing a magpie costume for a girl and instructions
Let's look at ways to create costume elements. So, you can take the girl’s existing clothes as a basis. Many also use gymnastics training leotards as a base. A bright scarf looks good as a skirt.
The most spectacular option is a fluffy tutu skirt made of white and black tulle or a combination of both. You can sew a real tutu with a lining and a zipper. However, there is an easier option without using a sewing machine. To do this, you need to buy tulle, the amount of which depends on the length of the skirt and the desired pomp. Next, it needs to be cut into rectangles 10-15 centimeters wide. It is better to use a soft elastic band 2.5-3 cm wide as a belt. It is necessary to measure the girl’s waist and subtract a couple of centimeters from this number, because The elastic tends to stretch.
Next, the elastic is ground into a ring. The resulting belt can be placed on the back of a chair and strips of tulle can be attached to it. Each strip is folded in half and attached to the elastic using a knot. By the way, you can experiment with nodes. In this simple way, you can make a fluffy skirt without sewing in a couple of hours. If desired, the skirt can be made multi-tiered: shorter in front than in the back, creating the effect of an impromptu tail.
Attention! If you don’t have a suitable dress, you can sew a regular children’s a-line dress. To make it, you can take the simplest pattern from a sewing magazine, consisting of two parts. The neckline and armhole are usually finished with piping and simple folding of the fabric inward.
Sewing a cape is the most difficult process in making a costume, because... it should imitate wings. It is better to sew it from satin, silk or other light fabric. It is necessary to cut out a circle from the material with curly edges at the bottom and make a recess for the neck. Additionally, it can be decorated with a small bib like a baby’s bib, imitating the white breast of a bird.
Next, it’s worth starting to design the face of this bird. It’s easier, of course, to buy a ready-made mask in specialized departments. Making it yourself with the whole family is much more interesting. This is where a pre-purchased hat comes in handy. It is better if it is made of light, breathable material so that the child does not feel hot.
Eyes and beak can be cut out of colored paper and then glued onto fabric. If it is not possible to make a muzzle, then the simplest headdress for a magpie can be fluffy bows in black and white. You can also combine the headdress from a black cap, cutting the visor in such a way that it resembles a bird’s beak. It can be covered with leather or covered with colored paper.
It is better to make the beak separately and then attach it to a hat or mask. To do this you will need thick black cardboard. It needs to be rolled into a narrow cone and glued. In its manufacture, proportions should be observed so that the beak can be easily placed on the child’s nose. It’s easy to adjust the length of the cone: just trim off a couple of extra centimeters. It is necessary to make a couple of holes at the top so that this product can breathe.
To make a slightly open beak, an additional triangle-shaped part is cut out. It should be less than the length of the beak. It is then glued to the bottom of the beak. For comfortable dressing and wearing, an invisible narrow elastic band is sewn on.
Magpie headdress. Magpie (headdress)
Magpie.
Tula province Soroka is an ancient Russian headdress of married women or part of it. It was widespread in central and southern Russia, as well as among some groups of Karelians, Vepsians, Mari and Mordovians. Was the richest of women's headdresses; By the beginning of the 20th century, the magpie fell out of use.
The magpie, like a headdress, is a kind of kichka, slightly lower on the forehead, and slightly higher on the sides than a regular kichka.
The main items that together formed this headdress were the kichka, the magpie itself, the back of the head, the forehead, and the scarf. Additional - various decorations made of beads, feathers, ribbons, artificial flowers.
A married Cossack woman in a festive costume with a magpie. The village of Vyshnyaya Zalegoshch, Novosilsky district, Tula province. 1902
Mari in a magpie headdress. Yaransky district. 1905-1906
The kitschka was a soft canvas cap, on the front of which there was a solid eminence. The kitty was pulled in at the back, tightly fitting the head. The elevation on the front part of the kichka, called kichka, horns, sderiha, hoof, was varied in shape: in the form of a shovel (shovel-shaped kichka), a horse's hoof (hoof-shaped kichka), horns directed upward, up and back (horned kichka), as well as in the form of a circle or semicircle (kettle-shaped kichki). In the same area there could be different versions of kichek.
Soroka (crown, binding) - the upper part of the headdress, worn over the kichka. It was usually made of calico, silk, velvet on a canvas or chintz lining. The magpie was usually sewn from two or three pieces of fabric. Its front part was called brow, ochele, chelishka; side parts - wings; back part - tail. Along with magpies in the form of caps, magpies that were not completely sewn together were also common: only the headband with the “tail” and the “wings” with the headband were connected.
The back of the head (the back of the head, the back of the head, the block) is a rectangular piece of fabric, glued or sewn onto a solid base made of cardboard, birch bark, quilted canvas, etc. It was laid at the back, covering the hair on the back of the head and part of the neck, and tied with ribbons around the kichka under the magpie .
Browband (forehead, headband, bald patch) - a narrow (from 3 to 8 cm) strip of canvas, trimmed with braid, beads, beads, placed around the head in such a way that one of its edges was covered with a magpie, and the other covered part of the forehead, temples, tips ears. The ends of the forehead were tied under the back of the head.
A scarf is a necessary accessory for a magpie. It appeared as part of the headdress from the second half of the 19th century, taking the place of the towel and fly.
A magpie decorated with embroidery or precious stones was called a sazhenaya; There was also a winged magpie (with side lobes with strings, or wings): the hair was pulled together by a sderich at the back of the head. Sometimes a pearl garter was added to the front of the magpie on the magpie itself (also known as the ocela). If a scarf was tied over the magpie, then it was called “magpie with a howl.”
An unusual “magpie”, more like the headdress of an Indian leader or the tail of a peacock, was worn by representatives of the ethnographic group of Novosilsky Cossacks, who lived in a number of villages of the former Novosilsky district of the Tula province. N. M. Mogilyansky, who explored these regions in 1902, wrote: “The women’s costume has been much more fully preserved in some villages of the Novosilsky district, where, for example, in the village of Vyshnyaya Zalegoshcha, this women’s “rite” has been preserved in amazing completeness and diversity to this day. has since enjoyed widespread recognition. The photographs posted here show two married women in festive costumes; one of them is in the “forty”, a headdress consisting, in total, of fourteen separate parts, putting on which is a long and complex procedure, requiring a lot of time and great skill.... By the way, a small amount of silver is in the threads of these “golden “headdresses are the cause of their mass destruction: buyers buy hundreds of headdresses and burn silver from them.”
Voronezh province
Nizhny Novgorod province
Nizhny Novgorod province
- Russian folk headdresses
- Belgorod region folk costume
- N. M. Mogilyansky “A trip to central Russia to collect ethnographic collections” Materials on the ethnography of Russia. Edited by F.K. Volkov. Volume 1.- Publication of the ethnographic department of the Russian Museum of Emperor Alexander III, St. Petersburg, 1910
- N. M. Mogilyansky “A trip to central Russia to collect ethnographic collections” Materials on the ethnography of Russia. Edited by F.K. Volkov. Volume 1.- Publication of the ethnographic department of the Russian Museum of Emperor Alexander III, St. Petersburg, 1910
- Shangina I. I. Soroka // Sosnina N., Shangina I. Russian traditional costume: Illustrated encyclopedia. -SPb.: Art-SPB, 2006. - pp. 302–307. — ISBN 5-210-01612-9.