Tips for working with thin fabrics
It is recommended to iron the fabric before starting work. For basting, it is better to use thin yarn. When stitching, it is advisable to use a thin overlock needle, the main thing is that the point is not deformed. Carry out the stitching only with small stitches.
What does an American seam look like?
Lines of parts and all marks on a paper sketch must be transferred to the canvas using copy stitches, not carbon paper (otherwise all the lines may appear). To do this, place the details of the paper template on a fabric laid out in several layers and stitch the needle forward, making the contours of the details of the paper template.
Attention! Make straight contours with a larger stitch; in places of roundings and corners, the stitches should be shorter.
Process of working with chiffon
When all the stitches are ready, you need to cut each 3 cm high loop in the center and remove the paper template. Then push the layers of material apart and carefully trim the threads between them.
To cut thin fabrics, it is recommended to place cotton on the table, otherwise the fabric will slip.
Scissors should be special for thin materials, or simply sharpened. You can put something heavy on top of the pattern to prevent it from fidgeting.
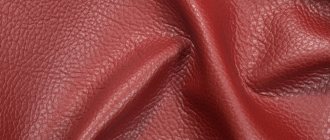
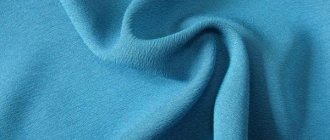
Properties of chiffon material:
- Beautiful, slightly embossed structure with various visual effects: shine, shimmer or matte surface;
- Rare drapery - the canvas has airy folds;
- Softness and comfort - this is the most pleasant material to touch;
- Hygienic features - chiffon circulates air well and is also hypoallergenic.
Thin fabrics
It is usually used to make summer T-shirts, sundresses and dresses, evening and formal suits, as well as stoles and beautiful scarves. Decorations for things are made from it. The material needs good care because it is very capricious. Before working with chiffon, be sure to wash your hands or wipe with wet wipes. Because you can easily leave a greasy stain on the fabric. It is also advisable to remember to use stabilizers.
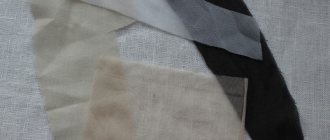
Stabilizers are fabrics that are used to stabilize the product during operation. They prevent the fabric from getting wrinkled and getting stuck under the machine foot. Stabilizers are used mainly when working with thin transparent materials or with embroidery. You can buy them at any textile store.
You may be interested in Constructing a pattern and sewing children's shorts
Hand Zigzag
It is recommended to wash chiffon items carefully. Give preference only to hand washing, at a temperature not exceeding 30 degrees. Use only liquid laundry detergents. Try not to use friction during the process, as many creases or folds may form. Once completed, do not wring or twist the fabric too much. You need to place it in a dry terry towel and let it dry. When the product dries a little, it is advisable to spread it on the surface and let it dry completely. Ironing must be done at a temperature not exceeding 100 degrees and only using gauze.
Machine zigzag
Stage two: cutting the fabric
Now you need to do the internal processing of the fabric. Using scissors, cut off the outer part of the material from the edge to the stitching right next to each other.
Overlock stitch pattern
Make a small gap, about 1 mm. The finished result turns out more beautiful if you wrap the stitched edge in a semicircle around the working finger of your left hand, and cut the fabric with your right hand. The main thing here is not to overdo it, because you can ruin the seam line. Carrying out a Moscow seam is quite difficult; you need to have a good hand and eye.
Stage three: second stitching
The edge must be folded approximately 3 mm, so that the first line is in the center. Make a needle-to-needle stitch on a machine, indenting 2 mm to the left. The material should not be stretched or distorted. The width of the finished scar will depend on how the first seam is positioned towards the edge of the product.
Zigzag on chiffon
For a good result, there must be a high-quality preparation. With the help of these seams you can beautifully finish products without having a professional tool.
How to simply hem tulle without basting
For tulle curtains, synthetic fabrics are most often used, usually consisting of 100% polyester. Among their many positive qualities is this: they are easily torn by hand, and there is absolutely no need to cut them with scissors. You need to make a small cut along the edge and then tear the entire width of the canvas with your hands.
This very simple method is suitable for thin, simple organza or voile curtains. But, for example, a mesh with an etched or woven pattern cannot be torn off; it must be cut, otherwise it will tear in the most unpredictable direction. Thick fabric cannot be hemmed in this way, as folded in four layers it will look unsightly.
The dimensions of the hem directly depend on the width of the foot on the sewing machine. Our foot width is about 16 mm, the hem is 8 mm wide. For it you need to provide an additional 24 mm of fabric.
We calculate the required length of the veil, taking into account the reserves for hemming, and tear it off. Don’t let the resulting ragged cut bother you; everything will be hidden in the folds of the stitched edge.
Fold the edge to the width of the presser foot, insert it under it, and lower the needle. We check whether the fabric lies evenly, whether it goes beyond the edge of the foot (even the fringe threads should not come out), lower the foot.
Let's start the line. As we go, we tuck the fabric under the foot, making sure that it is the same width along the entire length of the seam.
This is what the line should look like - see photo.
We sew to the end.
Cut the thread.
Now we will do the second line. The second fold is easier to do; we already have a line that will serve as a guide. Along this line we will tuck the fabric under the foot. The quality and ease of execution of the second line directly depends on how smoothly and correctly the first line is executed. If everything is done carefully, then the second fold is done simply and quickly.
Fold it over, insert it under the presser foot, and lower the needle. Check to see if the fabric lies flat and lower the presser foot.
In this case, the right edge of the foot is a kind of border, focusing on which you need to lay a line from above along the edge of the hem.
For beginners, this operation may seem difficult. But, if you don’t do everything quickly and carefully, you will end up with an even stitch at a distance of 1-2 mm from the edge, as in the next photo.
We get a neat gateway at the bottom.
This way you can hem the tulle on the sides, repeating all the steps.
We make one hem with a machine stitch.
We turn it a second time, tucking all the threads inside the fold.
Sew it a second time, stitching along the edge.
Processing chiffon with Moscow seam and zig zag seam
The American seam for chiffon is made in three variations. Below is a detailed description of the processing methods.
You might be interested in this All about the pattern of big-legged dolls and its sewing
First method
Here, before starting work, you need to make an allowance of 2 cm.
The stitching must be done at a distance of 1mm from the fold. It is important to lay it very evenly. Iron the product well and trim the seam allowance. Next, an allowance of 2 mm is again made on the inside and sewn along the first seam.
Washing chiffon
To make the Moscow seam beautiful, the stitching must be even. After this, you need to run a steam iron over the fabric thoroughly. This type of seam is used in clothes sewn on the bias, for example, a flared skirt. But the cut itself will be wavy, because the material is elastic. This cut looks beautiful on light fabrics. There are other methods for processing chiffon.
Second method
It is mainly used for processing cuts in clothes sewn on the bias, but when wavy edges are not needed. To work, you need an adhesive filler, and the allowances should be approximately 2 cm.
The classic width of the lobe is 2 cm, so you need to trim the lobe to a size of 8 mm.
How to iron chiffon
From the inside of the product, make an allowance for the processed cut with a dolevik; this is done so that the fabric does not begin to stretch. Now make an allowance of 2 mm on the same side and stitch, indenting from the folds by a couple of mm. Next, everything is ironed well and the allowance is cut closer to the line.
Now an allowance of 2 mm is made and a stitch is made along the first seam.
This method has one drawback - due to the hem, the hem will be very tight, so it cannot be used for light fabrics. It will look very rough.
Third method
This version of the work is the most complex and is used for processing the edges of clothes sewn on the bias from light but dense materials. You need to make an allowance of 1 cm. An auxiliary stitch is required on the allowance of the cut that will be processed; the distance from the edge should be about 3mm. Thanks to this stitching, there will be no stretching of the fabric.
Curtains made of thin materials
Attention! For stitching, threads are used exclusively in the tone of the product.
On the inside you need to make an allowance along the auxiliary seam and make the first line at a distance of 2mm from the fold. This is very difficult to do, so you can’t rush at this stage. Everything is ironed and the allowance is trimmed, leaving 2 mm. Next, an allowance of 2 mm is made on the wrong side and the seam is sewn along the first line. The Moscow seam on chiffon is ready.
You might be interested in what sublimation printing on fabrics is
Moscow seam
- “American”, “French seam”, “Leningrad rib”, narrow rib, whatever they call it!
- We are talking about a method of processing a cut, whose most common name is “Moscow seam”.
- The “Moscow seam” can be used to process sections of flounces, frills, bottom sections of skirts and dresses, various scarves, handkerchiefs made of thin fabrics and even tulle curtains.
- Correctly and accurately executed “Moscow seam” will be an excellent decoration for your product!
I think I won’t be wrong if I say that for a beginner in sewing, performing the “Moscow seam” seems like a difficult task. No wonder.
This processing method is most often used for thin, delicate fabrics , which by definition are not easy to work with. But, “the eyes are afraid - the hands are doing”, try to make such a seam yourself, and you will see that everything is not so scary!
The most important thing is that you need to be able to sew straight lines on a sewing machine, and the rest can be achieved through hard work and honing your sewing skills.
So, in order to perform the “Moscow seam” you need:
- Fold the allowance for the width of the seam (0.3 - 0.4 cm) along the edge of the workpiece to the wrong side of the part;
- Along the folded allowance, sew a stitch close to the edge at a distance of 0.1-0.2 cm from the fold;
- Carefully cut off the excess allowance right down to the stitching; NOTE: When performing the “Moscow seam”, you can skip the intermediate stage - cutting the allowance if you initially bend the allowance to a small width and sew the stitch “under tension”. That is, the fabric under the foot needs to be stretched and the stitching boldly done.
- Then fold the stitched edge to the wrong side again , so that the machine stitch is on the wrong side almost at the very second fold;
- Lay a second line , trying to fit exactly into the first line (this way the seam will look more aesthetically pleasing). Keep the fabric under slight tension again!
- As a result, there will be one line on the front side of the product, and two on the back side (if possible, one on top of the other).
The whole difficulty when making the “Moscow seam” is to carefully sew the seam in the corners of a part, say, a scarf. Try sewing each section separately .
I suggest you see how to perform the “Moscow seam”.
In any case, even if you don’t manage to master the stitch the first time, don’t despair! As one of my teachers liked to say: “It’s not the Gods who burn the pots!”
You will definitely succeed!
With wishes of good luck, Elena Krasovskaya https://shjem-krasivo.ru
Source: https://shjem-krasivo.ru/novoe/rekomendatsii/moskovskiy-shov.html