Knit a collar with knitting needles - collar, shawl, boat, English, stand-up
How to properly knit a collar for a women's sweater, jumper, jacket - we tried to present to your attention the most popular types of collars: a cowl collar, a shawl collar, a boat collar, an English collar, a stand-up collar or a golf collar. Knitting a collar and processing it is one of the important components of knitting.
Which necklines are best for women and men to wear?
For lightweight, summer knits for women, a boat neck is ideal. This is the simplest method that does not require much skill. The boat is suitable for both winter mohair dresses and sweaters, and for demi-season products made from warm thin yarn. This type of neckline perfectly emphasizes the femininity of the slight curve of the shoulder, placing emphasis on the line of the collarbones.
A round neck with a stand-up collar or a cowl collar is very common among the knitwear patterns of the world's leading designers. No fashion show is complete without presenting a model with a similar element. This collar will warm you on a cold winter day or protect you from the cold wind in the fall.
In men's jumpers made from wool yarn, the classic feature is a shallow round neck. This product is intended for lovers of a casual sporty style, and for adherents of the office style under a shirt and tie.
V-neck is a popular neckline among smart casual style lovers. The treatment and neck depth depend on the pattern and type of yarn chosen. This neckline makes the neck visually longer and the silhouette slimmer. Jumpers with a V-neck allow you to look presentable and quite democratic.
Cowl collar - how to knit it
Let's figure out how to beautifully knit a cowl collar. After all, this is perhaps the most popular knitted collar for women. Let's consider 2 options - a small (shallow) collar-collar that completely covers the neck (Fig. 243) and a large collar-collar that folds in folds on the upper part of the shelf (Fig. 244).
Small collar collar
You can knit on circular needles, or on simple ones, and then sew the edges.
We start knitting the collar from the bottom (Fig. 246). Let's take a centimeter in our hands. We measure the Neck Circumference and add 2-3 cm to this number (in our case, this is the sewing line - 42 cm).
Then, using a centimeter, we estimate how high the collar we want to make. Considering the elastic band is 3 cm, let's see how many more cm to knit. For an average size from 42 to 54 you need another 10-14 cm. Or even higher - as you like. Well, let's start from the bottom - see how many loops you need to cast on in order to get 50-52 cm.
The sewing line should be equal to the neck of your product!
So, we cast on the required number of loops and knit either with garter stitch, elastic, or the main pattern. Don’t forget to make decreases, it’s very easy to calculate the number of decreases - (52 - 42): number of rows in height. At the end we change the knitting needles to a smaller size and make a 1/1 elastic band.
We don't close the knitting! We collect the loops on circular knitting needles. We sew the side edges, fold them so that the sewing edge coincides with the middle of the back. We connect at several points. We sew the collar collar with knitting needles using a “loop-to-loop” stitch, or make a beautiful “kettel stitch”:
Large collar collar
This collar (Fig. 244) is knitted from the bottom, it turns out to be in the form of a rectangle (Fig. 247). Such collars are made with thick knitting needles, preferably in garter stitch. Once you have reached the desired height, switch to circular knitting needles and sew the side seam of the hem. Fold the thief in half and pin it to the neck in several places. All that remains is to pin the collar to the inside of the sweater.
Sweater with large cowl collar
Let's try our skills on a cowl neck sweater knitted in a very simple stitch. Suggested yarn: Pierrot Yarns Junmo Namibuto2 (100% wool) - 40 g / 72 m - 13 skeins (510 g) Size M (44-46). Regular and circular knitting needles 4.5 mm. and 4.25 mm. Markers, needle. If you work on regular knitting needles, the seams will have to be sewn together at the end. OG - 91 cm, sleeve length from neck to end of cuff - 78 cm, back length - 45.5 cm, front length - 38 cm. Knitting density: 10/10 cm = 18 sts/27 rows. So, we are knitting a sweater with a high collar.
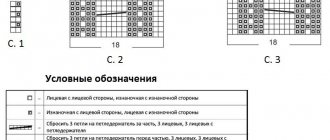
Translation of terms from English: Pattern - pattern repeat (pattern), cm - centimeters, knit - front, sts - loop, rows - row, garter st - knitting in a circle, rounds - circular, times - times, times, repeat - repeat .р Sleeve - sleeve, Collar - collar, Back - back, Front - front.
In this diagram we see the pattern repeat (in gray) - it is 16 stitches/24 rows. Bottom - garter stitch. Garter stitch. The bottom of the blouse, collar, and cuffs are made. Everything else is done with the basic pattern. The front of the sleeve is decorated with a braid of crossed loops. Knit the sleeves separately on regular knitting needles. We knit the collar after we have sewn all the parts of the product: we raise the loops in a circle and work according to the pattern on circular knitting needles.
Sweater back
We cast on 4.5 mm knitting needles. 82 p. (45.5 cm) and knit 7 cm. (28 rows) in garter stitch. If you work on ordinary knitting needles, use only faces. R.
28th row: purl; 29th: persons. row; 30th: k1, 16 rapport stitches (gray) - repeat 5 times, k1.
The repeat is 24 rows, use markers for marks.
This is how we knit 20 cm (54 rubles) from the set of stitches. We have 82 loops.
Next, we start decreasing on both sides.
1st, 2nd decrease - edge, 2 stitches together with a tilt to the left (see “symbols” below), knit until the last 3 stitches, last stitches - 2 together with a tilt to the right, edge. (-2 p). *3rd r. with decreases (-2 p). 4th: no decreases.* - repeat 8 times. (rest. 62 p.). 18th and 19th rows: with decreases. 20th: no decrease. *21st with decrease, 22nd without decrease* - repeat 8 times (remaining 42 sts). 36th and 37th row: decreasing. 38th without decrease. *39th with decreasing, 40th without decreasing.* - repeat 6 times. 49.50 rub. - no decrease There are 26 sts left. Close off 26 sts for the neckline.
In total we must knit 18.5 cm (50 rows) from the beginning of the decreases.
Front end
We cast on 4.5 mm knitting needles. 82 sts and knit 7 cm (28 rows) in garter stitch.
Next, we knit with the main pattern 20 cm (54 rubles) from the set of stitches. We have 82 loops. We begin decreasing for the armholes. At both sides. We read the diagram from bottom to top:
every r. 1 p. * 7 times - that is, decreases in 7 rows of 2 p., (decreases, as on the back) rest. 68 p.
in each 2nd r. 1 p. each - row without decreasing, row - decreasing, p. no decrease (rest. 66).
10 rows of 2 decreases. in every r. (rest. 46).
row - decreasing, p. no decrease (44).
Knitted cowl collar
There are many types of neck designs for finished products. One of them is the cowl collar, which can also be knitted in several ways. Let's take a closer look at the varieties of such a collar.
A “collar” happens:
- large, which falls in soft folds;
- small, close to the neck;
- “collar” in the form of a hood.
Knitting products
To knit a collar that lags behind the neck, work must begin from the bottom edge of the collar. The shape of the knitted fabric is rectangular. To make the product soft and at the same time voluminous, it is advisable to knit it with thick knitting needles and garter stitch. In garter stitch, the errors of loose knitting are practically invisible.
For this “collar” model, not only garter stitch is used. Recently, the 2x2 elastic band has become popular; but there are 1x1 elastic and stocking stitch.
The cowl collar can come with the product or as a separate item. You can knit it both lengthwise and crosswise using two knitting needles. But if you really want to, you can use 5 knitting needles to knit it. This means that the cast-on loops are distributed onto 4 knitting needles, and the fifth knitting needle is used.
"Collar" as a separate item of clothing
It is best to start knitting such a “collar” from the bottom (wide) edge, which will cover the shoulders. To determine the number of loops, you need to knit the sample with the selected knitting. The height of the finished product can vary from 20 to 30 cm, which depends on the desired depth of the collar.
During the knitting process , decreases are made so that the upper part of the collar is one third smaller than the lower part. The number of decreases will depend on the thickness of the thread, the knitting density and the number of loops on the knitting needles.
After all the decreases have been made and the product has reached the desired height, all loops can be closed. To give the product a finished look, it can be crocheted. After this tying, the edge of the product will become smoother.
“Clamp” as a single unit with the product
In this case, the loops for the collar are gathered along the edge of the neckline. When finished, it will have the shape of a trapezoid, only upside down. The canvas will not narrow, as in the previous case, but expand. Already in the second row you need to start adding loops. To make it even, you need to add 8-10 loops at equal intervals.
To make the addition unnoticeable, you need to do this: insert the knitting needle between the loops into the weave of the threads, throw the thread over it and pull it back in the form of a loop. In the next row you need to knit a loop like other loops.
Depending on the density of knitting and the thickness of the threads, an increase in loops occurs. It is recommended to do this in every second row 5-6 times, and then in every sixth row 5-6 times. As a result of this increase, the number of loops on the knitting needles should double. Knitting the collar continues, but without any increases, to the desired length.
Model No. 1
The shape of the collar collar is trapezoidal. This is an independent product, the lower part of which covers the shoulders (this is the bottom of the trapezoid). The collar is high, to work you need to know its length in advance. By measuring the length of the product along the shoulders and knitting a 2x2 elastic pattern, you can determine the number of loops that need to be cast on for the work. The average length is 30 cm.
During the knitting process, in order to get a trapezoid, you need to make decreases. The first time will be in the 4th row, where you need to decrease 7 loops. Several times after this, you need to make decreases in every fourth row, then in every second row.
As a result, having reached a certain height, the upper edge should be narrower than the lower one by one third. If you get this result, then the remaining stitches on the knitting needles can be closed off.
To prevent the collar from stretching for a long time, you can weave an auxiliary thread while knitting, at the beginning and at the end. This is done not at the very beginning of knitting, but in the 5th row from the beginning and in the 5th row before the end of knitting.
The resulting “collar” can be sewn to the finished product if the neck coincides with the bottom of the “collar”. To do this, you need to pin the collar to the product at four points: front, back and sides. This means: in the center of the front and in the center of the back of the product. Next, using the same pins, make uniform fastenings in other places of the neckline. Having removed all the irregularities, the collar can be sewn to the product.
It’s not at all difficult to knit such a warm “collar” with your own hands. You just need to take the measurements correctly so as not to make a mistake and not to bandage the product. See how it's done.
Model No. 2
In this model, a set of loops is made from neck loops, in a circular manner. To prevent the collar from looking like a golf collar, it needs to be at some distance from the neck.
When casting on loops, you need to have more of them on the front half. The first 10 cm are knitted with the selected pattern, without adding stitches. Next you need to make increases only on the front part of the panel of the product. As an example: from every 5 loops, two loops are knitted.
Knitting continues until the product is a certain height. After this, all loops need to be closed.
The “collar” connected in this way has a slight sag in the front part, which looks very beautiful and impressive.
Another option for knitting a collar is in this video.
Scheme
Below are knitting patterns for a cowl collar. Depending on the chosen model, the diagrams will differ.
For the first model, the collar is knitted like a rectangle, the height of which corresponds to the height of the collar, and the width is equal to half the circumference of the neck of the finished product. For knitting, a 1x1 elastic band is used. To keep the collar free, close the loops of the last row as loosely as possible.
In the second model, the “collar” hangs beautifully, for which increases are made while knitting it. This is clearly depicted in the collar diagram. To knit the collar in this model, stocking knitting is used, the height of the finished product is 19–20 cm.
In the third model, the “collar” turned out to be more spacious than in the first model, and its height is 40–45 cm, and not 32–35, as in the first case. It is knitted horizontally with an English elastic band. The fabric is knitted separately, and after the seam is completed, it is sewn to the product.
Options for knitting products with a cowl collar
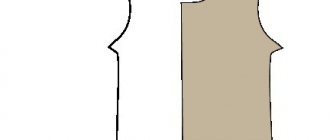
Shawl collar
Before us is a women's blouse with a shawl collar with knitting needles (Fig. 235). Here the collar is connected to the transverse direction. And the second option is a jacket with a shawl collar, where the shawl collar can be made directly together with the front.
The collar placket is made in garter stitch. Estimate the size of the bar in advance. On the knitting needles we cast on the number of sts + sts for the bar. We make the right shelf simultaneously with the bar to the place where the collar widens. From this point, start adding stitches between the shelf and the bar in every 4th row. Add a st using a yarn over. r., next same r. we knit these stitches. behind the back wall - so that the holes in the additions are not noticeable. We reach the desired height, on the back without approx. We also make the left shelf, and at the end we sew both halves of the hem together.
And the second option - after both shelves are ready - rise from the edges of the shelves. This model is usually made with raglan. And this will already be knitting the collar and fastening strap in the transverse direction:
Jacket with shawl collar
V-neck two ways
The V-shaped neckline can be styled in two ways. As a result of the 1st method, the cutout is strictly U-shaped. When making a neckline using the 2nd method, the bevels to the shoulder seams are vertical.
1 way
The loops should be decreased in every 4th row: in the front row the edge loop is knitted, then the loop according to the pattern, and the 3rd and 4th loops are knitted together with the front one tilted to the left on the front side and tilted to the right on the wrong side.
Method 2
Loops should be decreased in each front row 6 times in a row, then in every 4th row 6-10 times, depending on the depth of the cutout.
The remaining rows are knitted straight without any decreases.
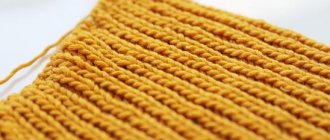
Stand collar
How jackets and sweaters with stand-up collars are knitted - let's understand the knitting technology. When knitting a stand-up collar with knitting needles, we leave the back neck loops open so that later, after lifting the front loops, all stitches on the collar are knitted, adding the required number of stitches.
We knit all subsequent rows (stand) with an elastic band of 1/1, 2/2, or as you prefer. We do the last row of stitches lightly and close the work. The average size of a stand-up collar with a lapel is 18-20 cm. This collar is also called a golf collar. Suitable for both adults and children.
Sweater with stand-up collar
Knitted sweaters are often made with a cuffed stand. Suggested yarn: Pierrot Yarns Bruno (80% merino wool, 20% yak) 93 m./30 g. 15 skeins (450 g) are used.
Size: Chest circumference - 102 cm, central back from neck to cuff (with folded cuffs) 78 cm, back length - 56 cm. Used knitting needles 3, 3.6, and 3.9 mm.
Knitting needles 3 mm thick. - for cuffs. Knitting needles 3.6 mm. - collar and main knitting.
Knitting needles 3.9 mm. - collar.
Knitting density 10/10 cm. for pattern A = 25 p./32 r.
Knitting density 10/10 cm. for pattern B = 27 p./34 r.
Translation of terms from English is at the beginning of the article.
On video: how to calculate the loops for a stand-up collar:
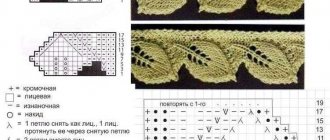
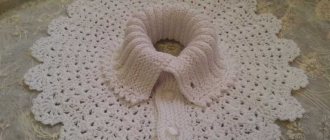
Delicate specimen in light pink tone
For this model of a delicate openwork collar, you only need 50 grams of yarn of a suitable tone and a number 3 knitting needle.
- Creating a collar begins from the edge, cast on only 3 stitches with knitting needles, knit the product with garter stitch, not forgetting to add 1 stitch at the beginning of the row and at the end until you get 30.
- After this, knit 20 rows straight in garter stitch, knit the same number of rows with a standard 1*1 elastic band, distributing the loops in the following way: 10 loops per elastic band, the rest based on the pattern.
- The attached brief diagram reflects all rows: even and odd.
- Taking into account the specifics of unique Asian patterns, the purl row is depicted there as it appears on the front part, so if the knit rows are shown there, then purl rows need to be knitted in these rows.
- Having knitted another 20 rows of standard elastic with knitting needles, we perform the same number of rows in garter stitch, cut the loops on both sides of each row until there are 3 loops, pass the thread through them, and pull them together tightly.
Knitting lessons-3 Collars on knitted items.
I am sharing a selection of Knitting a collar on men's garments. But the principle of knitting is the same and applies everywhere.
POLO COLLAR The name of this type of collar is borrowed from the sports game of polo, whose players wore sports shirts with similar collars. A distinctive feature of this collar is that the neckline turns into a small placket with buttons. To decorate the collar, a bosom is knitted on the front half of the sweater. At a distance of about 12 cm from the middle of the front neckline in the center of the front of the sweater, close several loops (about 2-3 cm). Next, knit each side of the front separately from the beginning of the bosom to the neck line. Knit the neckline and shoulder bevels according to the pattern.
Take knitting needles one size smaller than the main ones. It is more convenient to lift the loops with a crochet hook and then transfer them to the knitting needle. We knit a placket with buttons.
Along the left shelf, pick up and knit with a 1×1 elastic band a number of rows equal to the number of closed loops. For men's products, knit a placket on the right shelf. Close the loops by knitting them with an elastic band. We knit a placket with buttonholes. From the front side, pick up the loops and knit half the width of the placket with a 1×1 elastic band. On the next row for three (or more) buttonholes, bind off the stitches just below the neckline. The number of closed loops depends on the size of the button. Then, evenly across the entire bar, close the loops in two more (or more) places at the same distance from each other. To create button holes on the next row, cast on the appropriate number of new stitches above the cast-on stitches. Then knit the second half of the width of the placket with an elastic band. Close the loops by knitting them with an elastic band. We connect the planks with the shelf. Lay the sweater right side up and connect the bottom edge of the buttonhole placket to the closed loops of the chest base. On the wrong side behind the buttonhole placket, sew the bottom edge of the button placket.
Collar Finish the shoulder seams. Place the sweater right side up. At the neckline, pick up an odd number of stitches, starting from the right side and passing the loops of the straps. Next, starting from the wrong side, knit with a 1×1 rib. Purl 1 at the beginning and end of each row.
Having knitted the required collar height, close the loops by knitting with an elastic band.
Note: Knit the last 2 rows of elastic with knitting needles one size larger than the main ones, and use them to close all the loops so that the knitted turn-down collar does not puff up.
Double stand collar.
This collar is used on polo jackets and pullovers. The double stand-up collar holds its shape well and, when unbuttoned, looks neatly finished on the inside, since the folded edge of the collar is hidden under the stand-up collar.
1. Start casting on circular knitting needles from the outside of the product from the middle of the right fastener bar. In the areas where the edge of the neck is rounded on the right and left, the number of stitches cast on should be the same, and the total number of loops should be sufficient so that the neck does not tighten. The total number of stitches cast on for this model is a multiple of 4 plus 2 more loops. Work 1 purl row with purl loops, 1 knit row with knit stitches and 1 purl row with purl loops, then leave the loops temporarily and cut the working thread. After every 10th stitch, use a contrasting thread to make a mark.
We make stylish golf collars - an excellent decoration for a sweater
This collar is simply made for a sweater. It can perfectly decorate any sweater, even the most ordinary one, and give it a second life. Such a collar together with the trim can be made separately from each other, and later sewn to the sweater.
And so, we take the first step towards our collar. We make a set of the number of loops you have chosen, and then knit in the round. This collar model is obtained by alternately knitting a pair of knit stitches and two purl stitches. In the first row we take the number of loops, which is a multiple of four. After you finish knitting the collar, be sure to make two more additional rows of knit stitches and cover them with a thread of a contrasting color.
After completing all the steps described above, we make seams along the shoulders. To do this, the front side and back side of the collar must be laid out in a single layer.
We stitch the collar with a needle with a rounded tip using a kettel stitch. After this, unravel the first two loops and use a needle to sew the edge of the neckline through the first loop of the collar. We repeat these steps until all the loops are sewn.
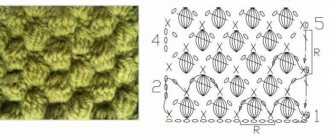
Scarf collar with braids
We will need :
- yarn, alpaca (50g per 167m) – 150g;
- circular sp. No4 with line length 40cm;
- circular sp. No5 with line length 60cm;
- marker (M).
- shawl pattern: all sts in all r. – facial;
- persons satin stitch: alternate rows of knit stitches/purl stitches;
- patterns according to diagrams.
Density: face. Satin stitch using knitting needles No. 5 with double thread 17p. for 22r. correspond to 10cm by 10cm.
We cast on with knitting needles No. 4.5 with yarn in two folds of 47 sts. (of which 2 cr.). and do 2p. shawl pattern. Let's go to sp. No5 and knit 2p. persons satin stitch Don't forget - the outermost stitches in the row are edge stitches! In persons row we add 6 stitches at equal intervals. In total we have 53p. We continue knitting: next. R. (front): 1 cr., 18 p. – diagram C.2, last loop cx. S.1, 14p. – diagram C.1, 18p. – diagram C.3, 1cr.
Knitted sweater models from the Internet
Sweater made of cotton and modal knitting needles
Mohair knitted sweater
In this jumper we combine the fluffiness of mohair and the shine of lurex. A memorable detail: sleeves with a voluminous pattern reminiscent of weaving.
Sweater size 38/40.
You will need: Mohair Trend yarn (70% mohair, 30% silk; 75 m/25 g) - 350 g color. khaki; Lamé yarn (75% viscose, 25% polyester; 85 m/50 g) - 225 g sulfur; knitting needles No. 6; circular knitting needles No. 6.
See the link for description
See also our interesting selection of knitted sweaters for women at the link
Melange sweater with beautiful sleeves
Sweater sizes: 38/40 (42/44, 46/48, 50/52).
You will need: 11 (12, 13, 14) skeins of gray melange (No. 60) Katia “lndiana” yarn, consisting of 60% acrylic, 40% cotton; thread length 115 meters in 50 grams; knitting needles No. 4; 1 auxiliary needle.
Description and knitting patterns for a sweater
Openwork sweater with peplum and braids
Sizes: 34/36 (38/40) 42/44 (46/48) 50/52.
You will need: yarn P. Partner 3.5 (50% polyamide, 25% combed wool, 25% acrylic; 125 m/50 g) - 9 (10) 11 (12) 13 skeins of burgundy (BORDEAUX); knitting needles No. 3.5 and No. 4; auxiliary knitting needle.
Schemes and description at the link
Knitting patterns for an openwork sweater
Sweater with knitted braid pattern
Sizes: 38/40, 42/46, 48/50.
You will need: 50-24 skeins of beige Anny Blatt Mandala yarn (82% alpaca, 18% silk, 52m/50g), knitting needles No. 4.5; 5; 5.5; 1 aux. knitting needle for braids
See the link for description and diagrams
Stylish knitted sweater from Nina Ricci
Stylish knitted sweater with jacquard yoke
A loose fit and wide collar make this jacquard yoke sweater casual and comfortable.
Sizes 36/38 (40) 42/44
You will need Yarn (60% natural wool, 40% polyacrylic; 90 m/50 g) - 600 (650) 700 g light brown, 100 (150) 150 g brick and lilac, and 50 (100) 100 g dark -brown; knitting needles No. 4.5; short and long circular knitting needles No. 4.5.
Description and knitting patterns for a sweater
Knitted sweater with a wide braid
This loose sweater is knitted crosswise on fairly thick knitting needles and decorated with a large, interesting braid, making the model look very impressive.
Sizes 38/40 (46) 48/50
You will need: yarn (75% natural wool, 25% cotton; 90 m/50 g) - 600 (650) 700 g pink; knitting needles No. 8 and 9; short circular needles No. 9; long circular needles No. 8.
Description and patterns for knitting a sweater
Women's sweater “MULLION COVE” knitted
Women's sweater with arans is made in the tradition of knitted jumpers for fishermen.
Description of knitting a sweater from designer Sarah Hatton translated from “The Knitter” magazine No. 121.
Dimensions:
- 8-10 (12-14, 16-18, 20-22, 24-26).
- Chest circumference – 81-86 (91-97, 101-107, 111-117, 122-127) cm,
- Chest circumference of the finished product – 94 (102.5, 111, 123.5, 132) cm,
- Length – 58 (60, 62, 64, 66) cm,
- Sleeve length along the seam – 45 (45, 46, 46, 46) cm.
Necessary materials:
- Rowan Original Denim yarn (100% cotton; 92 m / 50 grams per skein) – 13 (14, 15, 16, 17) skeins.
- Required tools:
- Knitting needles No. 3.25 and No. 4, additional needle, stitch holders.
Knitting density:
- 20 loops and 28 rows = 10 cm of stockinette stitch, made with needles No. 4, before washing, and 20 loops and 32 rows after washing at 60°;
- 19 stitches and 30 rows = 10 cm block pattern, made with size 4 needles, after washing;
- Harness panel = 25cm wide after washing.
See the link for description and diagrams
Knitted trapezoidal sweater
This comfortable, flowy jumper will look great on your figure thanks to its slightly outlined A-line silhouette.
Size: 38/40 (42) 44/46.
You will need: yarn (88% cotton, 12% polyamide; 140 m/50 g) - 400 (450) 500 g soft pink; knitting needles No. 4; hook No. 3.5.
Diagrams and description of the sweater at the link
Women's knitted sweater – Wishbone by Norah Gaughan
Sweater sizes: X-Small (Small, Medium, Large, 1X and 2X). Bust girth (finished product): 80 (90, 100, 110, 120, 130) cm. Yarn BERROCO INCA GOLD (80% wool, 20% silk, 50 g/112 m) 8(8-10-11-13- 14) skeins, circular knitting needles 4 mm and 4.5
Read more…
Women's turtleneck sweater knitted, video tutorial
Women's black turtleneck with knitting needles, video tutorial. A master class on a women's black turtleneck in three parts will tell you about all the stages of knitting this shoulder item. Knitted turtleneck from Alize Superlana Klasik yarn. Composition: 25% wool – 75% acrylic, 100 g * 280
Read more…
Knitted sweaters with voluminous elastic
Favorite sweater... These words exude warmth and comfort. This thing never goes out of fashion and is loved by everyone - young and old. Under the influence of fashion trends, the style and texture of this item of clothing changes.
Read more…
Scarf collar with arans
Collar width is about 17cm.
- yarn h/w (50g per 50m) – 150g;
- knitting needles No. 8;
- add. Arana needle;
- marker (M).
- shawl pattern: all stitches in all rows. facial;
- arans - see diagram.
How to perform short rows on both sides of the collar:
- 1st row (face stitch): 6p. handkerchief rice, turn the canvas;
- 2p. (purl stitch): tighten the thread and knit 6p. plat. pattern;
- 3p: knit all stitches;
- 4p.: knit the initial 6p. shawl knot, turn;
- 5p.: tighten the thread and knit 6p. handkerchief knot;
- 6p.: knit all stitches.
We cast on with knitting needles No. 8 24p.
Track. R. (front side): 6p. – board drawing, 12p. according to the scheme, 6p. – board risk. We continue to knit the pattern, while simultaneously performing shortened rows every 6cm, as described above. Set M at the beginning of the trail. R. on the front side – the height of the part is 22 cm. We used a marker to mark the seam of the collar.
Continue to a height of 76cm (measure in the center). We finish with the last p. Arana schemes. Closed p. We join the closed edge and the side of the collar, guided by M - see as in the photo above. We make a seam.
Knitted scarf collar for beginners
The length of the fabric before the seam is made is 90cm. When sewn, the length is 21cm.
- h/w yarn (50g per 75m) – 150g;
- sock knitting needles No.5;
- marker (M).
- shawl pattern: all stitches in all rows. facial;
- pattern - see diagram.
Density: face. satin stitch 17p. for 22r. will be 10cm by 10cm.
We dial 35p. and do 2p. handkerchief rice.
Further in persons. r.: 2cr. – shawl knot, 1 p., 30 p. = 3 p. x 10 repeats – pattern C.1, 2 cr. – board knot We continue using this algorithm until the height is 21cm. Install M (useful during assembly). After 89cm we switch to a scarf. pattern. Need to knit with 2p needles. and close p.
Along the long side of the scarf, carefully sew the short edge, guided by M.
Option nine: rectangular cutout
We knit one row of l in the circle. p., mark the corner p.. Then we continue, alternating l. p. and i. p., there should be faces on the corners. p., if necessary, here you can add or subtract additional sts. In all rows of elastic, we remove the corner and previous sts together, as with knit stitches. knitting, and knit the next stitch and pull the removed stitches through it..
We make the binding of the width we need and close the loops. We perform angular decreases as when fastening the loops.
Knitted scarf - collar with buttons
Size: 34cm by 60cm.
- yarn h/w (50g per 75m) – 250g;
- knitting needles No; and No5;
- markers (M);
- buttons – 4 pcs.
- shawl pattern: all stitches in all rows. facial;
- pattern - see diagram.
Density: 17p. for 22r. will be 10cm by 10cm.
Using knitting needles No. 4, cast on 62 stitches. and do 1p. knit stitches. This row will be purl. Next (personal row): 6p. – shawl knot., 2l., *2i., 2l.* – from * to * repeat up to 60 p., 6p. - handkerchief knot. Having knitted 4cm, we switch to sp. No5. Distribution p.: 6p. shawl knot, 50p. – сх. S.1, 6p. handkerchief knot Having received 20cm of scarf height, close. 6p on both sides. Cut the thread and set aside knitting. We knit the second part of the scarf in the same way.
We cast on 6 stitches with knitting needles No. 5, transfer stitches from the first part of the scarf set aside to the knitting needle, transfer the loops of the second postponed part here, and cast on another 6 stitches. There are only 112p in work. We work with them like this: 6p. handkerchief rice-k, 100p. – сх. S.1, 6p. - handkerchief risk. Having completed it to a total height of 34 cm, we move on to sp. No4. Add evenly to the trail. R. 2p. and knit: 6p. - handkerchief rice. 2l., *2i., 2l.* – from * to * repeat until 6th last. loop. We knit them with a handkerchief. drawing. There are only 114p in work. Continue 4cm in height with an elastic band. Closed p. Sew the fastener, sewing buttons through two layers of fabric.
Knitted scarf hood with collar
A very original solution to combine a scarf, snood and collar in one model allows you to knit an irreplaceable item for cool weather.
The diagrams assume that the hooded scarf with a collar is knitted by machine.
But, for a knitter with even minimal experience, it is quite possible to knit such a model by hand with knitting needles. We use the same patterns for the model as for machine knitting. For the collar we choose an elastic pattern, the main part is knitted with a “rice” or “honeycomb” pattern. The main thing is that the yarn should be very thin, otherwise the knitted scarf-hood will be bulky. And it is very important to make the seams carefully.
Wide braid collar
Dimensions: approximately 23cm by 73cm.
- h/w yarn (96m per 100g) - 200g;
- knitting needles No. 7;
- marker (M).
- shawl pattern: all stitches in all rows. facial;
- patterns - see diagrams.
Density: face. Satin stitch with knitting needles No. 6 13p. on 17r., knitting needles No. 7 12p. for 16r. will be 10cm by 10cm.
Using knitting needles No. 7, cast on 33 sts. and knit: 10p. – diagram C.1, the rest of the items – shawl pattern. Having knitted 24cm (we measure along the edge of the scarf), we put M at the end of the p. (front side facing us). We continue knitting up to 75cm and closed. P.
We sew the closed edge to the left long side (the front side is facing us) between the starting row and M.
Option six: double binding
We monitor the smoothness of the lines.
After processing the part and making the seams, we cast on circular sp. loops along the edge: divide the edge into sections of 10 cm each, cast on sts at the rate of “number of sts + 3-4 sts.” Now we alternate 2 liters. p. and 2 i. p. (“elastic band” 2 x 2) or 1 l. p. and 1 and. p. (“elastic band” 1 x 1), the number of p. is a multiple of four or, respectively, two.
Having knitted the frame, we loosely close all the stitches, cut the thread, leaving a long tail. We fold the knitting in half, turn it inward and pin it with pins, sew the closed edge to the neckline.