View photo gallery 43 photos
Author of the article
Marina Ilyina
At one time I studied to be a seamstress-cutter. She is a needlewoman who not only sews clothes, but also knits and crochets, embroiders with beads, and makes toys and various crafts with her grandchildren. Currently works as a sales consultant in a bed linen and bed accessories store. He knows a lot about choosing quality products and is well versed in modern fabrics and materials.
The interior of the bedroom should promote relaxation and rest after a busy day. This means that the decor of this room should please the eye not only in the evening, but also in the daytime. Of course, the sleeping place attracts maximum attention. You can make it beautiful and stylish if you sew an exclusive bedspread with your own hands, which will fit perfectly into the textile ensemble of the room.
Deciding on the bedspread model
Even with basic cutting and sewing skills, you can sew a bedspread with your own hands without much difficulty. First, of course, you need to choose the model that best suits the style of the bedroom and the shape of the bed.
The simplest option is a rectangular bedspread with a simple cut. You can make it attractive and stylish with the help of decor. For example, using satin ribbons, cords, braid, lace, decorative stitching, fabric appliqués, embroidery, compositions made of beads and beads.
Bedspreads can be light and flowing, lined or unlined, dense, quilted and even insulated. An excellent solution for the bedroom would be a double-sided option. By placing it one way or the other, you can quickly change the mood in the room. The choice of model largely depends on the taste preferences of the bedroom owners.
What techniques exist
Due to the huge variety of materials, patterns and sewing methods, there is a large selection of techniques for creating a bedspread with your own hands.
The simplest option is a rectangular fabric blanket. You can decorate it with edging, ruffles, fringe, and tassels. You can also choose fabric with a pattern, or add embroidery.
Bedspread made of several combined multi-colored fabrics
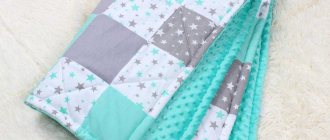
Quilted bedspread - usually made with a padding polyester lining, which is sheathed on both sides; you can choose any material for the front part and backing.
Three layers are combined and stitched according to a pre-selected pattern.
There is also ready-made quilted fabric on sale, from which it is even easier to sew the finished product.
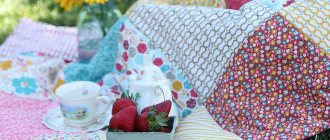
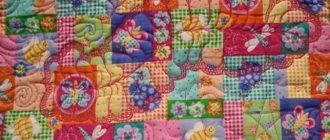
A patchwork style bedspread is made from relatively small rectangular or triangular pieces of fabric that are sewn together.
Great for rustic country or Provence styles. This bedspread, made from patches with drawings, will look great in a children's room.
A bedspread with puffs looks very impressive, but requires experience and long, delicate work from the needlewoman. Puffs are folds in fabric that are created by gathering stitches in a specific pattern. For work they usually use beautiful expensive fabrics like silk.
Material options - which is better
When choosing fabric for a bedspread, it is recommended to take into account its compatibility with the textiles on the windows in terms of texture and density. In addition, the material should match the style and color of the bedroom decor.
Silk bedspreads are considered the most popular, because they look equally good in classic, minimalist and modern interiors. A shiny flowing cover on the bed will make it luxurious and attractive.
Linen, bamboo and cotton fabrics, such as satin, calico, cambric, are also excellent for making this bedding. They retain their original appearance for a long time, are easy to care for, and amaze with their richness of colors and patterns.
Wool is often used to sew winter bedspreads. It is distinguished by a variety of textures and weaves, retains heat perfectly, and lasts a very long time.
Velvet and velor products look respectable and noble. They can be either plain or with a printed pattern.
A bed covered with natural or artificial fur looks stylish and modern. This solution is suitable for youth and classic bedrooms, as well as for interiors in ethno, loft and art deco styles.
Important! It is better for novice needlewomen to choose a material that does not require special attention in work. It is recommended to give preference to not very dense cotton and blended fabrics.
Choosing a color
The color of the material should correspond to the style of the bedroom, its lighting, dimensions, as well as the seasonality of the product itself.
In small rooms, the bed should not be too bright, so it is better to choose fabric in the same color scheme as the rest of the textiles. Glitter and shimmer are appropriate in spacious apartments designed in a classic style. Bedspreads in warm and light colors are ideal for dark bedrooms, and any colors for well-lit bedrooms.
It should be remembered that a warm palette fills the space with freshness, creates the illusion of its enlargement, and makes it more comfortable. Bright, dark and rich shades allow you to make an accent. This means that a bed with such a cover will stand out from other pieces of furniture and decor.
Calculating fabric consumption
An important preparatory stage for sewing a bedspread is calculating the amount of fabric. To avoid getting into trouble, you need to measure the length, width and height of the bed.
The width of the bedspread will be equal to: the width of the bed + 2 cm of its height + 5-10 cm seam allowances, and the length will be equal to: the length of the bed + one of its heights + 5-10 cm seam allowances. Based on this, the total material consumption is determined.
For products with frills, it is necessary to add to the result the amount of fabric corresponding to the width and length of the frills. Moreover, the length of each strip must first be multiplied by 1.5.
How to choose the right size
The calculation of the required size of the bedspread is carried out according to the main parameters
Determining the correct size of material used for a bedspread depends on the dimensions of the bed, model and creation technique. First, three dimensions are measured: width, length and height of the bed. It is worth considering that there should be free space between the bedspread and the floor - this will not only save the item from unnecessary contamination, but will also visually increase the height of the bed. When determining sizes, it is worth making allowances of one and a half to two centimeters - in any case, a little fabric will be spent on seams, and the measurements may not be entirely accurate. Also take into account the features of the bed, if there are headboards or other features.
The simplest version of the model is a rectangular product. For this option, it is enough to add twice the height to the width, by which the bedspread will cover the sides of the bed. Increase the length in the same way. After determining the dimensions, it is worth choosing the right material; it is desirable that its width matches or is greater than the width of the product. To determine the length of the fabric for edging, you need to multiply the value obtained during measurement by 1.5. After determining the dimensions of the bed and choosing a model, you can begin to create a pattern.
How to make a bedspread pattern
After taking measurements, you can begin to draw a pattern drawing on a reduced scale. An ordinary squared notebook sheet is suitable for this.
First you need to draw a rectangle, and then indicate on its sides the length and width of the bedspread obtained from measurements. If the model assumes the presence of frills, then they should also be drawn indicating the corresponding dimensions.
When constructing a pattern, it is necessary to take into account allowances for processing edges and seams, which, as a rule, are 3-5 cm on each side. If you plan to make a quilted bedspread, then it is recommended to mark the proposed stitching seams with a dotted line on the drawing. The resulting drawing will help you visually design all the details of the product.
Manufacturing techniques
Having decided to make an accessory for the bedroom, needlewomen are worried about how to sew a bedspread with their own hands so that it looks attractive and fits perfectly with the interior of the room. To do this, you not only need to select fabric of the appropriate texture and color, but also decide on the technique that is most suitable for sewing.
Quilted
An insulated, lined quilted bedspread will decorate any bedroom style. To make it, you can use any fabric, and choose the thickness of the insulation at your discretion. You can sew the product on a very thin padding polyester or fold the filling into several layers, then it will turn out fluffy and very soft.
When choosing a quilted model, you should remember that the smaller the size of the diamonds or checkers, the more material you will need. Therefore, when calculating the amount of fabric and constructing a pattern, an increase of 8-10 cm must be made on each side of the blanks.
Sew a blanket
Real, lined, beautiful, good quality, suitable for your interior. This is the kind of blanket you can sew if you have the patience to study my master class.
Yes, stores sell decent and inexpensive items. But they are like everyone else. This suits many people. But some are not satisfied. They want something different.
This lesson is for those who love exclusivity. And he loves to create with his hands.
To sew a blanket, it is not enough to have the desire and materials. A long surface is needed (250-270 cm). I work on special custom-made shields. I suggest that you put two or three tables together. So that one edge of the bedspread can be completely laid out on them.
You won't be able to work on the floor.
Table of contents
- It all starts with a drawing
- Then fabrics are purchased. Fabrics need to be prepared for work.
- How to mark corners
- Finally, secure the lining.
It all starts with a drawing
Made to scale. To do this, you need to know the dimensions of the mattress. And the desired overhangs (you need to take into account the thickness of the blanket, about five centimeters). You also need to decide on the width of the hem. I like the finished size to be 10 cm (plus 2 cm for the hem).
You can make a full turn, like on curtains + 10 cm, but in practice I was convinced that this is unnecessary. On the bedspreads, not on the curtains.
Having made a drawing, you can calculate the required amount of fabric.
- Please note that my bedspread has overhangs on three sides. If your bed has a backrest at the legs, there will be two overhangs. Either one or four. It depends on the bed. Be careful at this stage.
The lining is cut slightly larger than the finished bedspread. With a small margin for shrinkage (maximum + 2 cm).
Then fabrics are purchased
It’s easier if the material is wide/high (curtain). That is, the product will be solid. If the fabric is narrow, you need to know where to place the stitching seams.
- The fabric should go down the center of the bed, not the seam. There will be two seams. Because the missing parts are sewn to the central fabric (the second fabric is cut lengthwise).
- You don’t have to worry so much about the lining; just sew two pieces.
Fabrics need to be prepared for use
If the main fabric is not afraid of water, it can be decatified. Wrap in a wet sheet and then dry.
If the fabric cannot be washed, you just need to steam it. Give it time to dry. Few hours.
Iron the lining well.
Then - cut and primary actions
On the main fabric, draw rectangles “in finished form” and “in cut”. The outer one can simply be marked with pins. But internal - either draw or lay a thread. Cut and sew.
- If the rectangle is stitched, then the edges must be cut off, the allowances are overcast and, after stitching, ironed.
- There are fabrics whose pattern is such that it can only be joined if there are edges. Then they are left and often cut. So that the seams do not pull.
Lining fabric.
Mark “finished” plus 2 cm in length and width. It is easier to cut along the thread (pulling it out). Serve.
- A narrow lining will be stitched. To prevent the seam from being printed on the bedspread, I sew the sections separately. I sew, iron and stretch seam allowances. So that during use they do not crumple and form a convex roller. At the same time, I use thin threads, a thin needle and a fine stitch pitch.
The stitching on both pieces must be ironed so that it becomes flat.
The next stage is preparing lapels and corners
Iron on all sides 2 cm and 10 cm.
I advise you to work with each angle individually. Don’t do this: draw one corner, then take measurements, set them aside in all other places and draw them too. This is how you can work on paper.
You need to treat fabric like a capricious child: be patient, control and love.
- I was repeatedly convinced that even angles differ from each other. There are many reasons - different direction of the thread, they were woven unevenly, somewhere the ironing was wrong, the fabric itself decided so...
How to mark corners
Fold the hem. Mark the joining point with pins (on both sides).
Expand (except 2 cm), use a pencil or marker to place dots at the pins, on the edge itself. It is important.
Connect these points using a ruler. If done correctly, the line will pass through the corner of the inner rectangle “in finished form”.
Add a seam allowance (1.5 cm). Cut, sew. Do not turn 2 cm away.
Now you need to sew on the lining
In order to evenly distribute the lining over the main fabric, the edge of the bedspread is laid out completely.
Anything can happen. No one is immune from mistakes.
The lining may be larger than necessary. Then you'll have to cut it off .
Or it may turn out to be less. Then you will have to move it a little away from the markings. Do not tighten under any circumstances.
Pin.
- The marking is the future edge of the bedspread. And it must be perfectly even. Therefore, the lining must be sewn on with very weak stitches (silk stitches ) . The edge of the material should remain slightly movable.
- Why do this? So that the edge of the bedspread is filled and dense.
Then sew up the corners
The photo shows that it is not necessary to fit the corner of the lining clearly into the frame. After stitching it was slightly rounded. In addition, after grinding there will be a fair thickening in this place.
The corner must be folded evenly diagonally and sewn.
- I pre-fasten the top points by hand. Then nothing will move when stitching, and the angle will be perfect.
Iron the seam allowances by placing a rectangular piece of cardboard under the seam.
Turn out, steam.
Carefully, without pressing, so that the allowances are not printed.
All that remains is to hem the bedspread
In this case - manually.
The process is not fast. It takes me four hours.
First you need to do the following.
- Unfold one side entirely.
- Pin the hem. After about 10 cm.
- Be sure to mark a seam line on the lining.
When a large product is sewn, “little things” like an extra centimeter here or there are not noticed. But then it turns out that there is a problem here, a bubble has formed here, a wrinkle has formed here. And you have to flog and redo it.
Now you can sew.
First, tack the corner. And then - using hidden stitches - hem.
You need to stitch right through, through the lining to the main fabric. Very carefully so that there are no punctures on the front side.
The thicker the fabric, the easier it is.
Of course, you can do it on a typewriter too. In some cases it is even necessary.
But specifically in this case, the fabric is plump, two-layer. I was afraid of shifts and pinches under the foot.
Finally, secure the lining.
So that it does not hang like a bubble during the swings.
Sometimes this is not necessary because the lining "sticks" to the fabric. It’s better to try making the bed and see if fastenings are needed or not.
To make high-quality fastenings, you need to unfold the bedspread completely. Better - on the bed. And pinpoint the layers after about 40 cm. And then make mini-tacks by hand from the inside out.
The work is completed.
I've been sewing a blanket for two days. With breaks for lunch, tea and so on.
An inexperienced tailor can work longer, for example, four days.
But still, it’s quite possible to sew a bedspread yourself.
—- Author — Khoruzhaya G. —- Here you can read about how to sew curtains with your own hands —
Patchwork
Accessories made using the patchwork technique will transform interiors in country, art deco and ethno styles. They will create a playful, positive and cozy atmosphere. Intricate patches combined into a single composition are an ideal solution for children's rooms.
Using this technique, you should select a material that is similar in texture and thickness.
With puffs
Puffs are a type of fold made by pulling one edge of the fabric onto a thread. A bedspread with such decoration looks luxurious and sophisticated. Puffs can be sewn only along the edge of the product, arranged in several rows on its hanging parts, and also narrow strips can be sewn in the form of an ornate pattern on its plane. Working with such folds requires care and patience, but the result is worth it.
Knitting needles
Knitted bedspreads fit perfectly into bedroom designs in Provence, minimalism and Scandinavian style.
They will fill the room with warmth and comfort and create a unique atmosphere. They can be knitted in a single fabric with or without a pattern. You can also use threads of different shades to knit individual elements of a rectangular or triangular shape, which are then sewn together.
Crochet
Just like with knitting needles, you can similarly crochet a blanket. You just have to choose a suitable pattern, threads of the required thickness and color, be patient, and get to work. The canvas can be sewn from individual fragments, the patterns on which can be very different.
How to sew a bedspread from scraps
A bedspread made from patchwork, that is, made using the patchwork technique, is not so difficult to make. First you need to decide on the shape of the patches. These can be squares, rectangles, triangles.
To ensure that all the parts are the same size, it is recommended to make a pattern out of cardboard that will be easy to cut. After the required number of blanks have been made, you can begin sewing them together, sewing on the lining and processing the edges of the product.
Using old jeans
You can sew stylish and unusual bedspreads with your own hands from old jeans using the patchwork technique. Such a thing would be appropriate in the rooms of teenagers and young people, made in modern styles. The principle of creating denim accessories is the same as any product made from scraps.
How to finish the edge of a bedspread without a frill
Various decorative elements are perfect as decoration for models without frills. Beautiful braid, lace, satin ribbons and cords will make the white bedspread more attractive. They can be contrasting in color and texture, or matched to the same color scheme as the fabric, but in a darker or lighter shade.
A border with tassels, which is often used when sewing lambrequins and curtain tiebacks, will look good.
Textile
If you have a sewing machine, you can easily compensate for the lack of length or width of the bedspread using suitable fabric. To do this, you should choose a material that will be most harmoniously combined with the shade and texture of the product or will become an unusual contrasting element. Depending on where exactly the fabric is missing, you can sew it on top and bottom, on the sides or along the entire perimeter of the fabric. An original solution for a plain bedspread made of natural fabric would be to create a unique appliqué using the patchwork technique. If the product has a certain pattern or design, you should give preference to a plain fabric that is as similar in texture as possible.
Bedspread design ideas
There are a huge number of options for decorating the finished accessory. These can be puffs, flounces, appliqués, embroidery, beads, openwork lace and much more.
How to decorate a bedspread with a frill
Frills on bedspreads come in many different varieties. It all depends on how fluffy and airy the needlewoman wants to make it.
You can sew one wide frill or arrange narrower stripes in several rows, or decorate with flounces only the hanging parts at the corners of the bed.
How to add ruffles to a bedspread
Ruffles of different widths can be located not only on the side parts of the bedspreads, but also on their surface. To make the product elegant and beautiful, it is better to first draw a sketch, which will show where and in what quantity the ruffles are supposed to be sewn on. This will avoid difficulties in such a painstaking and patience-requiring process.
French folds
French folds are a special type of decor that is very popular among designers. Such folds look best on dense and heavy fabrics. They consist of three identical folds of material, resulting in luxurious volume at their base, while the rest of the bedspread hangs in soft waves. Bedspreads with such decoration look simply amazing.
Photo ideas for creating a bedspread with your own hands
There are countless types of designs and models of bedspreads. They differ in color, technique and style. Below are photos showing various design options for the main piece of furniture in the bedroom.
A homemade bedspread will make your bedroom interior exclusive and more attractive. It is important that it harmoniously combines with textiles and the overall design of the room. The key to success in this, although painstaking, but pleasant task, will be accuracy, precision of cut and assembly, beauty of finishing, and most importantly - the flight of imagination of the needlewoman.
How to sew a simple bedspread with your own hands: step-by-step instructions for beginners
Instructions for beginners on sewing a simple bedspread with your own hands:
- Open and sew all three sections with 12mm seams.
- To round the corners (optional), fold the blanket in half lengthwise, right sides facing in. At the bottom corner, measure and mark from the side edge and bottom edge a distance equal to the full fall plus 5 cm of hem allowance. Connect the marks to make a square. Using a measuring tape or meter as a guide, draw an arc as shown and round the corner. Cut the fabric along the marked line.
- Fold in the sides, then the top and bottom edges, using a 1-inch double hem, reducing the fullness of the fabric around the corners.
A basic homemade bedspread can be finished in a variety of ways.
Ruffled finish.
To decorate the side and bottom edges with a self-made or store-bought ruffled trim, when cutting out the sections, you need to shorten the length and width so that on the finished bedspread the frill does not reach the floor by 12 mm.
Tip: Leave the bottom corners square so that they fall to the floor, or round them so that they reach the floor even with the sloping sides.
Contrast bias tape.
You can skip the hem allowance on the sides and bottom and then finish the edges with contrasting bias tape.
Wide contrast stripe.
Use the finishing technique using a border (border).
Contrast lining (bottom).
To increase the service life, as well as for a beautiful appearance, use a contrasting lining. Adjust the hem allowance on all edges to 12mm, then round the corners.
Open and sew the lining and cover panels. Pin right sides together and stitch a 12mm seam, leaving the top edge unstitched so you can turn the blanket inside out. Turn right side out; Sew the unstitched area with a blind stitch. If you like, you can fold the lining over the top as a contrasting border.
In this case, cut the lining wider and longer than the bedspread, taking into account the width of the border. Topstitch the layers, placing the layers wrong side together, then fold the edges of the lining forward and sew them in place with a blind stitch.
Below is how to sew a ruffled bedspread for your bed.