What is patchwork technique?
Patchwork is a type of needlework that is a patchwork: pieces of fabric of different sizes and colors are sewn together in the form of a mosaic, and the result is an original and bright design.
- Patchwork has gained particular popularity only in the last few years, but this type of needlework cannot be called new, because it dates back to ancient times.
- People made bedspreads, pillowcases, sheets, tablecloths and even clothes for themselves from expensive scraps.
- In England and the USA, this type of needlework was called textile mosaic, which was classified as decorative and applied art.
- The patchwork masters left us as a legacy an excellent technique for creativity. We can use it to decorate our homes and sew soft original blankets for our children.
How to work with this technique? Anyone who is interested in her needs to clearly understand that she loves neatness and precision, although “patchwork” does not require special labor or skills. There are only a few basic rules that should be followed when creating products using the patchwork technique:
- It is necessary to think over a sketch of the future product. To sew the patches correctly, you need to at least imagine the end result in your head - what the final pattern should be on the blanket or sheet that we are sewing.
- Choose the fabric that suits you. Handicraft masters recommend using:
- Linen, which is very easy to cut and sew
- Wool, which makes excellent covers and bedspreads (this fabric can be combined with any semi-synthetic textile)
- Silk, from which you can make a very beautiful bedspread
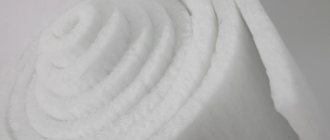
- Sintepon, which is used as the insulating part of the blanket
- Fabric blanks must first be folded according to a template into a general pattern, and only then sewn together using a sewing needle, thread or sewing machine (this device will significantly speed up the process of creating a blanket or any other product that you want to make). As a rule, blanks are made according to three main schemes:
- When the entire canvas consists of different flaps
- When a pattern stripe is created in scraps on a single piece of any fabric
- When the product is a kind of applique that is made without glue using fabrics and a needle and thread
- Each piece of fabric used to create any product using the patchwork technique must be ironed so that the result is a perfectly smooth fabric without flaws.
- All flaps must have a clear sequence - they need to be measured with graph paper, contours created with chalk, cut very evenly and leave allowances for creating seams.
Modern patchwork has many varieties:
- Traditional - when pieces of fabric are sewn together in strict sequence;
- “Crazy patch” - when patches of different sizes can be sewn together as desired and at the same time decorated with beads, rhinestones, and buttons;
- Knitted - no different in technique from the traditional one, except that the flaps in this patchwork should not be sewn, but crocheted;
- Japanese - products are sewn only from silk and stitches. The main pattern of any product is geometric shapes;
- Quilting is when two sheets of any fabric, between which there is a warm lining, are sewn together with a machine stitch (quilted fabric). This technique is best suited for creating quilts and furniture decor;
Each piece of fabric can be prepared using a special technique. Your choice should be based on where you want your patchwork piece to be used. Let's name the most widely used techniques:
- “Squares” - 4 fabrics are taken and cut into strips of the same size. You need to arrange two strips and sew them together. Then these strips need to be cut into squares, which can only be sewn together into a single piece.
- “Watercolor” - you need to choose a fabric in 7 different shades (some of the fabrics may even have a light print), which will harmonize well with each other. From the squares of this fabric you need to fold a pattern.
- “Strips” - this technique of sewing fabric is similar to the principle of folding parquet. The main thing is that all stripes are the same length and width (this will be more beautiful).
- “Log cabin” - the basis of the future canvas is a large square of fabric with a pattern, which is trimmed in any shape with other scraps.
- “Triangles” is exactly the same principle in stitching technique as “Squares”, only the blanks are made in a triangular shape.
- “Corners” is a technique that combines elements of the “Squares” and “Triangles” techniques. First, squares are cut out and folded diagonally into isosceles triangles. They are stitched together in any shape, forming a three-dimensional fabric.
- "Chess" - when the squares are stitched together like diamonds in a checkerboard pattern.
- “Russian square” - squares, triangles and strips are sewn together so that the base is a square, from the corner of which rays emanate from triangles located base down, and the sides are trimmed with rectangular pieces of fabric.
- “Honeycomb” - scraps of fabric are cut into hexagons that need to be sewn together.
- “Lyapochika” - you need to twist any strips of raw fabric into tubes (here you can even use old T-shirts), which are sewn together in any shape.
Using any of the above techniques and varieties of patchwork, you can sew a baby blanket with your own hands from padding polyester and any other natural fabric. We will present you several detailed master classes in the following sections.
This is interesting: Pattern Beautiful baby blanket made from scraps
How to sew a blanket from scraps
Blankets and plaids, made independently without any difficulties or extra expenses, can be a colorful spot in the decor, a wonderful surprise for new residents or newlyweds.
Sewing and assembling a blanket from scraps begins with preparing a place to work, since a large number of patches requires a lot of space. When choosing a material, first of all they look for the fabric for the front side. Professionals combine silk and chintz, linen and satin, satin and drapery in one product.
A sewing machine and an iron are a mandatory attribute of the patchwork technique; without them, assembly and good connections are impossible.
You can buy ready-made fabrics, but for beginning craftswomen it will be more interesting to choose unnecessary items from your own wardrobe. Pieces of denim can be combined with chintz or cotton to create a richer and more varied composition.
Before starting work, you need to think about combinations of shades and the overall picture of the blanket.
It is better to draw your own ideas with pencils on a piece of checkered paper. Master class on a patchwork quilt for beginning needlewomen: we take as a basis one fragment, which is assembled from several elements, then repeat it several times. When choosing color shades, it is important to take into account the shade of curtains and tablecloths so that the new product harmoniously complements the decor of the room. To sew the lining and border, strong fabric of the same color is most often used.
As a filler, you can use padding polyester, padding polyester, sheep or other down, wool, etc., even an old quilt.
Variety of styles
Chaotic patchwork also has its own directions. Not all of them are ideal for creating blankets using this technique. Styles are:
- classical. The most suitable for sewing a blanket, as it easily fits into the selected dimensions and monotonous decor of the room. This style includes patches of equal size, often in two color schemes, which are placed in clear symmetry or in a checkerboard pattern;
- Oriental. More suitable for decorative small blanket. The style is maintained in the use of flaps of different shapes and sizes, adding to them a variety of embroidery with threads, beads, beads, as well as zippers, buttons, chains and any other type of decorative design. However, unlike the next type, the eastern one adheres to a certain system and symmetry in stitching the flaps;
- crazy patchwork is a “crazy” patchwork technique. The style, which is not limited in the shapes and placement of flaps, combines the chaotic clumsiness of the placement of parts and a mixture of color schemes. More suitable for blankets and bedspreads of outdoor garden decor.
Quilt patches come in many forms:
- squares - simple stitching of square flaps of the same size;
- stripes - flaps of stripes can be sewn either alternating or in a circle, into a spiral, decreasing their length as you work, using a template in the form of a lined square;
- triangles - in order to achieve a smooth square canvas at the end, such flaps are cut in the form of isosceles triangles;
- honeycombs - symmetrical hexagons, which are combined with triangular flaps along the edge;
- lapachikha is a type of patchwork made from patches of different shapes, assembled into a specific pattern according to a pre-prepared template.
We sew a patchwork quilt with our own hands
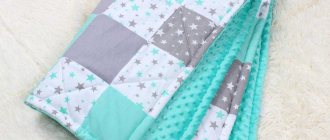
Technique for creating a “Watercolor” blanket - combining square patches in the same color scheme, creating smooth transitions
The “Honeycomb” technique is suitable for a blanket made of hexagonal patches in any color scheme
. Patchwork is very popular. This is not only an opportunity to use unnecessary scraps of fabric, but a fashionable interior accessory. Unique creations are created from scraps of fabric with figures of animals, cartoon characters, ships, flowers, fruits, etc. It's good to use old, bright children's clothes.
Patchwork technique “Checkerboard” - a blanket made of squares in two colors
The “Stripes” technique is suitable for narrow pieces - instead of squares, strips are used, sewn in a chaotic order
Making a Patchwork Quilt
Making a blanket using the patchwork technique differs from other types of sewing blankets only by working on the front part. For a blanket in a classic patchwork style you will need:
- scraps of fabric measuring 25x25 cm, 20 pieces;
- filler 130×130 cm;
- fabric for the back 130×130 cm;
- fabric for the canvas seal 130×130 cm;
- sewing machine, needle and thread, scissors.
The first step is to lay out the flaps in the required order.
The second stage involves connecting the flaps together into strips.
The third step will be to connect the strips into one canvas.
The fabric should be ironed well, after which the appropriate part should be cut out of the seal according to its size.
After this, you should cut out a piece of the appropriate size from the backing fabric or filler. We lay out the parts in the following order: seal, filler, canvas, wrong side to the filler, wrong side, right side to the canvas.
Please note that, if desired, the filling can be inserted into an already sewn blanket after turning it inside out.
All parts need to be sewn together, leaving a 10-15 cm hole for turning inside out.
Having removed the protruding corners and uneven edges, turn the blanket inside out and sew up the hole.
The blanket is ready. According to the described size, it is more suitable for a child, but the size of the fabrics and the number of flaps can always be changed to suit your own preferences.
To create a more complex blanket pattern, you can use the following patterns:
The simplest master class
To make your first quilting item, you can use a master class with step-by-step instructions. The easiest way to sew a patchwork quilt with your own hands is using the quick squares technique. The finished product will have a size of 220x200 cm, repeat - 20x20 cm, material - chintz.
- We do the calculations. We will need 110 squares, add 0.5 cm to the seams on each side. Each piece will have a size of 21X21 cm. Naturally, the canvas is not dimensionless. Chintz is produced in different widths, the most convenient to use is 150 cm. You will need 16 strips 21 cm long, 7 squares can be cut from each (2 will remain extra).
- For convenience and less fabric consumption, we will use 4 different prints - 4 stripes each 84 cm long. Taking into account shrinkage, you need to take more material.
- Wash, starch and iron the fabric.
- Using a template, mark the material and cut along the outer edge.
- We lay out the parts on a white sheet and come up with a sequence for connecting them into a pattern.
- We sweep the squares exactly according to the internal markings and sew them on a machine.
- Iron the seams.
- We assemble the front part of the blanket by sewing the blocks together.
- Remove the basting and iron it.
- We cut out insulation from batting, and from calico - the back is tight. On each side we leave an allowance of 3-5 cm.
- We connect the batting and the patchwork fabric, sew the corners, baste, starting from the middle.
- If your machine does not have a quilting foot, use a zigzag stitch. The seams can be placed on top of or near the joints of the squares. We sew in the direction from the middle of the blanket to the edges.
- Separately fasten the lining.
- We process the edge of the blanket. You can use one of the fabrics used or a contrasting tape. Its width should be equal to twice the seam allowance of the backing fabric and interfacing plus 1 cm.
- We fix the corners of the product manually or with a machine.
The blanket is ready!
Fabric for making a patchwork blanket
Patchwork is patchwork sewing from fabric of various household and decorative items - beds, blankets, bags, clothes, tablecloths, kitchen utensils, etc. The technique, known for thousands of years, is popular all over the world. Skilled craftswomen create all sorts of outlandish works of art using the patchwork method. And novice needlewomen are advised to start with wide blankets made from “quick squares”. Such products are practical and aesthetic, and are also optimally suited for mastering such a delicate science.
Today, patchwork is considered one of the most popular patchwork techniques. It consists of stitching together various pieces of fabric according to the mosaic principle. In the hands of experienced needlewomen, bright pieces of material are transformed into luxurious products that surprise and delight. But not all fabrics are equally good for patchwork patchwork.
To choose the right material for creating a patchwork quilt, you can follow the traditions of our grandmothers: simply save all the scraps and leftovers from sewing clothes or bed linen. From such different-sized shreds you will certainly get a motley blanket. Or you can do it much simpler - purchase a set of fabrics for patchwork at any specialized store. Since the most difficult process in the patchwork technique is working with the material, the fabric must certainly not only be beautiful in appearance, but also of sufficient quality.
Cotton fabrics are considered the ideal material for patchwork because they meet all the important requirements:
- Do not wrinkle;
- Don't rush;
- Do not shrink;
- They do not shed;
- Easy to cut.
Linen, silk, viscose and wool are used a little less often in patchwork, since such materials are more capricious and always require special care in work. Craftswomen with experience begin to use complex fabrics; for beginners, there is nothing better than cotton!
Sewing material stores offer customers a huge selection of cotton fabrics of different colors and densities. But, unfortunately, they are not always suitable for patchwork. Some options fray too much when cut, others are hard to iron or sag after washing. It is, however, recommended to buy special fabrics for patchwork that have undergone special pre-treatment. This material is very easy for beginners to work with.
Patchwork Basics
You can sew anything from scraps of fabric, for example, extremely practical things, or realize your wildest ideas, letting your imagination fly free. One of the patchwork techniques is called “crazy” (“crazy”), however, it is too complicated for beginning craftswomen.
Sewing from scraps with your own hands is not easy. The work requires time, perseverance and accuracy.
Accessories and tools for needlework
Patchwork requires a certain set of tools. Below is a comprehensive list , there may be some you don't need:
- Sewing machine. Experienced handicraftsmen who make products for sale buy a special one for patchwork. Of course, it makes the job much easier, but if you are sewing only yourself and friends, a regular one will do just fine. For convenience, you need to buy a quilting foot.
- Chalk, soap or quilting pencil.
- Tailor's ruler and measuring tape.
- Seam ripper, large and small scissors.
- Self-healing mat and roller blade.
- Iron. It must be equipped with a steam generator.
- Needles, safety and tailor's pins.
- High-quality threads of different thicknesses and colors.
- Patterns. You can buy them together with a patchwork kit or make them yourself.
- Tracing paper, graph paper, carbon paper.
Making patterns
It only seems so - we randomly cut pieces of fabric and sew anything from the scraps with our own hands. Patterns in patchwork play the same role as a pattern in creating clothes. It is with their production that work on the product begins.
The same templates can be used repeatedly, so to create them, use durable material, preferably transparent plastic, through which you can see the fabric pattern. First, the desired element is drawn (square, rhombus, triangle), then a seam allowance is added and a second contour is drawn.
The finished template looks like a frame. The details of the future product are cut out along its outer contour, and stitched along the inner contour.
Selection and preparation of fabric
It is not necessary to use a special patchwork fabric for needlework - any fabric you like will do. Perhaps the necessary materials can be found at home - pieces left over from sewing clothes or old, but not dilapidated things. Each fabric has its own characteristics:
- Cotton is cheap, easy to cut, holds its shape well and is an ideal raw material for beginning needlewomen. It is used to make bedding and kitchen utensils, curtains, and furniture covers.
- Linen is ideal for background or lining. It is durable and comfortable to sew with, but it wrinkles a lot and is difficult to iron.
- Denim fabric is suitable for creating clothes, rugs, blankets, capes. It looks good with chintz and tartan.
- Silk will look great in any product, but it is difficult to sew with.
- Only experienced craftswomen can work with chiffon, crepe de Chine and other similar fabrics. Their shreds are usually glued to non-woven fabric.
- Wool holds its shape well, but is rarely used in patchwork. Thick fabric is cut into parts without allowance and joined end-to-end on a zigzag machine or glued onto a larger non-woven fabric and stitched.
- Drape, gabardine, and tweed are often used for tapestries, decorated with braid, embroidery, and lace.
Synthetic padding or batting is used as a gasket (middle layer).
Any fabric must be prepared before cutting , otherwise during use the product may fade, shrink, or warp:
- Old items are ripped open, all seams are cut off, and the hem is cut off on new fabric.
- The next step is washing. If this is not a problem with cotton and denim, then wool and silk are laid out in one layer on a wet sheet or towel, rolled into a roll and left for 2-3 hours.
- It is advisable to starch thin material.
- The damp fabric is ironed from the inside out along the grain thread. It is better to use an iron with a steam generator.
Popular types and patterns of patchwork
The patchwork style is a wide field for ideas and experiments, which has no boundaries in combinations of shapes, colors, and types of material. Here, any creative idea of the author can be brought to life. Fancy patterns, applications with animals and flowers, geometric mosaics and other equally interesting options can easily be folded into a warm bedspread or comfortable blanket.
Of course, you can create a diagram for a product with your own hands, armed with imagination and a sharp pencil. Or you can use ready-made ones, of which there are hundreds of thousands, depending on the types of patchwork.
Let's look at the most popular types of patchwork:
- Classic English
. In this version of patchwork, all parts of the same shape and size are used, usually in two primary colors. Patterns for English patchwork are very primitive. For example, squares of two shades arranged in a checkerboard pattern, or symmetrically stitched triangles. - Eastern patchwork
. The manufacturing principle is similar to the classic one, but differs in the use of various decorative elements - ribbons, beads, zippers, etc. Most patterns for oriental patchwork products allow greater freedom in the shapes and sizes of parts. For example, these can be arched and wavy patches, connected and decorated with satin ribbons. - Crazy patchwork
. The most “free” look. Characterized by its aesthetics and attractiveness. As a rule, the shape, color and size of parts are not limited by anything other than the pattern used. And the designs can be incredibly diverse: images of nature or flowers, floral or geometric patterns, complete abstraction.
This is interesting: Pattern Cool children's hoodie
Peculiarities
Patchwork is an ancient skill that can be traced back to the invention of fabrics themselves. The thrifty housewife did not throw away precious scraps of material, but sewed them into linens for further use. Museums around the world have historical exhibits that confirm the interest of our ancestors in quilting. A carpet made from fragments of pilgrims’ clothes was discovered in the Cave of a Thousand Buddhas; it dates back to the 10th century. One of the museums in Egypt displays a canvas made from pieces of leather, the appearance of which dates back to 980 BC.
The peculiarity of patchwork art lies in its uniqueness . It is impossible to make two identical blankets from the many scraps, so each product is exclusive. There are other advantages of the patchwork technique:
- Only threads are used to create the product, and the canvas itself is assembled from scraps;
- by piecing together scraps, you can sew blankets of different sizes, even for non-standard children's beds;
- during work, any fantasies are realized, and the more original they are, the more the craftswoman will be able to surprise with the final result.
The colorful pattern of the paintings adds mood, it brings comfort to any home. A patchwork-style blanket can be supported by a mosaic pattern on the wall, a bedside rug made from pieces of fabric, or an equally colorful lampshade. The main thing is not to overdo it, otherwise the original interior will turn into a tacky and tasteless environment.
To prevent the blanket from looking haphazard, craftswomen put a certain logic into the selection of patterns and colors . For example, the entire ornament is built around a central plot appliqué, or patches are selected that match the dominant shade of the children's room. The pattern of the blanket should not put pressure on the eyesight or create an imbalance in the interior, so designers recommend choosing several primary colors and 2-3 background shades to create it. Variegation and many small details are allowed in small children's rooms.
A blanket for a large room is formed from large patches connected by a common storyline or making up a common ornament.
Blanket Making Tips for Beginners
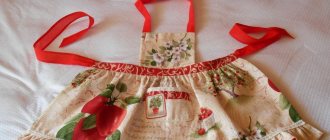
Nowadays, patchwork creations have become more popular than ever. In between the noisy bustle and tiring workdays, you really want to touch something warm and cozy. Even those women who have never thought about needlework before begin to confidently master patchwork. Decorative sofa pillows, aprons, coasters, colorful panels, curtains for a country house, ultra-modern bags and many other things can be created by experienced craftswomen.
Beginning needlewomen should pay attention to a few useful tips:
- Before using new fabric, it must be washed, ironed and only then cut. This will prevent accidental shrinkage, loss of color, or other problems.
- The color of the thread used should match the color of the shred or differ by a couple of tones.
- For drawing, use a pencil or soap. It is prohibited to use a pen.
- Cutting is done along the shared thread. In this case, the part will not warp.
- When cutting, leave a 1 cm indent on all sides. If the fabric is loose - 1.5 cm.
- Ideal templates are made of plastic.
- Without a ruler, patchwork is impossible.
- The resulting fragment must be ironed after each line.
Method of sewing a children's patchwork quilt with your own hands step by step
From the prepared material, cut small squares of 15x15 cm using a ruler and scissors.
We fold the model of the future blanket, laying out the shreds using the chosen technique, sew the shreds face to face in the form of ribbons of 7-8 shreds
We sew a whole fabric from ribbons, iron all the seams
We fold the edges of the upper and lower parts by 1.5 cm and sew around the perimeter; the edges can also be processed using binding
Patterns for making a blanket using the patchwork technique
Depending on the chosen patchwork technique, the needlewoman may need one or another pattern pattern:
- Square technique
. It involves creating a product from square patches or square blocks of different colors. In this case, a pattern in the form of a regular square or a pattern of strips from which a square block will be made will be useful. - Strip technique
. This is parallel or circular stitching of strips of different colors and lengths. To create a product using this technique, you will need to cut out different strips. - Triangle technique
. In many ways similar to squares. Most often, patterns of isosceles triangles, identical in size, but different in color, are used for it. Parts can be sewn along a short edge to form a strip, 4 pieces to form a square or in the shape of a star. - Honeycomb technique
. It got its name thanks to the end result. Upon completion of the work, the design of the product will resemble the pattern of a honeycomb. For production, patterns of symmetrical hexagons are used. - Lapachikha technique
. It is considered the most interesting and at the same time difficult. Pieces of fabric with raw edges are attached to the canvas, thereby forming a three-dimensional drawing of a certain pattern or a chaotic image of a three-dimensional abstraction. If a specific pattern is chosen for the product (bird, animal, flower, etc.), patterns for each part will be needed. If you plan to randomly sew on different patches, you can do without patterns altogether.
How to make a patchwork blanket - watch the video:
Products made using the patchwork technique are not only beautiful and cozy home decorations, but also positive emotions from the process of making them. Agree, a few pieces of fabric, a sewing machine and imagination in combination can work wonders.
The process of sewing a bedspread with your own hands for beginner needlewomen
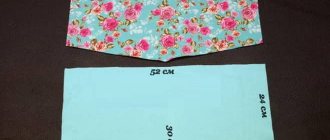
All we have to do is sew the product from pre-made scraps and blanks. We place our cut blank No. 1 on the paper block so that there are seam allowances. Then we put the second part face to face with the first and stitch it on the other side, as in this photo.
Remember when we stitched the outlines of our design on a machine? In order for them to be visible in the photo, I outlined the lines with a marker and from the inside out. This is what came in handy for us right now, because on the back of the paper block we see all the lines, and we write along them.
For convenience, so that the parts do not move out, I fasten them together and with a paper block with an ordinary pin.
We sew all the other cut out parts of the block, while observing the numbering, that is, everything is in order. We sew the second to the first flap, then to the first - the third, and to all three - the fourth, to the fourth - the fifth and to the fifth - the sixth. We sew the rest of the blocks in the same way; we will have 24 of them in total for the baby blanket. When we have made the required number of blocks, I zigzag the edges around the perimeter and cut off all excess. And then the fun begins. We will start assembling our blocks and creating the design.
There can be many of them!
After choosing a pattern, all we have to do is sew all the blocks, iron the seams, and sew the border onto our blank. Now we need to remember to remove the paper from the back of our blocks. We just carefully tear it off at the seams, and that’s it.
And one more addition, especially useful for beginners. Try to use the thinnest paper, then it will be easier to tear it off the stitched fabric.
We have a blank top for a child's bedspread using the Patchwork technique. And then everything is as usual - padding polyester or batting, assembling the blanket with the backing, stitching and edging the blanket. So we sewed a children's blanket with our own hands from scraps in a patchwork style. And you can not only sew, but also knit bedspreads and blankets with knitting needles, crochet, and even make them from pompoms.
What are they?
Patchwork blankets for children are especially varied . They are rich in color, contain applications, thematic images based on the plots of your favorite cartoons. In addition, products can be for a boy or a girl, intended for a newborn baby, or sewn in certain sizes, especially for a baby’s crib. Children of any age – from toddlers to teenagers – can appreciate these funny blankets.
We invite you to look at a selection of children's blankets to understand how beautiful, original they are, and made with great love for little users.
- When creating a blanket for boys, they often resort to a marine theme. Here you can use white and all shades of blue. The younger the child, the weaker the tonality and the more delicate blue is present in the product. Marine themes with other shades are used much less frequently; they are used when it is necessary to maintain the overall color of the interior.
- Kids especially like blankets with a large pattern in the center ; it can be viewed as a picture, including imagination and inventing adventures for their favorite characters.
- Look how lovingly you can completely decorate a baby’s crib in patchwork style. The sheet, blanket, pillow and even the sides are made of bright patches. A variety of funny bunnies will hold the baby’s gaze for a long time, because they are not repeated, but you want to look at each one.
- For the little princess choose light and delicate colors . A large number of pillows made from pieces of fabric, bows and lace sit on top of a quilt with appliqués.
- Boys prefer products with pictures of cars . For a baby, a calm background is selected, and an older child can be offered a riot of colors. The colorful canvas with pictures is impressive and delights children.
- Stories are also being developed for animal lovers. For example, a teenager can be offered a beautiful canvas depicting African wild animals (safari). And for a little one, a plot with mischievous dogs, or kind pets that he saw in the village with his grandmother (farm theme) is more suitable.
- Your teen will appreciate a blanket with photos of family memories . The canvas is sewn from squares containing non-repeating plots.
For kids, each square can become their favorite frame from a cartoon.
- When creating children's blankets, they often resort to appliqués ; they neutralize the diversity of the patches and interest children in a specific topic, as they often depict animals, favorite equipment, or cartoon characters.
- A complex blanket for a girl was made with extraordinary love, using many techniques. It does not contain a specific plot, but shows good taste and high skill of the author.
Overview of techniques
Over the millennia of its development, patchwork has developed different techniques for making canvases from pieces of fabric. There are so many of them that it is impossible to cover them all in one article. Let's look at the most popular of them.
From the stripes
This type is considered the simplest technique, since sewing identical strips together is easy even for a novice craftswoman. For the strip stitching technique, the material is prepared in advance. They cut out identical elements in the form of elongated rectangles from pieces of fabrics of different colors and structures, and then sew them together. You can place a large square with appliqués in the center of such a blanket.
From squares
Blankets made from squares are just as easy to create as from stripes. This technique is one of the most ancient . But this applies to flaps of the same size. If the product uses squares of different sizes, you will need a diagram with which to lay out the working material. The pattern is chosen by the craftswoman according to her taste: it can resemble a chessboard, alternate colors in rows, or look chaotic.
The squares are sewn side by side to each other, or a more complex stepwise stitching design is chosen, when one flap begins to be sewn from the middle of the edge of the second. The pattern in this case resembles the laying of ceramic tiles. A similar stitching technique can be used to create a fabric of triangles or rectangles . In the first case, it is better to choose isosceles figures . High-class craftswomen, using geometric rags, are able to create “pixelated” portraits that look like photographs.
"Well"
The beautiful, unique “well” style is also called “American square” ; it was very popular in America several centuries ago. Europeans also made him famous by borrowing equipment from overseas. The basis of the product is a small square located in the center of the blanket, around which larger squares are gradually built up, sewn together in size in ascending order. If you look at the canvas from above, it creates the illusion of a well made of logs.
This technique gives visual volume and depth to the picture, especially if you use color effects correctly.
Watercolor
In this technique, it is the color, not the shape of the flaps, that is important. A watercolor blanket may consist of squares, stripes or shapeless segments, but they are all united by one color scheme, as if painted in watercolor and created with an artist’s brush.
From hexagons
The blanket is sewn from hexagons of the same size, cut from scraps . If you introduce shades of honey color into the canvas, it will begin to resemble a honeycomb. But most often a harmonious hexagon is used to create a flower or star blanket; other artistic images are created less often.
"Lyapochika"
The most beautiful and voluminous technique, used for many years in Russia . The “frog” blanket is made up of tiny scraps, the free end hanging from the canvas. Even more volume is provided by pieces of fabric rolled into a tube. Creating such a product is hard, painstaking work, as you have to work with a large number of small parts. Thanks to the selection of various shades, you can create paintings from scraps. They, like canvases painted with oil paints, look amazingly beautiful if you move away from them.
Infinite variety
A patchwork quilt of squares, rectangles, triangles, rhombuses, circles does not exhaust the entire variety of the patchwork method. His separate direction is compositions of small single-color and patterned patches that resemble appliqué, while masters take on the most complex carpet patterns.
Another patchwork technique, which is called “crazy”, consists of sewing irregularly shaped pieces together. They resemble ordinary scraps of various configurations and sizes, which are assembled into an abstract mosaic.
Any materials can be used in patchwork - exquisite silk is intended for compositions in the Japanese style, rural style is enriched with knitted fragments, upholstery fabric produces original bedspreads that fit perfectly into a classic interior.
As a secondary use in patchwork, it is most convenient to use denim, stocks of which are available in every home.
The decorative effect is provided by contrasting compositions with floral patterns, inventive use of pockets, fragments of clothing with stripes, embroidery, etc. But we must take into account that the full use of a patchwork quilt as bedding is only possible if it is made from easily washable fabrics.
Materials
For the patchwork style there are no restrictions in the selection of material, the main thing is harmony in the combination of texture and color . As for children's blankets, there are certain recommendations for the use of fabrics. For small users, natural products are predominantly chosen, soft, tactilely pleasant, with environmentally friendly dyes, ensuring complete safety for children. The following fabrics can be used to decorate children's bedrooms.
- Cotton . Durable and natural material, it makes durable and beautiful blankets. Many types of fabrics are produced from cotton.
- Flannel . Soft, pleasant to the touch fabric made from cotton threads. Often used in products for newborns.
- Linen . Dense, rough material with a high degree of hygroscopicity. Suitable for summer blankets in country and ethno style.
- Kulirka . The thinnest and smoothest cotton jersey, the touch of which children really like.
- Silk . Natural silk is beautiful, but very expensive, even scraps are rarely found. Its sliding texture is not to everyone's taste. But silk is ideal for oriental styles. The same characteristics apply to satin products.
- Fleece . The fabric is synthetic, but soft and light, pleasant to the touch, and does not require complex care. The bottom layer of the blanket can be made from natural material, and the top layer from fleece patches.
- Chintz . Durable cotton fabric in a variety of, mostly bright colors. The bedspreads are inexpensive and elegant.
In addition to fabrics, knitted fabric made in the form of colorful fragments is used to create children's blankets in the patchwork style.
Sew a patchwork quilt from strips
Interesting results can be obtained by using stripes rather than squares for the quilt. From them you can build a rainbow row, patterns in the form of parquet or a square.
The strips are cut so that they have the same width. Also pay attention to the direction in which the grain is placed (taking into account seam allowances).
It is better to sew strips using a fabric base. A strip is placed on the surface of the fabric (equal to the size of the blanket or more) so that its front side is directed upward. The second strip is placed on top of the first with the front part facing it, and both of them are attached to the base. The following strips are sewn in the same way.
On a note! Stripes distributed diagonally look great. They are sewn together on a fabric base from the center, where the first strip is installed. The rest are sewn to it on both sides.
Sewing of the cut and laid out strips is carried out on the front side of the fabric base. Thus, its entire part is filled. Then you need to put damp gauze (or other material) on top, and cut off the excess fabric.
So, we have told you about the different ways to sew a quilt with your own hands. This is not difficult, but quite painstaking work. However, the result is worth the time and effort. A patchwork quilt will decorate the interior of any room and will become a pleasant and memorable gift, reminiscent of your love and care.
If you have any questions or have any additions to the topic of the article, write in the comments below. Our specialists will answer you as soon as possible.
Dimensions
Baby blanket sizes vary. The patchwork technique allows you to make products of any parameters, from envelopes for newborns to teenage bedspreads for a single or single bed. To ensure that the blanket matches the size of the rest of the bedding, there are still certain standards.
- Single products - 110x140 cm. For the little ones, square options are made 110x110, 120x120, 130x130 cm.
- One-and-a-half blankets – 135x200 cm or 140x210 cm.
As for European standards, another 10 or 15 cm should be added to the above parameters. Many craftswomen prefer to sew non-standard blankets that are comfortable for a particular child and designed for his sleeping place.
Patchwork equipment
Patchwork has become so widespread that in many handicraft stores you can see and purchase patchwork kit But for those who are not going to do such handicrafts all the time and do not want to spend money on purchasing such a set, tools that can be found at home for free are suitable.
Tools
To create a patchwork masterpiece you will need:
- scissors or roller cutter
- needles
- threads
- pencil
- pins
- centimeter
- chalk
- paper
- sewing machine (if there is a lot of sewing to do)
Textile
In addition, you need materials that can also be purchased at the store or searched for at home. To create a beautiful multi-colored craft, you will need colorful pieces of fabric and lining - all this can be cut from unusable old clothes, bed linen, scarves, curtains and other unused household items.