A six-piece skirt is part of the basic wardrobe of almost any woman. She helps create different looks even for overweight ladies, using a minimal set of things. This elegant skirt will decorate any look: from office to festive. And with a huge selection of fabrics, it’s not difficult. We offer various step-by-step patterns (photo).
Elegant six-piece skirts
These models usually assume a midi (from the knee to the ankles) and a maxi length - below the ankle. There are quite a few mini-options; the minimum length starts from the palm above the knee.
A - the silhouette created by this skirt visually elongates the figure, slims and makes you look younger. That is why this style is not forbidden to be worn by ladies of any size and age.
In addition to the strict lines of regular wedges, options for godet - flared skirts - are possible. They are built on the basis of conventional six-blade blades.
The lineup:
- Skirts with frills.
- Models on the yoke. The yoke pattern is being made. After this, a wedge is modeled, but instead of the waist line we take the yoke line.
- Godet.
- Models with offset wedges. The wedge lines are rounded, go in a spiral, and so on.
- Set-in frills and flounces. The patterns are cut and the frill pattern is made. The frill is then sewn inside the wedge. After this, the individual pieces are stitched together.
- Prefabricated wedges made of various materials, including lace, mesh, leather.
Models and styles: who will suit them?
The peculiarity of this skirt is that it is created from 6 symmetrical cuts that form an A-shaped silhouette. The photo shows different variations of this style. But the most current are long styles and medium length samples. Miniskirts are quite rare.
The skirt has a narrow shape from the waist to the middle of the hips, flaring downwards with gussets and creating an A-line appearance. This style is perfect for overweight ladies and those of short stature. Thanks to several vertical seams, any figure is visually stretched, it becomes more beautiful and thinner.
The style is created using a straight skirt pattern with 2 seams. Auxiliary stitches are an extension of the darts placed along the waistline. The uniqueness of the cut is that it makes it possible to more accurately convey the body structure and create a beautiful fit.
Like trousers in a classic style with arrows, such a skirt has also long established itself in the category of popular and universal styles. The skirt with six wedges is perfect for both everyday wear and business style. It is rarely used for formal occasions; however, the bright and unusual style is also appropriate for a social event.
Taking measurements
To create a pattern we will need the following measurements:
- Waist circumference - measure at the thinnest part of the body.
- Hip circumference - measure along the hip line (protruding bones).
- Hip height - measures from the waist line along the hip line along the side seam. For skirts made of wedges, measurement is required; it shows from which place we begin the moderate flare.
- Skirt length is the distance from the waist line to the expected length of your product.
Step by step we build a six-piece skirt pattern
It’s not difficult to create a pattern, but it’s convenient to include all the measurements and features of the figure. The finished pattern somewhat narrows the variability.
Pattern details:
- Wedge – 6 pieces.
- The belt is one piece with a fold.
There are two ways to construct a wedge skirt:
- By changing the pattern - the base.
- By modeling the pattern of one wedge.
Base - straight skirt
Construction based on a pattern - the basics.
First of all, you need a pattern - the basis of a straight skirt. All other variations and models of skirts are built on its basis. If you have it, then the rest is just formalities. If you have never built a foundation, then a good, well-fitting old straight skirt can help you out.
We rip it apart, circle it - our base is ready:
- The wedges do not have to be exactly the same; the middle one may differ from the side ones.
- We find out how far from the middle of the front panel the seams will be located.
- On the front panel we draw a vertical line parallel to the middle.
- We transfer the dart onto it.
- If the dart is very large (wide or deep), then only a part of 2 cm can be transferred; the remaining width is removed into the side seam.
- Cut the pattern along the resulting outline.
- Circle both blanks.
- The share is strictly vertical!
- We carry out slopes - extensions to the hem, on average 4-10 cm.
- Align the hem line.
- We worked with half of the front, making one side wedge and half of the middle wedge from it.
- There is a fold of fabric in the middle of the middle wedge.
- In total, there are three wedges on the front panel.
- We model the rear panel in the same way.
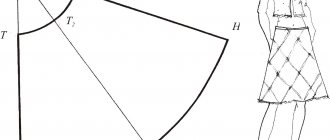
Wedge pattern
We make a pattern for one wedge according to our measurements
Wedges are very easy to build, there doesn’t have to be six of them, maybe four, eight, ten , but the models, in this case, will be called differently.
We carry out the following calculations and constructions:
- Determine the number of wedges.
- Divide the circumference of the waist and hips by 6 (the number of wedges). If the result is a fractional number, round to the nearest tenth.
- We are building a trapezoid.
- A = waist circumference, plus increase in waist (1.5-3 cm), divide everything received by six.
- B = hip circumference, plus increase in hips (2-5 cm), divide everything received by six.
- We set the length of the product strictly along the line of the grain thread.
- We define the width of the wedge along the bottom edge as the width of the skirt along the hem divided by six.
- We take into account the length (height) of the thigh, and it is from this that we draw the thigh line.
- Round the bottom line.
- The middle part with a fold running strictly along the lobar.
- The simplest pattern is ready.
Designing a drawing of a skirt from six identical wedges
This skirt is easier to design and easier to sew. Her drawing represents one sixth of the entire skirt. The measurements are the same as when designing the base of a straight skirt, size 48.
The waist circumference is divided into six parts or the half-circumference is divided into three parts (38 cm: 3 cm = 12.6 cm). This value determines the width of each of the six wedges along the waistline. The width of the pattern along the hip line is determined in the same way (52 cm: 3 = 17.3 cm).
An auxiliary vertical line is drawn, the length of which is equal to the length of the skirt - 60 cm. A horizontal line 12.6 cm long is drawn through its upper edge, equal distances are laid along it to the left and right of the central point and thus the waist line is outlined.
The construction of a drawing of a skirt consisting of eight, ten or twelve wedges is similar to the construction of a six-piece skirt; the circumference of the waist and hips is divided by the corresponding number of wedges.
The picture below shows a skirt made of six identical gussets, but much more extended along the hem line than in the previous picture.
To the left and right of the extreme points along the hem line, another 5 cm is set aside. The resulting points are connected to the hip line with straight lines.
The skirt of this cut fits tightly to the figure to the hip line, and from the hip line down the skirt falls freely in tails.
The same drawing shows another option for expanding the skirt. From the hip line up, 4 to 5 cm are laid down along the side seams. From the auxiliary line on the main pattern, along the hem line, 10 cm are set aside to the left and right. The resulting points are connected to the points marked above the hip line, using smooth curves.
Cutting and sewing a skirt from six identical wedges
The pattern of this skirt can serve as the basis for other similar models. Additional fabric can be inserted into the seams for folding. With a fabric width of 80-90 cm, which does not have any special features, the footage is equal to double the length of the skirt as measured plus 12 cm for allowances; if the fabric has special features, then the footage is equal to triple the length of the skirt according to the measurement plus 18 cm for allowances. For fabric widths from 120 to 140 cm, the footage is equal to double the length of the skirt plus 14 cm for allowances. In this case, the entire length of the skirt is not used. For greater convenience, the pattern is translated in triplicate. A piece of fabric is unfolded widthwise and then folded lengthwise with the right side inward. The fabric is stretched well and all three identical patterns are laid out.
The picture below shows how to lay out patterns on fabric with a width of 80 cm, if the fabric does not have any features. In this case, you can cut in a more economical way, since the patterns are laid out in two opposite directions.
If the fabric has special features, then the patterns are laid out only in one direction along the triple length of the cut, and the direction of the patterns is indicated with an arrow. The middle of the pattern should coincide with the grain of the fabric. Draw the lines of the pattern and allowances, and then mark the middle of the front and back with straight basting stitches.
The assembly of individual skirt wedges begins from the waist down, while the fabric is pulled evenly so that the seams do not bend. The seams are sewn by machine and ironed. This is done in two ways: by separating the seams and ironing them, or by ironing them to one side. In the second method, the hem is aligned and hemmed before stitching the seams. The seams are then sewn by machine to the bottom of the skirt and the threads in each seam are tightened by machine. To ensure that the seam allowances are not visible from the front side, they are aligned at an angle at the fold of the hem and smoothed out. The fastener is sewn into the seam on the left side of the skirt. The waist is decorated using one of the previously described methods.
Layout on fabric
Layout of fabric patterns is possible in two ways:
If the pattern on the fabric is not expressed , then you can lay it out “jack”, that is, alternate the top and bottom of the individual elements.
If the material is checkered , directed floral print or striped, then we place all the details in parallel, strictly one after another, so that the pattern from one area smoothly transitions to another with the least loss.
Advice! Consider the direction of the pattern on the fabric when purchasing fabric. It may cost 1.5-2 times more if the pattern is large and has a clear direction. The same goes for fabric pile.
After laying out the parts, we chalk the parts, not forgetting the seam allowances, and cut them out.
Fabric consumption
With a fabric width of 1.5 m and sizes up to 46-48, you will need a fabric consumption of about 1.5 times the length of the product. For sizes 50-52 and above, the fabric consumption is 2-2.5 times the length of the product.
Place the wedge patterns on the fabric vertically, shifting them in the waist area (3 wedges “look” up, 3 wedges in the opposite direction in a checkerboard pattern relative to the first wedges).
When cutting, take into account that the grain line of the fabric must coincide with the center line of the part in direction.
Sewing the product
We will need:
- Fabric – 2 skirt lengths, plus 10 cm for the waistband.
- Fastener – zipper, 15-20 cm.
- Button.
- Belt pad.
- Threads to match.
- Tailor's scissors, chalk.
Progress:
- Stitch the wedges together, leaving 20 cm unsewn in the side seam for fastening.
- Sew on a zipper; if it is not hidden, make sure that the teeth are not visible.
- Tissue the belt cleanly, turn it inside out, and stitch it.
- Sew the belt to the skirt; to do this, fold it so that the top cut of the panel is between the layers of the belt.
- Sew a button.
- Sew a loop around the waistband.
- Sew the bottom edge of the skirt.
- Fold and sew with a blind seam using a machine stitch or by hand.
- Iron the skirt.
Having a universal pattern, it is easy to model it, and get skirts that are completely different in appearance, using materials of different textures.