What is a blind seam
The answer is hidden in the name itself. A blind seam, when performed using different methods, allows you to connect two parts so that the stitching is not noticeable from the face. Please note that they are usually passed through from the front. A hidden seam helps to finely and exquisitely hem clothes, finish edges, and carefully create children's toys and products with filling.
For this manual work you will need the following materials:
- the product itself or the fabrics that need to be sewn together;
- threads in color;
- needles;
- pins;
- scissors.
It is important to understand that the secret method is performed in 1 thread. Also the key point is the exact selection of threads to the color of the fabric. The line should not be highlighted, otherwise the method will no longer be hidden.
Have you already sewn with a blind stitch?
Yes.
35.48%
No.
64.52%
Voted: 31
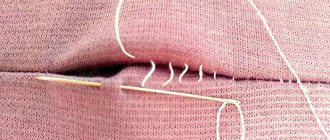
What does a finished blind seam look like?
In this photo you can see what a blind seam looks like on the back of the hem, that is, on the inside of the leg.
To make it easier for you to understand what a hidden seam looks like on a product, I took several pictures dismantling the details of such a stitch.
The hem will be held in place by a stitch that only catches one or two fibers of the fabric (ideally).
On loose and thick fabric, the trace of a hidden stitch is almost invisible. But in addition to thick fabric, making a hidden seam also requires experience and dexterity. https://www.sewing-master.ru/potajnoj-shov-na-shvejnoj-mashinke.html
Kinds
There are two main methods of blind stitching, but they are similar to each other.
Both types of blind stitch are essential to completing any sewing project, from clothing to accessories, toys to home decor.
Purl
The first is used when hemming the edges of skirts, trousers, thin jackets and other products. The cut edges are folded to the wrong side, and the thread is passed into the folds of the parts. The stitches on both sides are the same width. Using this method it is possible to sew a drawstring and insert an elastic band. For example, to reduce the width of a dress.
Creating a hemming method is as follows:
- Fold the excess fabric to the wrong side 1 or 2 times.
- Inserting a needle and thread in the color of the material, tying a knot.
- Inserting the needle under the folded fabric.
- The stitch is 60-80 millimeters and the output is through the edge of the fold.
- Picking up 1-3 threads on the fabric to which the hem is sewn.
- Inserting the needle into the fold and into the place where the threads came out.
- Stitch the same length.
- Repeat step 5.
- Stitch the same length.
It is important not to pull the thread too hard, otherwise the material will wrinkle and look pulled together.
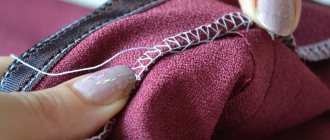
Facial
The second method, often known as ladder or herringbone stitch, is good for embroidering on stuffed animals or other items that need to be joined on the right side of the fabric. American needlewomen call the front seam “overlapping”, that is, “whip stitch”.
Here the seams are even, but completely hidden. Stitches vary in width.
Creating a ladder joint consists of three main steps:
- Inserting the needle into the material from below the hole and withdrawing it after a couple of millimeters. Next you need to take a step forward.
- Inserting the needle from the second side of the slot directly above the exit of the needle, namely perpendicular to the first stitch. Again it is necessary to perform the “forward needle” movement and move the tool to the outer part.
- Pulling up the thread. One seam must be pressed against the second so that the stitching is not visible.
Types of sewing machines
Modern sewing machines come in three types: electromechanical, electronic and computer-controlled machines. The most affordable of them, financially, are electromechanical models, in other words manual. They are not suitable for production purposes or for working with dense materials. For example, if you need to repair a coat, then a manual sewing machine may not be able to cope with this task, because... most often they have a lightweight mechanism. The most popular models of electromechanical devices can perform about twenty types of seams, including hidden ones. A foot for a blind seam is usually included with the household appliance, otherwise it can be purchased at a specialty store.
Electronic models are controlled by an electronic microprocessor, which sets the necessary modes of the sewing machine. It also helps control the needle, which makes working with seams that are difficult to make by hand several times easier. In addition to the blind seam, electronic sewing machines are capable of performing a huge variety of decorative finishing stitches, as well as combining them with each other.
Computer controlled sewing machines are luxury home appliances. They are very expensive, but the functionality of such devices is very impressive. When working with a computerized machine, there is practically no limitation on the complexity of the seam to be performed. Such models have two modes: sewing and sewing-embroidery. At the time of purchase, dozens of embroidery samples are usually already included in the device’s computer system, but if the standard sketches do not suit the buyer, he can easily download the embroidery patterns he likes via the Internet. It is clear that for such an advanced model there is no question of how to make a hidden seam, but not every housewife can afford to acquire such a device. And, in fact, such a machine is not useful for minor repairs and one-time adjustments of things.
Where is it used (table)
| Usage | Seam type |
| Repairing clothing (e.g. sewing up rips, rips, cuts, discrepancies) | Connecting from the face |
| Creation of plush and other toys (sewing parts of paws, faces, heads, noses, tails) | Connecting from the face |
| Hemming the bottom of products (pants, skirts, sundresses, tops, etc.) | Purl hem |
| Garment processing (sewing sleeves, linings) | Connecting from the face |
| Production of works in the style of patchwork and quilling (folding edges, processing decorative parts) | Purl hem |
Sew with an invisible seam on a machine
Even a novice seamstress can create an invisible seam using a sewing machine. You just need to know a few nuances. To figure out how to sew without a seam using a sewing machine, you need to prepare the right tools and make the appropriate settings for the device itself. This particularly applies to the paw.
Correct foot
Careful preparation of the instrument is also necessary. In addition to choosing a presser foot, it is worth performing a standard check of the device for functionality. Next, you can begin to consider the settings that are made for example on a Janome sewing machine:
You might be interested in this: How to sew a denim skirt on your own
Device setup
The instructions on how to sew two parts of fabric with an invisible seam on a sewing machine consist of performing the following steps:
- Fold the fabric as desired and iron it well. Then the lapel of this part is carried out. A clear line remains on the canvas along which the stitching will be formed.
- Next, the material is laid. Here it is worth using a certain pattern so that the seam is accurate and hidden. The diagram is presented below.
- When making the seam itself, you need to ensure that the needle catches only a few threads along the ironed fold. Otherwise, the thread will appear in the front part of the product.
Scheme for laying fabric
To make this option for connecting parts on a sewing machine, you can use other options for feet. There are even universal designs of this type.
Naturally, the time spent on forming hidden stitches on a machine is significantly reduced compared to doing the work manually. At the same time, the result looks more aesthetically pleasing - the stitching is uniform and the stitches are of the same length. But not every needlewoman has such a device in her arsenal, so mastering the manual type is also necessary.
Hidden seam
To repair clothes, connect parts or hem parts, you need to use a unique stitch option. This is a hidden stitch that can be formed by hand or on a sewing machine. A hidden stitch is made manually and using a machine in accordance with a certain algorithm-scheme.
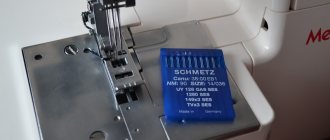
How to choose a thread and needle for a blind stitch
There are special monolithic options with the purpose “for hidden seams”. Despite this, any strong and not very thick threads that match the color of the fabric are suitable for working with hidden equipment. It is also important to choose reels based on the material:
- All polyester or nylon. They are distinguished by good twisting, due to which they have less “fuzz”. The stitching is smooth and beautiful.
- Polyester staple. They have good elasticity. Suitable for working with knitted fabrics.
- Bobbins. These threads are strong, thin, and elastic. They serve for a long time.
- Polyamide or nylon. Used when working with genuine leather. High strength, elastic.
- Silk. Very beautiful. Medium strength. Used for machine embroidery, working with thin fabrics and handicrafts.
Preparing to sew
When working with the technique of creating a hidden stitch, people put extra strain on their eyes. The technique requires concentration and a lot of free time. It is also necessary to hold the clothing, toy or other item without changing position, otherwise the vertical seam will turn out crooked and visible.
Therefore, you need to start preparing by choosing a comfortable place with good bright lighting. A practical choice is a table with a lamp. This can help preserve vision and posture. However, sitting on a hard chair for a long time is uncomfortable. Then try to set up a work area on a sofa, armchair or sofa next to the lamps.
Organize your “sewing area” so that you can always reach the tools: pins, threads, scissors, chalk.
Install lighting to your left. It is important that the rays hit the entire workspace. It is advisable not to rely on sunlight - it tires the eyes. The ideal option is a convenient combination of artificial and natural lighting.
How to secure thread at the end of a seam
You can secure the thread at the end of the seam using 2 methods: a knot or a tack. To get the first method:
- Sew a small stitch on the wrong side above the last stitch.
- Slowly tighten the thread.
- After a small ring appears, stand up.
- Pass the needle through the loop.
- Tighten until a new ring appears.
- Insert the needle through the second loop.
- Pull the thread tightly until a knot is formed.
To sew the tack, sew 2-3 small stitches using the backstitch technique. This seam is located on top of another and perfectly connects the layers of material.
Step-by-step instructions for making invisible seams by hand
Using simple technology, you can easily and quickly sew, change or repair clothes, toys and other products. A blind seam using your hands is done according to the same principle. However, some points, nuances and changes relate to the place where the secret technique is used.
Hem your trousers
Often, after buying pants, people encounter one problem - the product is too long, but otherwise it fits perfectly. There is a solution: sewing trousers with a hidden stitch is as easy as shelling pears.
Before you start, you need to try on your purchase and bend the edge so that the fold point is the desired changed length. In this case, the leg should be straight, not bent. Use soap or chalk to mark a dotted line along the fold. Already at the workplace, draw a straight line along the entire perimeter of the trouser leg, using a ruler.
If the owner of the item is not at hand, then simply take his trousers that are suitable in length and measure their length.
Next, draw another line over the bottom seam. It should be about a couple of centimeters above the bottom. Cut this piece in a circle (that is, you only need to cut one layer of fabric, not two).
Now fold the bottom first in one layer so that the edge reaches the top marked line. It is important to fold the fabric to the inside so that the final result looks neat. Secure with pins on the front side. Fold along the fold line again to the desired length. Re-secure with pins.
Then make a hand stitch using a thin needle and thread in the following color:
- Insert the needle into the fold of the fabric from one part so that the knot is “hidden”.
- Insert the tool into the material from the opposite side. Try to get as close as possible to the area through which the tool was just removed.
- Pull the needle into the inside and after a couple of millimeters bring it out through the fold.
- Repeat until you reach the beginning of the line.
Do not over-tighten the thread, otherwise part of the seam will be pulled on the outside.
Fold the edges of jeans
This method of hemming jeans is distinguished by maintaining the factory bottom seam. Additionally, the method is great for fast-growing children, as unraveling the hand stitching is easy.
- Fold the jeans outward to the desired length.
- Next, take a needle and thread and sew a classic seam or a goat stitch along the entire leg. The stitch length is no more than 1-1.5 centimeters. The shorter, the more reliable.
- Now go a second time down a couple of millimeters, trying to fill in the empty spaces.
- Turn out and iron.
Invisible external seam, clothing repair MK video in detail
How to sew clothes from the front side
- An invisible external seam, made with a thread and a needle on the front side, will save you in an unexpected situation.
- Video tutorial: How to quietly sew a hole on the outside of a garment along the seam
If you have a seam torn and it is impossible to quickly sew it up from the inside out, because... there is no access, for example, the lining is in the way.
Photo 1
It is very easy to sew up a torn area. In addition, no lines need to be drawn. The seam line on the fabric will be visible by itself, it has already been created by machine stitching, iron and time (photo 1)
Photo 2 Photo 3
Using a needle, carefully “open” the seam further (photo 2, photo 3). This will release the threads of the remaining seam. Tie them together with 2 knots, thereby securing the remaining seam. Remove the threads from the fabric inside out. Do the same with the opposite side of the opened seam.
Take a thread that matches the color. Thread it through a needle. Make a knot at one end of the thread and leave the other end of the thread hanging freely. For the photo, I deliberately took a thread of a contrasting color to show that the seam would be invisible.
- Photo 4
- Make a puncture with a thread and a needle on the left half of the seam from the wrong side strictly along the seam line, slightly above the ripped place, pull the thread with the needle to the front side of the fabric to be sewn (photo 4).
- Photo 5
Photo 6
On the right side of the product, strictly opposite the thread exit from the left half of the seam, make a puncture with a needle and thread on the wrong side and immediately on the front side, also strictly along the seam line. Stitch length is about 1 mm. Pull the thread to the front side (photo 5, photo 6). Tighten the thread so that the halves of the rupture of the product are connected.
Blind stitch on a sewing machine
The special magic foot for secret stitching has a stopper whose position can be adjusted with a screw. There is a twin sister – a model with a “visor”.
As a rule, stitches with a single projection (straight - zigzag - straight) are used for invisible techniques. Suitable for all types of fabric. Options in which a straight line is replaced by a small zigzag are used when working with knitwear.
The further the puncture, the more noticeable the treatment looks from the front side. Therefore, you can first try the technique on a scrap piece of fabric, adjusting the settings.
When preparing to work, iron the hem and turn it over so that only the overcast edge remains.
Then just stitch along the edge.
How to sew trouser tape on a sewing machine
Before I talk in detail about the hidden seam, I want to briefly explain how to sew on a trouser tape. The ribbon is adjusted using a sewing machine using two lines. It is not necessary to baste it, the main thing is to tension it correctly when sewing. Otherwise, the tape can either tighten the bottom of the trouser leg, or, on the contrary, stretch it and this defect cannot be corrected with an iron.
It is difficult to explain in words the degree of tension on the tape; this requires practice. But the general idea is this. If the tape is loose, the hem of the pant leg will be wavy. And vice versa, if it is overtightened, it is narrowed. It is best to pull the tape and fabric lightly at the same time with a little force. Just so that the tape is evenly applied to the fabric without deforming it. Never do this as your last operation. Better put it off for the next day. A careless hem at the bottom of the product will ruin its entire appearance. Moreover, an inexperienced seamstress sometimes has to redo this work more than once.
( 2 ratings, average 5 out of 5 )