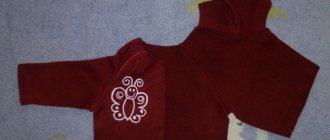
What it is
The name “bell” was assigned to the product because of its conical shape: the skirt widens slightly from the waist to the hem line.
Sometimes the style is confused with the “semi-sun”. The styles are similar only in appearance, but differ in width. The bell skirt is slightly narrower - it occupies 1/5-1/7 of the circumference, while the “half sun” accounts for 0.5 of the circumference. The first variety lies flat, and the second - freely.
Huge color palette
The length of the model is arbitrary: mini, midi, maxi - it all depends on the preferences of the owner of the product, and the thickness parameters of the bottom are based on the structural features of the body.
Sewing the product is easy. The sewing process will not take much time. In patterns published on the Internet, DI is not taken into account, since drawing a line to the desired mark is not difficult, the main thing is to correctly calculate the waist and hips.
Handmade product
The skirt looks good on a figure of ideal proportion, without flaws. When cutting out bell skirts and patterns with your own hands step by step, the emphasis is on the hips and waist. This skirt is made in different variations: mini, midi, maxi. In any case, the product will look perfect on a proportionate female figure. A DIY bias skirt pattern step by step is not difficult to make; such a product can be cut by a novice seamstress. The most important thing is to perform an accurate calculation of the fabric, take measurements, and determine in advance the width of the future product. In terms of width, such products are:
- Slight odor;
- Average;
- Wide.
Slight smell
To ensure that the product looks perfect on your figure, you should match the length of your waist to your hips:
- If the difference between the waist and hips is insignificant, it is preferable to choose a narrow option;
- If it’s big, it’s on a wide bell.
To help those who want to sew a product, instructions.
Model building
- The starting point of construction is placed in the upper left corner of the paper sheet or piece of fabric.
- To the right side of the first point, set aside 1/6 of the waist circumference.
- From the second mark, lower the length line of the product. This straight line will mark the path for the longitudinal seam.
- From the second point of the drawing, according to an arcuate line, plot several radii. Form them into a single arc.
- Place the same radii from the leftmost point of the bottom part of the construction. Connect them with an arcuate line.
studfiles.net
Product width
- If the bell skirt pattern is built directly on a piece of fabric, its width will be equal to the width of the standard “half-sun” model - 1/4 of the circle construction. By adding a sector of the required length, the product can be expanded.
- The width of the model, equal to half the width of the half-sun style, needs to be checked at the level of the hips. To do this, the hip circumference is measured and 11-12 cm are set aside from the second construction point to the right. If the drawing is completed correctly, the distance from the obtained point to the first construction mark should be equal to 1/6 of the hip circumference value.
- Wider models do not need width control; they will lie freely on the hips.
- If the width of the model at the hips is insufficient, you need to add 2-4 cm to the bottom line, continuing the arc in the drawing. Connect the lower extension point to the second construction mark. This will maintain your waist size and expand your hips.
Construction Additions
- It is necessary to supplement the pattern so that the fabric spreads evenly throughout the entire volume of the item.
- Find the midpoints of the upper and lower radial lines. From the obtained points in the direction of the starting mark, set aside 2 cm from the waist line and 4 cm from the lower arc.
- Connect the resulting marks with rounded lines.
Layout on fabric
- To make a product of a standard medium size, a piece of fabric 1.5 m wide will be enough. The length is calculated by adding 20 cm to your height measurement.
- A model cut taking into account the course of the bias thread may stretch unfavorably when worn. Therefore, before cutting, it is advisable to moisten the fabric parts with water and hang them to dry. If the fabric does stretch, cut off the excess.
sitemasterov.ru
If the pattern was made on paper, align its center line with the bias of the fabric folded in half, at an angle of 45 degrees to the grain thread. This rule is important to follow if the fabric has a checkered pattern or large prints over the entire surface.
When cutting out fabric, we must not forget about the reserve for seams. Leave allowances of 1 cm at the waist and sides, and 2-3 cm at the bottom.
The model can be attached to an elastic band using a drawstring or equipped with a belt. In the latter case, prepare a rectangle of fabric with a width twice the width of the bodice. The length of the part will be equal to the waist circumference with the addition of 3-5 cm for the fastener and 1 cm for allowances. When cutting out a belt, take into account the course of the grain thread.
Product processing
- Place the pieces together along the side seams facing each other.
- If there is only one seam, fold the fabric in half with right sides facing in along the seam lines. If there are two seams, it is recommended to start stitching from the right one - the left one will have a zipper.
- Sew the edges, departing 1 cm from the edge of the fabric.
- Leave 10-15 cm at the top of the seam for the future zipper.
- Finish the edges and press the seams.
- Sew the fastener on the wrong side. A side zipper can distort the overall outline, so it is recommended to place the clasp on the back.
- Machine stitch at a distance of 0.5 cm from the folds.
- Attach the waist part, slightly stretching the main fabric at waist level. You can insert a reinforcing corsage tape into the belt.
- It is recommended not to process the bottom of the product for one or two days after finishing work. The item should hang and stretch in the central part. You can wet it first. After this, the bottom edge is leveled.
- The bottom is processed with overlock, edging or hemming seams.
- There is no need to make an additional extension for the lining that the model may need.
plaid.com
Fabric selection
For beginner seamstresses, the best choice is a plain material. The fabric should not be loose - satin, linen, denim, leather.
You might be interested in Simple patterns for a robe dress with buttons: sewing order
Note! Experienced needlewomen prefer silk or chiffon, knitwear. If you need your skirt to be warm, you can opt for a soft wool blend and sew a thin lining fabric to it.
Plain fabric
When sewing a product, it is better to choose plain fabrics, although the presence of checks and small patterns will not affect the appearance of the product.
When choosing a material, do not forget that cotton shrinks when washed; before sewing, you need to wet, dry and iron the material.
Satin bell skirt
What to add
Pumps and a clutch on a metal strap will be a natural completion of the look. This is a feminine and elegant ensemble that will decorate any girl. If you have a plain and smooth top, you can safely complement the look with a pendant, a long chain with large links or a string of pearls . The voluminous bottom of the skirt does not exclude the use of jewelry and accessories in the upper part, which will balance the proportions.
A bell skirt should be worn with high-heeled shoes. These could be high-heeled or platform shoes, or wedge-heeled clogs. Complete the retro look with strappy pumps or statement ankle boots with an inverted cone heel.
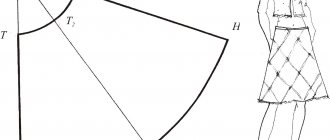
Constructing a pattern
Draw a 90 degree angle on paper with point A at the vertex. Find the value of K.
K - characterizes the curvature of the upper section of the skirt at the waist. Depending on the expansion of the product along the lower boundary, K is:
- 0.8 - large bell;
- 0.9 - average;
- 1 - small.
Choose the middle bell. The K value is 0.9.
Pattern No. 1
How much fabric will you need?
- Calculate the radius of the construction using the formula: K x (OT/2 + 1 cm). For example: 0.9 x (78/2 + 1) = 0.9 x (39 + 1) = 0.9x40 = 36 cm.
- Lay A to the right, the resulting value and put the designation T. A rounded line is drawn down from T. The value of OT/2+ cm for fit is plotted along the line. For a specific example - 78 cm/2 + 1 cm = 39 + 1 = 40 cm.
- Point T1 is placed. From point A through T1 there is a downward line. CI is measured from T and T1. In this case - 70 cm.
- The designations H and H1 are indicated.
- Check the hip line. For items T and T1, put the skirts down 18 cm, set the designations B and B1, draw the main line, measure it. The line length is no more than 52 cm in a particular case.
- Draw a bottom line from point H to point H1.
- Raises the waist and bottom.
Draw the center line of the pattern, setting aside the distance upward, depending on the type of bell:
- Large - waist - 1.5 cm, bottom - 3 cm;
- Average - 1.25 and 2.5 cm;
- Small - 1 and 2 cm, respectively.
When cutting, you should pay attention to cutting the product obliquely.
Bell skirt pattern
Bell skirt pattern.
Hi all!
Often, some fashion “gurus” call all skirts that emphasize the waist line and diverge towards the bottom with thick, slightly thinner and very rare conical folds - waves - a bell skirt.
And, in general, purely in appearance, all these skirts really resemble a bell.
But this name is too general and completely incorrect. All these skirts are conical (from the word cone) and differ in the amount of flare of the skirt cut:
“sun” skirts (the skirt pattern is a full circle);
sun skirt with elastic (circle);
skirts “double sun”, triple, etc. (2 circles, 3);
half-sun skirts (semi-circle);
half-sun skirt with elastic (semicircle);
bell skirts (≈ 1/5 – 1/7 circle);
flared skirts (≈ 1/8 – 1/10 circle).
In today's article we will talk about the real bell skirts.
Today we will learn how to create a bell skirt pattern. Even three patterns. Because there are “bell” skirts - a “large bell” skirt, a “medium bell” skirt, and a “small bell” skirt.
And also, all these skirts can be made with elastic, with a yoke, with various kinds of folds, etc. and so on. So there will be something to read and watch.
Any of the skirts, the patterns of which will be created today, in this article, is part of a truncated cone, in which the upper arc is the waist line, the lower hem line.
We just need to calculate the digital values of the radii of the circles, part of which are the arcs - the waist line and the bottom line of the skirt.
To construct the skirt patterns announced above in the article, we will use the dimensional characteristics of size 50 (height 164 cm, 1st full group, chest volume - 100 cm, waist volume - 78.2 cm, hip volume - 104 cm (including protrusion of the abdomen)).
We will also need an allowance for a loose fit along the waistline.
(Here 1.0 cm).
Pattern for a “big bell” skirt.
The radius of the circle, with the help of which its part is drawn - the arc (the waist line of the “big bell” skirt) is calculated using the already familiar formula Rt = K (POT + Pt). Wherein:
Rt is the radius we need.
K – skirt flare coefficient. For a “big bell” skirt it is 0.8.
WAT – half waist circumference.
Fri – increase in waist circumference for a loose fit.
Here Rt = K (POT + Pt) = 0.8 x (39.1 + 1.0) = 32.08 ≈ 32.1 cm.
We immediately determine the radius for constructing the bottom line. We use the formula Rн = Rт + Du = 32.1 + 70 = 102.1 cm.
(You, dear readers, substitute your data).
And let’s move on directly to creating the pattern. From point C we draw a vertical line down.
Using the calculated radii Rt and Rn, we draw circles from point C. Or rather, only parts of circles - arcs.
Let us denote the points of intersection of the drawn arcs with the vertical line as T (waist) and H (bottom).
The segment CN is the line of the middle of the back of the “big bell” skirt.
From point T directly from above along the drawn arc - a curved line, we lay off a segment whose length TT1 = POT + Pt = 39.1 + 1.0 = 40.1 cm.
This is what created our waist line.
We connect points C and T1 with a segment, and then from point T1 we continue it with a straight line until it intersects with the next arc (bottom line).
The segment CN is the line of the middle of the front panel of the “big bell” skirt.
The “big bell” skirt pattern can be considered ready!
Skirt “medium bell”, pattern.
The “medium bell” skirt pattern is constructed in exactly the same way as the “large bell” skirt pattern (see previous section). The only difference is K - the flare coefficient of the skirt. For a “medium bell” skirt it is 0.9.
Here, with the data of the 50th size, Rt = 36.1 cm, Rn = 106.1 cm.
Skirt “small bell”, pattern.
The same is true with the construction of the “small bell” skirt pattern. Only K = 1.
Here, with the data of the 50th size, Rt = 40.1 cm, Rn = 110.1 cm.
If you look at the patterns of the three types of bell skirts separately, you won’t see the difference between them at all.
But side by side, or if you put them on top of each other... With the same length of the TT1 segments (40.6 cm) and the same length of the skirts (70 cm), they have different volumes, different distances of the waist line from point C, different lengths of the hemline .
Belt for bell skirts.
For each of the three types of bell skirts, the belt is a rectangle, the length L of which is From + Pt.
From – waist circumference. Here it is 78.2 cm.
Fri - increase in freedom of fit along the waist line (see table above in the article). Here 2 cm.
Here the length L of the rectangle is 78.2 + 2 = 80.2 cm.
The width of the rectangle is 2 times the width of the finished belt (according to the model).
Allowances of 0.7 - 1.5 cm wide are given along the entire perimeter of the rectangle.
If the belt is “composed” of several parts, this means that the number of connecting seams on it increases, and therefore the total amount of allowances increases.
Pattern of a bell skirt with elastic.
Any of the skirts - large, medium and small "bell" can be made with elastic. For all three types of bell skirts, the pattern is constructed exactly the same. So a description of how to construct a “big bell” skirt pattern will be quite enough to fully understand the essence of the process.
To create the pattern, we will use the same dimensional characteristics of size 50. (Height 164 cm, 1st full group, chest volume - 100 cm, waist volume - 78.2 cm, hip volume - 104 cm (taking into account the protrusion of the abdomen)).
However, this time the “main” measurement will be the measurement of the widest part of the figure. Here it is Ob.
All “bell” skirts are made with an elastic band, or rather with an elasticated belt, in order to quickly finish the sewing process when there is no desire to make a skirt with a fastener, but you can’t wait to put on a new thing quickly. And yet, the “bell” skirt is made with elastic, because this way it is convenient and very quick to put on.
The increase for the free passage of the waist line of the skirt through the widest part of the figure is at least 10 cm. Here AB +10 or FOB + 5 cm.
Otherwise, the construction of the skirt pattern, in this case a “big bell” with an elastic band, is carried out according to the same scheme as the construction of a regular “big bell” skirt. To find Rt and Rn, the same formulas are used.
Rt = K (POT + Pt). Only instead of POT and Pt we substitute POB and Pb. Rt = K (POB + Pb).
K = 0.8.
Here Rt = 45.6 cm.
Radius of the bottom line Rн = Rт + Du = 45.6 + 70 = 115.6 cm.
Attention! We work with the half-girth of the hips, but build the waist line!
See the article above for the construction of the “big bell” skirt.
Belt for a bell skirt with an elastic band.
Belts for a bell skirt with an elastic band are a long rectangular piece with a fold and allowances (0.7 - 1.5 cm) around the entire perimeter.
The length L of the rectangle is OB + 10 cm allowance for freedom of fit. Here it is 116 cm.
The width of the rectangle is according to the model.
Pattern of a bell skirt with a wrap .
Smell is one of the types of fasteners on clothes. A smell is when two absolutely identical, but symmetrical parts of the shelf, with one side sewn into the side seams - left and right, while the other remains free, flying away. But due to the fact that these two parts copy the entire or almost the entire opposite side of a particular clothing model, on the finished product they overlap each other (swapping) and the front figure is covered from prying eyes by the additional material of these two parts.
On women's clothing, the right side of the shelf overlaps the left.
The parts are held in this position using fasteners with a button, button, hook or ties.
A bell skirt can also be made with a wrap. To do this, first a pattern for such a skirt is created (see the construction diagram above in the article), and then the smell is “realized”. The shelf seems to split into two identical but symmetrical parts.
The wrap modeling is done on the front of the skirt. “But the pattern of any bell skirt,” another reader will object, “is built on ½ of the figure, from the line of the middle of the back panel to the line of the middle of the front panel.” To this objection I will answer that the pattern of any bell skirt, no matter how you look at it, no matter how you twist it, it is the same everywhere. That the pattern is from the line of the middle of the front panel to the line of the middle of the back panel, that the two front halves from the first pattern are absolutely identical parts.
Let's return to the smell. Both wrap details can, from the front, from one side seam to the other, completely or almost completely copy each other.
The corners of both parts from below, from their free flying side, are designed according to the model, if desired. These areas of both parts can be the same on both parts, or vary (by model, if desired). These can be various kinds of corners and roundings, as on the flying parts (see the next section of the article).
Pattern of a bell skirt with an imitation wrap .
Bell skirts can be made with an imitation wrap. That is, there is no electric smell, but the appearance of it is present. The smell can be imitated using a separate detachable part.
Modeling of the flying part is carried out on the pattern of the front panel of the bell skirt. (For example, “big bell”).
This is a creative process in its purest form. We decide on the configuration of the part, the shape of its corners, etc. and so on. (according to model, optional). For example, a pattern for a flying part may look like this.
A detachable, completely autonomous detail is sewn into the right side seam of the skirt at the same time as it is being sewn.
Pattern of a bell skirt with pleats.
Bell skirts can be decorated with pleats. Most often, bell skirts have soft, counter pleats. This type of finishing is used when they want to further emphasize the line of the waist and hips, or to give the bottom of the skirt a pronounced shape of a voluminous bell or the shape of a half-opened flower bud.
Folds can be laid from the waistline and below, from the yoke. (See the article below about yokes.) The back and front panels of bell skirts have the same number of folds and the same type.
First, a bell skirt pattern is created. For example, “large bell” size 50.
We divide the existing pattern into equal parts (quantity according to the model, optional). It’s more convenient to split the pattern into pieces this way. First, the waist and bottom lines are divided into equal parts, and then the marks on them are connected by segments.
We cut the pattern along the drawn lines and spread it apart.
In order not to significantly damage the final appearance of the skirt, the resulting parts must be moved apart correctly. Each subsequent part is moved away from the previous one by the required distance (fold depth in cm). This distance should be the same along the entire length of both parts. The midpoints of the parts moved apart from one line should be opposite each other on the same straight line.
The details of the cut pattern can be moved apart directly onto the fabric, or they can be re-glued in the desired shape on a new sheet of paper.
We divide the “gaps” that formed between the individual parts of a previously single pattern into four equal parts.
The 5 lines formed in this case are the fold lines and the alignment lines.
1 - lines of external folds of the fold.
2 - lines of internal folds of the fold.
3 - alignment line.
You can read how counter folds are made in the article “Counter folds.”
Bell skirt with yoke.
Bell skirts can be decorated with yokes.
According to the “scenario” outlined above in the article, we are building a pattern for a “bell” skirt. For example, a “small bell” skirt pattern.
Yokes can be placed only on the back panel of the skirt, only on the front panel and on both panels at once (according to the model, if desired). Located on both the front and back panels of the skirt, the yokes can follow each other's shape or be completely different.
Yokes on a bell skirt can come in a variety of shapes. For example, these.
Everything is very individual and according to the model, at will. The only wish is that the yoke is still a small cut-off part of the upper part of skirts, trousers, shirts, blouses, dresses, etc. and so on. and it cannot be too wide, from 0 to 10 - 15 cm maximum.
Good luck to all! Sincerely, Milla Sidelnikova!
How to sew
The product can be sewn with one seam - if the size chart allows, with 2 or 4 seams. The product will fit perfectly on a belt with a zipper and an elastic band.
You might be interested in Description of adhesive tapes and webs for fabrics
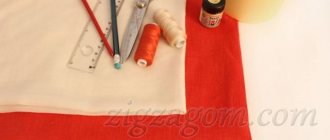
What is required for sewing?
- Material;
- Lightning;
- Button;
- Threads to match the fabric;
- Scissors;
- Special machine needles.
Bell skirt pattern
Work progress:
- Sew the side seam, sew in the zipper;
- Sew on a belt;
- Process the bottom of the product. An overlocker must be used to finish the seam.
Important. To avoid damaging the fabric, you need to make sure that the pattern is laid out correctly - the cut is folded along the grain (the weft thread is located along the edge).
How to cut?
- Patterns are applied to the cut, folded in half, so that one of the sides coincides with the fold of the material;
- Outline the pattern with chalk;
- Make seam allowances - cm;
- Cut out the panel;
Sewing in 2 seams
Sewing differs slightly: instead of a fold line on the fabric there is a cut line, to which, when cutting the product, a slight seam allowance is made. Operating procedure:
- Cut out the product;
- Cut out the canvases: front and back.
- Markings are made on the left cut under the zipper;
- Stitching the seam to the marking;
- Ironing, overcasting;
- Marking and attaching the zipper, stitching is done carefully.
Important! Before sewing the belt, the product is tried on - if the waist is loose, the fabric is stitched together with coarse stitching.
Pleated skirt
In order for others to appreciate the beauty of the figure - the waist and hips, you can sew the product with folds. The folds can diverge from the waist, or they can diverge from the hips; most often, they make counter folds.
Pleated skirt for girls
If there are several folds, you need to sew carefully so that their quantitative ratio in front and back is the same.
The basis for creating a pattern for a product with pleats is the classic version of the pattern, but it should be taken into account that it will take more fabric to sew a skirt with pleats.
Skirt cut with one pleat at the front
The basting is removed from the fold and ironed.
Model with several folds, cut in a similar way. The cut is based on a basic pattern.
Product with one counter pleat at the front
Skirt pattern with several folds
The finished pattern is cut into pieces according to the number of folds. At an equal distance along the line of the arc of the waist, bottom, mark the points and places of their connection.
- Cut along the formed lines.
- The wedges are laid out on the material in such a way that the distance between them is the same, identical in the depth of the fold, and the cut lines are parallel to each other.
- Trace with chalk, leave allowances.
- Cut and baste folds;
- Stitching side seams, inserting a zipper, sewing on a waistband, finishing the bottom.
- The final touch is ironing the folds and removing the basting.
You might be interested in this: The procedure for sewing a bedspread for a sofa with your own hands
Bodice and hem finishing
If the calculations are carried out correctly, the hem line needs to be double-checked, the product tried on and trimmed if necessary. All this is not done at once: the skirt is wetted, dried, ironed, the bottom is leveled, and the protruding fabric is trimmed.
The design of the bottom can be done using an overlocker (when sewing from knitwear), and the machine can be hemmed manually using a “blind” stitch (hem parameters - 5mm). If desired, stitching of the bottom, edging with cord, sewing on a frill or lace material can be done.
How to sew a belt
To prepare a belt, draw a rectangle with the appropriate parameters (the belt part takes up 0.5 of the product). Patterns are placed on it, secured with pins, outlined with chalk and cut out.
The resulting part (strip) is folded along the inside out, in half, and the short sides are sewn together.
Important. To make the corners neat, some of the allowances are cut off from the part.
The part is turned inside out, ironed, and the seam allowances are ironed inward along the long side.
Insert the skirt along the waist line into the belt and baste it.
Stitching the waistband using an edge stitch.
Cut and sew over a buttonhole.
Sewing on a belt
How to make a pleated skirt
If you want to further emphasize your figure, in particular your waist and hips, you can sew a bell skirt with pleats. They can diverge both from the waist and from the hips, most often they are made in counter. If there is not one, but several folds, then you need to ensure that their appearance and number are the same on the back and front.
The pattern of a bell skirt with pleats is created on the basis of a classic pattern (see above), but you need to remember that such a model will require more fabric.
Cutting a skirt with one front counter pleat:
- Make a pattern of fabric according to the required dimensions, as described earlier.
- Fold the cut along the grain thread and bend along the fold a strip of width equal to the desired depth of the fold. Baste the resulting fold line.
- Place the pattern on the fabric so that one edge coincides with the basting line.
- Trace with chalk, not forgetting the seam allowances, and cut out.
- Sew the seam, sew in a zipper.
- Iron and baste the fold.
- Sew on the belt and finish the bottom of the product.
All that remains is to remove the basting from the fold and iron it thoroughly again.
The model with several folds is cut in the same way. The basic pattern is taken as a basis.
Cutting a model with several folds:
- Cut the finished pattern into as many pieces, their number depends on how many folds there will be. To do this, mark points at equal distances along the arc of the waist and bottom and connect them. Cut along the resulting lines.
- Place the wedges on the fabric so that the distance between them is the same, equal to the depth of the folds, and the cut lines run parallel to each other.
- Trace with chalk, making seam allowances.
- Cut, lay and baste folds.
- Sew the side seams, insert a zipper, sew on a waistband and finish the bottom.
Iron the resulting folds, remove the basting - and the skirt is ready.
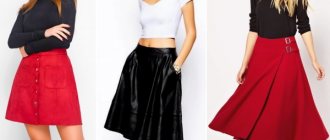
How to wear
This product is a real find for a fashionista. The skirt is perfect for creating different looks: frivolous, elegant, for going to work - it all depends on the material chosen for sewing the product.
Advantages: emphasizing the strengths of the figure, hiding flaws with the correct cut in length. For example, knee-length models lengthen the legs and hide the width of the hips. Pleated skirts emphasize the waist and give the missing volume to thin hips.
Top options:
- Blouses;
- Mikey;
- Jumper;
- Turtleneck with a classic cut.
Note! In order for the product to look perfect, the top of the composition should be devoid of volume, since the skirt is flared downwards.
It is for this reason that the top should be simple.
By color scheme
Colored items go well with plain ones, and a white blouse and a plain skirt are a great option for the office.
LiveInternetLiveInternet
Quote from Vera_Olkhovskaya
Read in full In your quotation book or community!
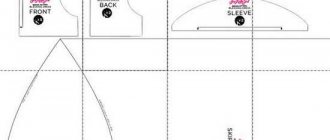
Electronic pattern for a dress (tunic) “bell”
Sizes: 42-52
File format: PDF
Sewing difficulty level: easy
Despite the loose silhouette, the model of such a dress is suitable only for thin girls and this is due to the outline of the armhole, and not to the silhouette shapes.
The set of patterns includes a shelf and a back (Fig. 1).
Only thin silk fabrics are suitable for sewing. For the “top” the most suitable would be chiffon, for the “cover” (lining) the same chiffon, crepe chiffon, satin or other thin silk
Consumption depends on the size of the product and will be 135 – 155 cm.
How to buy an electronic pattern
How to print a pattern
Cutting and sewing a dress (tunic) “bell”
For cutting, the fabric is folded in half, and the edges are aligned and placed parallel to the edge of the cutting table (Fig. 2).
The front and back patterns are placed on the fabric with the middle seams towards the fold and edges. In this case, the allowances for the middle, side and shoulder seams will be 1 cm. The armholes, sprout and neckline are cut out beyond the outline line of the patterns. And the allowance at the bottom should be added based on the method of processing you have chosen, plus 1 - 2 cm to equalize the length.
By the way, leveling the length is a necessary operation when sewing flared dresses and circle skirts.
And this need arises due to the different directions of the threads along the seams of the product. In this dress, the middle seams are located along the grain, and the side seams are located along the bias and, therefore, will stretch under their own weight.
You've probably often seen the pattern in similar dresses and flared skirts or even coats sewn in factories - the side seams in these products sag, and the back and front look short.
In order to “balance” the product to some extent, I made deflections along the middle seams of the back and shelf.
Returning to cutting, I will add that the “top” and “cover” (lining) of the dress are cut out the same way. In this case, the “cover” can be shorter or longer than the “top”. Same length is also possible.
Sewing a bell dress is not difficult. And here there are three possible tailoring options
The first one is without a “cover” and with the armholes and neckline finished with facings (see the video master class on sewing and read the article on this topic).
The second - with a “cover” and edging the neckline with bias tape (see the video sewing lesson if you use ready-made bias tape and edging, or read the article on how to make bias tape at home and edging the neckline and armhole without using tools) .
The third is with a “cover” and in this case the “cover” acts as a facing for the neckline and armholes.
If everything is clear with the first method (process the shoulder and side seams, trim the neckline and armhole, bottom - and you’re done), then the second method of sewing a bell dress can cause a little difficulty for beginners. Therefore, a little sewing lesson won't hurt.
So, to avoid them, you should stitch, overcast and iron the shoulder and front middle sections of the “top” and “cover” of the product. Then, put the “top” on the “cover”, as it should be in the finished dress, and sweep them along the neckline and armholes.
You need to baste with large oblique stitches (up to 5 cm), stepping back a couple of centimeters from the cuts. Of course, all seams and cuts of the “top” and “cover” should be combined.
After basting, sew the same armholes and neckline with a machine stitch, departing from the cuts by 0.5 cm. After making sure that the “top” and the “cover” are combined securely and without distortions, trim the seam to 0.3 cm (from line to cut).
After edging the neckline and armhole using the method that you have chosen, sweep away the raw sections, “beat” the bottom according to your figure and process it with a rolled seam (also called a rolled seam - as translated from English - rolled - twisted, folded).
You can watch a video tutorial on sewing a beach jumpsuit, which shows how to set up an overlocker for a rolled seam at this link.
And the sewing of the dress should be completed by processing the remaining seams - the side seams and the middle seam along the back. They will also have to be basted with oblique stitches, the corresponding seams of the “top” and “cover” sewn together, stitched and ironed. It is advisable to secure the ends of the seams either by machine or by hand.
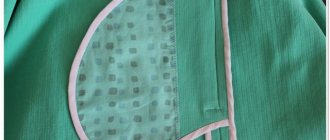
The third method (shown in the photo) is somewhat unusual, but quite simple. In this processing option, the “case” plays the role of a facing and the sequence is important.
We start with the middle seams of the front and back - grind, overcast, iron. Then, putting the “case” and “top” face to face, we grind the neckline in the same way as you would grind it with a facing (see video sewing lesson). Then we grind the armhole, for example, the right one. After that, I’ll take the left one. If this seems difficult, then the turning seams can be done in half.
After turning the armholes, the side seams of the “top” and “cover” are processed as one seam. Finally, use a rolled seam at the bottom.
As you can see, everything is simple. And you don’t have to be a sewing master to sew a dress.
You can download other women's patterns almost free of charge and without registration, and children's patterns are absolutely free.