DIY children's tie with an elastic band
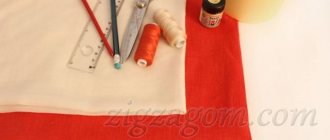
Necessary materials for sewing a tie:
Pattern and sewing of a tie with an elastic band:
We make a tie template and transfer the pattern to cardboard. According to this pattern, the tie turns out to be narrow; if you need a wide tie, the pattern needs to be increased accordingly by the required amount. Save the template - it may still be useful for sewing other ties.
We cut out a silk part according to the template, adding allowances of 0.7 cm on all sides, the same part from non-woven fabric, and the tip of the tie from the lining.
Glue the interlining to the back of the main part using an iron and a damp cloth.
We fold the tie and lining with the right sides inward and stitch at a distance of 0.7 cm, cutting off the allowances in the corners.
Fold the tie lengthwise and stitch along the long side at a distance of 0.7 cm.
We turn the tie inside out and iron it through a damp iron.
Making a knot for a tie. We cut out a strip of fabric with a length equal to double the length of the top of the tie + an allowance of 0.7 cm on both sides, a width of 7 cm, we cut out the same piece from non-woven fabric and glue it to the wrong side of the strip.
We fold the strip face down, stitch the edges, screw them in, the stitching seam should be in the middle. We cut the side sections of the strip at an angle.
Fold the strip again and stitch down the side edges.
We measure the elastic band along the child’s throat, make a small margin so that the elastic band does not press, and connect the ends of the elastic band into a ring.
We put a knot on the front side of the tie, attach an elastic band on top, as shown in the photo, and connect it with a single stitch. We pull the tie through the knot, straighten it, it’s ready.
Source
What you need
Before making a tie, choose a suit, shirt or jacket with which the selected pattern will be worn. Classic men's models are sewn from the following fabric options:
- velvet;
- silks;
- cotton;
- twila;
- wool;
- grenadine;
- flax
If the suit is made of thick wool, for your tie choose a fabric with shine, but quite dense - satin, jacquard. For a light summer jacket, silk is suitable for an evening outing or linen for a daytime set. Based on color, they are a guide to the combination of opposites, just like textures. If the suit is monochromatic, then add a colored tie. A men's suit with checks and stripes is decorated with monochrome.
To start working on your sewing product with your own hands, prepare the following tools:
- A pattern of the chosen style on tracing paper or paper.
- Scissors.
- Ruler, measuring tape and chalk.
- Pins for attaching pattern pieces that do not leave punctures on fabric - silk, satin.
- Sewing thread, needle.
- Lining fabric.
Modern sewing machines are designed for sewing complex and delicate items - the seams are neat, tight, and without puffs. The front part of the finished product is visible, so it is important to carefully place the pattern of sewing a tie on the fabric, provide for indents, bends, correlate it with the fabric pattern and foresee how it will look on a hand-sewn model. The stripe on the knot and the bottom band meet and diverge in opposite directions. The degradation effect is laid out so that the knot has smaller details of the design, and the wide part of the tape has large ones. Classic cutting and transfer of the pattern with your own hands is done on the bias - on thick silk of plain weave.
Children's tie with an elastic band: pattern and master class
To sew an accessory with your own hands you will need:
How to sew a children's tie
An approximate tie pattern is shown in the photo below. The finished product made from it will have a width of 7 cm and a length of 25.5 cm. You can change the dimensions as you wish.
We mark all the details on the main fabric. We cut out two of them, except for the rectangular one, taking into account an allowance of 10 mm, and cut out the rectangular one without an allowance.
We cut out similar parts from non-woven fabric.
We strengthen the blanks with non-woven fabric.
We fold the two main parts (the tie and its lower corner) right sides together and stitch them together.
We trim the corners, turn the tie inside out, straighten all the corners and iron.
Now we fold the part in half along the long side and grind down the vertical sections.
Turn it inside out, straighten it, placing the seam in the center, and iron it.
To create a knot, fold the rectangular piece in half lengthwise and stitch it into a pipe.
Turn it inside out, placing the seam in the center of one side. Iron it.
Fold the ironed part as shown in the photo and cut along the line.
We cut off the elastic band with a margin and fix it to the knot part with a few stitches. We fold the parts as shown in the following photo.
Sew without stretching the elastic.
Now we thread the tie into the knot.
Gently straightening and tightening. The tie is ready!
Seven reasons to love: DIY seven folds tie
Today we will go through in detail all the steps of creating a “seven folds” tie. The seven-fold tie is a traditional Italian type of tie that is gaining popularity today among handmade connoisseurs.
90% of the seven-fold tie is created by hand. Its ends can be treated with a lining, or they can be without it - today we will look at just this option. The peculiarity of such a tie is that it does not require duplication; it duplicates itself due to several folds. The fabric can be of any natural composition, but not very thin. Silk and wool jacquard, cotton and linen of medium density, mixed fabrics are suitable. I decided to use wool suiting fabric with a matting weave.
DIY silk tie
You will need:
— fabric 90 cm;
— whatman paper for making patterns;
- long ruler;
- pencil;
- paper scissors;
- embroidery threads in a contrasting color;
— 2 small flat buttons (mother-of-pearl ones are perfect);
- tailor's pins, fabric scissors, thread, needle.
Making patterns
Let's make a life-size drawing of the tie (the photo shows a reduced drawing).
Draw a center line - a vertical 75 cm long.
At a height of 4.5 cm, 60 cm and 75 cm, draw perpendiculars.
Along the perpendicular, located at a height of 4.5 cm, measure 4.5 cm in each direction from the center.
Along a perpendicular located at a height of 60 cm, measure 2.1 cm in each direction from the center.
Along the perpendicular, located at a height of 75 cm, measure 1.9 cm in each direction from the center.
Connect the resulting dots and draw a corner of the tie.
In a similar way, draw the narrow part of the tie: length 75 cm, corner 4.2 cm wide and 2.1 cm high.
Draw the junction of the parts with lines at an angle of 45 degrees.
This is what the finished tie will look like.
Now you need to draw all the folds of the tie.
To do this, we will extend the rays of the lower and upper corners.
Mark the segments on the resulting lines. On the corner beams of the wide part of the tie: 6 cm, 5.5 cm and 5 cm.
On the beams of the angle of the narrow part of the tie: 3 cm, 2.9 cm and 2.9 cm.
Along a perpendicular located at a height of 60 cm, measure three segments 2.1 cm long in each direction from the center.
Along a perpendicular located at a height of 75 cm, measure three segments 1.9 cm long in each direction from the center.
Connect the resulting points as shown in the drawing.
All that remains is to mark the hem allowances for the corners of the wide and narrow parts of the tie.
Draw a 1.5 cm wide corner allowance for the wide part of the tie; on the sides it starts approximately 15 cm from the bottom.
Draw a 1.5 cm wide corner allowance on the narrow part of the tie, on the sides it starts approximately 7 cm from the top.
Also draw 1 cm allowances along the oblique cuts for stitching the parts.
This is what a life-size tie pattern looks like. To make patterns, it is better to take thicker paper, for example, whatman paper. This will make it more convenient to use the pattern when cutting.
The pattern is ready, now you can cut it out.
Making a tie
Decorate the fabric and place the tie parts prepared from whatman paper on it strictly at an angle of 45 degrees relative to the lobe.
Clarification:
It will be better if the oblique cuts of the parts (the place where the tie parts are sewn together) are located along the lobar. In the photo, the parts are laid incorrectly - along the weft. Also pay attention to the location of the stripes; if they are on the fabric, the slope of the stripes in the finished tie in the classic version should be from left to right.
Cut out the pieces.
Also cut out a rectangular piece measuring 13*4 cm.
You will need to make a loop from it to secure the bottom of the tie: sew long sections with an allowance of 1 cm, turn them inside out and iron them. The result is a belt loop 13 cm long and 1 cm wide.
Pin the bias cuts of the tie pieces right side to right side.
Place a stitch 1 cm from the edges and press the seam allowances.
Let's start processing the corners of the tie.
Iron the 1.5 cm wide side seams to the wrong side.
To make this operation more convenient, use thin cardboard (a piece of whatman paper) as a template.
Fold the open edges of the seam allowances inwards, iron and baste. The width of the finished allowance is 7 mm.
Iron the 1.5 cm corner allowances as shown in the photo.
Baste and iron too.
On the layout I will show you how to beautifully decorate a corner.
Place the piece with the corner up and fold the side allowances twice.
First iron the right side of the corner 1.5 cm, and then the left.
Inside the corner you will get a square like this.
The square must be cut out exactly as shown in the photo.
And then iron it diagonally.
After this, fold the open edges of the allowances inwards: first the allowances on the right side, and then the allowances on the left.
It is better to first practice this operation on mock-up fabric or an unnecessary piece of main fabric.
Hem the seam allowances with blind stitches, catching 1-2 threads of fabric.
When finishing the corners, be sure to ensure that the angles of the top and bottom of the tie are exactly 90 degrees and that the sides of the tie are symmetrical.
Treat the top and bottom of the tie in this manner.
Using disappearing chalk or a basting stitch, mark the center line of the tie.
Place the edges of the tie towards the center along the entire length, securing with tailor's pins.
Baste the edges of the tie along the entire length and press the folds.
Fold the tie again, tucking the edges toward the center again. Secure with pins.
The edges of the tie in the center can overlap each other by 1 mm.
At a distance of ~12 cm from the corner of the narrow part, begin to sew the main seam of the tie using a “forward needle” slip stitch.
At a distance of ~27 cm from the corner of the wide part, fasten a loop to secure the “tail” of the tie. Insert the belt loop into the seam being made with open short cuts inward, as shown in the photo.
At a distance of ~20 cm from the corner of the wide part of the tie, finish the stitching and tack.
Iron the tie well without stretching it with the iron.
Remove all basting threads and iron again.
When performing an OBE, try to avoid the area with the belt loop - there may be loops left on the front side of the tie.
Bartacks
Place the belt loop in opposite directions from the tie seam and, using embroidery thread in a contrasting color, secure the belt loop with four small clips.
The finished belt width should be ~5 cm.
If you don't have embroidery thread, you can use regular 2-ply thread.
At the beginning and end of the stitching, sew backtacks.
The fastening can be done in the following way.
Make a stitch.
Place the needle under the stitch.
Pass the needle through the resulting loop, forming a knot.
Make several of these knots until they cover the entire stitch.
The fastenings are ready.
At a distance of ~12 cm from the corner of the wide part, make a small loop, as shown in the photo.
Sew a button on a small thread stem to the opposite side.
This element is not necessary, but it is better to do so that the folds of the tie do not diverge to the sides during use.
The buttons are also for decorative purposes, so that you can open the halves of the tie and admire the folds.
Make loops and sew buttons on the upper and lower ends of the tie (at the lower end of the tie, the loop and button are located at a distance of approximately 7 cm from the corner).
Sometimes pendants made of jewelry materials are hidden under the halves of a tie in the folds - for beauty and to make the end of the tie heavier.
The tie is ready!
Processing an internal pocket in outerwear
We sew a vest for drivers with our own hands
Men's vest in 5 days: master class
Author of the master class and photo: Daria Tabatchikova
By training, Daria is a PR specialist and economist, but several years ago she devoted herself entirely to her favorite activity - sewing.
She learned to sew from magazines, books and using the Internet; she also has sewing courses, but Daria considers herself self-taught. She loves to study specialized literature on sewing from different years and countries, and then apply the acquired knowledge in practice.
At the end of 2021, Daria became the winner of a holiday competition from BurdaStyle.ru.
She runs her own Instagram page and VKontakte group.
Material prepared by Yulia Dekanova
The bow tie
When choosing fabric for sewing a butterfly, preference should be given to cotton, satin, silk and jacquard. A boy's tie made of brocade looks very formal. Original accessories are made from leather or felt.
To sew a butterfly for a child over 7 years old you will need:
How to sew a tie with your own hands
We cut out the blanks according to the specified dimensions and iron them.
We fold the finished parts in half and stitch them with a zigzag stitch. The use of such a stitch is justified by the fact that it is guaranteed not to cause puffs and creases on satin fabric. As an alternative, you can replace this stitch with a hand-blind stitch made with a thin needle.
Turn the butterfly inside out and iron it.
To make a lintel, take a rectangular piece 80 by 120 mm, grind it along the long side, turn it inside out, and iron it. We put the jumper on the main part, fix it on the inside with hand-made blind stitches.
Types of ties
At this point, when describing the types of ties, it is worth mentioning that these things are divided into three large subgroups. There are children's, men's and women's. There are also other more extensive classifications. According to one of them, the tie can be classic (150 centimeters), regatta with elastic band, windsor, plastron, butterfly, bolo, lavalier, sewing scarf and herring.
DIY tie
Children's with elastic band
An embroidered tie with an elastic band is a children's model for girls and boys, thanks to which the little gentleman or lady looks elegant. This is a practical and versatile pioneer item that can be worn both everyday and for a weekend, depending on the type of natural fabric and color. It can be created from either paired cotton or satin, silk and jacquard. Tying this pattern to a shirt for a child is as simple as possible. All you need to do is put the elastic band around your neck and adjust the edges of the dudes shirt.
Children's with elastic band
Men's classic
A classic men's tie is a thing made in a plain or discreet color from silk, wool, satin, cashmere, or linen. 100% wool is used for the lining. The size of the model reaches 11 centimeters in width.
Note! Classic models are those with polka dots, checks, grosgrain ribbons, paisley and various geometric, discreet shapes.
Men's classic
Herring
A long narrow model, available in classic and non-classical styles. Worn in different designs. Easily converts into a Windsor with a Half Windsor, Grantchester, Elridge and Quad Knot. Like a classic tie, it is suitable for both festive events and going to the office. Made from the same materials.
You might be interested in Sewing fabric hair ties yourself
School for girls
A school tie for a girl can be made in different shapes and colors. Its main detail is the severity of the colors. Can be issued in the form of a classic, a bow or even a neckerchief. May resemble a frill. Most often, satin and jacquard in a plain or checkered style are used to create it.
School for girls
Female
A woman's tie is no different in model from a man's or a child's. Produced from the same festive and, at the same time, practical fabric. It can have a classic and non-traditional shape. Unlike the men's model, it can be complemented with a variety of accessories and brooches.
Note! May be shaped like a frill or part of clothing. Today, tulle products are also popular. You can sew from this material.
Female
Leather bow tie for kids
The dimensions of a tie for a boy from three to ten years old are 5 by 10 cm.
To sew a butterfly for a little dude you will need:
How to sew a butterfly for a child
We cut out from leather:
Cut the elastic to fit around the neck.
We provide allowances of 5-7 mm on all parts.
Fold the main part with the wrong side outward, stitching, taking into account the allowance.
We turn it inside out, and the stitching seam should be in the center of one of the sides. We fold the piece into a bow and sew it with a machine stitch.
We repeat the process for the jumper part.
We tuck the bow into the jumper, controlling the symmetry, and fix this position with manual blind stitches. We thread an elastic band through the jumper.
Sew the ends of the elastic or sew on a fastener.
simple butterfly
Among our assortment of sewing products you can easily select the necessary fabric.
If there is no time or, as they say, both hands are left, then the simplest method will come in handy.
Any fabric for a tie will do. The main condition is that it should not drag. Moreover, it can be dense or thin, plain, polka dot, flower, striped, shiny or matte.
Little gentlemen with bow ties are so adorable. But did you know that this accessory suits not only men? Girls also wear it and look stylish, unusual and very cool. Have you seen how much ready-made “butterflies” cost in the store? Quite expensive. But if you know how to sew a bow tie with your own hands, then you won’t have to spend any money, and you can sew them on for big and small men, for your loved one and, let’s tell you a secret, attach an elastic band and make an elegant hair clip.
More homemade products: How to beautifully tie a thin scarf around your neck - ideas with photos
Hand-sewn bow ties are tied at the neck over a shirt according to the classic pattern.
Traditional DIY bow ties have a specific length depending on the size of the shirt collar. Modern versions have the main part in the form of an elastic strip and can be adjusted according to the length of the neck circumference. Less formal models are also used in the form of a clip, which is fastened in the center of the stand-up collar.
White and black “black tie” in the classic knotted version goes well with wide collar flaps. A hand-tied tie or bow tie is always valued higher than ready-made options. Classic, without a clasp or clip, a bow tie always looks more noble and elegant. A wide butterfly gives a special chic in the spirit of the 30s of the 20th century.
Cotton bow tie
For sewing you will need:
Description
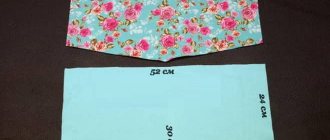
We cut out a piece of fabric 20 by 60 cm, reinforce it with non-woven fabric.
Then we mark a rectangular piece 13 by 50 cm (allowances are taken into account) and cut it out.
Fold the piece in half and pin it together.
For the jumper, cut out a piece 6 by 7 cm.
We divide it widthwise into four equal parts. We reinforce the two middle ones with non-woven fabric.
Fold the jumper in half, wrong side out, and stitch along the long side. Turn it inside out and iron it.
We sew the finished main part in the center.
We form beautiful folds, put on a jumper, and secure it with hand stitches.
We insert Velcro or other fastener into the jumper for fastening.
About butterflies on school uniforms
Every little princess wants to look not only elegant and beautiful, but also unique. Even if she is in a school uniform, which a priori should be strict. How to sew a tie for a girl for school so that it not only matches the accepted dress code, but also emphasizes the individuality of the young lady? Let's try to figure it out in accordance with the latest fashion trends.
How to sew a tie for a girl for school with your own hands using this technique? I must say that doing this is not so difficult; you don’t even need a pattern.
Now let's look at another option for making this stylish accessory. How to sew a tie for a girl for school if it is a bow tie?
As you can see, sewing a tie for a girl for school is not as difficult as it seems at first glance.
We sew the finished butterfly or glue it to an elastic band/strip with fasteners.
We cut out a piece of fabric 20 by 60 cm, reinforce it with non-woven fabric.
We trim the corners, turn the tie inside out, straighten all the corners and iron.
We sew a tie with an elastic band
Photo shoots, matinees, holidays are commonplace when it comes to preschool children. Quite often, parents have to rack their brains about what to dress their child in for the next event. And here a mother’s ability to sew, at least a little, can come to the rescue. Then the whole suit or even some accessory for it can be made with your own hands.
Firstly, this will help save time searching for it in stores and the family budget for a one-time purchase, and secondly, it will allow you to create an item of absolutely any design, and even from scrap materials.
A striking example of this is a children's tie with an elastic band. He can be strict, he can be humorous - it all depends on the suit he chooses to wear. Moreover, any model of such a tie is sewn the same way.
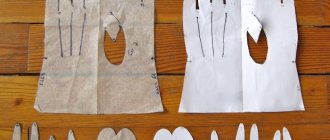
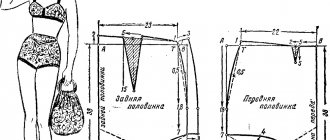
In order to sew a tie with an elastic band yourself, you need to create a life-size pattern for it. You can use the diagram or make it to your own size (photo 1).
Attention: the pattern is given without taking into account seam allowances!
They need to be added when cutting. The width of the allowance is 7 mm. According to the pattern, you should cut out 2 parts of the tie - the main one (made of thick fabric) and the lining (made of thin fabric) (photo 2).
Important: both parts of the tie are cut at an angle of 45 degrees to the direction of the warp thread.
The main part needs to be duplicated with an adhesive pad, cut in the same way, on an oblique. Then the top and lining of the tie must be placed on top of each other face to face and hemmed along the bottom corner, as shown in the photo. Seam allowances in the corners must be cut out, not reaching the line 2 mm (photo 3).
The tie must be turned out and ironed from the lining side (photo 4).
Then, on the main part of the tie, you need to mark and cut off the excess seam allowances (photo 5). The tie needs to be folded in half lengthwise (facing inward), and stitched along the long edges. The seam must be carefully ironed with the tip of the iron (photo 6).
The hemmed tie must be turned inside out and ironed from the inside out (photo 7-8).
After this, you need to measure the width of the tie at the very top. This figure must be multiplied by 2 and added 2 cm for the seams.
From the main fabric, cut out the upper part of the tie in the form of a rectangle with dimensions equal to the calculated value of 7 cm (photo 9).
This detail also needs to be duplicated (photo 10).
Then it must be folded in half along the long side and hemmed, as shown in the photo (photo 11).
The seam allowance should be pressed using the tip of the iron. The part should be turned inside out and ironed, placing the seam in the middle at the back (photo 12). The sides of the workpiece must be cut off with a corner (photo 13).
Step-by-step instruction
As a rule, any step-by-step instructions for creating a tie include the formation of a template, and then the main and additional parts, finishing the edges with ironing and fitting. Therefore, it is possible to form a product only if you fully follow the master class on the topic of how to sew a tie with your own hands, a pattern.
Making a template
For a template, you can take a ready-made step-by-step diagram from the Internet or from a popular blogger. As a rule, ties differ from each other only in length, material and color, and these parameters do not affect the basic design. Of course, you can always make your own unique design, but you need to base it on the classic design. It is best to use a cut old tie for the template. It will help the novice craftsman create his first product faster and not make mistakes in the calculations.
As for the length, the minimum tie pattern for a man should be 30 cm in size. The width is 7 centimeters.
Important! When creating such an element as a pattern for a men's tie, you need to understand that the width of the pattern should be 3 times greater than the width of the finished product, since the product will be turned to the middle 3 times.
You might be interested in Beautiful patterns for sewing trousers for boys Making a template
Cut out the main part of the tie
The main part is cut out carefully according to an existing template or a lesson in sewing ties. It must be placed at an angle of 45 degrees. The sharp corner of the fabric should be at the intersection of the thread along and across. Then you need to draw a knife along the outline and cut out the part.
Main part
Transfer seam lines for stitching facings
On the wrong side of the silk, you should draw seam lines for stitching the bottom edge. Next, repeat the same procedure with the upper end of the product.
Transferring the seam line for stitching facings
Reveal additional details
In addition to the main fabric part, several more facings will be required. One will go to the bottom edge, the other to the top. This is the bottom corner with a part of the tie at least thirty centimeters. For interfacing, cut out several woolen pieces and baste them using long stitches, without adhesive interfacing. Next, make processing in the image of a single-layer part. You can use non-woven fabric for this. A strip should be made of silk along the width of the product minus a few centimeters. When finished, it should be 3 centimeters wide. Then all the patterns need to be ironed.
Additional details
Rhinestones, clips, fasteners, chains, ends, sequins, beads, sequins, bugles and other accessories can be used as additional details for a tie. It can be decorated with smooth or machine embroidery, ribbons, and knitted inserts. It can also be made in a patchwork style with the addition of different materials, and it can have an unusual shape. For example, a female model can be decorated with a brooch or shaped like a flower, have a zigzag shape and be more suitable for a high fashion item, or become an decoration for an unusual and non-everyday look.
Finishing the top and bottom edges of the tie
Processing the edges is the most crucial moment. You need to finish the edges well with a sewing machine. Do this as carefully as possible. Note! There is no need to overcast the cut edges of the tie.
To process, you need to place the turning on the bottom of the product face up, aligning the corners. Next, stitch from the top to the first corner, then from the bottom corner to the other.
Note! Make a parallel seam in the same way. Finally, stitch the sharp corner of the finished model.
You might be interested in this Manual for the Chaika 134 A sewing machine: how to properly set up Processing of the top and bottom edges
Turn out and iron
Turning the finished product inside out and ironing it is an important part of creating a classic and unusual design model. This way you can understand whether there were errors in the work and how quickly they can be corrected.
Ironing
Place the gasket
Laying out the spacer is practically the most important stage in the development of a creative product, because it will determine how the tie will fit on a shirt or other clothes, and how it will ultimately look. Therefore, it is best made from practical and flexible materials.
Wool pad
Fold the long sides towards the middle
You need to tuck the long sides towards the middle so that they meet in the middle of the product inside. One half should overlap the other by three millimeters.
Sew a bartack
The bartack under the fold is sewn on by hand. It will help the tie keep its shape better. In this case, the needle should not be pierced on the front side.
Sewing a bartack
Start stitching the middle fold from the bottom.
The seam of the middle fold from the bottom should be made using blind stitches or using the goat technique. Both fold folds should be sewn down the middle of the tie on the inside.
Sewing the middle fold from the bottom
Finish the seam in the middle inside the tie
The seam ends in the middle, in the inner part of the created product. This is important to ensure that you get a practical and multifunctional design canvas. You can see how it ends from a special diagram presented on the Internet.
Own label - proof of handmade quality
If the product is sewn to make a batch for sale, then creating a label is necessary to confirm handmade work. In this case, the label can be made of ordinary paper, cardboard, plastic or special metal with a personal engraving or emblem.
Note! It can be attached to the formed tie using a ribbon, pin, paper clip or other elements.
Label as a sign of handmade
Iron and try on
After finishing working with a decorative element for suits or casual wear, you need to carefully iron the fabric on a low iron setting or use a steam generator. Then you should try on the product and visually evaluate the quality of the work performed. The result should be something with even, sharpened corners without extra threads.
In general, ties come in different types and shapes. At the same time, there is a male and female model. Anyone can make it, following the simple technology of working with matter presented above.
Bow tie with an elastic band: how to sew without a sewing machine
For several years now, “familylook” has not lost its relevance. It is very easy to choose the same dresses for mother and daughter. But for families with sons, choosing a stylish family look is much more difficult. This problem can be solved by one accessory that is easy to make with your own hands - a bow tie. Jeans, plain shirts and matching denim bow ties will help the whole family look stylish. This accessory can also be sewn from any trouser fabric, leather or satin.
Types of ties
A tie does not have a clear gender and age characteristic; it can be either an addition to a classic men’s suit, or part of the collar of a children’s shirt, or a detail of a woman’s blouse.
pinterest.com
A special version of the neck accessory is a men's bow tie. A plain silk bow tie is worn on special occasions when the dress code requires it. The colored and textured model emphasizes the stylistic features of the image.
wordpress.com
A men's classic tie is quite standard in appearance. It is a narrow strip of two-layer plastic fabric that expands downward in the shape of an angle. Depending on fashion trends, the length of the product, width and lower angle change.
If a classic tie made of jacquard silk or satin can be purchased ready-made, then a fancy, unique one can be easily made by yourself.
How to sew a bow tie with an elastic band without a sewing machine
We sew the base piece “inside out” along its length, turn the sewn piece inside out, fold it so that the seam is in the middle and iron it.
The second step is to sew the workpiece along the width, while the previous seam should be on the outside.
When you have a ring, turn it inside out with all the seams. The “width” seam should be placed in the center of the product and ironed well.
Let's start making the bow tie jumper. We sew the corresponding piece of fabric with the seam facing outwards on the wrong side.
The workpiece should also be turned with the seam inside.
Note: This is easier to do with a pencil or pen. Place the sewn tube onto the base and carefully turn it inside out.
Place the jumper seam in the center and press it flat.
Attach the workpiece to the base and measure what diameter the ring needs and sew it so that the seam can be hidden inside. Then carefully fold the base and place it on the center of the jumper.
The elastic can be sewn directly to the back of the jumper or pulled through it.
Sew the elastic with the seam facing inward.
We hide the elastic seam under the jumper.
Author: Ekaterina Vishnevetskaya
Did you like the article? Share information on social networks:
Source
Minimum quantity 1 piece.
In this master class, I want to share with you my technique for making such a stylish accessory as a bow tie. It will take you very little time and you will be very pleased with the result of this wonderful tie. We will not sew a classic self-knitted butterfly, but a so-called “lazy” one, which is easy to use (you don’t need to carefully tie it), and at the same time it looks no worse than a self-knitted one, but on the contrary, many people like it precisely because of their correct neat forms.
Step 4
- a piece of fabric 4*7 cm for the jumper;
The next step is to fold the ironed part in half with the seam facing out and stitch it, retreating 5 mm from the edge.
Step 6
A two-layer butterfly is made, so the main part for the second (top) layer needs to be made smaller by 1-2 cm at the edges.
Bearded questions: How to choose a hairstyle to suit a man's face
A strap is inserted through the central jumper.
Pattern is the basis of a successful business
Regardless of your experience and skills, they start with preparation. To do this, create the correct tie pattern, taking into account the dimensions of the future product.
A regular tie with an elastic band is sewn together from four parts:
Craftswomen strongly recommend cutting exclusively on the bias, despite the noticeable increase in fabric consumption in this case. To do this, the base material is laid out on a flat surface, a guide is drawn diagonally and the patterns are oriented along it.
To sew a tie with your own hands, you will also need a spacer part, which is made from a lining, cutting out a part from adhesive onto the nodal part.
Types of butterflies
Now let's move on to the bow tie. Sewing a model in the shape of a bow is not difficult even for a schoolgirl. You don't need a tie pattern for this.
Tools you need to prepare for work:
In this masterclass you will learn how to create a classic-shaped accessory.
Do not forget that such a tie can only be worn in an informal setting. The accessory is considered an alternative to the classic form, which needs to be tied. An elastic tie is suitable for boys, women and men as part of a stage costume. At special events, as well as in the business world, it is customary to wear classic models.
which include: classic knot
Cutting and sewing diagram: step-by-step instructions
To sew a tie for a boy with an elastic band, you need to roughly divide the work into three stages. The first stage is making a pattern. The second is preparing fabric parts. The third is stitching the finished product. Consider a bow tie option.
They start with a pattern. It will be enough to prepare rectangles with dimensions of 8 × 13 cm, 11.5 × 22 cm and 13 × 23.5 cm. It is most convenient to work with the pattern on an ironing board, to the surface of which you can attach patterns with pins.
So, the next stage - the pattern of a tie for a dude boy is attached to the surface of the board on the fabric and carefully cut out. The output should be fabric rectangles. They start working with the largest part. It is folded lengthwise, ironed with an iron, smoothing the fold, straightened and folded again across so that the edge and fold lines coincide.
Stages of making a tie
- Using a measuring tape and an existing tie, estimate the length of the future product when untied.
- Draw a tie pattern on paper: a triangle approximately 9.0 cm wide at the bottom (depending on the model), up to 50 cm long (finished - at least 145 cm). Line up the corners of the bottom edge at a slope of 45 degrees (on the fabric they will correspond to the warp and weft threads).
rukikryki.ru
- Extend the triangle by extending the bottom corners by a width equal to two times the width of the tie (the extension represents the wrong side that will be overlapped).
- Place the silk face down on the table, straightening it out carefully. Place the pattern at an angle of 45 degrees.
- Transfer the contours, extending them to the previously calculated length (approximately 145 cm). Cut out the detail. If necessary, using a fabric coinciding with the grain thread, create the length of the main part from two parts, stitching them at an angle of 45 degrees. Cut out the detail.
- Lay out the lining material and, using the template, draw the contours of the facings. The dimensions along the contour should be 0.5 cm narrower than the main part up to 30 cm long. Cut out the facings in the corners or in one solid piece.
- Cut out a tack that, when finished, has a width of 2.5-3.5 cm and a length equal to the width of the tie minus 2-3 cm.
- Clean the corners. Apply facings with pressed seams and sew with hidden stitches, stepping back from the fold of the main part by 0.5 cm. Stitch the corners using a sewing machine. Press seams and trim seam reserves. Turn out the corners. Iron the seam reserves and the edges of the piece overlapping onto the wrong side.
- Pin the edges together without overcasting them. Secure the edges with hand blind stitches.
- If there is a lining equal to the contour of the front fabric, hem the corners except for long cuts. Turn out. Sweep and iron. Pin the edges together, pressing the open edges inward.
- Secure the pinched edges with blind stitches using thin or silk thread.
- Prepare the loop by stitching it along the length of the piece. Turn inside out, iron and attach with hand stitches. As an option, you can secure the short open sides of the bartack loop inside the blind seam of the tie.
- Iron the finished tie through a thin cotton fabric from the wrong side.
rukikryki.ru
joeandcheryl.com
moodfabrics.com
blogspot.com
wordpress.com
tumblr.com
Plastron - how to sew for a schoolchild
Who said that school ties must necessarily be narrow, cut according to classic patterns? On special occasions, the child can be invited to add new notes to the image, for example, using an unusual model of a plastron tie. Just like a regular “herring” plastron, you can make it at home with your own hands.
The tie with Italian roots has an unusual shape, reminiscent of a breastplate that fencers once used. In combination with the right clothes, the accessory looks elegant, fashionable and noble, especially if you choose a classic fabric option - silk or satin - as the sewing material.
It is correct to wear a plastron in combination with a vest that matches the ends of the accessory. Decorative pins and clips are often used as an additional decorative element. There are two ways to make a plastron - ready-made with a knot and “self-knitting”. Since we are talking about a tie, the first option will be convenient for a child.
So, to sew an accessory you will need fabric 70 cm long and 80 cm wide. Silk or viscose are quite suitable as a base. It is not necessary to prepare patterns for this tie model, except in cases where you have to cut the product from leftover fabric.
A plastron tie consists of three main parts:
The stand with a width of 2.5-3 cm is equipped with a Velcro fastener. A roller is an element through which the ends of a product pass. The tie itself measures from 75 to 80 cm, is distinguished by sharp corners at the bottom and light voluminous padding. Part parameters: stand - 7×65 cm; roller - 13x13 cm, tie - 22x80 cm. The product is cut out in the same way as a herring tie on the bias.
The roller is folded in half, stitched, turned inside out and steamed. The same applies to the stand. From the lining fabric, following the direction of the lobar, prepare two parts with a height of up to 15 cm. Place it on the front side and sew the corners with slight tension. Turn it inside out and steam it so that the lining is invisible.
At the next stage, the tie is folded lengthwise, fastened with pins and stitched along the edges with an indentation of 1 cm, and steamed. The lining is cut out of thin woolen fabric, again on the bias, with dimensions: 9.5 cm - width and 78 cm - length. They put it inside.
All previously prepared parts are assembled like a construction set, pulling the stand and tie through the roller, forming beautiful folds, fixing them with stitches. The decorative pin can be replaced with a miniature Swarovski button. It is enough to sew it right through to the roller. The button will not only serve a decorative role, but will also be able to hold folds, giving the product a finished look.
LiveInternetLiveInternet
I think this will be interesting for fans of exclusives, because... a creative tie will always help you stand out from the crowd.
Let's start with the cut. There are several options for constructing tie patterns. You can rip an existing tie (at the same time you can view the technology). Another option is to use the experience of others (those who have already figured out everything they need and shared their knowledge on the Internet))) Thanks to the pioneers!!!
Option 1 tie pattern:
Narrow end
Wide end
Below are the words of the author of MK from this site. There are several tutorials on sewing a tie, I’ll combine them into one message
It is very important that you transfer all the measurements and draw them correctly on paper.
Another very important point is that the corners themselves on both sides should form a right angle. And because the fabric for ties is laid out along an oblique line (at an angle of 45 degrees to the warp thread), then if it is cut correctly, we get that one edge runs along the grain thread, the other along the transverse thread (on both sides).
I would like to immediately make a reservation that I had to learn how to sew a tie myself, but this does not mean at all that the method that I propose is artisanal.
In order to master and find out what the technology of sewing ties , I had to look into one high-quality worn tie.
What do you think? This is how we learn - we tear apart and study the latest innovations in the field of technology. No one will tell you how it is done - everything is patented.
The technology for sewing ties is as follows:
1. Take a thick canvas and cut it out exactly according to the tie pattern. It will give it shape and prevent it from creasing. A solid part will most likely not work, because... you need to cut it at an angle of 45 degrees, so we cut it with the joint and connect it later.
2. Now we prepare a loop. To do this, we cut out a strip of fabric on the bias, about 4 cm wide. We fold this strip with the front side inward and pin it together.
3. Place a stitch in the center of this strip.
4. Turn it right side out and iron it.
5. Next, we prepare the tie itself for further processing. To do this, we chop off the seam on it.
6. Stitch and iron the seam allowances.
And then you need to process both corners. There are two ways to do this.
Processing corners. Method 1 (less convenient)
Processing corners. Method 2.
1.2 First, you need to draw lines on the basis of the tie (the boundaries of the corners in finished form).
2.2 We also apply the same lines on the lining (repeate them from the base one by one).
3.2 Iron the corners on the base along the marked lines. IMPORTANT: The angle must be clearly marked! The final appearance of the corner will depend on this clarity.
4.2 Place the corner of the lining with the right side on the front side of the base. We clearly align the intended angles. Let's prick.
5.2 We sew a line from the corner to the edge of the cut. We take out the pins. You can iron it.
6.2 Once again we control the angle. Let's schedule it. Need clarity!
7.2 We grind the second side in the same way as the first.
8.2 Turn the corner inside out and iron it. Next, from the first method we do points 6 and 7.
We sew the sides of the corner as seen in the picture:
Now we turn the entire structure right side out and iron it.
It turns out a very beautiful and neat look at the ends.
7. Now we put the canvas base into the tie, straightening the corners. The canvas should be held tightly in the corners! Pierce it in the center with pins.
8. We sew, thereby fastening both parts, and remove the pins.
9. We secure the edges of the allowances to the base with pins, and pin the middle with an overlay seam. Then we secretly hem it so that the hem is not visible.
10. Now we need to sew a loop that will keep the short end inside from inadvertently peeking out from under the top.
To do this, at a distance of approximately (it’s better to visually try it on and look at the “body”, it depends on how long the tie should be), 30 cm from the bottom of the wide side, mark the location of the loop.
We sew the loop manually, not through it, but only by grabbing the top layer of fabric and maybe even the canvas.
We pin the other side with a pin so that the loop is not sewn tightly, but so that there is a gap for the narrow end of the tie (we also sew it by hand).
11. Now we fasten the edges together at the narrow end of the tie.
And at the wide end we make the same fastening.
12. We also make a one-stitch tack above the loop. Approximately 1-1.5 cm higher. This is necessary so that the tie does not break when the inner end of the tie is constantly being put in and then pulled out.
They worked and worked and here it is - a tie with your own hands!